Table of Contents
Advertisement
Available languages
Available languages
Quick Links
www.babytrend.com
Baby Trend, Inc.
Baby Trend, Inc.
13048 Valley Blvd.
1607 S. Campus Ave.,
Fontana CA 92335
Ontario, CA 91761
1-800-328-7363
1-800-328-7363
(8:00 a.m. ~ 4:30 p.m. PST)
(8:00am ~ 4:30pm PST)
www.babytrend.com
www.babytrend.com
DJ96XXXA_2L_110322
Read all instructions BEFORE assembly and USE of product.
KEEP INSTRUCTIONS FOR FUTURE USE.
Lea todas las instrucciones ANTES de armar y USAR el
producto. CONSERVE LAS INSTRUCCIONES PARA USO FUTURO.
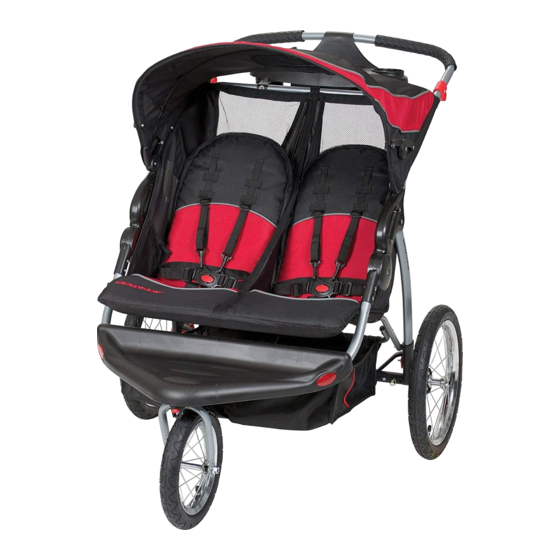
Expedition® Double Jogger
Instruction Manual
Manual de Instrucciones
DJ96XXXA
Advertisement
Table of Contents

Related Manuals for BABYTREND Expedition Double Jogger


Summary of Contents for BABYTREND Expedition Double Jogger
- Page 1 Lea todas las instrucciones ANTES de armar y USAR el producto. CONSERVE LAS INSTRUCCIONES PARA USO FUTURO. Expedition® Double Jogger Instruction Manual DJ96XXXA Manual de Instrucciones www.babytrend.com Baby Trend, Inc. 1-800-328-7363 Baby Trend, Inc. 1-800-328-7363 13048 Valley Blvd. (8:00 a.m. ~ 4:30 p.m. PST) 1607 S.
- Page 2 Customer Service Department can be contacted at 1 (800) 328-7363 Monday through Friday between 8:00 a.m. and 4:30 p.m. (PST). Return Authorizations are required prior to returning product(s) to Baby Trend®. Please visit http://babytrend.com/pages/ limited-warranty for complete warranty details. GARANTIA NO DEVUELVA SU PRODUCTO A LA TIENDA.
- Page 3 WARNING WARNING WARNING: • We recommend that the child occupant be at least 6 months of age prior Please follow all of these to use of the stroller for jogging. Because children develop at different instructions to ensure the safety of your child. Keep rates, please discuss the use of a jogging stroller with your health care these instructions for future reference.
- Page 4 ASSEMBLY ASSEMBLY IMPORTANT! 3) • Slide the retainer plates onto the front Front Fork To ensure safe operation of your wheel. Be sure that the raised lip is stroller, please follow these instructions carefully. Please pointing toward the fork and insert it keep these instructions for future reference.
-
Page 5: Parent Tray
ASSEMBLY ASSEMBLY PARENT TRAY • Line up the front fender and press onto Snap the front frame assembly (Fig. 5c). WARNING: • Insert the 4 screws through the underside of the front frame assembly not place hot liquids or into the front fender’s plastic tubes. more than 3 pounds in the Tighten the screws only until snug parent tray. -
Page 6: Front Wheel Lock
ASSEMBLY SAFETY 9) • To fold the canopy: pull upwards on the BRAKES Close tensioners and then pull backwards on the front edge (Fig. 9). 11) • To engage brakes, apply light downward pressure to the brake lever located on each rear wheel. The stroller may require slight forward or rearward movement in order to line up the teeth on the brake with each wheel brake cluster (Fig. - Page 7 SAFETY SAFETY TO SECURE THE CHILD TO RELEASE THE CHILD Type 1 Buckle WARNING: Avoid Type 1 serious injury from falling or 14) • To release, push Button on Center sliding out. Always use the Clasp, the two Harness Buckles will pop safety harness.
-
Page 8: Fold / Unfold
SAFETY FOLD / UNFOLD JOGGING WITH YOUR STROLLER TIRE INFLATION 17) • Tires are shipped un-inflated. The tires WARNING: Never jog or should be inflated on a regular basis to the P.S.I. specified on each tire. Always run with your newborn. Use for use a bicycle style hand air pump to strolling only. -
Page 9: Maintenance
FOLD / UNFOLD MAINTENANCE TO UNFOLD STROLLER TESTING FOR PROPER WHEEL INSTALLATION WARNING: Care WARNING: ALWAYS must be taken when check the double nut unfolding the stroller to locking system before each prevent finger entrapment. use to ensure that the front CAUTION: wheel is securely fastened to not allow children near... -
Page 10: Wheel Adjustment
MAINTENANCE PIEZAS WHEEL ADJUSTMENT: Verifique que tenga todas las piezas para este modelo antes de montar el carrito. • It should be noted that all three wheel vehicles can be easily influenced to deviate from a straight line. In most cases strollers can have a tendency to pull to the right/left due to many factors, including uneven tire pressure, improper wheel installation, road conditions and manufacturing tolerances. - Page 11 ADVERTENCIA ADVERTENCIA ADVERTENCIA: • NUNCA use el carrito en escaleras mecánicas o comunes. Por favor, siga todas estas • NUNCA use el carrito con patines de ruedas, patines en línea, instrucciones para garantizar la seguridad de su hijo. monopatines o bicicletas. Conserve estas instrucciones para referencia futura.
-
Page 12: Montaje
MONTAJE MONTAJE ¡IMPORTANTE! 3) • Inserte la placa de retención en el eje Para asegurar el funcionamiento de la rueda. La clavija en la punta de la seguro de su carrito, siga estas instrucciones placa debe de colocarse hacia adentro, cuidadosamente. - Page 13 MONTAJE MONTAJE • Estos tubos deben estar alineados con los BANDEJA PARA PADRES Cierre a presión agujeros del armazón delantero (Fig. 5b). ADVERTENCIA: • Alinee el guardabarros delantero y presiónelo en el armazón delantero No coloque líquidos (Fig. 5c). calientes ni más de 3 libras Fig.
-
Page 14: Peligro De Caída
MONTAJE SEGURIDAD 9) • Para plegar la cubierta: tire hacia FRENOS Cierre arriba de los tensores y luego tire hacia atrás del borde delantero (Fig. 9). 11) • Para aplicar los frenos, ejerza una ligera presión hacia abajo a la palanca del freno situada en cada rueda trasera. - Page 15 SEGURIDAD SEGURIDAD PARA SUJETAR AL NIÑO PARA SOLTARLAS AL NIÑO Hebilla tipo 1 Hebilla tipo 1 ADVERTENCIA: 14) • Para soltarlas, presione el botón rojo en Evite lesiones graves por la presilla central para destrabar las dos caídas o resbalones. hebillas del arnés (Fig.
-
Page 16: Plegar / Desplegar
SEGURIDAD PLEGAR / DESPLEGAR TROTAR CON SU CARRITO NEUMÁTICOS ADVERTENCIA: 17) • Los neumáticos se entregan desinflados. Los neumáticos deben inflarse regularmente de acuerdo Nunca trote ni corra con su al P.S.I. específico de cada neumático. Siempre infle los neumáticos con un inflador de aire manual para recién nacido. -
Page 17: Mantenimiento
PLEGAR / DESPLEGAR MANTENIMIENTO PARA DESPLEGAR EL CARRITO PARA VERIFICAR LA INSTALACION DE LAS RUEDAS ADVERTENCIA: Se debe ser prudente ADVERTENCIA: al desplegar el carrito ANTES DE CADA USO verifique para evitar que queden el sistema de traba de dedos atrapados. tuerca doble con el fin de PRECAUCIÓN: comprobar que la rueda esté... - Page 18 MANTENIMIENTO AJUSTE DE RUEDAS: • Debe tenerse en cuenta que todos los vehículos de tres ruedas pueden influenciarse fácilmente para el desvío de una línea recta. En la mayoría de los casos, los carritos pueden tener una tendencia a desviarse hacia la derecha o izquierda debido a numerosos factores, incluyendo presión dispareja en los neumáticos, instalación incorrecta de las ruedas, condiciones del camino y tolerancias de fabricación.
Need help?
Do you have a question about the Expedition Double Jogger and is the answer not in the manual?
Questions and answers