Advertisement
Quick Links
Baby Trend, Inc.
13048 Valley Blvd.
Fontana CA 92335
1-800-328-7363
(8:00 a.m. ~ 4:30 p.m. PST)
www.babytrend.com
WG02_CW02XXXA_3L_092324
Read all instructions BEFORE assembly and USE of product.
KEEP INSTRUCTIONS FOR FUTURE USE.
Lea todas las instrucciones ANTES de armar y USAR el
producto. CONSERVE LAS INSTRUCCIONES PARA USO FUTURO.
Lisez toutes les instructions du manuel AVANT l'assemblage
ou L'UTILISATION de ce produit. CONSERVEZ CES
INSTRUCTIONS POUR RÉFÉRENCE ULTÉRIEURE
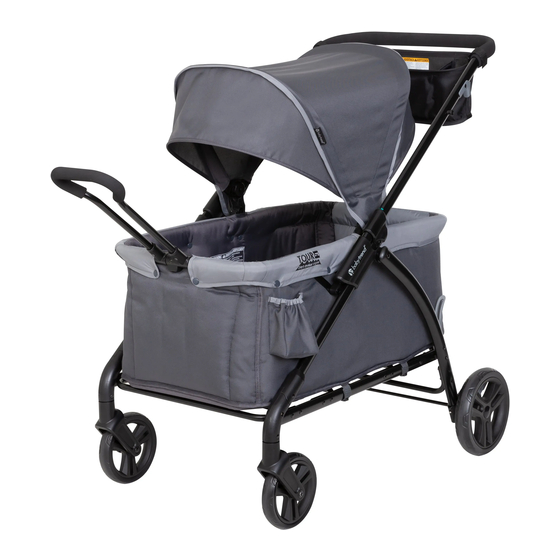
Tour™/ Expedition™ LTE
2-in-1 Stroller Wagon
Instruction Manual
WG02XXXA / CW02XXXA
Manual de Instrucciones
Manuel d'instruction
Advertisement

Related Manuals for BABYTREND Tour LTE


Summary of Contents for BABYTREND Tour LTE
- Page 1 L’UTILISATION de ce produit. CONSERVEZ CES INSTRUCTIONS POUR RÉFÉRENCE ULTÉRIEURE Tour™/ Expedition™ LTE 2-in-1 Stroller Wagon Instruction Manual WG02XXXA / CW02XXXA Manual de Instrucciones Manuel d’instruction Baby Trend, Inc. 1-800-328-7363 13048 Valley Blvd. (8:00 a.m. ~ 4:30 p.m. PST) Fontana CA 92335 www.babytrend.com WG02_CW02XXXA_3L_092324...
-
Page 2: Warranty
Customer Service Department can be contacted at 1 (800) 328-7363 Monday through Friday between 8:00 a.m. and 4:30 p.m. (PST). Return Authorizations are required prior to returning product(s) to Baby Trend®. Please visit http://babytrend.com/pages/ limited-warranty for complete warranty details. GARANTIA NO DEVUELVA SU PRODUCTO A LA TIENDA. - Page 3 PARTS PIEZAS PIÈCES PARTS PIEZAS PIÈCES Check that you have all the parts for this model before assembling the stroller. Verifique que tenga todas las piezas para este modelo antes de montar el carrito. Vérifiez que vous avez bien toutes les pièces pour ce modèle avant de monter la poussette. Rear Axle parts (2) caps and spare parts Partes del eje trasero (2) tapas y piezas de repuesto Pièces d’essieu arrière (2) capuchons et pièces de rechange...
- Page 4 WARNING WARNING WARNING: • • Purses, shopping bags, parcels, diaper bags or Purses, shopping bags, parcels, diaper bags or Please follow all of these instructions Please follow all of these instructions accessory items may change the balance of the accessory items may change the balance of the to ensure the safety of your child.
- Page 5 ADVERTENCIA ADVERTENCIA ADVERTENCIA: • • El peso máximo que se puede llevar en organizador El peso máximo que se puede llevar en organizador Por favor, siga todas estas Por favor, siga todas estas flexible para padres es 2 lbs (0.90 kg). flexible para padres es 2 lbs (0.90 kg).
- Page 6 MISE EN GARDE MISE EN GARDE MISE EN GARDE : • • Le poids maximum pouvant être transporté ddans Le poids maximum pouvant être transporté ddans Veuillez suivre toutes ces Veuillez suivre toutes ces chaque poche latérale est de 1 lb (0,45 kg). chaque poche latérale est de 1 lb (0,45 kg).
- Page 7 ASSEMBLY MONTAJE ASSEMBLAGE ASSEMBLY MONTAJE ASSEMBLAGE IMPORTANT ! FRAME SETUP To ensure safe operation of your product, please INSTALACIÓN DE MARCO follow these instructions carefully. Please keep these instructions for MONTAGE DU CADRE future reference. IMPORTANT ! To attach the wheels, unfold stroller as described in the following section: Before assembly and each use, inspect this Para colocar las ruedas, despliegue el carrito como se describe en la siguiente sección: product for damaged hardware, loose joints, missing parts or sharp edges.
- Page 8 ASSEMBLY MONTAJE ASSEMBLAGE ASSEMBLY MONTAJE ASSEMBLAGE • La unión del armazón se trabará en FRONT WHEELS RUEDA DELANTERA su posición. ROUE AVANT NOTA: verifique que los indicadores VERDES estén visibles para asegurar • Push each front wheel peg into the que el armazón esté...
- Page 9 ASSEMBLY MONTAJE ASSEMBLAGE ASSEMBLY MONTAJE ASSEMBLAGE REAR AXLE-WHEELS/Diagrams • Diagram B: Refer to this diagram to remove the pin and washers from EJE TRASERO-RUEDAS TRASERAS/Diagramas both ends of the rear axle parts. AXE ARRIÈRE-ROUES ARRIÈRE/Schémas • Diagrama B: consulte este diagrama para retirar el perno y las Attach the rear axle assembly and wheels as follows: arandelas de ambos extremos de las piezas del eje trasero.
- Page 10 ASSEMBLY MONTAJE ASSEMBLAGE ASSEMBLY MONTAJE ASSEMBLAGE REAR AXLE- ASSEMBLY • 2e étape : Retirer les goupilles et les EJE TRASERO - MONTAJE rondelles de l’axe, comme le montre AXE ARRIÈRE - ASSEMBLAGE le Schéma B (Fig. 4b). • 3e étape : Installer toutes les pièces Parts in bag Step 1: Remove the 2 caps from the bag Partes en la bolsa...
- Page 11 ASSEMBLY MONTAJE ASSEMBLAGE ASSEMBLY MONTAJE ASSEMBLAGE • Push the cap into the wheel to close • Insert the rear wheel assembly into the axle assembly. the frame bushing from the rear side NOTE: Press firmly with your palm to (Fig 4g). press the cap in completely (Fig.
- Page 12 ASSEMBLY MONTAJE ASSEMBLAGE ASSEMBLY MONTAJE ASSEMBLAGE COMPLETE FRAME VIEW SOFT PARENT ORGANIZER VISTA COMPLETA DE MARCO ORGANIZADOR FLEXIBLE PARA PADRES VUE COMPLÈTE DU CADRE PANIER DE RANGEMENT SOUPLE POUR PARENTS WARNING: Ensure to complete the frame assembly before Do not place hot liquids or more than Do not place hot liquids or more than attaching the accessories that follow: 2 lb.
- Page 13 ASSEMBLY MONTAJE ASSEMBLAGE ASSEMBLY MONTAJE ASSEMBLAGE CANOPY • Para cerrar lel dosel: pliegue los DOSEL visores y empuje por completo hacia AUVENT abajo en dirección al armazón (Fig. 6c) • To install the canopy: Locate the (Right) and (Left) indicators on the •...
- Page 14 FOLD PLEGAR PLIER ASSEMBLY MONTAJE ASSEMBLAGE ASSEMBLY MONTAJE ASSEMBLAGE PULL HANDLE TO FOLD STROLLER LA MANIJA PARA PLEGAR EL CARRITO LA POIGNÉE POUR PLIER LA POUSSETTE WARNING: are must be taken when are must be taken when TO USE THE HANDLE: •...
- Page 15 FOLD PLEGAR PLIER UNFOLD DESPLEGAR DÉPLIER UNFOLD DESPLEGAR DÉPLIER TO UNFOLD STROLLER PARA DESPLEGAR EL CARRITO • Jale ambos gatillos al mismo tiempo tpara plegar el vagón DÉPLIER LA POUSSETTE (Fig. 8a). • Release the fold latch (Fig. 9a). Unfold •...
- Page 16 SAFETY SEGURIDAD SÉCURITÉ SAFETY SEGURIDAD SÉCURITÉ TO USE THE SAFETY HARNESS • Stay near and watch child during use NEVER PARA USAR EL CINTURON DE SEGURIDAD leave child unattended. POUR UTILISER LE HARNAIS DE SECURITE • Place the crotch strap between your WARN child’s legs.
- Page 17 SAFETY SEGURIDAD SÉCURITÉ SAFETY SEGURIDAD SÉCURITÉ TO RELEASE SAFETY BELT BRAKES PARA AFLOJAR EL CINTURÓN DE SEGURIDAD FRENOS POUR LIBÉRER L’ENFANT FREINS WARNING: Always set brakes when the stroller is Always set brakes when the stroller is • Push Button on Center Clasp, the not being pushed so that the stroller will not roll away.
- Page 18 SAFETY SEGURIDAD SÉCURITÉ MAINTENANCE MANTENIMIENTO D’ENTRETIEN MAINTENANCE MANTENIMIENTO D’ENTRETIEN CANOPY REMOVAL • Para activar los frenos, aplique ELIMINAR LA CUBIERTA una leve presión hacia abajo en las ENLÈVEMENT L’AUVENT palancas de freno del eje trasero. El carrito podría requerir un leve •...
- Page 19 MAINTENANCE MANTENIMIENTO D’ENTRETIEN MAINTENANCE MANTENIMIENTO D’ENTRETIEN REAR AXLE WHEEL REMOVAL NOTE: NEVER use stroller if wheels do DESMONTAJE DE RUEDA DEL EJE TRASERO ENLÈVEMENT DE ROUE ARRIÈRE not lock into place. If you need assistance, please contact our customer service •...
- Page 20 MAINTENANCE MANTENIMIENTO D’ENTRETIEN MAINTENANCE MANTENIMIENTO D’ENTRETIEN WAGON FABRIC REMOVAL • Repita los pasos en el segundo lado. Front Frente RETIRAR LA TELA DEL VAGÓN NOTA: para sujetar nuevamente la l'avant RETRAIT DU TISSU DU WAGON tela del vagón, (invierta el paso 16), e introduzca las hebillas de •...
- Page 21 MAINTENANCE MANTENIMIENTO D’ENTRETIEN MAINTENANCE MANTENIMIENTO D’ENTRETIEN • Press the pin to remove the rear NOTE: NEVER use stroller if wheels do not lock into place. If you need frame bar and pull the fabric away assistance, please contact our customer service department at 1-800-328- from the frame.
- Page 22 ASSEMBLY MONTAJE ASSEMBLAGE ASSEMBLY MONTAJE ASSEMBLAGE MAINTENANCE MANTENIMIENTO D’ENTRETIEN CUIDADO Y MANTENIMIENTO • Limpieza del cojín del asiento: Para limpiar manchas - Limpie las ® BABY TREND CUSTOMER SERVICE pequeñas manchas pasando un paño por la superficie con una solución suave de agua y jabón.
Need help?
Do you have a question about the Tour LTE and is the answer not in the manual?
Questions and answers