Advertisement
Quick Links
KTRBUu217.456
Montageanleitung
BACnet Raumregler mit Display
Hinweise zur Anleitung
Lesen Sie diese Anleitung sorgfältig, bevor Sie das Gerät installieren und
in Betrieb nehmen. Die Bedienungsanleitung muss für Bediener und
Wartungspersonal an frei zugänglicher Stelle aufbewahrt werden.
Folgende Symbole werden in dieser Anleitung verwendet:
Warnung vor elektrischer
Spannung
Sicherheitshinweise!
Dieses Gerät darf nur durch eine Elektrofachkraft und gemäß dem
entsprechenden Anschlussschaltbild in der Bedienungsanleitung
installiert werden. Dabei sind die bestehenden Sicherheitsvorschriften
zu beachten.
Die Montage / Demontage darf nur im spannungsfreien Zustand
erfolgen.
Fehlersuche und Beseitigung ist nur durch eine Elektrofachkraft
durchzuführen.
Defekte Teile nur durch Originalteile vom Hersteller ersetzen.
Staub und Schmutz vorsichtig mit einem trockenen, lösungs-
mittelfreien und weichen Tuch von der Gehäuseoberfläche entfernen.
1. Anwendung
Der alre BACnet Raumregler mit grafischem Display wurde speziell für den
zeitabhängigen Heiz- und Kühlbetrieb in 2- oder 4-Rohr-Systemen entwickelt.
Der Regler kann in vielfältigen Bereichen eingesetzt und angewendet werden,
wie zum Beispiel in Hotel, Wohn-, Büro- und Geschäftsräumen sowie
Krankenhäuser und Schulen.
Die Kommunikation erfolgt mittels BACnet gemäß DIN EN ISO 16464-5
mit dem Netzwerkprotokoll BACnet MS/TP. Damit ist der Raumregler mit
allen gängigen Systemen der Gebäudeautomation kompatibel. Der Regler
entspricht dem BACnet-Profil "B-AAC" (BACnet Advanced Application
Controller).
Mit den vordefinierten Applikationen sind vielfältige Anwendungen für
Raumtemperierungen in der Raumautomation abgedeckt.
2. Technische Daten
Betriebsspannung:
Elektrischer Anschluss:
Schaltkontakt:
Schaltvermögen O1/O2:
Analoger Ausgang O3:
Einstellbereiche:
Schutzart:
Schutzklasse:
zul. Luftfeuchte:
Umgebungstemperatur:
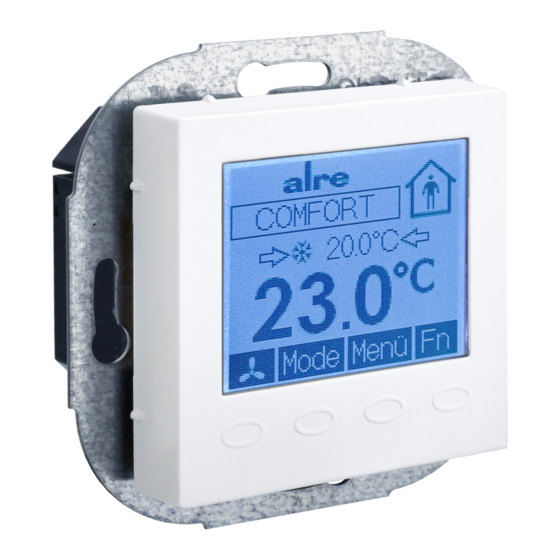
Anzeige:
Montage / Befestigung:
Softwareklasse:
Bemessungsstoßspannung:
Verschmutzungsgrad:
Energieeffizienzklasse:
3. Montage / Anschluss
Die Montage und der elektrische Anschluss dürfen nur im
spannungsfreien Zustand erfolgen.
Das Gerät ist zur Montage in die Unterputzdose bestimmt und darf nicht
direkt Wärme- oder Kältequellen ausgesetzt werden. Es ist darauf zu achten,
dass das Gerät auch rückseitig keiner Fremderwärmung oder -kühlung, z.B.
bei Hohlwänden durch Zugluft oder Steigleitungen, ausgesetzt wird. Der
Tragring ist auf die Tapete / den Wandbelag zu montieren. Das Gerät mit dem
50 x 50 mm Gehäusedeckel ist mittels Zwischenrahmen der Schalterhersteller
nach DIN 49075 in nahezu alle Schalterprogramme integrierbar. Das Gerät
mit dem 55 x 55 mm bzw. 60 x 60 mm Gehäusedeckel ist ebenfalls für
diverse Schalterprogramme geeignet. Bei Mehrfachrahmen ist das Gerät
immer an unterster Stelle zu montieren.
Der elektrische Anschluss erfolgt gemäß Anschluss-Schaltbild Punkt 4. /
Abb.3. Hierzu können die Steckklemmen komfortabel vorverdrahtet und bei
der Montage in die Unterputzdose mit dem Gerät verbunden werden (siehe
Abb. 1). Zum Öffnen des Gerätes oben und unten am Gehäusedeckel greifen
und ziehen, wie in Abb. 2 dargestellt.
Stand 05.2022
Wichtige Information
230 VAC, 50Hz
Schraub-Steckklemmen
netzspannungsseitig 0,75 – 2,5 mm²
kleinspannungsseitig 0,08 – 1,5 mm²
2 Relais / Schließer, Typ 1C
je 3 (0,5) A / 230 VAC,
(max. 5 Ventilantriebe je Ausgang)
0-10V (SELV), max. 5mA zur
Lüfter- oder Ventilansteuerung
5 ... 30°C Heizen
18 ... 40°C Kühlen
IP 30
II, nach entsprechender Montage
max. 95%, nicht kondensierend
0 ... 40°C
beleuchtetes, grafisches Display
in Unterputzdose, in nahezu alle
Flächenschalterprogramme adaptierbar
A
4000 V
2
I (Beitrag zur jahreszeitbedingten
Raumheizungs -Energieeffizienz 1 %)
Assembly instruction
BACnet room controller with display
Notes relating to instructions
Read these instructions carefully before installing and commissioning
the device. The operating instructions must be stored somewhere freely
accessible to operator and maintenance staff.
The following symbols are used in these instructions:
Warning of electric voltage
Safety notices!
This device may only be installed by an electrician in accordance with
the corresponding connection diagram in the operating instructions.
The applicable safety regulations should be observed.
Mounting / removal may only be undertaken when de-energised.
Troubleshooting and fault rectification should only be carried out by
an electrician.
Defective parts can only be replaced with original factory parts.
Carefully remove dust and dirt from the housing surface using a dry,
solvent-free and soft cloth.
1. Function
The alre BACnet room controller with graphic display is suited to time-based
heating and cooling operation in 2- or 4-pipe systems. The controller can be
used in various sectors, such as hotels, apartments, offices and business
premises as well as hospitals and schools.
The unit communicates using BACnet in accordance with DIN EN ISO 16464-
5 with the network protocol BACnet MS/TP. The room controller is therefore
compatible with all common building automation systems. The controller has
a "B-AAC" BACnet profile (BACnet Advanced Application Controller).
Most uses of room automation are covered by the predefined applications for
room temperature control.
2. Technical data
Operating voltage:
Electrical connection:
Switching contact:
Switching capacity O1/O2:
Analogue output O3:
Setting range:
Degree of protection:
Protection class:
Permissible humidity:
Permissible ambient temp.:
Display:
Installation / mounting:
Software class:
Rated impulse voltage:
Degree of pollution:
Energy efficiency class:
3. Installation / connection
Mounting and the electric connection may only be undertaken when
de-energised.
The device is designed for installation in the flush-mounted box and may not
be directly exposed to sources of heat or cold. It must be ensured that the
device is also not exposed to external sources of heat or cold from behind
i.e. with hollow walls through drafts or standpipes. The bearer ring is to be
mounted onto the wallpaper / wall covering. The device with a 50 x 50 mm
housing cover can be integrated in almost all light switch programmes when
the switch manufacturer's intermediate frame according to DIN 49075 is
used. The device with a 55 x 55 mm or 60 x 60 mm housing cover is also
suitable for different switch programmes. The device must always be installed
at the lowest position when it comes to multi-frames.
Electrical connection is undertaken in accordance with the connection wiring
diagram in Point 4. / Fig. 3. For this purpose, the plug-in terminals may be
conveniently prewired and connected with the device in the flush-mounted
box during mounting (see Fig. 1). To open the device, catch hold of the top
and bottom of the housing cover and remove it as depicted in Fig. 2.
1
Important information
230 VAC, 50Hz
Screw plug-in terminals
mains voltage supply 0.75 – 2.5 mm²
low voltage supply 0.08 – 1.5 mm²
2 relays (make contact), type 1C
3 (0.5) A in each case / 230 VAC
(max. 5 valve drives per output)
0-10V (SELV), max. 5 mA for fan triggering or
valve control
5 ... 30°C (heating)
18 ... 40°C (cooling)
IP 30
II, following appropriate mounting
max. 95%, non-condensing
0 ... 40°C
illuminated, graphic display
flush-mounted, adaptable in almost all
panel switch programmes
A
4000 V
2
I (contribution to seasonal space heating
energy efficiency 1 %)
5 22 053 01
Advertisement

Subscribe to Our Youtube Channel
Related Manuals for alre KTRBUu217.456


Summary of Contents for alre KTRBUu217.456
- Page 1 1. Function Der alre BACnet Raumregler mit grafischem Display wurde speziell für den The alre BACnet room controller with graphic display is suited to time-based zeitabhängigen Heiz- und Kühlbetrieb in 2- oder 4-Rohr-Systemen entwickelt. heating and cooling operation in 2- or 4-pipe systems. The controller can be Der Regler kann in vielfältigen Bereichen eingesetzt und angewendet werden,...
- Page 2 We reserve the right to hierfür übernehmen wir keine Gewährleistung. Änderungen vorbehalten. amendments. ALRE-IT Regeltechnik GmbH · Richard-Tauber-Damm 10 · D-12277 Berlin Tel.: +49(0)30/ 399 84-0 · Fax: +49(0)30/ 391 70 05 · mail@alre.de · www.alre.de...
Need help?
Do you have a question about the KTRBUu217.456 and is the answer not in the manual?
Questions and answers