
Related Manuals for Hans Grohe Metris 31101 1 Series


Summary of Contents for Hans Grohe Metris 31101 1 Series
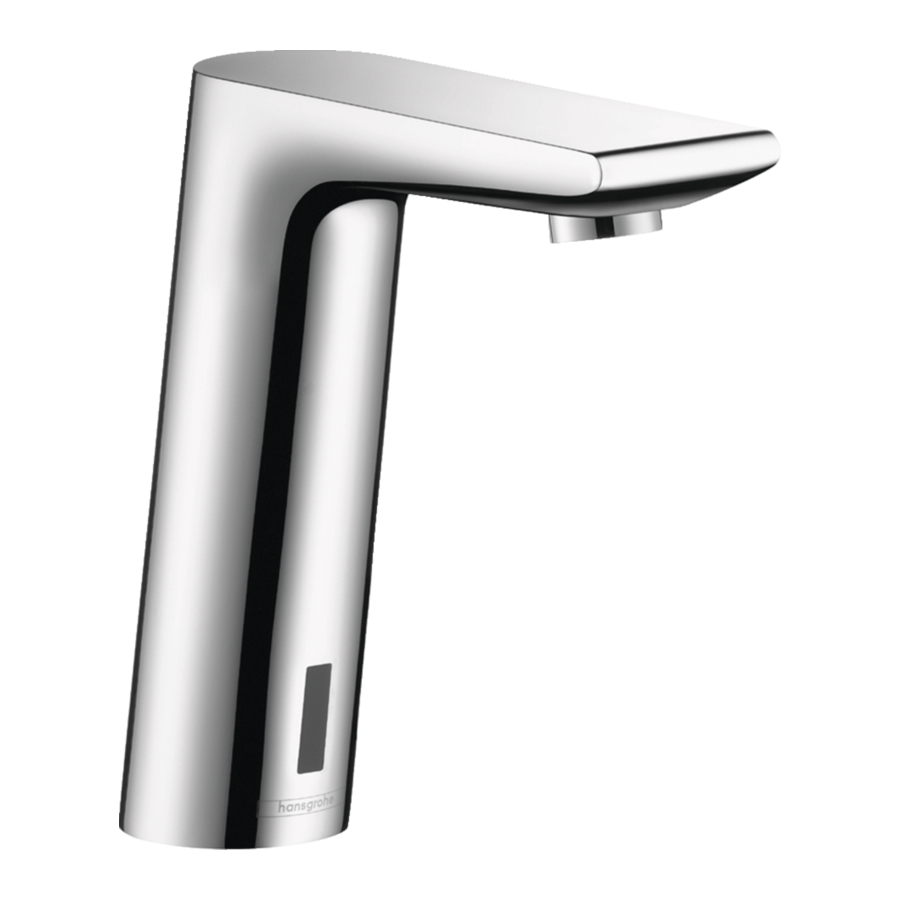
- Page 1 EN Installation / User Instructions / Warranty FR Instructions de montage / Mode d'emploi / Garantie ES Instrucciones de montaje / Manejo / Garantía Metris 31101xx1...
-
Page 2: Technical Information
English Technical Information Recommended water pressure 15 - 75 psi Max. water pressure 145 psi Recommended hot water temp. 120° - 140° F* Max. hot water temp 176°F* Flow rate 1.5 gpm Hole size in mounting surface 1⅜" Max. depth of mounting surface 1⅝" 2¼" 1¼" *Please know and follow all applicable local plumbing codes when setting the temperature on the water heater. 5" 2⅜" 2⅛" ⅜" 31101xx1... -
Page 3: Installation Notes
Installation notes • Flush the hot and cold supplies thoroughly tions on page 14. When the faucet is in re- before installing the faucet. Damage to the duced range mode, the LED in the sensor window faucet caused by debris is not covered under the will flash while the faucet is not in use. warranty. • Drops of water or condensation on the sensor • The hot and cold supplies should be of equal window may cause the faucet to run. pressure. • If the LED in the sensor window flashes while the • The faucet should not be used with a continuous faucet is in use, the battery is low, but the faucet flow water heater. may still be used. If the LED stays on, the faucet will not run, and the battery must be changed. • Do not install the faucet on a sink with a raised edge. • If the power to the outlet or to the building fails, the 110 V version of the faucet will not run. • Strong light sources should not shine directly on the sensor window of the faucet. • The spray pattern will be unattractive immediately after installation or service, • The faucet should only be used with the battery due to air in the faucet. -
Page 4: Données Techniques
Français Données techniques * Vous devez connaître et respecter tous les codes de plom- berie locaux applicables pour le réglage de la température Pression d’eau recommandée 15 - 75 psi du chauffe-eau. Pression d’eau maximum 145 psi Température recommandée 120° - 140° F* d'eau chaude Température maximum d'eau chaude 176°F* Capacité nominale 1.5 gpm Dimension du trou dans la surface de montage 1⅜ po Profondeur maximale de la surface 1⅝ po de montage Notes d'installation • Rincez bien les conduites d’alimentation en eau réduction de portée en page 14. Lorsque chaude et froide avant d’installer le robinet. La le robinet est en mode de portée réduite, la DEL garantie ne couvre pas les dommages causés au à l'intérieur de la fenêtre du capteur clignote robinet par des dépôts ou des impuretés. lorsque le robinet n'est pas utilisé. • L’alimentation en eau chaude et l'alimentation en • Des gouttes d'eau ou de la condensation sur la eau froide doivent avoir la même pression. -
Page 5: Datos Tecnicos
Español Datos tecnicos *Debe conocer y cumplir todos los códigos locales apli- cables para ajustar la temperatura del calentador de agua. Presión recomendada en servicio 15 - 75 psi Presión en servicio max. 145 psi Temperatura recomendada del 120� - 140� F* agua caliente Temperatura del agua caliente max. 176�F* Caudal máximo 1.5 gpm Tamaño del orificio en la superficie de montaje 1⅜" Profundidad máxima de la superficie de montaje 1⅝" Notas de instalación 14. Cuando el grifo esté en el modo de rango • Lave los suministros de agua caliente y fría a fondo antes de instalar el grifo. Los daños al reducido, el LED en la ventana del sensor titilará grifo causados por residuos no están cubiertos mientras el grifo no se esté utilizando. por la garantía. • Las gotas de agua o la condensación en la • La presión de los suministros de agua caliente y ventana del sensor pueden provocar que el grifo fría debe ser igual. haga correr agua. • El grifo no se debe usar con un calentador de • Si el LED en la ventana del sensor titila cuando el grifo está en uso, la batería está baja, pero agua de flujo continuo. - Page 6 Installation Considerations / À prendre en considération pour l’installation / Consideraciones para la instalación Tools Required / Outiles Utiles / Herramientas Útiles 10 mm 19 mm...
- Page 7 Replacement Parts / Pièces détachées / Repuestos 98802xx0 98808000 98204000 (31x2) 98803000 95654000 (40x2.5) 98801000 13961000 98809000 96456000 95291000 xx = Colors / Couleurs / Acabados 00 = Chrome 95576001 80 = Steel Optik Klüh 15.04.2011...
-
Page 8: Installation
English Installation Place the faucet on the mounting surface. Tighten the mounting nut. Tighten the screws. Install the adapters and filters on the stops. 10 mm 19 mm Connect the supply lines. Use two wrenches as shown. Do not allow the supply lines to twist. -
Page 9: Instalación
Français Español Installation Instalación Placez le robinet sur la surface de montage. Coloque el grifo en la superficie de montaje. Serrez l'écrou de montage. Apriete la tuerca de montaje. Serrez les vis. Apriete los tornillos. Installez les adaptateurs et les filtres sur les robinets Instale los adaptadores y filtros sobre los topes. d’arrêt. Conecte las tuberías de suministro. Raccordez les conduites d'alimentation. No permita que las tuberías de sumi- Assurez-vous que les conduites nistro se retuerzan. d'alimentation ne s’entortillent pas. - Page 10 English Fasten the battery box to the wall. Connect the battery box to the faucet. Use a cable tie to bundle the excess cable. Turn on the water at the stops.
- Page 11 Français Español Connectez le réceptacle pile au robinet. Conecte el adaptador para pila al grifo. Utilisez un attache-câble pour enrouler le surplus de Use un cable para atar el cable sobrante. câble. Ouvrez l'eau aux robinets d’arrêt. Abra el paso del agua en los topes.
- Page 12 English Wait 30 seconds. Place a hand in front of the sensor. The water should turn on automatically.
- Page 13 Français Español Attendez 30 secondes. Espere 30 segundos. Placez une main devant le capteur. L’eau devrait Coloque una mano frente al sensor. El agua debería couler automatiquement. encenderse automáticamente.
- Page 14 English Reduce the Sensor Range The sensor is set for maximum range at the factory. If the faucet is used on a very small or highly reflective lavatory, the sensor range may be reduced by ap- proximately 2". Disconnect the power cable for approximately 10 seconds (1). Reconnect the power cable (2). The LED will blink once to indicate that it is in the “maximum range” mode. When the LED stays on, cover the sensor window with your hand or with a white card for 20 - 40 seconds to reset the electronics*. When the hand or card is removed, the LED will blink -- once for “maximum range”, twice for “reduced range”. *If the card or hand is removed in less than 20 seconds, or after 40 seconds, the sensor mode will not reset. The LED will then stay on while the sensor recali- brates itself. When the LED turns off, the faucet is ready for use.
- Page 15 Français Español Réduire la portée du capteur Reduzca el rango del sensor Le capteur est réglé pour une portée maximale à El sensor está ajustado al rango máximo de fábrica. l'usine. Si le robinet est utilisé sur un lavabo très petit Si el grifo se utiliza en un lavatorio muy pequeño ou très réfléchissant, la portée du capteur peut être o altamente reflectivo, el rango del sensor puede réduite d'environ 2". reducirse en 2” aproximadamente. Débranchez le câble d'alimentation pendant environ Desconecte el cable de alimentación durante aproxi- 10 secondes (1). Rebranchez le câble d'alimentation madamente 10 segundos (1). Vuelva a conectar el (2). cable de alimentación (2). La DEL va clignoter une fois pour indiquer que le El LED titilará una vez para indicar que está en el robinet est dans le mode « portée maximale ». modo de “rango máximo”. Lorsque la DEL reste allumée, couvrez la fenêtre Cuando el LED continúe encendido, cubra la ventana du capteur avec votre main ou avec une carte del sensor con la mano o una tarjeta blanca de 20 a blanche pendant 20 - 40 secondes pour réinitialiser 40 segundos para reajustar las partes electrónicas*. l'électronique*. Cuando retire la mano o la tarjeta, el LED titilará, Lorsque la main ou la carte est retirée, la DEL va una vez para el “rango máximo”, dos veces para el clignoter – une fois pour « portée maximale », deux “rango reducido”.
- Page 16 User Instructions / Instructions de service / Manejo 31100xx1 / 31102xx1...
- Page 17 User Instructions / Instructions de service / Manejo 31101xx1 / 31103xx1...
-
Page 18: Maintenance / Entretien / Mantenimiento
Cleaning / Nettoyage / Limpieza ca. 60 sec ca. 10 sec Maintenance / Entretien / Mantenimiento... - Page 19 Maintenance / Entretien / Mantenimiento 19 mm 10 mm...
- Page 20 Change the battery / Changement de pile / Cambio de pila - P 2 i u m L i t h...
- Page 21 Cleaning Recommendation for Hansgrohe Products Modern bathroom faucets, kitchen faucets and shower products are made from different materials to comply with the needs of the market with regard to design and functionality. To avoid damage to the product, it is necessary to take proper care of For best results: • Prevent the buildup of mineral scale and /or soap residue by cleaning your Hansgrohe product(s) when needed. • Select a cleaning agent specifically intended for the type of product. • Do not use these types of cleaners as they will cause damage to your Hansgrohe product: Any cleaning agent containing hydrochloric acid, formic acid, lye, or acetic acid. Abrasive cleaning powders, pads, or brushes. Steam cleaners. “No rinse” cleaning agents. • Always follow the instructions provided by the manufacturer of the cleaning agent. • Do not mix cleaning agents, unless directed by the manufacturer. • Do not spray cleaners directly onto the product as drops could enter openings and gaps and cause damage. When using spray cleaners, spray the cleaner onto a soft cloth or sponge. • Always rinse your Hansgrohe product thoroughly with clear water and polish dry with a soft cloth after cleaning. Important • Residue from soaps and shampoos can cause damage. Rinse the product with clean water after each use. • Residue from basin/tub/tile cleaner can cause damage to faucets and fittings. Immediately rinse any overspray from the Hansgrohe product.
-
Page 22: Indications Importantes
• Pour le nettoyage avec produit vaporisé liquide, en aucun cas sur la robinetterie, mais au contraire aspergé sur le chiffon (torchon, éponge) et effectuer comme cela le nettoyage, car les aérosols peuvent pénétrer dans les ouvertures et fentes de la robinetterie et peuvent provoquer des détériorations. • Après le nettoyage rincez avec suffisamment d’eau claire pour éliminer les restes de produits attachés. • L’utilisation d’appareil de nettoyage à vapeur n’est pas autorisée, car les températures importantes peuvent détériorer les produits. Indications importantes • Les produits pour le corps comme les savons liquides, les shampooings ou les gels de douche peuvent causer des détériorations. • Ici aussi on doit: Après l’utilisation rincer soigneusement les restes avec de l’eau. Conseil de nettoyage • Les deteriorations imputables à un mauvais entretien ne peuvent être pris en considération par notre garantie. • Par l’action d’un nettoyant sur les revêtements déjà endommagé il se produit une aggravation des dégâts. Recomendación de limpieza para los productos de Hansgrohe Hoy en día, las griferías de baño y de cocina así como duchas modernas se componen de materiales muy distintos para satisfacer las exigencias del mercado respecto al diseño y la funcionalidad. Para evitar daños y reclamaciones hay que tener en cuenta ciertos aspectos tanto en el uso como en su limpieza. -
Page 23: Limited Consumer Warranty
Limited Consumer Warranty This product has been manufactured and tested to the highest quality standards by Hansgrohe, Inc. (“Hansgrohe”). This warranty is limited to Hansgrohe products that are purchased by a consumer in the United States or Canada after March 1, 1996, and installed in either the United States or in Canada. WHO IS COVERED BY THE WARRANTY This warranty extends to the original purchaser only. This warranty is non-transferable. WHAT IS COVERED BY THE WARRANTY The warranty covers only your Hansgrohe manufactured product. Hansgrohe warrants this product against defects in material or workmanship as follows: Hansgrohe will replace at no charge for parts only or, at its option, replace any product or part of the product that proves defective because of improper workmanship and/or material, under normal installation, use, service and maintenance. If Hansgrohe is unable to provide a replacement and repair is not practical or cannot be made in timely fashion, Hansgrohe may elect to refund the purchase price in exchange for the return of the product. LENGTH OF WARRANTY Replacement or repaired parts of products will be covered for the term of this warranty, as stated in the following two sentences. If you are a consumer who purchased the product for use primarily for personal, family or household purposes, this warranty extends for as long as you own the product and the home in which the product is originally installed. If you purchased the product for use primarily for any other purpose, including, without limitation, a commercial purpose, this warranty extends only (i) for 1 year, with respect to Hansgrohe & Commercial products, and (ii) for 5 years, with respect to Axor products. THIS WARRANTY DOES NOT COVER, AND HANSGROHE WILL NOT PAY FOR: A. Conditions, malfunctions or damage not resulting from defects in material or workmanship. -
Page 24: Exclusions And Limitations
Exclusions and Limitations REPAIR OR REPLACEMENT (OR, IN LIMITED CIRCUMSTANCES, REFUND OF THE PURCHASE PRICE) AS PROVIDED UNDER THIS WARRANTY IS THE EXCLUSIVE REMEDY OF THE PURCHASER. HANSGROHE NEITHER ASSUMES NOR AUTHORIZES ANY PERSON TO CREATE FOR IT ANY OTHER OBLIGATION OR LIABILITY IN CONNECTION WITH THIS PRODUCT.
Need help?
Do you have a question about the Metris 31101 1 Series and is the answer not in the manual?
Questions and answers