Table of Contents
Advertisement
Quick Links
DOVE
Thermostatic mixer shower with diverter
Installation and
operating instructions
I
NSTALLERS PLEASE NOTE THESE INSTRUCTIONS ARE TO BE LEFT WITH THE USER
The showerhead and hose supplied with this product are an integral
part of the safety of your shower. Failure to use genuine Triton
parts may cause injury and will invalidate your warranty
2180746G
-
October 2019
Advertisement
Table of Contents

Related Manuals for Triton DOVE


Summary of Contents for Triton DOVE
- Page 1 NSTALLERS PLEASE NOTE THESE INSTRUCTIONS ARE TO BE LEFT WITH THE USER The showerhead and hose supplied with this product are an integral part of the safety of your shower. Failure to use genuine Triton parts may cause injury and will invalidate your warranty...
-
Page 2: Table Of Contents
SPARE PARTS ..................16 MAINTENANCE ..................17 FAULT FINDING ................18 - 19 GUARANTEE, SERVICE POLICY, ETC........REAR COVER To check the product suitability for commercial and multiple installations, please contact Triton’s specification advisory service before installation. Telephone: 024 7637 2222 E mail: technical@tritonshowers.co.uk... -
Page 3: Main Components
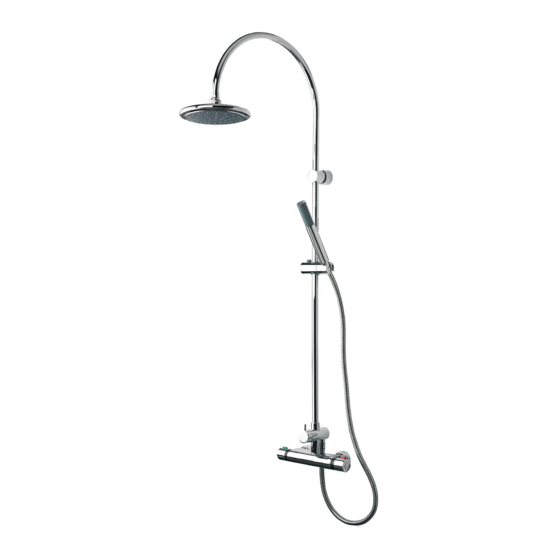
Bar mixer shower with diverter MAIN COMPONENTS Fig.1 Fig.1 A. Thermostatic mixer valve B. Lower shower arm C. Handset holder D. Rail bracket E. Upper shower arm Fixed showerhead G. Handset H. Handset hose Dogleg fitting X2 Cover trim X2 All dimensions listed in this fitting book regarding the product and installation are approximate. -
Page 4: Introduction
‘site requirements’. d. DO NOT connect the mixer shower to a gravity hot supply and a mains cold supply or Replacement parts can be ordered from Triton Customer vice versa. Service. See ‘spare parts’ for details. - Page 5 DO NOT solder fittings near the mixer unit have to be fitted. For advice on the Triton as heat can transfer along the pipework and scale inhibitor, please contact Customer damage the mixer valve.
-
Page 6: Typical Domestic Installations
Bar mixer shower with diverter TYPICAL DOMESTIC INSTALLATIONS *Fig.2 (diagrammatic view – not to scale) Pumped gravity fed systems ( fig.2) Stop valve The shower control MUST be fed from a cold water cistern and hot water cylinder providing Cold water Cold supply cistern nominally equal pressures. - Page 7 Bar mixer shower with diverter Unvented mains pressure systems ( fig.4) *Fig.4 (diagrammatic view – not to scale) The shower control can be installed with an unvented, stored hot water cylinder. For systems with no cold water take off after the appliance reducing valve, it will be necessary to fit an additional drop tight pressure reducing valve when the mains pressure is over 5 bar.
-
Page 8: Preparing The Mixer Valve
Bar mixer shower with diverter INSTALLATION *Fig.6 (diagrammatic view – not to scale) PREPARING THE MIXER VALVE Check the contents to make sure all parts are present. Before starting the mixer installation, make sure all the openings on the valve are carefully covered to stop ingress of any debris, etc. -
Page 9: Supply Pipework
Bar mixer shower with diverter SUPPLY PIPEWORK IMPORTANT Complete the pipework to the shower area Consideration must be given for having decided on the position of the shower the adequate ceiling space for the and direction of pipe entry, for example rising, installation of this shower. -
Page 10: Variable Fittings
Bar mixer shower with diverter VARIABLE FITTINGS Fig.8 The supply pipes can be routed from the side, rising, rear or falling and must end in suitable fittings (fig.8) to accept the variable connectors. The variable connectors can be used to connect to ½”... -
Page 11: Making Good
Bar mixer shower with diverter Fig.11 WARNING! Check there are no hidden cables or pipes before drilling holes for wall plugs. Use great care when using power tools near water. The use of a residual current device (RCD) is recommended. MAKING GOOD Make good the wall and complete the tiling. -
Page 12: Leak Testing
Bar mixer shower with diverter • Slide the diverter collar and rubber seal Fig.14 (making sure the tapered part of the seal is at the bottom) over the base of the lower shower arm assembly and fit into the outlet Lower shower arm of the diverter (fig.14). -
Page 13: Commissioning
Bar mixer shower with diverter COMMISSIONING Fig.18 Important: Make sure that all supply pipework has been flushed through before commissioning. Start the water flow by rotating the flow control. Make sure that both the hot and cold water supplies are fully open and at (or near to) their design temperature and pressures, and are within the requirements as stated. -
Page 14: Operating The Shower
Bar mixer shower with diverter OPERATING THE SHOWER AND Fig.21 DIVERTER • To start the mixer, rotate the On/Off flow control (left-hand side) fully anti-clockwise for maximum flow. • To stop the water flow, rotate the On/Off flow control fully clockwise (fig.21). •... -
Page 15: Operating The Diverter
Bar mixer shower with diverter Operating the diverter Fig.23 The divertor fitted to this product has two position settings. The first position allows the user to select the fixed showerhead and the second position selects the hand-held showerhead. The positions are selected by rotating the handle clockwise or anticlockwise (fig.23 - 24). -
Page 16: Dimensions
Bar mixer shower with diverter DIMENSIONS 1/2” BSP 115mm 3/4” BSP 135mm 70mm All dimensions listed in this fitting book regarding the product and installation are approximate. -
Page 17: Bar Mixer Fittings (Optional)
Bar mixer shower with diverter *BAR MIXER FITTINGS Ref. Description Part No. A. Bar mixer bracket assembly UNBMXBKT B. Straight connector 86001120 C. Dogleg fittings 86001110 The bar mixer fittings can be purchased from Customer Spares. Please check that they are suitable for your installation requirements before ordering. - Page 18 Bar mixer shower with diverter To purchase a genuine Triton spare part for your product, please visit www.tritonshowers.co.uk/spares for product codes and prices. Alternatively please call our Customer Services team on 024 7637 2222 to order direct. Please have your model name available.
-
Page 19: Spare Parts
Bar mixer shower with diverter MAINTENANCE Cleaning Triton recommends that all products are cleaned The following maintenance procedure must using warm, soapy water. be carried out for commercial and health care premises, but is not necessarily required for Do not use abrasive or aggressive chemical domestic installations. -
Page 20: Fault Finding
1.4 Cold water supply 1.4.1 Turn off the shower and consult a compe- blocked. tent plumber or contact Triton Customer Service. 1.5 High volume of cold 1.5.1 Reduce the simultaneous demand from the water drawn off else- supply. - Page 21 Bar mixer shower with diverter FAULT FINDING Problem/Symptom Cause Action/Cure 4 Water does not 4.1 Water supplies cut off. 4.1.1 Check water elsewhere in house and if flow or shower necessary contact local water company. pattern collapses 4.2 Shower unit blocked. 4.2.1 Inspect the inlet filters.
- Page 22 Bar mixer shower with diverter...
- Page 23 Bar mixer shower with diverter...
- Page 24 Trade Installer Hotline: 024 7637 8344 Nuneaton www.tritonshowers.co.uk Warwickshire, CV11 4NR E-mail: serviceenquiries@tritonshowers.co.uk E-mail: technical@tritonshowers.co.uk Triton is a division of Norcros Group (Holdings) Limited Triton reserve the right to change product specification without prior notice. E&OE. © TRITON SHOWERS 2019...
Need help?
Do you have a question about the DOVE and is the answer not in the manual?
Questions and answers