Table of Contents
Advertisement
Quick Links
Advertisement
Table of Contents

Related Manuals for Kramer VM-92


Summary of Contents for Kramer VM-92
-
Page 1: User Manual
Kramer Electronics, Ltd. USER MANUAL Model: VM-92 9x 1:2 Video Distributor... -
Page 2: Table Of Contents
Figure 9: Connecting the VM-92 as a 9 x 1:2 Composite Video Distributor Tables Table 1: Front and Rear Panel Features of the VM-92 9x 1:2 Video Distributor Table 2: Underside Features of the VM-92 9x 1:2 Video Distributor Table 3: Technical Specifications of the VM-92 9x 1:2 Video Distributor... -
Page 3: Introduction
GROUP 6: Accessories and Rack Adapters; GROUP 7: Scan Converters and Scalers; and GROUP 8: Cables and Connectors 2 Download up-to-date Kramer user manuals from the Internet at this URL: http://www.kramerelectronics.com 3 The complete list of Kramer cables is on our Web site at http://www.kramerelectronics.com Introduction... - Page 4 Getting Started KRAMER: SIMPLE CREATIVE TECHNOLOGY...
-
Page 5: Overview
Overview The VM-92 is a high performance universal style video distributor. It can be configured in several different ways, including as a: 9 x 1:2 composite video distributor with looping inputs 4 x 1:2 s-Video (Y/C) distributor with looping inputs... -
Page 6: Figure 1: Vm-92 9X 1:2 Video Distributor
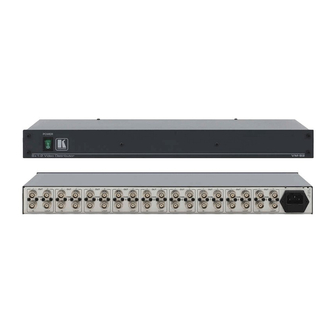
Table 1: Front and Rear Panel Features of the VM-92 9x 1:2 Video Distributor Feature POWER Switch OUT 2 BNC Connector OUT 1 BNC Connector IN BNC Connector LOOP BNC Connector Power Connector with FUSE Figure 1: VM-92 9x 1:2 Video Distributor... -
Page 7: Figure 2: Underside Of The Vm-92 9X 1:2 Video Distributor
Table 2: Underside Features of the VM-92 9x 1:2 Video Distributor Feature INPUT TERM Button EQ. Trimmer 1 Independent controls per channel 2 For looping select Hi-Z 3 Insert a screwdriver into the small hole and carefully rotate it to adjust the level... -
Page 8: Configuring The Vm-92 9X 1:2 Video Distributor
2 x 1:2 RGBS distributor, see section 5.5 5.1 Configuring a 9 x 1:2 Composite Video Distributor You can configure the VM-92 as a 9 x 1:2 composite video distributor (see Figure 3) or as a 1:18 composite video distributor... -
Page 9: Configuring A 4 X 1:2 S-Video (Y/C) Distributor
Figure 5: Configuring as a 4 x 1:2 s-Video (Y/C) Distributor 5.3 Configuring a 3 x 1:2 Component Video (YUV) Distributor Figure 6 illustrates the VM-92 as a 3 x 1:2 Component Video (YUV) distributor: Figure 6: Configuring as a 3 x 1:2 Component Video (YUV) Distributor... -
Page 10: Configuring A 3 X 1:2 Rgb Distributor
Configuring the VM-92 9x 1:2 Video Distributor 5.4 Configuring a 3 x 1:2 RGB Distributor Figure 7 illustrates the VM-92 as a 3 x 1:2 RGB distributor: Figure 7: Configuring as a 3 x 1:2 RGB distributor 5.5 Configuring a 2 x 1:2 RGBS Distributor... -
Page 11: Installing On A Rack
Installing on a Rack Installing on a Rack This section describes what to do before installing on a rack and how to rack mount. -
Page 12: Connecting The Vm-92 9X 1:2 Video Distributor
2 Only channels 1 and 9 are illustrated in Figure 9, but you can connect each channel in a similar way 3 Switch OFF the power on each device before connecting it to your VM-92. After connecting your VM-92, switch on its power and then switch on the power on each device 4 As required. -
Page 13: Figure 9: Connecting The Vm-92 As A 9 X 1:2 Composite Video Distributor
Connecting the VM-92 9x 1:2 Video Distributor Figure 9: Connecting the VM-92 as a 9 x 1:2 Composite Video Distributor... -
Page 14: Technical Specifications
Technical Specifications Table 3 includes the technical specifications Table 3: Technical Specifications of the VM-92 9x 1:2 Video Distributor INPUTS: OUTPUTS: MAX. OUTPUT LEVEL: BANDWIDTH (-3dB): DIFF. GAIN: DIFF. PHASE: K-FACTOR: S/N RATIO: CROSSTALK (all hostile): –53dB CONTROLS: COUPLING: POWER SOURCE:... - Page 15 EXCLUSION OF DAMAGES The liability of Kramer for any effective products is limited to the repair or replacement of the product at our option. Kramer shall not be liable for: Damage to other property caused by defects in this product, damages based upon inconvenience, loss of use of the product, loss of time, commercial loss;...
- Page 16 For the latest information on our products and a list of Kramer distributors, visit our Web site: www.kramerelectronics.com, where updates to this user manual may be found. We welcome your questions, comments and feedback. Safety Warning: Disconnect the unit from the power supply before opening/servicing.
Need help?
Do you have a question about the VM-92 and is the answer not in the manual?
Questions and answers