Table of Contents
Advertisement
Quick Links
Advertisement
Table of Contents

Subscribe to Our Youtube Channel
Related Manuals for Kramer FC-4046


Summary of Contents for Kramer FC-4046
- Page 1 Kramer Electronics, Ltd. USER MANUAL Model: FC-4046 Video MultiCoder®...
-
Page 2: Table Of Contents
Table 1: Front Panel FC-4046 Video MultiCoder® Features Table 2: Rear Panel FC-4046 Video MultiCoder® Features Table 3: Recommended Ambient Temperature and Humidity Range Table 4: Dipswitch Settings Table 5: Dipswitch Standard Definitions Table 6: Technical Specifications of the FC-4046 Video MultiCoder® Contents... -
Page 3: Introduction
3 Download up-to-date Kramer user manuals from the Internet at this URL: http://www.kramerelectronics.com 4 The complete list of Kramer cables is on our Web site at http://www.kramerelectronics.com 5 Converting RGB or YUV analog or digital input signals to composite or Y/C video output signals... -
Page 4: Your Fc-4046 Video Multicoder
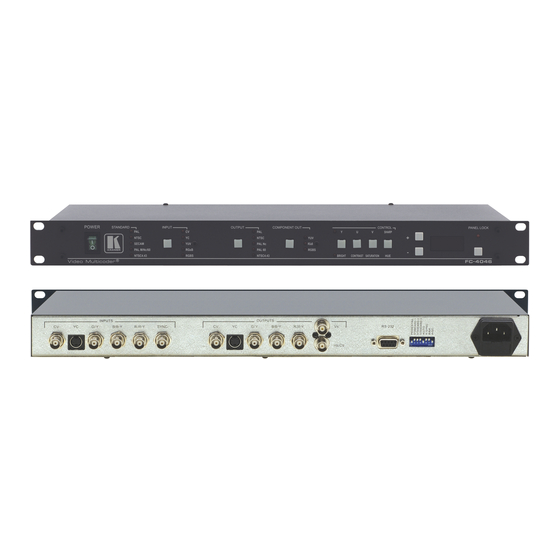
Your FC-4046 Video MultiCoder® Figure 1 illustrates the front and rear panels of the FC-4046. Table 1 and Table 2 define the front and rear panels of the FC-4046, respectively. 1 When the fifth dipswitch, AUTO, is set to ON for the multi-standard 2 Only supporting actions that are capable of performance. -
Page 6: Table 1: Front Panel Fc-4046 Video Multicoder® Features
17 7-segment Display 18 PANEL LOCK LED 19 PANEL LOCK Button 1 When the FC-4046 is set to the Automatic mode 2 PAL (B/D/G/H/I/N), NTSC(3.58), SECAM, PAL (M/Nc/60) and NTSC (4.48) 3 CV, YC, YUV, RGsB, or RGBS 4 YUV, RGsB, or RGBS... -
Page 7: Table 2: Rear Panel Fc-4046 Video Multicoder® Features
Table 2: Rear Panel FC-4046 Video MultiCoder® Features Feature CV INPUT BNC Connector YC INPUT 4p Connector G/Y INPUT BNC Connector B/B-Y INPUT BNC Connector R/R-Y INPUT BNC Connector SYNC INPUT BNC Connector CV OUTPUT BNC Connector YC OUTPUT 4p Connector... -
Page 8: Installing On A Rack
1 Always mount the machine in the rack before you attach any cables or connect the machine to the power. If you are using a Kramer rack adapter kit (for a machine that is not 19"), refer to the Rack Adapters user manual (download it at: http://www.kramerelectronics.com) for installation instructions... -
Page 9: Connecting The Fc-4046 Video Multicoder
4. Connect a PC or other RS-232 controller (optional), see section 6.1. 5. Set the dipswitches, see section 6.2. 1 Switch OFF the power on each device before connecting it to your FC-4046. After connecting your FC-4046, switch on its power and then switch on the power on each device... -
Page 10: Connecting A Pc
To connect a PC to the FC-4046, using the Null-modem adapter provided with the machine (recommended): Connect the RS-232 DB9 rear panel port on the FC-4046 unit to the Null-modem adapter and connect the Null-modem adapter with a 9 wire flat... -
Page 11: Dipswitch Settings
Connecting the FC-4046 Video MultiCoder® 6.2 Dipswitch Settings Configure the FC-4046 unit by setting the 8 dipswitches, as Figure 4 and Table 4 define: Figure 4: Dipswitches (Factory Default) Dipswitch Set as follows: PEDESTAL ON for pedestal; OFF for no pedestal (7.5 IRE offset selection for NTSC) -
Page 12: Operating Your Fc-4046 Video Multicoder
Locking the Front Panel To prevent changing the settings accidentally or tampering with the front panel, lock your FC-4046. Unlocking releases the protection mechanism. To lock the FC-4046: Press the PANEL LOCK button (for about 2 seconds) until the PANEL LOCK LED illuminates freezing the front panel controls. -
Page 13: Technical Specifications
2 Not available at the time of printing. See our Web site (go to this URL: http://www.kramerelectronics.com) for the latest updated information Technical Specifications of the FC-4046 Video MultiCoder® on BNC connector; YC: 1Vpp / 75 on BNC connector; YC: 1Vpp / 75 (Y);... - Page 14 EXCLUSION OF DAMAGES The liability of Kramer for any effective products is limited to the repair or replacement of the product at our option. Kramer shall not be liable for: Damage to other property caused by defects in this product, damages based upon inconvenience, loss of use of the product, loss of time, commercial loss;...
- Page 15 For the latest information on our products and a list of Kramer distributors, visit our Web site: www.kramerelectronics.com, where updates to this user manual may be found. We welcome your questions, comments and feedback. Safety Warning: Disconnect the unit from the power supply before opening/servicing.
Need help?
Do you have a question about the FC-4046 and is the answer not in the manual?
Questions and answers