Table of Contents
Advertisement
Quick Links
Advertisement
Table of Contents

Subscribe to Our Youtube Channel
Related Manuals for ICS HF37/1/LPT


Summary of Contents for ICS HF37/1/LPT
- Page 1 Tension meter dynarope HF37/1/LPT Operation and maintenance manual...
-
Page 2: Table Of Contents
SUMMARY DEFINITIONS ......................3 PICTOGRAMS USED IN THIS MANUAL ..............3 STANDARD CONTENT OF DELIVERY ..............3 INTRODUCTION ......................4 4.1. Description ........................4 4.2. Characteristics ........................ 4 4.3. Data bank HF 37/1/LPT ....................4 4.4. Specific calibration ......................5 PRESENTATION ...................... - Page 3 PRIORITY INSTRUCTIONS 1. Before installing and using this unit, to ensure safe, efficient use of the unit, be sure you have read and fully understood the information and instructions given in this manual. A copy of this manual should be made available to every operator. Extra copies of this manual can be supplied on request. 2.
-
Page 4: Definitions
1. DEFINITIONS In this manual, the following terms mean: « Product » : Equipment element or assembly defined on the cover page, delivered complete in its standard version, or as one of the various models described. « Installation » : Comprehensive set of operations required to place a complete product in a condition ready for commissioning (or connection to other components for commissioning), starting from the state in which the product has been delivered. -
Page 5: Introduction
4. INTRODUCTION 4.1. Description This tension meter dynarope HF 37/1 LPT is an electronic load cell that has been designed to measure the effort applied in a wire rope without having to dismantle the installation. The resulting signal generated by the sensor equipped with strain gauges is interpreted by a digital display controlled by a microprocessor. -
Page 6: Specific Calibration
Ref. Nominal Nominal Nominal Range Item Material Structure Calibration diameter (mm) diameter (/'') diameter (mil'') (daN) 0199 Steel 6 x 19 + AT 0,2362 60-600 0187 Steel 7 x 1 3/16 0,1874 40-400 0188 Steel 7 x 1 0,2500 50-500 0189 Steel 7 x 1... -
Page 7: Presentation
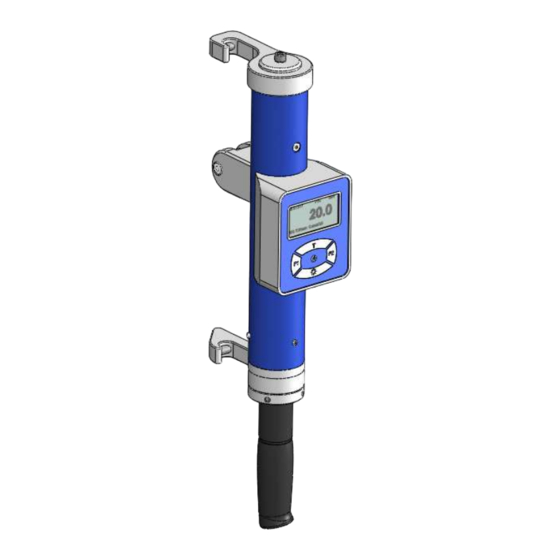
5. PRESENTATION 5.1. Tension meter HF 37/1/LPT Fixed hook Stainless steel wheel Main body 3 alkaline cells type "AA" Display Fake alkaline cell Fixation screws (3) to open the battery Support for alkaline cells cells compartment Tilting hook Protective wedging foam Rubber cover handle Positioning mark (on handle and main body) USB port... -
Page 8: Display Information And Keyboard Functions
5.2. Display information and keyboard functions A Battery level indication B Current temperature C GPS Status D Current unit F Current measure T Key • Press 3 sec = increase police of the current measure Graphic visualization of the measure between •... -
Page 9: To Carry A Measurement Out
6. TO CARRY A MEASUREMENT OUT System is zeroing at the time of initialization. Initialization (display "ON") must be carried out prior to fix the tension meter on the wire rope. It is also necessary to lay the sensor horizontally before starting. •... -
Page 10: Configuration Menu
7. CONFIGURATION MENU • Accede to the Menu by pressing the • Use the key board to scroll the menu (See § 5.2 ) ON/OFF PARAMETRES LANGUAGE AUTO OFF BACKLIGHT TIME DATE INFORMATION RESTORE RECORDS READ DELETE UNITS LOAD DIAMETER TEMPERATURE •... -
Page 11: Advanced Functions
• RECORDS READ Read the previous logged operations DELETE To clear the memory • UNITS LOAD UNITS N, daN, kN, kg, lbf, lbs "g" COEFFICIENT Modify the default parameter : 9,81 DIAMETER Available units: mm, decimal inches, fraction inches. TEMPARATURE Available units : C°... -
Page 12: Record
• Press F1 during 2 seconds to leave the average mode Note: the effort must be an actual value (neither "–MIN–" nor "–MAX–») otherwise, the display shows the error message “!” 8.2. Record To record the data at the end of a measurement process •... -
Page 13: Use
8.3.2 Use • Press F2 and select the cable -- Special -- (first line of the list) • Select an existing custom calibration o Select “Use” with key to use the custom calibration • The display shows the current effort with, at the bottom left of the screen, the reference of the selected custom calibration and the value of the calibration The effort will only be accurate at this calibration value. -
Page 14: Maintenance, Checking And Cleaning
9. MAINTENANCE, CHECKING AND CLEANING 9.1. Changing batteries • Turn the display OFF • Unscrew de fixation screws of the handle and extract the battery compartment block. • Pull out the batteries cover with the string attached to it. • Replace the 3 batteries and respect polarities (leave the fake cell in place) •... -
Page 15: Error Messages
10.2. Error messages Message Cause Solution Use the optional « LOADER » software to update Corrupted Error in the wire rope parameters. the data bank. signature Or, consult the manufacturer. Use the optional « LOADER » software to update Corrupted Error in the wire rope parameters.
Need help?
Do you have a question about the HF37/1/LPT and is the answer not in the manual?
Questions and answers