Advertisement
Quick Links
Advertisement

Subscribe to Our Youtube Channel
Related Manuals for NANLITE Forza 60C


Summary of Contents for NANLITE Forza 60C
- Page 1 Forza 60C USER MANUAL Guangdong NanGuang Photo&Video Systems Co., Ltd...
-
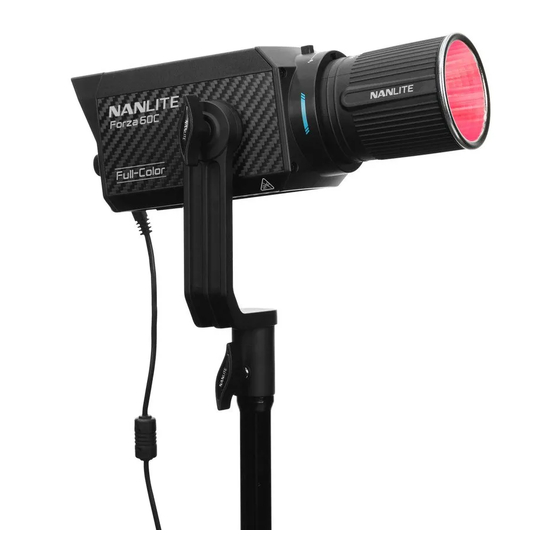
Page 2: Product Diagram
Forza 60C LED RGBLAC Spot Light Product Diagram Forza 60C Technical Data Rated power: 88W Input voltage/current: DC15V/6A Max AC100-240V 50/60Hz Color Temperature: 1800K-20000K CRI: Average 96 TLCI: Average 95... -
Page 3: Product Details
Product Details 1. Angle Fixing Knob 4. Lock Catch 6. LCD Display 11. Right Knob 7. Left Knob 12. MODE Button 8. DC Power Socket 9. Power Switch 2. L Shaped 5. Reflector Bracket 10. DMX In/Out 3. Bracket Fixing Knob 13. -
Page 4: Detailed Description
Detailed Description 1. Angle Fixing Knob: Allows for adjusting and fixing the direction of light in tilt. 2. L Shaped Bracket: Designed for connecting the light to the light stand and adjusting the direction of light. 3. Bracket Fixing Knob: For locking the light fixture and stand, and adjusting the horizontal direction of light. 4. - Page 5 Usage 1. Installation of the Reflector ① When installing the reflector, ensure its mounting points align with the slots on the light fixture. When the mounting points and slots are aligned, push the reflector in place and rotate it in the direction shown on the light until it clicks into place.
- Page 6 2. Installation of Bowens Mount Adapter ① When installing the adapter, ensure its mounting points align with the slots on the light fixture, rotate it according to the direction shown on the light until the adapter is put into place. ②...
- Page 7 ④ ⑤ When removing the accessory, push and hold the When removing the adapter, push and hold the release button on the adapter and rotate according lock catch on the fixture and rotate according to to the direction shown on the adapter until the the direction shown on the light until the adapter accessory is free to be removed from the adapter.
-
Page 8: Remote Control
Remote Control Forza 60C supports 2.4G remote control, DMX/RDM control, and includes a built-in bluetooth module as well. · ▲ Address code need to be pre-set for 2.4G remote control, DMX/RDM control solutions. 1. Address Code and DMX Mode Setting ①... - Page 9 ② DMX Mode Setting MENU MODE LANGUAGE: ENG Press the MODE button to enter the menu. MENU MENU DMX MODE: CCT & RGB 8 LANGUAGE: ENG DMX REDUCED CH: ON Rotate "Right knob" to DMX MODE. MENU MENU DMX MODE: CCT &...
- Page 10 ③ DMX Reduced Channel Setting MENU MODE LANGUAGE: ENG Press the MODE button to enter the menu. MENU MENU DMX MODE: CCT & RGB 8 LANGUAGE: ENG DMX REDUCED CH: Rotate "Right knob" to DMX REDUCED CH. MENU MENU DMX MODE: CCT & RGB 8 DMX MODE: CCT &...
- Page 11 2. DMX Control ① Connect the fixture to the DMX/RDM consoles via DMX cable as shown below: DMX IN DMX OUT GND 1 1 GND DATA- 2 2 DATA- DATA+ 3 3 DATA+ ② DMX Terminator ln DMX control mode, the DMX output of the last light fixture should be connected with a DMX terminator (not included).
- Page 12 Control the fixture via a console with RDM function. (For specific operation methods, please refer to the RDM console operation manual.) Note: The UID format of the fixture is as follows: 0008 XXXX XXXX Serial number 0207:Forza 60C Manufacturer: Nanguang...
- Page 13 4. 2.4G Remote Control Set the address of the 2.4G remote controller to be consistent with the light fixture, enabling the fixture to be · remotely controlled by 2.4G remote controller or by APP via the transmitter box. ① Note: 2.4G remote controller and transmitter box are sold separately.
- Page 14 Operating Instructions 1. Connection between fixture and power adapter. ① First ensure that the power switch of the fixture is in the "off " position. Now turn on the light, the LCD screen will display all the relevant information for the fixture. CH: 512 DIM: 100% CCT: 05600 G/M: 0...
- Page 15 2. CCT mode setting: Press MODE button to CCT mode, rotate "Right knob" to select from DIM, CCT and G/M, rotate "Left knob" to adjust the value of DIM, CCT and G/M. DIM range: 000%…100%, CCT range: 01800K…20000K, G/M range: -100…+100 MENU CH: 512 DIM: 100%...
- Page 16 3. HSI mode setting, press MODE button to HSI mode, rotate "Right knob" to select from DIM, HUE and SAT, rotate "Left knob" to adjust the value of DIM, HUE and SAT.DIM range: 000%…100%, HUE range: 000…360, SAT range: 000…100. CH: 512 CH: 512 DIM: 100%...
- Page 17 4. Effect mode setting, press MODE buttob to EFFECT, Forza 60C has built-in effects including Hue Loop, CCT Loop, INT Loop, CCT Flash, HUE Flash, CCT Pulse, Hue Pulse, Storm, Police Car, TV, Paparazzi, Candle/Fire, Disco, Bad Bulb, Firework, Explosion and Welding.
- Page 18 EFFECT CH: 512 EFFECT CH: 512 FX: HUE LOOP FX: HUE LOOP DIM: 100% DIM: 099% Rotate "Left knob" to set the corresponding parameters. ② CCT LOOP To set the CCT LOOP, rotate "Right knob" to select from DIM, cct and SPD (SPD range: 02S…30S), then rotate "Left knob"...
- Page 19 ③ INT LOOP To set the INT LOOP, rotate "Right knob" to select from DIM, SPD (range: 02S…30S) and CLR (includes CCT and HUE), then rotate "Left knob" to set the corresponding parameters. EFFECT CH: 512 EFFECT CH: 512 INT LOOP FX: INT LOOP DIM: 000% - 100% DIM: 000% - 100%...
- Page 20 EFFECT CH: 512 EFFECT CH: 512 FX: CCT FLASH FX: CCT FLASH DIM: 100% DIM: 099% Rotate "Left knob" to set the corresponding parameters. ⑤ HUE FLASH To set the HUE FLASH, rotate "Right knob" to select from DIM, HUE, SAT and INTVL (range: 0.1S…10.0S), then rotate "Left knob"...
- Page 21 ⑥ CCT PULSE To set the CCT PULSE, rotate "Right knob" to select from DIM, CCT, G/M and PULSES/M (range: 001…240), then rotate "Left knob" to set the corresponding parameters. EFFECT CH: 512 EFFECT CH: 512 CCT PULSE FX: CCT PULSE DIM: 000% - 100% DIM: 000% - 100% Rotate "Right knob"...
- Page 22 EFFECT CH: 512 EFFECT CH: 512 FX: HUE FLASH FX: HUE FLASH DIM: 100% DIM: 099% Rotate "Left knob" to set the corresponding parameters. ⑧ STORM To set the STORM, rotate "Right knob" to select from DIM, CCT and INTVL (range: 01S…60S), then rotate "Left knob"...
- Page 23 ⑨ POLICE CAR To set the POLICE CAR, rotate "Right knob" to select from DIM, CLR (B/RB/BW/RBW) and SPD (range: 001…100), then rotate "Left knob" to set the corresponding parameters. EFFECT CH: 512 EFFECT CH: 512 POLICE CAR FX: POLICE CAR DIM: 100% DIM: 100% Rotate "Right knob"...
- Page 24 EFFECT CH: 512 EFFECT CH: 512 FX: TV FX: TV DIM: 000% - 100% DIM: 001% - 100% Rotate "Left knob" to set the corresponding parameters. ⑪ PAPARAZZI To set the PAPARAZZI, rotate "Right knob" to select from DIM, CCT, G/M and SPD (range: 001…100), then rotate "Left knob"...
- Page 25 ⑫ CANDLE/FIRE To set the CANDLE/FIRE, rotate "Right knob" to select from DIM, CCT, G/M and SPD (range: 001…100), then rotate "Left knob" to set the corresponding parameters. EFFECT CH: 512 EFFECT CH: 512 CANDLE/FIRE FX: CANDLE/FIRE DIM: 000% - 100% DIM: 000% - 100% Rotate "Right knob"...
- Page 26 EFFECT CH: 512 EFFECT CH: 512 FX: DISCO FX: DISCO DIM: 100% DIM: 099% Rotate "Left knob" to set the corresponding parameters. ⑭ BAD BULB To set the BAD BULB, rotate "Right knob" to select from DIM, CCT, G/M and SPD (range: 001…100), then rotate "Left knob"...
- Page 27 ⑮ FIREWORK To set the FIREWORK, rotate "Right knob" to select from DIM, COLOR (3、6、9、12、15、18、21、24), SPD (range: 001…100) and DECAY (range: 001…100), then rotate "Left knob" to set the corresponding parameters. EFFECT CH: 512 EFFECT CH: 512 FIREWORK FX: FIREWORK DIM: 100% DIM: 100% Rotate "Right knob"...
- Page 28 EFFECT CH: 512 EFFECT CH: 512 FX: CANDLE/FIRE FX: CANDLE/FIRE DIM: 000% - 100% DIM: 001% - 100% Rotate "Left knob" to set the corresponding parameters. ⑰ WELDING To set the WELDING, rotate "Right knob" to select from DIM, CCT, G/M, SPD (range: 001…100) and PAUSE (ON/OFF), then rotate "Left knob"...
- Page 29 5.MENU MENU MODE LANGUAGE: ENG Press MODE button to menu. MENU MENU CH:512 LANGUAGE: ENG LANGUAGE: Rotate "Right knob" to select from CH, LANGUAGE, FAN, BLUETOOTH, DMX MODE, DMX REDUCED CH, WIRELESS PROTOCOL, FIRMWARE UPDATE and VERSION. ① For channel setting, please refer to P7 for more operation details. ②...
- Page 30 ③ FAN setting MENU MENU FAN: LANGUAGE: ENG BT: RESET Rotate "Right knob" to FAN. MENU MENU FAN: FAN: BT: RESET BT: RESET Rotate "Left knob" to select ON or OFF. Note: (1) The maximum output is 100% when the fan is turned on. (2) The maximum output is 25% when the fan is turned off.
- Page 31 MENU BT RESET FAN: OFF BACK RESET RESET Rotate "Left knob" to enter the interface of Bluetooth reset. BT RESET BT RESET BACK RESET BACK RESET Rotate "Right knob" to select RESET. MENU BT RESET MODE BACK RESET LANGUAGE: ENG Press MODE button to confirm reset, and it will automatically return to the menu after Bluetooth reset.
- Page 32 ⑧ FIRMWARE UPDATE Insert the USB flash drive with new firmware into the USB port of the fixture. MENU MENU UPDATE:UPDATE LANGUAGE: ENG VERSION:V1.02.08 In the menu, rotate "Right knob" to FW UPDATE. MENU FOUND FIRMWARE _V1.02.08 UPDATE:UPDATE BACK UPDATE VERSION:V1.02.08 Rotate "Right knob"...
- Page 33 ⑨ VERSION MENU MENU VERSION: V1.02.08 LANGUAGE: ENG Rotate "Right knob" to VERSION to check the current version. 6. Lock or Unlock Settings: long press the "Right knob" to lock the light status. The current light status cannot be changed by pressing the button or rotating the knob. Long press the "Right knob" again to release the lock status. EFFECT CH: 512 EFFECT...
-
Page 34: Safety Precautions
Safety Precautions 1. Please open the package to check for possible damage caused in transit, please do not use if damage is found and contact place of purchase or manufacturer as soon as possible. 2. Do not use a power cord with damaged insulation, do not unplug too hard or drag the power cord directly. 3. - Page 35 What's in th box? Please kindly check. Forza 60C ×1 Power Adapter ×1 Power Cable 3M ×1 RF-FMM-45-S Reflector ×1 RF-FMM-45-S AS-CAP-FMM BH-FZ60 AS-BA-FMM Carrying Bag ×1 Battery Grip ×1 Bowens mount adapter ×1 COB Protective Cap ×1 User Manual × 1...
- Page 36 If the failure is not resolved after troubleshooting, please contact place of purchase. This manual and all stats within it were produced under controlled conditions, and are accurate at time of print. Any future changes to design/technical data can be found at www.nanlite.com.
- Page 37 Version: V1 2022-04-09 +86-754-85751187 +86-754-85300887 service@nanlite.com Zhanglin,324,Dongli Chenghai Shantou Guangdong China www.nanlite.com...
Need help?
Do you have a question about the Forza 60C and is the answer not in the manual?
Questions and answers