
Subscribe to Our Youtube Channel
Related Manuals for Beijer Electronics korenix JetWave 3220v3 Series


Summary of Contents for Beijer Electronics korenix JetWave 3220v3 Series
- Page 1 JetWave 3220v3/3420v3 Series Industrial 802.11ac Multi-Radio Wireless AP/ 4G Gateway / LTE Gateway User Manual V1.0 Jan, 2020...
- Page 2 JetWave 3220v3/3420v3 Series User Manual Copyright Copyright © 2014 all rights reserved. No part of this publication may be reproduced, adapted, stored in a retrieval system, translated into any language, or transmitted in any form or by any means without the written permission of the supplier.
- Page 3 JetWave 3220v3/3420v3 Series User Manual Federal Communication Commission Interference Statement This equipment has been tested and found to comply with the limits for a Class B digital device, pursuant to Part 15 of the FCC Rules. These limits are designed to provide reasonable protection against harmful interference in a residential installation.
- Page 4 JetWave 3220v3/3420v3 Series User Manual FCC Radiation Exposure Statement: This equipment complies with FCC radiation exposure limits set forth for an uncontrolled environment. To avoid the possibility of exceeding radio frequency exposure limits, you shall beep a distance of at least 100cm between you and the antenna of the installed equipment.
-
Page 5: Table Of Contents
JetWave 3220v3/3420v3 Series User Manual Content Chapter 1 Introduction ......................... 2 2.1.1 Introduction .......................... 2 2.1.2 JetWave 3220v3 Series Appearance ................... 3 2.1.3 JetWave 3220v3 Major Features ..................4 2.1.4 JetWave 3420v3 Major Features ..................6 2.1.5 Product Package ........................7 Chapter 2 Hardware Installation ...................... - Page 6 JetWave 3220v3/3420v3 Series User Manual Mounting ..........................24 2.6.1 Mounting the AP ......................24 2.6.2 Mounting the AP with Celling-mounting Kit ..............26 2.6.3 Mounting the default antenna on unit ................28 2.6.4 Mounting the default antenna for vibration environment ..........29 2.6.5 Mounting the SMA-Type external antenna ..............
- Page 7 JetWave 3220v3/3420v3 Series User Manual 4.2.5 Relay Settings ........................ 54 4.2.6 Serial Settings ........................ 55 4.2.7 Traffic Shaping........................ 56 4.2.8 Outbound Firewall ......................56 4.2.9 Inbound Firewall ......................58 4.2.10 NAT Settings ........................58 Wireless ..........................62 4.2.1 Wireless Basic Setting (JetWave 3220v3) ..............62 4.2.2 Wireless Security Setting ....................
- Page 8 JetWave 3220v3/3420v3 Series User Manual 4.7.2 Site Survey ........................95 4.7.3 Ping Watchdog ....................... 96 4.7.4 Ping ..........................97 Main Entry ..........................98 4.8.1 Save ..........................98 4.8.2 Logout ..........................98 4.8.3 Reboot ..........................98 VPN............................99 4.9.1 Status ..........................99 4.9.2 OpenVPN Client ......................
- Page 9 JetWave 3220v3/3420v3 Series User Manual General Question ......................... 124 6.1.1 How to know the MAC address of the AP/Gateway? ........... 124 6.1.2 What if I would like to reset the unit to default settings? ..........124 6.1.3 What if I can not access the Web-based management interface? ....... 124 Wireless/Cellular ........................
- Page 10 JetWave 3220v3/3420v3 Series User Manual Chapter 1 Introduction Page 1...
-
Page 11: Chapter 1 Introduction
2.1.1 Introduction The user manual is applied to Korenix JetWave 3220v3 Series Industrial IEEE 802.11ac 2.4G/5G MIMO Wireless AP/Bridge, etWave 3420v3 Series Industrial Ethernet/802.11ac WIFI to LTE IP Gateway. The 2 product series equips with the same 802.11ac WIFI technology, the same hardware/software platform and the same installation consideration for indoor or outdoor field box. -
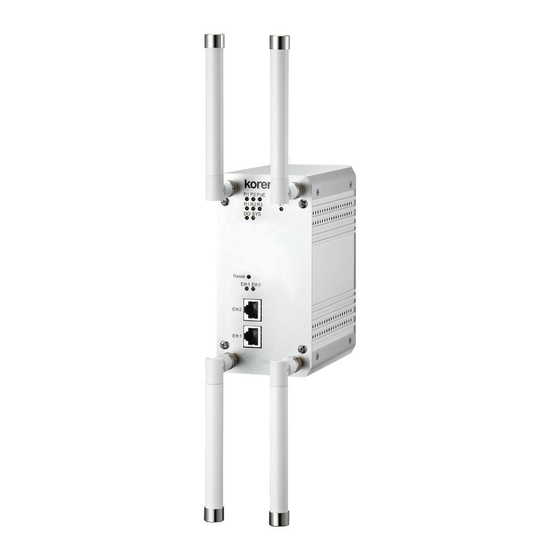
Page 12: Jetwave 3220V3 Series Appearance
JetWave 3220v3/3420v3 Series User Manual 2.1.2 JetWave 3220v3 Series Appearance Figure - JetWave 3220v3 Appearance Figure - JetWave 3220v3-M12 Appearance Page 3... -
Page 13: Jetwave 3220V3 Major Features
JetWave 3220v3/3420v3 Series User Manual 2.1.3 JetWave 3220v3 Major Features JetWave 3220v3: Industrial Dual 802.11ac 2T2R WIFI AP with 2x Gigabit LAN JetWave 3220v3-M12: Industrial Dual 802.11ac 2T2R WIFI AP with 2x Gigabit LAN M12 Connector 802.11ac 2x2 MIMO doubles data rate, 300Mbps Dual 802.11ac Radio Design LAN/WIFI Bridge/Routing Dual WIFI Redundancy... - Page 14 JetWave 3220v3/3420v3 Series User Manual JetWave 3420v3 Appearance Page 5...
-
Page 15: Jetwave 3420V3 Major Features
JetWave 3220v3/3420v3 Series User Manual 2.1.4 JetWave 3420v3 Major Features Models: JetWave 3420v3-LTE-E: Industrial 4G LTE + 802.11ac WIFI IP Gateway, Band 20,8,3,7 JetWave 3420v3-LTE-U: Industrial 4G LTE + 802.11ac WIFI IP Gateway, Band 17,5,4,2 Features: Connect Ethernet, WLAN & Serial device over 3G or LTE network Next Generation Long Term Evolution (LTE) technology, 2x2 DL-MIMO, max. -
Page 16: Product Package
JetWave 3220v3/3420v3 Series User Manual 2.1.5 Product Package The product package you have received should contain the following items. If any of them are not included or damaged, please contact your local vendor for support. Package: JetWave 3220v3/3220v3-M12/JetWave 3420v3 Unit (depends on the model you purchase) Pre-installed Embedded WIFI/LTE Module (depends on the model you purchase) Default Antenna (JetWave 3220: 4, JetWave 3420: 4) Din-Rail Mounting Kit... - Page 17 JetWave 3220v3/3420v3 Series User Manual Chapter 2 Hardware Installation Page 8...
-
Page 18: Chapter 2 Hardware Installation
JetWave 3220v3/3420v3 Series User Manual Chapter 2 Hardware Installation This chapter describes safety precautions and product information before installing JetWave 3200 Series. 2.1 Professional Installation Required Please seek assistance from a professional installer for field installation or professional IT Engineer for indoor installation. These engineers must be well trained in the RF installation and knowledgeable for the Wireless AP setup and field plan. -
Page 19: Power Installation
JetWave 3220v3/3420v3 Series User Manual 2.2 Power Installation The system provides both DC power input and PoE power input. DC Input There is one 4-pin terminal block within the package for screwing the DC wires. It is a good practice to turn off the system power, and to unplug power terminal block before making wire connections. -
Page 20: Connect Both Dc Input And Poe
JetWave 3220v3/3420v3 Series User Manual power input source. Thus Korenix can provide better quality assurance for your network. Note 2: Please select Industrial IEEE802.3at (PoE+) compliant PoE Injector or Switch as the power input source, it can deliver up to 30W power source. This is in case the system has more power once the power on inrush current is higher than 15W. -
Page 21: I/O Configuration
JetWave 3220v3/3420v3 Series User Manual 2.3 I/O Configuration 2.3.1 Wiring your Ethernet Port There are two Gigabit Ethernet ports. The 2 ports are standard RJ-45 form factor. They can support 10Base-TX, 100Base-TX and 1000Base-T. The 10/100Base-TX also support both full or half duplex mode. -
Page 22: Serial Port
JetWave 3220v3/3420v3 Series User Manual 2.3.3 Serial Port There is one RS232 serial port for serial communication on JetWave 3420v3. The serial port is designed for Serial over WIFI/Cellular communication. The port supports RS232/422/485 3-in-1, and up to 460.8kbps baud rate. The software supports TCP/UDP connection. Below figure shows the pin assignment of the serial port. -
Page 23: Sim Socket
JetWave 3220v3/3420v3 Series User Manual 2.3.4 SIM Socket The JetWave 3420v3 provides one external SIM (Subscriber Identity Module) socket to store the LTE SIM card. Loosen the screw and then you can plug in the SIM card. The supported SIM card is standard SIM card. If your ISP provide you Micro-SIM or Nano-SIM, please find the SIM card format carry board for the SIM socket. -
Page 24: Digital Input
JetWave 3220v3/3420v3 Series User Manual 2.3.5 Digital Input The system provides 1 digital input in the bottom side of the device. It allows users to connect the termination units’ digital output and manage/monitor the status of the connected unit. The Digital Input pin can be pulled high or low; thus the connected equipment can actively drive these pins high or low. -
Page 25: Ground
JetWave 3220v3/3420v3 Series User Manual 2.3.8 Ground To ensure the system will not be damaged by noise or any electrical shock, we suggest you to make exact connection with the Earth Ground. There is one earth ground screw on the bottom side of the device. -
Page 26: Wifi Antenna
JetWave 3220v3/3420v3 Series User Manual 2.4 WIFI Antenna The JetWave 3220v3 series WIFI radio supports IEEE 802.11ac 2T2R (2 Transmit 2 Receive) Multiple-input Multiple-output (shot of MIMO) technology, is the use of dual polarization antenna to double the communication performance than traditional 1T1R SISO (Single-in Single-out). MIMO &... - Page 27 JetWave 3220v3/3420v3 Series User Manual direction, but with different polarization. The result is only antennas with the same polarization will be able to communicate with each other, this is important especially in point-to-pint wireless communication. There are two major polarizations, Vertical and Horizontal. The antenna may support either one, you can choose Vertical or Horizontal polarization for the antenna installation.
-
Page 28: Antenna Socket
JetWave 3220v3/3420v3 Series User Manual whether this is Dual Polarization or not. Connect the 2 end of the antenna to the antenna socket of the Access Point. The below figure shows the dual polarization transmitting between the 2 MIMO antennas: Antenna Socket The JetWave 3200 Series supports IEEE 802.11ac 2T2R MIMO technology. - Page 29 JetWave 3220v3/3420v3 Series User Manual Antenna No. JetWave 3220 JetWave 3420 WIFI 1-1 WIFI 1-1 WIFI 1-2 WIFI 1-2 WIFI 2-1 LTE Main WIFI 2-2 LTE Aux Page 20...
-
Page 30: Antenna Installation
JetWave 3220v3/3420v3 Series User Manual Antenna Installation The figure shows the direction to lock the antenna, it is clockwise direction. There is Nylock pasted on the antenna to avoid antenna loosen in vibration environment, please don’t often lock/un-lock the antenna, otherwise, the Nylock paste will be damaged. -
Page 31: Default Wifi Antenna Specification
JetWave 3220v3/3420v3 Series User Manual Default WIFI Antenna Specification: The following information apply to the Default WIFI Antenna. Material of the antenna: The body material is Brass, Insulator is Teflon. Frequency Range: 0~6GHz Impedance: 50ohm VSWR: ≦1.5 Gain: The default WIFI antenna support both 2.4G and 5G band, its gain value is 2.6dbi for 2.4G band, 3.5dBi for 5G band. -
Page 32: Led Indicator
JetWave 3220v3/3420v3 Series User Manual 2.5 LED Indicator The following table indicates the LED of your device. Indication Indication Power 1 Status Status of the Radio Number 2 Green ON = System ON Green ON = Radio 2 is activated *Note Power 2 Status Green ON = System ON... -
Page 33: Mounting
JetWave 3220v3/3420v3 Series User Manual 2.6 Mounting 2.6.1 Mounting the AP The JetWave 3200 series supports Din-Rail mounting. The Din-Rail mounting kit is Din 35 compliant and pre-installed in the back of the AP. The JetWave 3200 series also provide celling-mount plate as optional accessory. The celling- mount plate is available for celling-mount or wall-mount installation, for example the vehicle, railway and warehouse. - Page 34 JetWave 3220v3/3420v3 Series User Manual Celling-mounting Plate Dimension: Page 25...
-
Page 35: Mounting The Ap With Celling-Mounting Kit
JetWave 3220v3/3420v3 Series User Manual 2.6.2 Mounting the AP with Celling-mounting Kit To mount the AP with celling-mounting plate, you must unlock 4 screws on the front/back of the unit first. Use the new attached screws to lock the device. Then you have some other optional screws for different kinds of celling-mounting. - Page 36 JetWave 3220v3/3420v3 Series User Manual installation by using the celling mount kit. This is applied to the indoor environment. 4. In some cases, you may need to install the celling mount plate first then lock the AP/Gateway to the celling-mount plate. Page 27...
-
Page 37: Mounting The Default Antenna On Unit
JetWave 3220v3/3420v3 Series User Manual 2.6.3 Mounting the default antenna on unit There are dual band antennas for the JetWave3200 Series in the product package. You can install the default antenna to the SMA socket on the front. Each radio supports 2T2R MIMO technology, you must install 2 antennas for one radio. -
Page 38: Mounting The Default Antenna For Vibration Environment
JetWave 3220v3/3420v3 Series User Manual 2.6.4 Mounting the default antenna for vibration environment You can purchase our external antenna mount kit accessories. There are antenna mounting L plates and extended RF cable package to ease such mounting installation need. The antenna mounting L plate is available for both N-Type and SMA type antenna. -
Page 39: Below Figure Shows The Optional External Antenna Mounting Kit
JetWave 3220v3/3420v3 Series User Manual 2.6.7 Below figure shows the optional External Antenna Mounting Kit Wall-mount Antenna L Plate Kits: This plate supports SMA or N-Type connector, you can wall- mount it with the attached screws. External Radio Cable: The cable is SMA Male Reverse to SMA Female Reverse RF cable. Wall-mount Antenna L Plate Dimension Page 30... -
Page 40: Using The External Antenna
JetWave 3220v3/3420v3 Series User Manual 2.7 Using the External Antenna Consult your system integrator or our technical support engineer to choose the suitable external antenna with SMA-type or N-Type connector for your application. Different antenna supports different bands, polarization and different range of coverage. Antenna Socket of the AP/Gateway: Front Left: Radio 1 (WLAN 1). - Page 41 JetWave 3220v3/3420v3 Series User Manual Lightning Arrestor: While you install the external antenna in outside area, the Arrestor is a must accessory to avoid the environment attack through the antenna. The arrestor protects the insulation and conductors of the system from the damaging effects of lightning. For example the JWA-Arrestor-5803 is 0- 6G Arrestor for N-Type Antenna.
- Page 42 JetWave 3220v3/3420v3 Series User Manual Chapter 3 Prepare for Management Page 33...
-
Page 43: Chapter 3 Prepare For Management
JetWave 3220v3/3420v3 Series User Manual Chapter 3 Prepare for Management The JetWave 3220v3/3420v3 Series supports Web GUI Configuration, Simple Network Management Protocol (SNMP), Telnet and Diagnostic Command Line Interface for management and Window Utility helps you discover the device cross network, basic IP setting, firmware management…etc. This chapter describes the preparation for management. - Page 44 JetWave 3220v3/3420v3 Series User Manual Subnet Mask 255.255.255.0 Gateway 0.0.0.0 Primary DNS Server 0.0.0.0 Secondary DNS Server 0.0.0.0 IP Address 192.168.10.1 Subnet Mask 255.255.255.0 DHCP Server Enabled DHCP IP Range Start 192.168.10.101 IP Setup – Eth 2 (LAN) DHCP IP Range End 192.168.10.150 DHCP Subnet Mask 255.255.255.0...
-
Page 45: System Requirements
JetWave 3220v3/3420v3 Series User Manual It is Important to change all the default settings of the Wireless AP, includes the User Name, Password, Default IP Address, Default SSID, SNMP Community Name and configure Wireless Security to secure your network. 3.2 System Requirements Before configuration, please make sure your system meets the following requirements: A computer coupled with 10/100/1000 Base-T(X) adapter;... -
Page 46: Fail To Login The Web Gui
JetWave 3220v3/3420v3 Series User Manual Figure - Main Page Note: The username and password are case-sensitive! 3.4 Fail to login the Web GUI If you failed to login the web GUI, there are something you can do for troubleshooting. 1. Korenix web management page is developed by JAVA. It allows you to use a standard web-browser such as Microsoft Internet Explorer, or Mozila, to configure and interrogate the switch from anywhere on the network. - Page 47 JetWave 3220v3/3420v3 Series User Manual 3-pin Diagnostic Console: There is one 3-pin Diagnostic console for out of band management. If you want to access the AP through the console, please assembly the console cable or purchase from our sales first. Please attach RS-232 DB-9 connector to your PC COM port, connect another end to the 3-pin socket Console port located in the bottom side.
- Page 48 JetWave 3220v3/3420v3 Series User Manual 2. Choose the “Telnet” protocol. Then click on “Open” to start the Telnet session console. 3. If you want remote access the CLI securely, choose the “SSH” protocol. Then click on “Open” to start the SSH session console. 4.
-
Page 49: Discovery Utility - Korenix View Utility
JetWave 3220v3/3420v3 Series User Manual 3.6 Discovery Utility – Korenix View Utility Please download the latest Korenix View Utility from Korenix Web Support page. The PC with Korenix View Utility can discover the AP/Gateway cross the IP subnet. But, if you want to do further configuration, the PC must be located in the same subnet with your AP/Gateway. - Page 50 JetWave 3220v3/3420v3 Series User Manual Chapter 4 Web GUI Configuration Page 41...
-
Page 51: Chapter 4 Web Gui Configuration
JetWave 3220v3/3420v3 Series User Manual Chapter 4 Web GUI Configuration This chapter describes the Web GUI for Software Configuration. 4.1 Status The Status feature set includes Information, Association List, Network Flow, Bridge Table, ARP Table and DHCP Client List. The information allows you to see the information of the device. 4.1.1 Quick Setup and Overview Quick Setup page can is design for simple use case. - Page 52 JetWave 3220v3/3420v3 Series User Manual Page 43...
- Page 53 JetWave 3220v3/3420v3 Series User Manual Overview(Information) This page shows the current status and some basic setting of the device. Page 44...
- Page 54 JetWave 3220v3/3420v3 Series User Manual System Information: The Model Name, Device Name, Country/Region you selected and Firmware version number. LAN Setting: It shows the IP Address, Subnet Mask, Gateway IP Address and MAC Address of the LAN interface. Wireless 1 Settings: It shows the Operation Mode, Wireless Mode, SSID, Encryption, ACK Timeout, WMM State, Noise Floor of the Wireless 1.
-
Page 55: Network Flow
JetWave 3220v3/3420v3 Series User Manual 4.1.2 Network Flow This page shows the packet counters for transmission and reception regarding the wireless interface(s). 4.1.3 Bridge Table This table shows bridge table. MAC Address: The MAC address of the connected device. Interface: This field shows the interface which learnt the MAC Address. Aging Timer(s): The aging time of this entry. -
Page 56: Association List
JetWave 3220v3/3420v3 Series User Manual client device. IP Address: The assigned IP address of the connected DHCP client device. MAC Address: The MAC Address of the connected DHCP client device. Time Expired(s): The DHCP expire timer connected DHCP client device. Time unit is second. The number can be changed in DHCP Server Lease Time setting. - Page 57 JetWave 3220v3/3420v3 Series User Manual Noise Floor: The Noise Floor of the associated device. Connection Time: The time when the device connected to the AP. Last IP: The last IP address it had. Action – Kick: This command allows you force Kick the associated client. Refresh: The item helps you refresh the table manually.
-
Page 58: System
JetWave 3220v3/3420v3 Series User Manual 4.2 System For users who use the JetWave 3200 series for the first time, it is recommended that you begin configuration from the “System” feature set pages shown below: In System pages, there are some configuration pages for the system settings. These setups are introduced in below pages. -
Page 59: Ip Settings
JetWave 3220v3/3420v3 Series User Manual the same network. In JetWave 3420 default setting, the LAN/WLAN to 3G connection is working under Router mode as well. Ethernet 1 Data Rate: Configure the Speed/Duplex of the port Eth 1. The default value, Auto means Auto-Negotiation. - Page 60 JetWave 3220v3/3420v3 Series User Manual interfaces. Here you may change the setting for IP address, subnet mask, Default Gateway, DNS, Static IP or DHCP…etc. WAN Settings: WAN Access Type: Static IP IP Address: Once Static IP is selected, the IP Address field allows you to set the device’s WAN IP address manually.
- Page 61 JetWave 3220v3/3420v3 Series User Manual IP Address: The IP Address field allows you to set the device’s WAN IP address manually. Subnet Mask: This is the subnet mask address for your WAN interface. Set the IP subnet mask manually. DHCP Server: Enabled / Disabled DHCP Server Setting: In Router mode, you can enable DHCP Server to assign IP address to DHCP clients.
-
Page 62: Radius Settings
JetWave 3220v3/3420v3 Series User Manual check “Enable DHCP Relay” to redirect the DHCP request to the DHCP Server. Assign the Server IP address in “DHCP Server IP” field to activate the function. 4.2.3 RADIUS Settings Use this page to configure the RADIUS Server Setting. RADIUS (Remote Authentication Dial-In User Service) is a server for remote user authentication and accounting;... -
Page 63: Relay Settings
JetWave 3220v3/3420v3 Series User Manual Current Time: You can manually type the current time or get the time from you PC. Click “Get PC time”, the current time will be updated according to your PC’s time. Time Zone Select: Select the time zone of your country from the dropdown list. NTP: You can select “Enable NTP client update”... -
Page 64: Serial Settings
JetWave 3220v3/3420v3 Series User Manual Link Failure: You can bind the Ethernet port failure event with Relay output. Select the Port 1, 2 or 1+2 as the power failure event. Press “Apply” to activate the settings. 4.2.6 Serial Settings Use this page to configure the Serial Settings. The JetWave 3420 series is equipped with one RS-232/422/485 3-in-1 Serial port. -
Page 65: Traffic Shaping
JetWave 3220v3/3420v3 Series User Manual will queue the transmit data before time interval expired. The time unit is millisecond. Service mode: You can select TCP Server, TCP Client, and UDP listening. Serial to Ethernet/ Ethernet to Serial Delimiter: Configure the Delimiter and Flush time (a timeout that the delimiter not matched) setting for Serial to Ethernet or Ethernet to Serial transmission. - Page 66 JetWave 3220v3/3420v3 Series User Manual “Dest Port Filtering”: Destination Ports Filtering from the LAN to WAN through the gateway. • Source IP Filtering Entries in this table are used to restrict certain types of data packets from your local network to internet through the Gateway.
-
Page 67: Inbound Firewall
JetWave 3220v3/3420v3 Series User Manual local network. Select “Enable Destination Port Filtering”, type the “Local Port Number” and “Comment” (note for the entry) and then press “Apply” to activate the settings. 4.2.9 Inbound Firewall Inbound Filtering is used to restrict any access from the Internet to the gateway. Only the applied entries in the Remote Management Exception list can access the gateway. - Page 68 JetWave 3220v3/3420v3 Series User Manual address information in IP packet headers while they are in transit across a Gateway/Router for the purpose of remapping one IP address space into another. The simple type of NAT provides one to one translation of IP address. It can be used to interconnect two IP networks, normally one network is for Local Area Network and the other network is for Wide Area Network/Internet.
- Page 69 JetWave 3220v3/3420v3 Series User Manual to these port. Comment: Add information of the entry. Press “Apply” to activate the settings. After applied, there is one popup screen shows you already configured new entry. And then you can see the entries you configure in below. •...
- Page 70 JetWave 3220v3/3420v3 Series User Manual Randomize NAT source port mapping. When enabled, port mapping is randomized. Random Port: Enable/Disable NAT random port function. Click the Apply button to apply the configuration changes. Page 61...
-
Page 71: Wireless
JetWave 3220v3/3420v3 Series User Manual 4.3 Wireless The “Wireless” feature set pages allow users to configure the Wireless LAN configuration. The Wireless means the WIFI radio of the device. JetWave 3220 supports dual WIFI radios, you must configure Wireless 1 and Wireless 2. JetWave 3420 support one WIFI and one 4G radio, you must configure WIFI features here and go to 3G/4G LTE page to configure other settings. - Page 72 JetWave 3220v3/3420v3 Series User Manual Wireless Mode: The below operating modes are available on this AP/Gateway. AP: The AP works as the Access Point mode, it establishes a wireless coverage and receives connectivity from other wireless clients devices, the clients can search and connect to it. In Wireless AP mode, you can configure the Wireless Network Name (SSID), Enable/Disable Broadcast SSID, select the 802.11 mode, HT Protect Enabled/Disabled, Frequency/Channel, Maximum Output Power (per chain), Data Rate and Extension Channel Protection.
- Page 73 JetWave 3220v3/3420v3 Series User Manual and find the AP/Gateway, so that malicious attack by some illegal clients could be avoided. 802.11 Mode: The AP/Gateway can communicate with several wireless starndards. You can select appropriate wireless mode. Different band has different settings as below: 802.11A Only 802.11B Only 802.11G Only...
- Page 74 JetWave 3220v3/3420v3 Series User Manual the wider the signal can cover, but the power consumption will be greater accordingly. Usually "Full" with proper antenna is preferred. Date Rate: Usually "Auto" is preferred. Under this rate, the AP/Gateway will automatically select the highest available rate to transmit.
- Page 75 JetWave 3220v3/3420v3 Series User Manual Select Site Survey to select the target AP. In below figure, you can find the SSID: wds3200 is selected. Press “Selected” to activate the new setting, this Site Survey popup screen will then disappear. And the SSID in Wireless Basic Setting will be updated.
- Page 76 JetWave 3220v3/3420v3 Series User Manual WDS-AP: WDS mode is usually implemented in Point to Point (P2P) connection. When configuring P2P, one end should be WDS-AP and the other end should be WDS-Client. WDS- AP can also provide network access to general clients to act as an AP repeater. WDS-Client: Select the WDS-Client mode.
- Page 77 JetWave 3220v3/3420v3 Series User Manual and find the AP/Gateway, so that malicious attack by some illegal clients could be avoided. 802.11 Mode: The AP/Gateway can communicate with wireless devices of 802.11ac/a/g. You can also select 802.11A Only, 802.11G only, 801.11A/N and 802.11 G/N and make it work under an appropriate wireless mode automatically.
- Page 78 JetWave 3220v3/3420v3 Series User Manual output power is, the wider the signal can cover, but the power consumption will be greater accordingly. Usually “Full” with proper antenna is preferred. Half: 1/2 of Full (Full -3dBm), Quarter: 1/4 of Full (Full - 6dBm), Eighth: 1/8 of Full (Full –9dBm).
-
Page 79: Wireless Security Setting
JetWave 3220v3/3420v3 Series User Manual 4.2.2 Wireless Security Setting The page allows you configure the Virtual AP’s basic setting and Security Settings. Basic Setting Profile Name: The profile name of the settings. Wireless Network Name(SSID): This is the same SSID of the AP/Gateway. Broadcast SSID: Normally, the SSID is broadcast and all the clients can search the SSID. - Page 80 JetWave 3220v3/3420v3 Series User Manual among associated wireless clients. WMM Support: WMM (Wi-Fi Multimedia) is a subset of 802.11e. It allows wireless communication to define a priority limit on the basis of data type, thus those time-sensitive data, like video/audio data, may own a higher priority than common one.
- Page 81 JetWave 3220v3/3420v3 Series User Manual 152 bits WEP: It is made up of 32 hexadecimal numbers. TKIP: Temporal Key Integrity Protocol, which is a kind of dynamic encryption, is co-used with WPA- PSK. AES: Advanced Encryption Standard, it is usually co-used with WPA2-PSK. Eap Type: for WPA/WPA2 with Radius.
-
Page 82: Wireless Advanced Setting
JetWave 3220v3/3420v3 Series User Manual 4.2.3 Wireless Advanced Setting The page allows you to configure advanced wireless setting. These settings are only for more technically advanced users who have a sufficient knowledge about wireless LAN. Some of these settings should not be changed unless you know what effect the changes will take. And some of the modification on them may negatively impact the performance of your wireless network. - Page 83 JetWave 3220v3/3420v3 Series User Manual it at its default of 2346 is recommended. Beacon Interval: Specify the frequency interval to broadcast packets. Enter a value between 20 and 1024. The default value is 100ms. DTIM Interval: DTIM, which stands for Delivery Traffic Indication Message, is contained in the data packets.
- Page 84 JetWave 3220v3/3420v3 Series User Manual helps to get better response time and performance. Antenna Number: The setting allows you configure One for 1T1R SISO or Two for 2T2R MIMO. The default value is Two. While you change it to one, please connect the antenna to the first antenna of the radio, for example the Antenna 1-1 or 2-1.
- Page 85 JetWave 3220v3/3420v3 Series User Manual AP is lower than the value, the AP will be switched. Scan Channels:.This is the setting to configure what is the target scan channels. Ping Watchdog: Under Wireless Client mode, the item support to create a ping connection with the specific ip address.
-
Page 86: Wireless Access Control
JetWave 3220v3/3420v3 Series User Manual Roaming Min Diff: The Absolute value of roaming RSSI value. The default value is 3(dbm). Roaming Sensitivity: The different level will decide the roaming scan period. Scan Channels: When Roaming is enabled. The client will scan the APs on scan channels 4.2.4 Wireless Access Control This page allows you configure the Wireless Access Control list. -
Page 87: Cellular
JetWave 3220v3/3420v3 Series User Manual 4.3 4G/Cellular The “4G/Cellular” feature set pages allow users to see the 4G/LTE Status, configure the Basic LTE Setting, SIM Security and download the Debug message. The 4G means the 2 radio of the JetWave 3420 device. 4.3.1 Status This page shows the current status and some basic settings of the device. - Page 88 JetWave 3220v3/3420v3 Series User Manual -113 dBm or less (Low) -51 dBm or greater (Excellent) Not known or not detectable SIM Status: SIM OK: The SIM card is okay to use. SIM not inserted: The SIM card is not inserted. SIM PIN Locked: The SIM card is locked due to PIN error.
-
Page 89: Basic Settings
JetWave 3220v3/3420v3 Series User Manual 4.3.2 Basic Settings Normally, you can connect the LTE Gateway to the ISP cellular network without configuring LTE setting. However, in some countries, before the LTE gateway can access the ISP's cellular data network, you may need to enter the APN settings, User Name, Password, Authentication type… on the device. -
Page 90: Sim Security
JetWave 3220v3/3420v3 Series User Manual the same time. You can change the settings to WAN First. WAN first means the LTE feature is only activated when the Ethernet WAN port link down or failure. Auto IP Report: Most of the ISP assigns the dynamic IP address to the LTE clients and change the IP address every period of time. -
Page 91: Debug Mode
JetWave 3220v3/3420v3 Series User Manual 4.3.4 Debug Mode You can use the Mobile Manager Utility to help you monitor the IP address of the cellular devices after you installed it in the remote field site. Server: You can Enable or Disable this function. The default value is disabled. Server Address: Type the Mobile Manager Utility's IP address in this field. -
Page 92: Serial Setting
JetWave 3220v3/3420v3 Series User Manual 4.4 Serial Setting JetWave 3420v3 is equipped with RS-232/422/485 3-in-1 Serial port. It supports TCP Server/Client and UDP for remote connection. This page allows you to configure the Serial interface's parameters. Basic Settings: This page allows you to configure basic settings of the Serial port. Serial port Settings: You can select the Baudrate, Parity, Databit, Stopbit and Flow control settings from the dropdown list. -
Page 93: Management
JetWave 3220v3/3420v3 Series User Manual that the delimiter not matched) setting for Serial to Ethernet or Ethernet to Serial transmission. There are up to 4 delimiters can be configured here. After the Delimiter is configured, the data will be stored in the buffer until hit the Delimiter or the Flush time timeout. - Page 94 JetWave 3220v3/3420v3 Series User Manual Config Changed: The configuration of the AP/Gateway is changed event. SNMP Settings: Protocol Version: Select the SNMP version, the product supports SNMP V1, V2c and V3. While selecting the SNMPv3, continue to configure the SNMPv3 User Name and Encryption in lower screen.
-
Page 95: Smtp Configuration
JetWave 3220v3/3420v3 Series User Manual 4.5.2 SMTP Configuration The AP/Gateway supports E-mail Warning feature. The AP/Gateway will send the occurred events to remote E-mail server. The receiver can then receive notification by E-mail. The E-mail warning is conformed to SMTP standard. This page allows you to enable E-mail Alert, assign the SMTP Server IP, Sender E-mail, and Receiver E-mail. -
Page 96: Login Settings
JetWave 3220v3/3420v3 Series User Manual 4.5.3 Login Settings Use this page to set the password of the AP/Gateway. Type the New Password and Confirm Password again. Press “Apply” to activate the new password. 4.5.4 Firmware Upgrade In this section, you can update the latest firmware for your AP/Gateway. Korenix provides the latest firmware in Korenix Web site. - Page 97 JetWave 3220v3/3420v3 Series User Manual Press “Upgrade” to upload the firmware file to the AP/Gateway. After finishing transmitting the firmware, the system will copy the firmware file and replace the firmware in the flash. During the progress, please DO NOT power off your system.
-
Page 98: Configuration File
JetWave 3220v3/3420v3 Series User Manual 4.5.5 Configuration File The AP/Gateway provides Configuration File Backup (Save Setting to File), Restore (Load Setting from File) and Reset Setting to Default features. With Backup command, you can save current configuration file saved in the AP/Gateway’s flash to admin PC. -
Page 99: Remote Ip Scan
JetWave 3220v3/3420v3 Series User Manual 4.5.6 Remote IP Scan The page allows user to set remote IP Scan, it include Cluster Name and IP Scan Password. With Remote IP Scan, it provides higher wireless security when uses management tool. Cluster Name: Set Cluster Name, management tool will not list this device in Model filed unless user type the same Cluster name at Korenix View interface. - Page 100 JetWave 3220v3/3420v3 Series User Manual LLDP Timer: This setting determines how frequently (in seconds) it sends out LLDP discovery packets. Valid values are 5 to 254 and default is 30. LLDP Holdtime: This setting determines how long in seconds it will retain LLDP neighbor information. Valid values are 10 to 255 and the default is 120.
-
Page 101: Mqtt
JetWave 3220v3/3420v3 Series User Manual 4.6 MQTT 4.6.1 Broker The page allows user to set MQTT, it include Authentication, save and delete Certificate Authority. Enable MQTT: Check "Enable MQTT" to enable MQTT broker, uncheck means disable. Authentication: Check "Enabled" to use Authentication for MQTT protocol. Authentication Broker IP: The Authentication Broker IP field allows you to set the MQTT Broker IP address manually to create Certificate Authority file. -
Page 102: Tools
JetWave 3220v3/3420v3 Series User Manual Click the Apply button to apply the configuration changes. MQTT Publisher List This section allows you to modify and shows all of the MQTT Publisher content. Select: Click the Select checkbox to delete the selected entries. Edit: Click the Edit button to modify saved entries. - Page 103 JetWave 3220v3/3420v3 Series User Manual Use this pages to set remote log server and show the system log. Select “Enable Remote Syslog Server”, type the IP Address and Port number of your syslog server. The default port number is 514. Press “Apply”...
-
Page 104: Site Survey
JetWave 3220v3/3420v3 Series User Manual 4.7.2 Site Survey While your AP/Gateway is in Wireless Client mode, this page provides tool to scan the wireless network. You can monitor current existed wireless network, connect to the SSID with better signal strength…etc. Interface: Select the interface number. -
Page 105: Ping Watchdog
JetWave 3220v3/3420v3 Series User Manual 4.7.3 Ping Watchdog This page provides a tool configure the Ping Watchdog. If the failure count of the Ping reaches to a specified value, the watchdog will reboot the device. Select “Enable Ping Watchdog” to enable the function. IP Address to Ping: This is the target IP address of the Ping Watchdog. -
Page 106: Ping
JetWave 3220v3/3420v3 Series User Manual 4.7.4 Ping This is a simple Ping tool for you to check the status of remote station. Type the target IP address in the “Destination:___________” field then press “Ping”. The system will ping the remote station 4 times and list the ping result in the web GUI. Page 97... -
Page 107: Main Entry
JetWave 3220v3/3420v3 Series User Manual 4.8 Main Entry The main entry provides the system tools, for example the Device Front Panel status, Save the configuration, Logout and Reboot the system. 4.8.1 Save Use this page to save configuration to flash. Every time while you finished the configuring the device, please remember to save the configuration to flash. -
Page 108: Vpn
JetWave 3220v3/3420v3 Series User Manual The below warming message will appear after you reboot the system. 4.9 VPN The VPN is the new feature released from JetWave 3420v3 V1.1 firmware. In V1.1, the first VPN type supported is OPEN VPN Client. This page shows how to configure VPN settings and monitor its status. -
Page 109: Openvpn Client
JetWave 3220v3/3420v3 Series User Manual OpenVPN Client Information Enabled: yes: The VPN function is enabled. no: The VPN function not enabled. Connection Status: Connected: The VPN connection is successfully connected. Disconnected: The VPN has not connected. Remote Server IP: The remote server IP displays after the VPN client connection is successful. Tx / Rx Bytes: The transmission data volume in bytes displays after the VPN client connects. - Page 110 JetWave 3220v3/3420v3 Series User Manual Encryption Mode: Select the encryption is Static or TLS. Static Key: Use a pre-shared static key. TLS: Use SSL/TLS + certificates for authentication and key exchange. Remote Server IP (1): Input the IP address of VPN server. Remote Server IP (2): Input the second IP address of VPN server if necessary.
-
Page 111: Openvpn Server
JetWave 3220v3/3420v3 Series User Manual first use if VPN restart after Keepalive timeout, default value is Enable. Use LZO Compression: Select use LZO Compression or not, this function compress data to decrease the traffic but also need more CPU effort, default value is Disable. Keepalive: Select enable or disable keepalive function, this function is use to detect the status of connection, default value is Enable. - Page 112 JetWave 3220v3/3420v3 Series User Manual This page allows user to configure Port Forwarding rules on the OpenVPN Client tunnel. Enable VPN Port Forwarding: Select Enable VPN Port Forwarding and then enter the parameters to create the port forwarding entries. Protocol: Configure the protocol type: TCP, UDP or Both (TCP and UDP). Source IP Address: Enter the specific incoming packet's source IP address for the VPN interface.
-
Page 113: Vpn Certificate Management
JetWave 3220v3/3420v3 Series User Manual 4.9.5 VPN Certificate Management Use this page to upload or delete VPN certificates. The filename of the VPN certificate files MUST uploaded using the following file names. OpenVPN Server TLS Mode: ca.crt, server.key, server.crt, dh1024.pem OpenVPN Client TLS Mode: ca.crt, client.key, client.crt Static Mode: static.key Delete VPN Certificate: Press the Delete to delete the selected certificate file. - Page 114 JetWave 3220v3/3420v3 Series User Manual key is used when the authentication method set to RSA key in the configuration (below). Current Public Key: The content of the current public key is displayed. Use the Enable IPsec Connection check box to enable or disable the IPSec function. Configure the appropriate fields below.
- Page 115 JetWave 3220v3/3420v3 Series User Manual the public key which was generated from the top-half of this page. Page 106...
- Page 116 JetWave 3220v3/3420v3 Series User Manual Chapter 5 Configuration – SNMP, CLI, View Utility Page 107...
-
Page 117: Chapter 5 Configuration - Snmp, Cli, View Utility
JetWave 3220v3/3420v3 Series User Manual Chapter 5 Configuration – SNMP, CLI, View Utility 5.1 SNMP 5.1.1 What is SNMP? Simple Network Management Protocol (SNMP) is a protocol used for exchanging management information between network devices. SNMP is a member of the TCP/IP protocol suite. -
Page 118: Management Information Base (Mib)
JetWave 3220v3/3420v3 Series User Manual Manager (Network Management System, NMS): The manager is the console through the network. Network Management System (NMS) is the typical management system to manage the SNMP compatible devices. It normally provides device discovery, management, remote monitoring on network (RMON), trap server…etc. -
Page 119: Mib Tree In Nms
JetWave 3220v3/3420v3 Series User Manual 5.1.3 MIB Tree in NMS .The below figure shows the MIB tree after compiled in the NMS. Page 110... - Page 120 JetWave 3220v3/3420v3 Series User Manual Example: wlanSetting wlanSettingEntry: Page 111...
- Page 121 JetWave 3220v3/3420v3 Series User Manual Example of Object in wlanSettingEntry Operatemode: (Operation Mode) The OID: 1.3.6.1.4.1.24062.2.12.1.1.1.1.1 Max Access: read-write (Read and Write) Value list: you can read the value or set a new value according to the value list. This is the same as web GUI and CLI.
-
Page 122: Command Line Interface (Cli)
JetWave 3220v3/3420v3 Series User Manual 5.2 Command Line Interface (CLI) The AP/Gateway provides the Command Line Interface (CLI), you can access it through the console or Telnet. The Command Line Interface (CLI) is the user interface to the AP/Gateway’s embedded software system. You can view the system information, show the status, configure the switch and receive a response back from the system by keying in a command. -
Page 123: Show Command Set
JetWave 3220v3/3420v3 Series User Manual 5.2.1 SHOW Command Set: Type Show + “Tab↹” to see all the show command sets. The following command lines are available. Type Show wlan + “Tab↹” to see all the show wlan command lines. Page 114... - Page 124 JetWave 3220v3/3420v3 Series User Manual Type Show wlan + “Enter” to see all the wlan information. The console print all the information for reference. korenixffffff>show wlan wlan wirelessmode : AP wlan ssid : 3200 wlan ssidhided : Disabled wlan radio : Enabled wlan 802.11mode : 802.11G/N...
-
Page 125: Set Command Set
JetWave 3220v3/3420v3 Series User Manual For example: Type show wlan ra + “Tab” to complete the commands, and then you can see the result. korenixffffff>show wlan ra (+Tab) rate radio korenixffffff>show wlan rad (+Tab) rate radio korenixffffff>show wlan radio (+ Enter) radio : Enabled (This is the result.) - Page 126 JetWave 3220v3/3420v3 Series User Manual korenixffffff>set remote snmp Enabled remote snmp : Enabled korenixffffff> ====SNMP Setting========= The SNMP command lines and how to set SNMP version, community name, trap server. korenixffffff>set snmp (+Tab) getCommunity port setCommunity trapcommunity trapdestination v3Admin v3User version korenixffffff>set snmp version V2 snmp version...
-
Page 127: List Command Set
JetWave 3220v3/3420v3 Series User Manual 5.2.3 List Command Set: Type List + “Tab↹” to see all the command usage. This is similar to the Help command. Below command is to list the remote configuration command line and its description. korenixffffff>list remote show set del keyword Description... - Page 128 JetWave 3220v3/3420v3 Series User Manual Type del + “Tab↹” to see all the delete command sets. The following command lines are available. korenixffffff>del log list remote wlan wlan2 The log list can be delete through CLI. korenixffffff>del log list The configured smtp email addresses can be delete through CLI. korenixffffff>del remote smtp email1 email2 The below wlan 1 settings can be delete through CLI.
-
Page 129: Korenix View Utility
JetWave 3220v3/3420v3 Series User Manual 5.3 Korenix View Utility The Korenix View Utility (rename from the JetView V1.5.7) provides you convenient tool to scan the network and configure the AP. Please connect your PC to port Eth 2 (LAN) and start below steps to scan and configure. -
Page 130: Wireless Panel
JetWave 3220v3/3420v3 Series User Manual Figure: Assign the Auto-Assign IP Range. c. You can enable DHCP client by “DHCP Client Enable”. d. You can upgrade firmware for single or multiple units by “Firmware Upgrade”. A popup screen will ask you select the target firmware file you’d like to upgrade. e. - Page 131 JetWave 3220v3/3420v3 Series User Manual New version Korenix View Utility provides Wireless panel to configure some Basic Setting and Security setting for Wireless LAN Interfaces. You can use the tool to configure settings for single device or a group of devices. Select the target device/devices for further configuration. Click “Refresh”...
- Page 132 JetWave 3220v3/3420v3 Series User Manual Chapter 6 Troubleshooting Page 123...
-
Page 133: Chapter 6 Troubleshooting
JetWave 3220v3/3420v3 Series User Manual Chapter 6 Troubleshooting This chapter provides troubleshooting procedures for basic problems with the JetWave 3220v3/3420v3. For warranty assistance, contact your service provider or distributor for the process. 6.1 General Question 6.1.1 How to know the MAC address of the AP/Gateway? MAC Address distinguishes itself by the unique identity among network devices. -
Page 134: Wireless/Cellular
JetWave 3220v3/3420v3 Series User Manual 6.2 Wireless/Cellular 6.2.1 What if the wireless connection is not stable after associating with an AP under wireless client mode? • In addition, you can start “Site Survey” to check the signal strength. If it is weak or unstable (The smaller the number is, the weaker the signal strength is.), please join other available AP for better connection. -
Page 135: What If The Lte Connection Is Always Disconnected, How To Resolve It
JetWave 3220v3/3420v3 Series User Manual antenna is the same. • Check with the ISP and ask them check LTE connection condition of your site. • Mark sure the SIM card has enough quota/budget for both data upload and download. Some out-of-quota/budget card is only available for Download stream only. -
Page 136: Appendix
JetWave 3220v3/3420v3 Series User Manual 6.3 Appendix 6.3.1 ASCII WEP can be configured with a 64-bit or 128-bit Shared Key (hexadecimal number or ACSII). As defined, hexadecimal number is represented by 0-9, A-F or a-f; ACSII is represented by 0-9, A-F, a-f or punctuation. -
Page 137: Rssi Conversion
JetWave 3220v3/3420v3 Series User Manual 6.3.2 RSSI Conversion RSSI Conversion in JetWave 3220/3420 Series WIFI: RSSI is short of the Received Signal Strength Indicator, is a measurement of the power present in a received radio signal. In Korenix web GUI, you can see the two related values: Signal Strength: The signal strength of the associated device. - Page 138 JetWave 3220v3/3420v3 Series User Manual RSSI Conversion in Cisco for reference: Cisco has the most granular dBm lookup table. RSSI_Max = 100, Range from -10~-113dBm Convert % to RSSI in the following table. The RSSI is on the left, and the corresponding dBm value (a negative number) is on the right.
-
Page 139: M12 Connector Pin Assignment
JetWave 3220v3/3420v3 Series User Manual 6.3.3 M12 Connector Pin Assignment X-cord M12 Connector M12X to RJ-45 (Shielding) Cable Pin Assignment: Please follow below figure to assembly your cable. M12 Connector: M12 Male Xc-cord 8 Pin insert. NYLON-GF Contact: Brass, 6u” Gold plated. Male Contact M12 (C1) Color RJ-45 (C2) -
Page 140: Jetwave 3420 Web Gui
JetWave 3220v3/3420v3 Series User Manual 6.3.4 JetWave 3420 Web GUI Pages The firmware V1.1 released by Jan. 9, 2015 starts to support JetWave 3420 Series. This appendix shows the JetWave 3420 login page, Information and Main GUI. The JetWave 3420 Login Page The JetWave 3420 Main Entries Page 131... -
Page 141: Revision History
JetWave 3220v3/3420v3 Series User Manual Revision History Version Description Date Editor release for JetWave 3220v3 and JetWave 3420v3. V1.0 Jan, 2020 Andrew Chen Page 132...
Need help?
Do you have a question about the korenix JetWave 3220v3 Series and is the answer not in the manual?
Questions and answers