Table of Contents

Related Manuals for Compaq StorageWorks Fibre Channel SAN Switch 2


Summary of Contents for Compaq StorageWorks Fibre Channel SAN Switch 2
- Page 1 StorageWorks by Compaq Fibre Channel SAN Switch 2/16 Installation Guide Part Number: AA-RR84A-TE First Edition (January 2002) Product Version: This guide provides procedures for setting up, configuring and managing the SAN Switch 2/16.
- Page 2 All other product names mentioned herein may be trademarks of their respective companies. Compaq shall not be liable for technical or editorial errors or omissions contained herein. The information is provided “as is” without warranty of any kind and is subject to change without notice. The warranties for Compaq products are set forth in the express limited warranty statements accompanying such products.
-
Page 3: Table Of Contents
Compaq Authorized Reseller ........ - Page 4 Contents 2 Installing the Fibre Channel SAN Switch 2/16 Unpack and Verify Carton Contents........2–1 Installation and Safety Considerations .
- Page 5 Upgrading or Restoring the Switch Firmware ....... . 4–2 Downloading Firmware from the Compaq Website ......4–3 A Regulatory Compliance Notices Regulatory Compliance Identification Numbers.
- Page 6 Contents Canadian Notice (Avis Canadien) ........A–4 Class A Equipment .
- Page 7 Contents Glossary Index Figures 1–1 SAN Switch 2/16 front panel ........1–3 1–2 SAN Switch 2/16 rear panel .
-
Page 9: About This Guide
About this Guide This Installation Guide provides information to help you: • Install the StorageWorks™ Fibre Channel SAN Switch 2/16 by Compaq in a Compaq 9000 Series rack • Set network addresses • Backup and restore the configuration • Upgrade firmware... -
Page 10: Related Documentation
About this Guide Related Documentation In addition to this guide, Compaq provides the following corresponding information: • StorageWorks by Compaq SAN Switch 2/16 Release Notes, Part Number: AA-RR85A-TE • StorageWorks by Compaq Fabric OS Procedures User Guide, Part Number: AA-RQ6EA-TE •... -
Page 11: Document Conventions
Variables Monospace, italic font Website addresses Sans serif font (http://www.compaq.com) Symbols in Text These symbols may be found in the text of this guide. They have the following meanings. WARNING: Text set off in this manner indicates that failure to follow directions in the warning could result in bodily harm or loss of life. -
Page 12: Symbols On Equipment
About this Guide Symbols on Equipment Any enclosed surface or area of the equipment marked with these symbols indicates the presence of electrical shock hazards. Enclosed area contains no operator serviceable parts. WARNING: To reduce the risk of injury from electrical shock hazards, do not open this enclosure. -
Page 13: Rack Stability
24 hours a day, 7 days a week. NOTE: For continuous quality improvement, calls may be recorded or monitored. Outside North America, call Compaq technical support at the nearest location. Telephone numbers for worldwide technical support are listed on the Compaq website: http://www.compaq.com. -
Page 14: Compaq Website
About this Guide Compaq Website The Compaq website has the latest information on this product, as well as the latest drivers. Access the Compaq website at: http://www.compaq.com/storage. From this website, select the appropriate product or solution. Compaq Authorized Reseller For the name of your nearest Compaq Authorized Reseller: •... -
Page 15: Overview
Overview The StorageWorks Fibre Channel SAN Switch 2/16 by Compaq is a high-performance, 16-port, 2 gigabit (GB) Fibre Channel switch used to interconnect storage devices, hosts, and servers in a Storage Area Network (SAN). This chapter provides the following information: •... -
Page 16: Hardware
Allows you to create logical subsets of the fabric to accommodate closed user groups or to create functional user groups within a fabric. For more information refer to the StorageWorks by Compaq SANworks Zoning User’s Guide, PN AA-RQ6YA-TE. •... -
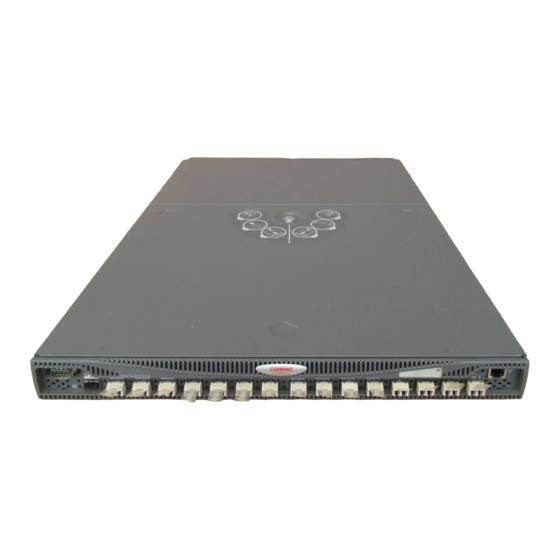
Page 17: San 2/16 Front Panel
Overview • A field-replaceable motherboard completely enclosed in an Electro-Magnetic Interference (EMI) enclosure tray, with logic and chassis ground connected to the chassis, and an embedded processor that processes frames up to 1024 bytes. • A real-time clock (RTC) with a 10-year battery and 56 bytes of NVRAM. SAN 2/16 Front Panel Figure 1–1 shows the front panel of the SAN Switch 2/16. -
Page 18: Isl Trunking
ISLs between two directly adjacent switches, while preserving in-order delivery. For specific information about ISL trunking, refer to the StorageWorks by Compaq ISL Trunking User Guide, Part Number AA-RR82A-TE. SFPs The ports connect to SFP media. SFPs are universal and self-configuring. -
Page 19: Field-Replaceable Units
Overview Field-Replaceable Units The power supply, fan trays, and motherboard can all be replaced in the field, without the use of special tools. The switch continues operating during the replacement of a fan tray or power supply, if they are replaced one at a time. The switch must be turned off during replacement of the motherboard. -
Page 21: Installing The Fibre Channel San Switch
Installing the Fibre Channel SAN Switch 2/16 This chapter covers the following topics: • Carton contents • Installation and Safety Considerations • Installing the switch as a stand-alone unit or in a 9000 Series Rack • Installing an SFP module •... - Page 22 Installing the Fibre Channel SAN Switch 2/16 IMPORTANT: If any items are damaged or missing, please contact Compaq or a Compaq Authorized reseller. SHR-2489A Figure 2–1: Carton contents 2–2 Fibre Channel SAN Switch 2/16 Installation Guide...
-
Page 23: Installation And Safety Considerations
• as a stand-alone unit on a flat surface, or • in the Compaq 9000 Series (or comparable) Rack using the Rack Mount Kit contents as outlined in Table 2–1. Fibre Channel SAN Switch 2/16 Installation Guide 2–3... -
Page 24: Selecting An Operating Location
An air flow of at least 300 cubic feet per minute, available in the immediate vicinity of the switch. • If the installing the switch in the Compaq 9000 Series, or comparable Electronics Industries Association (EIA) rack: — All equipment installed in the rack should have a reliable branch circuit ground connection, and should not rely on a connection to a branch circuit, such as a power strip. -
Page 25: Installing The San Switch As A Stand-Alone Unit
Installing the Fibre Channel SAN Switch 2/16 The switch has a universal power supply capable of functioning worldwide without voltage jumpers or switches. The power supply is auto ranging in terms of accommodating input voltages and line frequencies. Installing the SAN Switch as a Stand-alone Unit Use these procedures for setting up the switch as a stand-alone unit. -
Page 26: Installing The San Switch 2/16 In A 9000 Series Rack
IMPORTANT: The SAN Switch 2/16 ships with the complete set of rack mount hardware required for installation in the Compaq 9000 Series Rack. The 2/16 switch installs in all Compaq 19-inch racks. However, if installing in Compaq’s 41U Rack, you must purchase that specific Rack Mount Kit separately. -
Page 27: Attaching The Inner Slide Rails To The Switch
1. Position the Inner Slide Rails with the flat side against the switch, oriented in one of the following two ways: IMPORTANT: Compaq recommends installing the SAN Switch 2/16 so that the port side of the switch slides out the rear of the 9000 Series Rack (as described in step 1a below). In this way, the switch faces the aisle where exhaust air is released. -
Page 28: Attaching The Rear Or Front Rack Mount Brackets
Brackets to prevent the switch from accidentally sliding out of the rack, as follows. IMPORTANT: Compaq recommends installing the SAN Switch 2/16 so that the port side of the switch slides out the back of the 9000 Series Rack. (For example, the switch should face the aisle where exhaust air is released. -
Page 29: For Rear Rack Access
Installing the Fibre Channel SAN Switch 2/16 For Rear Rack Access Use these steps to attach the Rear Rack Mount Brackets to the switch. The Rear Rack Mount Brackets act as “stops” to prevent the switch from sliding out the rear of the rack. -
Page 30: For Front Rack Access
Installing the Fibre Channel SAN Switch 2/16 For Front Rack Access Use these steps to attach the Front Rack Mount Brackets to the switch. The Front Rack Mount Brackets act as “stops” to prevent the switch from sliding out the front of the rack. - Page 31 Installing the Fibre Channel SAN Switch 2/16 IMPORTANT: Before starting this procedure, verify that two of the slide mount L-Brackets are preinstalled at the end of each Outer Slide Rail, see Figure 2–4. The L-Brackets are necessary to attach the Outer Rails to the 9000 Series Rack. 1.
-
Page 32: Attaching The Outer Slide Rails To The 9000 Series Rack
Installing the Fibre Channel SAN Switch 2/16 [1] Select this graphic frame. [2] Select File. [3] Select Import. [4] Select File. [5] Choose the appropriate graphic file name. [6] Make sure you’ve checked the Copy Into Document. [7] Select Import. Position the illustration as required. [8] Adjust the size of the outer graphic frame as required. -
Page 33: Finalizing The Rack Mounting Procedure
Installing the Fibre Channel SAN Switch 2/16 Finalizing the Rack Mounting Procedure Read this section for finalizing the rack mount procedure. Installing the Switch in a 9000 Series Rack Follow these steps to install the switch in the rack. CAUTION: During the install, do not touch the inner section of the Outer Slide Rails. -
Page 34: Securing The Rack Mount Brackets
Installing the Fibre Channel SAN Switch 2/16 3. Slide the switch in the rack, see Figure 2–5. SHR-2476A Figure 2–5: Sliding the SAN Switch 2/16 in a 9000 Series Rack 4. To verify proper alignment, slide the switch in and out of the rack. If necessary, pull the switch out of the rack, and realign the slide rails. -
Page 35: Connecting Ac Power
Installing the Fibre Channel SAN Switch 2/16 Connecting AC Power Use these steps to power on the SAN Switch 2/16. CAUTION: Do not plug the power cords into the power source until the switch is completely installed in the rack. 1. -
Page 36: Power-On Self Test
POST is complete. If one or more LEDs do not return to a normal state, (and this is not due to the switch being set to beacon), see “Interpreting LED Activity,” in Chapter 3. NOTE: For more information about beaconing, refer to the StorageWorks by Compaq Fabric OS Procedures Guide. Checking POST Results... -
Page 37: Configuring San Switch 2/16 Network Addressing
Installing the Fibre Channel SAN Switch 2/16 Configuring SAN Switch 2/16 Network Addressing Read the following sections for information on how to configure the SAN Switch 2/16 addressing scheme. Requirements The following items are required to set network addressing. • An IP address from your Network Administrator •... -
Page 38: Connecting The Serial Cable
Installing the Fibre Channel SAN Switch 2/16 2. Connect the serial cable to the SAN Switch 2/16 serial port, see Figure 2–7. SHR-2470A Figure 2–7: Connecting the Serial cable 3. Connect the other end of the serial cable to an RS-232 serial port on the workstation. - Page 39 Installing the Fibre Channel SAN Switch 2/16 To configure Port Settings in a UNIX environment, type the following command, tip /dev/ttyb -9600 7. Log onto the switch (with administrative privileges). The default administrative logon is admin and the default password is password. a.
-
Page 40: Connecting The San Switch 2/16 To The Lan
NOTE: You can now access the switch remotely (and from multiple connections), using telnet or the StoragWorks by Compaq Web Tools application. Verify that the switch is not accessed from any other connections during the remaining steps. -
Page 41: Modifying Domain Ids
Installing the Fibre Channel SAN Switch 2/16 Modifying Domain IDs Modify the domain IDs if desired, as follows. NOTE: The default domain ID is 1. If the default domain ID is already in use when the switch is connected to the fabric, the domain ID for the new switch is automatically reset to a unique value. -
Page 42: Connecting Sfps
Use these steps to connect the SFPs and cables to SAN Switch 2/16 ports as required. NOTE: The ports and cables used in trunking groups must meet specific requirements. For a list of these requirements, refer to the StorageWorks by Compaq ISL Trunking User’s Guide. 1. Remove the shipping plug from the appropriate ports. -
Page 43: Verifying Operation
NOTE: If a switch boot failure occurs, the switch must be taken offline for repair or replacement. Contact your Compaq Technical Support for assistance. Fibre Channel SAN Switch 2/16 Installation Guide... -
Page 44: Cascading Switches
Domain is not set using the configure command. Refer to the StorageWorks by Compaq Fibre Channel SAN Switch Management Guide for more information. -
Page 45: Managing The Fibre Channel San Switch
POST or other diagnostic tests are running. This is normal, and does not indicate a problem. NOTE: Any errors related to LED activity are listed in the error log. For information about StorageWorks by Compaq Fabric OS Procedures Guide, the error log, refer to the Part Number AA-RQ6EA-TE. -
Page 46: Front Panel Leds
Managing the Fibre Channel SAN Switch 2/16 Front Panel LEDs The SAN Switch 2/16 front panel includes the following LEDs: • One Switch Power LED on the front panel. • One Port Status LED above and to the left of each of the sixteen ports •... - Page 47 Managing the Fibre Channel SAN Switch 2/16 (Continued) Table 3–1: Front Panel LED Patterns During Normal Operation Location Purpose Color of LED Status of Hardware Recommended of LED of LED Action Slow-flashing The port is disabled Reset the port from orange (result of diagnostics or a management...
-
Page 48: Rear Panel Leds
Errors may be listed green or more ports. in the error log. Refer to the StorageWorks by Compaq Fabric OS Procedures Guide for more information. Rear Panel LEDs The SAN Switch 2/16 rear panel includes the following LEDs: • One power supply LED for each power supply •... -
Page 49: Rear Panel Led Patterns During Normal Operation
Managing the Fibre Channel SAN Switch 2/16 Table 3–2: Rear Panel LED Patterns During Normal Operation Location Purpose Recommended of LED of LED Color of LED Status of Hardware Action On each Indicates No light Power supply is not Verify power supply power status of providing power. -
Page 50: Management Overview
“virtually” in front of any fabric, switch, or port. For more information refer to the StorageWorks by Compaq Web Tools User Guide, Part Number AA-RRTYA-TE. Optional Management Features In addition, Compaq provides the following optional management tools in support of the SAN switch. QuickLoop The optional QuickLoop application allows arbitrated loops to attach to a fabric. -
Page 51: Fabric Watch
NOTE: A license may have been installed on the switch at the factory. If not, contact your switch supplier to obtain a license key. For more information refer to the StorageWorks by Compaq Fabric Watch Version 3.0 User’s Guide, PN AA-RR7YA-TE. -
Page 52: Isl Trunking
Managing the Fibre Channel SAN Switch 2/16 For information refer to the StorageWorks by Compaq Extended Fabric User Guide Version 3.0, PN AA-RR7QA-TE. ISL Trunking The optional ISL Trunking software allows up to four ISLs to merge logically into a single link. -
Page 53: Running Basic Switch Operations Using Telnet
Managing the Fibre Channel SAN Switch 2/16 Running Basic Switch Operations Using Telnet Read the following sections to run common switch operations. Logging into the SAN Switch 2/16 Use these steps to log into the SAN Switch 2/16. 1. Open a telnet connection to the switch. The login prompt is displayed if the telnet connection successfully found the switch in the network. -
Page 54: Configuring The Ip And Fibre Channel Address
Managing the Fibre Channel SAN Switch 2/16 4. At the Old Password prompt, enter the old password. 5. At the New password prompt, enter the new password. The new password must be from 8 to 40 characters in length. 6. At the new password prompt, enter the new password exactly as entered to the previous prompt. -
Page 55: Displaying Devices Within The Fabric
Managing the Fibre Channel SAN Switch 2/16 Displaying Devices within the Fabric To verify that you have fabric wide connectivity when you install a new switch, display the fabric wide device count from the newly installed switch. Use these steps to display the fabric. 1. -
Page 56: Displaying Switch Configuration Settings
Any errors detected during POST are written to the system log, accessible through the errShow command. For more information about error messages, refer to the StorageWorks by Compaq Fabric OS Procedures User Guide Version 3.0, Part Number AA-RQ6EA-TE. Diagnostic Tests Diagnostic tests are provided to help troubleshoot the hardware and the firmware. - Page 57 All diagnostic tests are run at link speeds of both 1 Gbps and 2 Gbps. For information about the specific diagnostic tests and how to run them, refer to the StorageWorks by Compaq Fabric OS Procedures User Guide Version 3.0, Part Number AA-RQ6EA-TE.
-
Page 59: Backing Up Configuration Data And Upgrading Firmware
Backing Up Configuration Data and Upgrading Firmware This chapter provides the following information • Backing Up System Configuration Settings • Restoring Configuration Settings • Upgrading or Restoring the Switch Firmware Backing Up System Configuration Settings The two supplied utilities RSHD.EXE and CAT.EXE, currently support Windows downloads only. -
Page 60: Restoring The System Configuration Settings
Backing Up Configuration Data and Upgrading Firmware 2. Login to the switch as the admin user. 3. At the command line enter the following command: configUpload "hostIPaddr", "user", "path_filename","password" For example, hostIPaddr is the IP address of the host computer, user is the User ID used to log into this computer, path_filename is the path location and filename of the configuration file, and password is the password for the user ID specified. -
Page 61: Downloading Firmware From The Compaq Website
4. Reboot the switch by entering the following command: fastBoot Downloading Firmware from the Compaq Website To download the firmware from the Compaq website, go to www.compaq.com/products/storageworks. The website contains the required loaders and instructions for downloading the firmware to a switch. -
Page 63: A Regulatory Compliance Notices
For the purpose of regulatory compliance certifications and identification, your Compaq StorageWorks SAN Switch 2/16 is assigned a Compaq series number. The Compaq series number for this product is: Series NA2107. The series number can be found on the product label, along with the required approval markings and information. -
Page 64: Class A Equipment
Regulatory Compliance Notices The rating label on the device shows the classification (A or B) of the equipment. Class B devices have an FCC logo or FCC ID on the label. Class A devices do not have an FCC logo or ID on the label. -
Page 65: Declaration Of Conformity For Products Marked With The Fcc Logo-United States Only
Modifications The FCC requires the user to be notified that any changes or modifications made to this device that are not expressly approved by Compaq Computer Corporation may void the user’s authority to operate the equipment. Network and Serial Cables Connections to this device must be made with shielded cables with metallic RFI/EMI connector hoods in order to maintain compliance with FCC Rules and Regulations. -
Page 66: Canadian Notice (Avis Canadien
Regulatory Compliance Notices Canadian Notice (Avis Canadien) Class A Equipment This Class A digital apparatus meets all requirements of the Canadian Interference-Causing Equipment Regulations. Cet appareil numérique de la classe A respecte toutes les exigences du Règlement sur le matériel brouilleur du Canada. Class B Equipment This Class B digital apparatus meets all requirements of the Canadian Interference-Causing Equipment Regulations. -
Page 67: Japanese Notice
Regulatory Compliance Notices Japanese Notice Fibre Channel SAN Switch 2/16 Installation Guide A–5... -
Page 68: Taiwanese Notice
Taiwanese Notice Laser Devices All Compaq systems equipped with a laser device comply with safety standards, including International Electrotechnical Commission (IEC) 825. With specific regard to the laser, the equipment complies with laser product performance standards set by government agencies as a Class 1 laser product. -
Page 69: Laser Product Label
Regulatory Compliance Notices Laser Product Label The following label or equivalent is located on the surface of the Compaq supplied laser device. This label indicates that the product is classified as a CLASS 1 LASER PRODUCT. This label appears on a laser device installed in your product. - Page 70 Batteries, battery packs, and accumulators should not be disposed of with the general household waste. In order to forward them to recycling or proper disposal, please use the public collection system or return them to Compaq, your authorized Compaq partners, or their agents.
-
Page 71: B Electrostatic Discharge
Electrostatic Discharge To prevent damaging the system, be aware of the precautions you need to follow when setting up the system or handling parts. A discharge of static electricity from a finger or other conductor may damage system boards or other static-sensitive devices. This type of damage may reduce the life expectancy of the device To prevent electrostatic damage, observe the following precautions: •... -
Page 72: Grounding Methods
• Use a portable field service kit with a folding static-dissipating work mat. If you do not have any of the suggested equipment for proper grounding, have a Compaq authorized reseller install the part. NOTE: For more information on static electricity, or for assistance with product installation, contact your Compaq authorized reseller. -
Page 73: C Technical Specifications
Technical Specifications This appendix covers the following topics: • Dimensions • Power supply specifications • Environmental specifications • Memory specifications • Serial port specifications... -
Page 74: Dimensions
Technical Specifications Dimensions Table C–1 lists SAN Switch 2/16 dimensions. Table C–1: Physical Specifications Dimension Value Height 1.72 +/- 0.01 inches (4.37 +/- 0.03 cm) Depth 24.5 +/- 0.03 inches (62.2 +/- 0.1cm) Width 17 inches (43.2 cm) Weight (with both power 28.0 lbs (12.7 kg) supplies installed) Power Supply Specifications... -
Page 75: Environmental Requirements
Technical Specifications Table C–2: Power Supply Specifications (Continued) Specification Value BTU rating 170 Watts x 3.412 BTU/Hr/Watts = 580 BTU/hr Inrush current 10 Amps Peak, > 300 usec - hot/cold start Input line protection Fused in both hot & neutral lines Maximum dimensions 3.5”... -
Page 76: Memory Specifications
Technical Specifications Memory Specifications The SAN Switch 2/16 utilizes the following memory. • Main Memory (SDRAM): 32 MB per switch • Flash Memory: Dual 8 MB • Boot Flash: 512K bytes of 8-bit for system boot The centralized memory maximizes the overall switch throughput by guaranteeing full transmit and receive bandwidth to all fibre channel ports at all times. - Page 77 Glossary This glossary defines terms used in this guide or related to this product and is not a comprehensive glossary of computer terms. AL_PA Arbitrated Loop Physical Address; a unique 8-bit value assigned during loop initialization to a port in an arbitrated loop. Alias Address Identifier An address identifier recognized by a port in addition to its standard identifier.
- Page 78 Glossary AW_TOV Arbitration Wait Time-out Value; the minimum time an arbitrating L_Port waits for a response before beginning loop initialization. Bandwidth The total transmission capacity of a cable, link, or system. Usually measured in bps (bits per second). May also refer to the range of transmission frequencies available to a network. See also Throughput.
- Page 79 Glossary Circuit An established communication path between two ports. Consists of two virtual circuits capable of transmitting in opposite directions. See also Link. Command Line Interface that depends entirely on the use of commands, such as through telnet or SNMP, and does not involve a GUI.
- Page 80 Glossary E_D_TOV Error Detect Time-out Value; the minimum amount of time a target waits for a sequence to complete before initiating recovery. Can also be defined as the maximum time allowed for a round-trip transmission before an error condition is declared. E_Port Expansion Port;...
- Page 81 Glossary Fabric A Fibre Channel network containing two or more switches in addition to hosts and devices. May also be referred to as a switched fabric. See also Topology, SAN, Cascade. FC-AL-3 The Fibre Channel Arbitrated Loop standard defined by ANSI. Defined on top of the FC-PH standards.
- Page 82 Glossary Fibre Channel Service Protocol; the common protocol for all fabric services, transparent to the fabric type or topology. FSPF Fabric Shortest Path First; the routing protocol for Fibre Channel switches. Full Fabric The licensing that allows multiple E_Ports on a switch, making it possible to create multiple ISL links.
- Page 83 Glossary Idle Continuous transmission of an ordered set over a Fibre Channel link when no data is being transmitted, to keep the link active and maintain bit, byte, and word synchronization. Interswitch Link; a Fibre Channel link from the E_Port of one switch to the E_Port of another. See also E_Port, Cascade.
- Page 84 Glossary Management Information Base; an SNMP structure to help with device management, providing configuration and device information. Monitoring State The state in which a port is monitoring the flow of information for data relevant to the port. Multicast The transmission of data from a single source to multiple specified N_Ports (as opposed to all the ports on the network).
- Page 85 Glossary Phantom Address An AL_PA value that is assigned to an device that is not physically in the loop. Also known as phantom AL_PA. A twenty-bit public address created for an 8-bit loop device to allow public devices to access Phantom Device A device that is not physically in an arbitrated loop, but is logically included through the use of a phantom address.
- Page 86 Glossary Public NL_Port An NL_Port that logs into the fabric, can function within either a public or a private loop, and can communicate with either private or public NL_Ports. Public Device A device that can log into the fabric and support 20-bit addresses (or has 20-bit phantom addresses created for it by the switch).
- Page 87 Glossary Storage Area Network; a network of systems and storage devices that communicate using Fibre Channel protocols. See also Fabric. Sequence A group of related frames transmitted in the same direction between two N_Ports. Service Rate The rate at which an entity can service requests. Single Mode The fiber optic cabling standard that corresponds to distances of up to 10 km between devices.
- Page 88 Glossary Topology As applies to Fibre Channel, the configuration of the Fibre Channel network and the resulting communication paths allowed. There are three possible topologies: • Point to point - A direct link between two communication ports. • Switched fabric - Multiple N_Ports linked to a switch by F_Ports. •...
- Page 89 Glossary ULP_TOV Upper-level Time-out Value; the minimum time that a SCSI ULP process waits for SCSI status before initiating ULP recovery. Upper-level Protocol; the protocol that runs on top of Fibre Channel. Typical upper-level protocols are SCSI, IP, HIPPI, and IPI. Well-known Address As pertaining to Fibre Channel, a logical address defined by the Fibre Channel standards as assigned to a specific function, and stored on the switch.
- Page 91 ID 3–9 AC power checking results 2–16 cord 2–4 CLI 3–6 airflow command line, managing by 3–6 direction through switch 1–2 Compaq series number A–1 APM 3–7 compatibility 1–6 arbitrated loop 3–6 configuration settings 4–1 4–2 automatic self-discovery 1–2 configuring domain ID 2–21...
- Page 92 1–5 management interfaces 3–6 firmware modifications determining current version 4–2 FCC compliance statement A–3 downloading from the Compaq website 4–3 modifying domain IDs 2–21 FL-port connection 1–3 mounting methods F-port connection 1–3 surface 2–6 front mount brackets 2–8 multiple switches 2–23...
- Page 93 Index power 2–4 shock and vibration C–3 optical ports temperature and humidity C–3 LEDs 3–2 restoring 4–2 optional management tools 3–6 3–7 3–8 restoring the system configuration settings 4–2 outer slide rails 2–10 RJ-45 connector 1–2 RS-232 connector 1–2 physical dimensions of switch C–2 RS-232 port 2–18 port rubber feet 2–5...
- Page 94 Index telnet 3–9 upgrading or restoring the switch firmware 4–2 managing by 3–6 temperature, requirements C–3 verifying operation 2–23 tests, diagnostic 3–13 voltage capability 2–4 thermometers 1–2 three hole bar nuts 2–10 tips for installing 2–6 Web Tools 3–6 trunking 3–8 weight, switch C–2 cabling requirements 2–22 zoning summary 1–2...
Need help?
Do you have a question about the StorageWorks Fibre Channel SAN Switch 2 and is the answer not in the manual?
Questions and answers