Table of Contents
Advertisement
Quick Links
Advertisement
Chapters
Table of Contents
Troubleshooting

Related Manuals for Compaq 230934-002


Summary of Contents for Compaq 230934-002
-
Page 1: User Guide
StorageWorks by Compaq Modular SAN Array Fabric Switch 6 User Guide Part Number 230934-002 June 2002 (Second Edition) This guide is designed to be used as step-by-step instructions for installation and as a reference for operation, troubleshooting, and future upgrades. - Page 2 Microsoft, MS-DOS, Windows, and Windows NT are trademarks of Microsoft Corporation in the U.S. and/or other countries. Compaq shall not be liable for technical or editorial errors or omissions contained herein. The information in this document is provided “as is” without warranty of any kind and is subject to change without notice.
-
Page 3: Table Of Contents
Text Conventions... x Related Documents... x Getting Help... x Compaq Technical Support... xi Compaq Website ... xi Compaq Authorized Reseller ... xi Chapter 1 Overview of the Switch The MSA Fabric Switch 6 ...1-2 Features...1-3 Rear View of the Modular San Array 1000 ...1-4 Installation ...1-5... - Page 4 Accessing the CLI... 2-11 Exiting the Text-based UI... 2-11 Resetting the Switch ... 2-11 Using the Array Configuration Utility-XE (ACU-XE) to Configure the Switch... 2-12 Accessing the Switch Configuration Option of the ACU-XE ... 2-13 Initial Switch Configuration ... 2-16 Advanced Switch Configuration...
- Page 5 Reading the Global Status Indicator...4-2 Reading the Ethernet Indicators ...4-4 Reading the Port Indicators ...4-6 Serial Communication Problems...4-6 Connections ...4-6 Compaq-supported Small Form Factor Pluggables (SFP) ...4-7 Fibre Channel Cables ...4-7 Temperature Control...4-8 Preventative Maintenance Solutions...4-8 Appendix A Regulatory Compliance Notices Federal Communications Commission Notice ...
- Page 6 Appendix E Updating the Fabric Switch MSA Fabric Switch 6 Management Utility Finding the MSA Fabric Switch 6 Management Utility Version Number ... E-1 Downloading the Switch Management Utility Update... E-1 Updating the Switch using the Web Browser Interface... E-2 Updating the Switch using the Command Line Interface...
-
Page 7: About This Guide
WARNING: This symbol, in conjunction with any of the following symbols, indicates the presence of a potential hazard. The potential for injury exists if warnings are not observed. Consult your documentation for specific details. Modular SAN Array Fabric Switch 6 User Guide About This Guide... - Page 8 These symbols, on power supplies or systems, indicate that the equipment is supplied by multiple sources of power. WARNING: To reduce the risk of injury from electric shock, remove all power cords to completely disconnect power from the system. Modular SAN Array Fabric Switch 6 User Guide...
-
Page 9: Rack Stability
IMPORTANT: Text set off in this manner presents clarifying information or specific instructions. NOTE: Text set off in this manner presents commentary, sidelights, or interesting points of information. Modular SAN Array Fabric Switch 6 User Guide About This Guide... -
Page 10: Text Conventions
Related Documents For additional information on the topics covered in this guide, refer to the following documentation: • StorageWorks by Compaq Modular SAN Array 1000 User Guide, part number 230941 • StorageWorks by Compaq Modular SAN Array 1000 Installation Overview,... -
Page 11: Hp Authorized Reseller
For the name of your nearest HP authorized reseller: • In the United States, call 1-800-345-1518. • In Canada, call 1-800-263-5868. • Elsewhere, see the HP website for locations and telephone numbers. Modular SAN Array Fabric Switch 6 User Guide About This Guide www.hp.com www.hp.com... -
Page 12: Overview Of The Switch
This guide provides specific information for installing and configuring the MSA Fabric Switch 6 and its component parts. Table 1-1: Organization of this Guide For information about Overview of the Switch Initial Configuration of the Switch MSA Fabric Switch 6 Management Utility... -
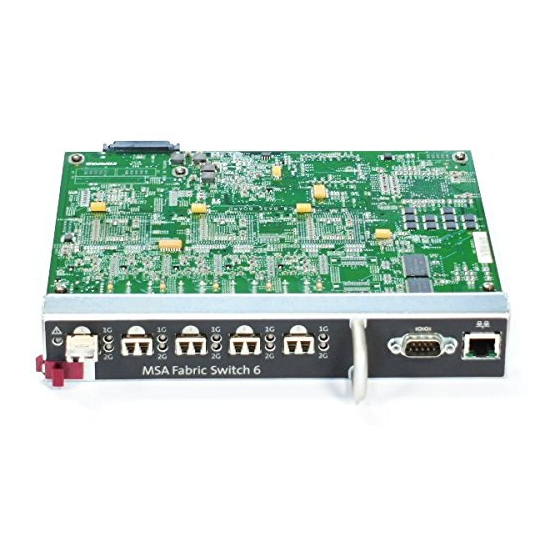
Page 13: The Msa Fabric Switch 6
Overview of the Switch The MSA Fabric Switch 6 The MSA Fabric Switch 6 is an integrated six-port module, featuring a 12 Gbps switch engine that enables full duplex non-blocking performance on all ports. Figure 1-1: The MSA Fabric Switch 6... -
Page 14: Features
Five external 2/1 Gbps ports, 1 internal 2/1 Gbps port • Auto switch between 1 and 2 Gbps • Array Configuration Utility-XE (ACU-XE) configuration support • Compaq Insight Manager (CIM-XE) launch of the Management Utility Modular SAN Array Fabric Switch 6 User Guide Overview of the Switch... -
Page 15: Rear View Of The Modular San Array 1000
Rear View of the Modular San Array 1000 Figure 1-2 is an illustration of the rear panel of the MSA1000 with an MSA Fabric Switch 6 installed. Figure 1-2: MSA1000 rear panel with a Fabric Switch 6 Item Description Œ... -
Page 16: Installation
Installation Before the MSA Fabric Switch 6 can communicate with Compaq-managed devices, all devices must be properly connected and powered on. Ethernet RJ-45 Cable This connector is provided for management through Simple Network Management Protocol (SNMP). By default, the MSA Fabric Switch 6 is configured to use an IP address of 127.0.0.1. -
Page 17: Hot-Pluggable
3. Verify that the storage device(s) are visible to the host(s). 4. Start Applications. Before the MSA Fabric Switch 6 can communicate with Compaq-managed devices, all devices must be properly configured, connected, and powered up. See Chapter 2, “Initial Configuration of the Switch,” for installation instructions. -
Page 18: Initial Configuration Of The Switch
This chapter details the procedures used to initially configure the MSA Fabric Switch 6. Preliminary switch configuration includes entering the Ethernet and the SNMP settings. Two configuration methods are available: • Using the text-based user interface to configure the switch •... -
Page 19: Configuration Overview
(text-based UI), Command Line Interface (CLI), the ACU-XE, and the Compaq MSA Fabric Switch 6 Management Utility. The text-based UI can be used for the initial configuration tasks and the CLI can be accessed from this interface to perform advanced configuration tasks. -
Page 20: Using The Text-Based Ui To Configure The Switch
Another difference between using the serial port interface and telnet is that when using telnet, you can only get access to the switch after it has started up and has initialized its network parameters. Consequently, you must have a directly-connected... -
Page 21: Bits Per Second
Settings tab. From the Emulation pull-down menu, select VT100 and click OK. 8. Power ON all peripheral device(s). 9. Wait at least ten seconds and power cycle the MSA1000. The switch sends a series of Power-on Self-Test (POST) messages in HyperTerminal. -
Page 22: Logging In To The Text-Based Ui
Logging in to the Text-based UI Upon connection to the switch or completion of the start-up sequence, you must log into the MSA Switch to access the management functions. To do this, you must login as “user” and enter the password assigned to the switch. -
Page 23: Accessing Networking Parameters
The second, third, and fourth parameters are used to configure the Ethernet settings for the MSA Switch. All these parameters must be set appropriately for the site before the MSA Switch can be managed over the Ethernet and connected to using telnet. - Page 24 Check with your network administrator before using the default address, as it is a special IP address used for testing purposes only. Figure 2-3: Network Parameters – Set IP address Modular SAN Array Fabric Switch 6 User Guide Initial Configuration of the Switch...
- Page 25 This mask will work in many installations, as Class C IP networks are by far the most common. The best source of the correct mask is your local network administrator. Figure 2-4: Network Parameters menu – Set subnetwork mask Modular SAN Array Fabric Switch 6 User Guide...
- Page 26 MSA Fabric Switch 6 over the Ethernet from systems on other segments. In both of these cases, the MSA Fabric Switch 6 will need the IP address of the gateway system in order for it to function. Direct questions about gateways to your local network administrator.
-
Page 27: Accessing Management Parameters
The SNMP Trap community string is the password that any SNMP client must use to poll the SNMP agent on the MSA Fabric Switch 6 for SNMP traps. This name can be any desired ASCII string. The factory default is “SNMP_trap.”... -
Page 28: Accessing The Cli
The complete Command Line Interface is outlined in Appendix C, “Command Line Interface.” Exiting the Text-based UI The user can log out of the MSA Switch by selecting option 5. Logout in the main menu. The original login prompt is redisplayed. Resetting the Switch Select option 6. -
Page 29: Using The Array Configuration Utility-Xe (Acu-Xe) To Configure The Switch
Advanced switch configuration includes managing and monitoring ports, setting up zoning, and upgrading the switch firmware. Advanced configuration tasks are performed in using the MSA Fabric Switch 6 Management Utility. A link to this utility is provided in the ACU-XE. -
Page 30: Accessing The Switch Configuration Option Of The Acu-Xe
Accessing the Switch Configuration Option of the ACU-XE The ACU-XE can be started from the Compaq Web Based Management screen or by selecting Start - Programs - Compaq System Tool - Compaq Array Configuration XE. Figure 2-7 is an example of the Compaq Web-Based Management screen. - Page 31 Assisted Configuration is used to configure the controller. • Advanced Configuration is used to configure the controller. • Switch Configuration is used to configure the switch. Figure 2-8: ACU-XE main screen 3. Select Switch Configuration. All available switches detected by the ACU-XE for the selected controller are listed.
- Page 32 Initial Configuration of the Switch Figure 2-9: Switch selection 4. Select a switch to configure. Modular SAN Array Fabric Switch 6 User Guide 2-15...
-
Page 33: Initial Switch Configuration
Initial Switch Configuration After a switch is selected in the Switch Configuration screen, available configuration tasks for that switch are listed. See Figure 2-10 for an illustration of these configuration task options. During the initial configuration of the switch, only one option is displayed. If the switch has already been configured and is active, additional tasks are displayed. -
Page 34: Ip Address
Subnet Mask • Read and Write Community strings 3. Click Finish to save the settings. 4. Repeat these procedures to set up another switch, if necessary. Modular SAN Array Fabric Switch 6 User Guide Initial Configuration of the Switch 2-17... -
Page 35: Advanced Switch Configuration
NOTE: Before using the Web-based Switch Configuration Utility, verify that the networking cables have been connected between the management computer running ACU-XE and the LAN management ports on the switch(es), usually through a Hub. Compaq recommends using the PING command to ensure connectivity before selecting the Link. -
Page 36: Msa Fabric Switch 6 Management Utility
MSA Fabric Switch 6 Management Utility This chapter describes how to use the Management Utility on the MSA Fabric Switch 6. The following sections describe the process to launch the Management Utility on your switch: • Defining System Requirements •... -
Page 37: Defining System Requirements
MSA Fabric Switch 6 Management Utility Defining System Requirements The MSA Fabric Switch 6 Management Utility runs as a Java applet in a Netscape or Microsoft web browser and works with the versions shown below: • Microsoft Internet Explorer version 5.5 or later •... -
Page 38: Launching The Management Utility
“Configuring your IP address," and be connected to an IP network. Once configured, use the following procedure to launch the utility: 1. Use Compaq Insight Manager (CIM XE) or enter the IP address of the switch you want to manage into the web browser’s address box. -
Page 39: Describing The Console
MSA Fabric Switch 6 Management Utility Describing the Console The Management Utility provides a web-browser-based user interface so the MSA Fabric switch 6 can be easily managed. The opening window, as shown in the figure below, consist of three sections: •... -
Page 40: Task Selection Toolbar
Figure 3-4. It is comprised of the following four elements: • Switch Status Indicators • Message Text Line • Progress Indicator Bar • Control Buttons, including Cancel, Clear Status, and Refresh. Figure 3-4: Status panel Modular SAN Array Fabric Switch 6 User Guide MSA Fabric Switch 6 Management Utility... - Page 41 MSA Fabric Switch 6 Management Utility Switch Status Indicators The switch indicators in the Status Panel display the operating condition of the switch, as described in the following table. Table 3-1: Switch Status Indicators TEMP Normal State Blinking Amber Amber...
- Page 42 Progress Indicator Bar The Progress Indicator bar displays the percentage of progress completed during a transfer of information between the MSA Fabric Switch 6 and StorageWorks Management Utility, such as during a retrieval, refresh, or update action. Modular SAN Array Fabric Switch 6 User Guide...
-
Page 43: Control Buttons
“Normal State” until the fault condition is corrected. Cancel Cancels the current activity. Refresh Contacts the MSA Fabric switch 6 being monitored and refreshes the current display with current configuration information. Clicking this button does not update information for other Switches that are not currently being displayed. -
Page 44: Port Statistics Tab
The SFP tab will only be displayed if SFP information is available for the port. NOTE: No SFP tab will be displayed when an SFP is not installed in the switch or when an installed SFP does not make any information available. - Page 45 MSA Fabric Switch 6 Management Utility In addition, the indicators that are displayed on the switch graphic reflect the indicators that are configured on the switch and display the same status that is currently on the switch being monitored. Figure 3-5: Port information (shown in the left panel)
- Page 46 When the System Information button is selected from the Task Selection toolbar, you can manage and monitor global parameters for the switch. It provides a set of tabbed panels that provide access to a set of 8 switch management functions and is displayed in the following figure.
- Page 47 When the Device View button is selected, a table displays information for connected devices, as shown in the following filtered by selecting the switch, a port, or a device from the tree. Selecting the switch will show all the devices, selecting a port will show only the devices connected to that port, and selecting a device will show only that device.
- Page 48 Management Utility application, as shown in the following figure. They can be viewed or modified from this window. Figure 3-8: Main session Modular SAN Array Fabric Switch 6 User Guide MSA Fabric Switch 6 Management Utility 3-13...
- Page 49 When the Help button is selected, the application information and service contact information is provided as well as access to the on-line help system, as shown in the following figure. Figure 3-9: Main help session 3-14 Modular SAN Array Fabric Switch 6 User Guide...
-
Page 50: Using Msa Fabric Switch 6 Management Utility
Using MSA Fabric Switch 6 Management Utility The Management Utility lets you manage and monitor a Fabric Switch 6 remotely through a web-browser interface. The following sections will help you to use the Management Utility: • Managing and Monitoring individual ports •... - Page 51 Figure 3-10: Port button in task selection toolbar This view provides information about configuration and operation of all of the ports on the MSA Fabric Switch 6 being monitored. It also provides configuration and operation information about individual ports that are selected from either the tree representation or the switch graphic.
- Page 52 The Port Summary window is the default foreground display when the Port button on the toolbar is clicked. It consists of a table that describes the status and configuration of each of the ports on the switch. The following figure is an example of this display.
- Page 53 Media Type Identifies the media type plugged into the port or that no media adapter is attached Port Type Displays the worldwide name for the port identified. 3-18 Modular SAN Array Fabric Switch 6 User Guide...
- Page 54 Information display. It consists of a table that lists all of the ports related events generated by the MSA Fabric Switch 6 being monitored as shown in the following figure. This events table, as shown in the following figure, displays the parameters described in the following table for each event logged.
- Page 55 Unknown, Emergency, Alert, Critical Error, Warning, Notify, Info, Debug, and Mark. The type of the event. The possible event type parameters are: Unknown, Other, Status, Configuration, Topology. The message generated by the event. Modular SAN Array Fabric Switch 6 User Guide...
- Page 56 The following figure provides an example of the Port Reset display (you must use the scroll-bar at the right side of the panel to bring the Port Reset display into view). Figure 3-14: Port info/Port Reset view Modular SAN Array Fabric Switch 6 User Guide 3-21...
- Page 57 Displays and allows you to select these values: On Line = Port is enabled on the Fibre Channel network. Off Line = Port is disabled from operating on the Fibre Channel network. 3-22 Modular SAN Array Fabric Switch 6 User Guide continued...
- Page 58 Allows you to manually adjust the number of times a heartbeat signal is missed before routing decides the switch is not longer present. Port heartbeat is used by routing to verify that a switch is still present. Port Reset Use the scroll-bar at the right side of the panel to bring this option into view.
-
Page 59: Port Statistics Tab
The number of frames of length between 65 - 127 bytes that passed through this port. The number of frames of length between 128 - 255 bytes that passed through this port. Modular SAN Array Fabric Switch 6 User Guide continued... -
Page 60: Error Statistics
Link Failures Loss of Synchronization Loss of Signal Invalid CRC Invalid Transmission Words Modular SAN Array Fabric Switch 6 User Guide MSA Fabric Switch 6 Management Utility continued Description The number of frames of length between 256 - 511 bytes that passed through this port. - Page 61 Transmit Dropped Frames Stat Counter Reset statistical counters. Selecting this button will reset all the counters in the switch to zero. You must use the scroll down to bring this into view. The following figures provide an example of the Port Statistics tab, the Error Statistics View, and the Stat Counter Reset view.
- Page 62 MSA Fabric Switch 6 Management Utility Figure 3-16: Error statistics view Figure 3-17: Stat counter reset view Modular SAN Array Fabric Switch 6 User Guide 3-27...
- Page 63 Transmitter display, the compliance parameter on the Transmitter display, the Operation display, the Vendor display, and the Unformatted Data parameter on the Vendor Display. Figure 3-18: SFP tab – transmitter display 3-28 Modular SAN Array Fabric Switch 6 User Guide...
- Page 64 MSA Fabric Switch 6 Management Utility Figure 3-19: SFP tab – transmitter display, second part Figure 3-20: SFP tab – operational display Modular SAN Array Fabric Switch 6 User Guide 3-29...
- Page 65 MSA Fabric Switch 6 Management Utility Figure 3-21: SFP tab – vendor display Figure 3-22: SFP tab –vendor display, second part 3-30 Modular SAN Array Fabric Switch 6 User Guide...
-
Page 66: Managing From The System Information Panel
Managing from the System Information Panel Selecting the System Information button brings up the System Information panels of the Fabric Switch 6 Management Utility display. This display allows you to perform a variety of management and monitoring functions relevant to the MSA Fabric Switch 6 you are managing, as shown in the following figure. -
Page 67: Backup/Restore Tab
Switch Health Tab The Switch Health window is the default tab that is displayed when the System Information button is clicked for the first time. It can also be displayed by clicking the “Health” tab. It consists of the following three separate boxes that provide operating information about the switch being managed: •... - Page 68 Failed if it is above. The operating temperature of the switch must be kept between 10 and 40 degrees Celsius (between 50 and 104 degrees Fahrenheit).
- Page 69 The Information window is accessed by clicking the “Information” tab of the System Information display. It consists of two separate panels that provide identification and firmware version information about the switch being managed. The following figure is an example of this display.
- Page 70 Modular SAN Array Fabric Switch 6 User Guide MSA Fabric Switch 6 Management Utility Description Product Name of the MSA Fabric Switch 6 that is being managed. Serial number of the switch being managed. MAC address of the switch being managed.
- Page 71 MSA Fabric Switch 6 Management Utility Switch Control Tab The Switch Control window is accessed by clicking the “Switch Control” tab of the System Information display. It consists of three panels: “Switch Configuration,” “Switch Reset,” and “Restore Factory Defaults” as shown in the following figure.
- Page 72 “lowest priority number”, then the switch with the lowest WWN number will become the principal switch. A priority 1 forces the switch to be principal; a priority 255 will never allow the switch to be principal switch. Priority 2 is reserved for the current elected principal switch.
- Page 73 Set this parameter to greater than the E_D_TOV time of the legacy device that requires in order delivery. This allows you to reset the switch. Use with caution as this will disrupt switch operations. Restores the settings enabled at the factory.
-
Page 74: Network Tab
CLI, see the section titled “Setting the Gateway Address.” IP Configuration This panel, as shown in the following figure, displays all of the IP networking parameters that were set on the Fabric Switch 6 using the serial interface. Figure 3-27: Network tab... - Page 75 To add a station, type its IP address and Port Number in the top text boxes in this panel and click the Add button. • To remove a station from receiving traps from this Fabric Switch 6, highlight its IP address in the list box at the bottom of this panel and click the Remove button. •...
- Page 76 All the information in this panel is for informational purposes only. The switch does not use any of this information to perform functions. For example, the switch will not send out emails to the email address listed. However, some management applications, including future versions, may display some of the information listed on the Service tab page.
- Page 77 Information display. This window, as shown in the figure below, allows you to download new firmware to your MSA Fabric Switch 6. To perform a download using this interface, fill in the text boxes, click the appropriate radio button, and click the Start Download button.
- Page 78 Address download the new firmware. TFTP Time-out (msec) Enter the time in milliseconds that you want the switch to wait after requesting a download before requesting again. TFTP Retries Enter the number of times you want the switch to try downloading the new firmware before quitting.
- Page 79 System Information display. It consists of one panel titled: “Backup and Restore Settings.” Using this interface, you can save the current configuration parameters of the switch to a named TFTP server. You can also restore any previously saved configuration to the switch.
- Page 80 Table 3-14: Backup/Restore tab Parameters Backup/Restore File Set TFTP Server IP Address Last Backup/Restore Status Modular SAN Array Fabric Switch 6 User Guide MSA Fabric Switch 6 Management Utility Description The name for the set of files that contains the backup configuration.
- Page 81 The Events window is accessed by clicking the “Events” tab of the System Information display. It consists of a table that lists all of the events generated by the switch being monitored as shown in the following figure. Also included on this page are two list-filtering options, System Events and Port Events.
-
Page 82: Events Window
Time Stamp Severity Type Description Modular SAN Array Fabric Switch 6 User Guide Description Selecting System Events will filter the list so that only the events related to the system (and not the individual ports) will be listed. Selecting both System Events and Port Events will display all the events. -
Page 83: Monitoring From The Device View
Selecting members from the tree acts like a list filter. Selecting the switch in the tree will list information about all the devices connected to the switch. Selecting a port in the tree will list information about the selected port only. -
Page 84: Session Configuration
The first retry will time out in 10000 ms. • The second retry will time out in 20000 ms. Compaq recommends that you set the retry count low if the timeout value is high. Modular SAN Array Fabric Switch 6 User Guide MSA Fabric Switch 6 Management Utility... -
Page 85: Setting Up Zoning
SNMP Read Community string is the password required to read management Community data from the switch. This value must match the setting for the switch that you are managing as it was set using the Command Line Interface (CLI). If the values do not match, the application will not be able to retrieve information from the switch. - Page 86 • Zone Sets CAUTION: Never add a zoned switch to an established fabric that has no zoning. If a switch configured with zoning is added to a fabric that has no configured zoning, the fabric’s HBAs and targets will no longer be able to communicate and the traffic in the fabric will be disrupted.
-
Page 87: Zone Sets
Each zone set is assigned a unique zone set name when it is defined. The MSA Fabric Switch 6 allows storing of multiple zone sets. However, only one of these zone sets can be active at a time. The other zone sets can be used as backup, trials, or other user-defined configurations. - Page 88 Table 3-17: Switch and Fabric Zoning Limitations Item Number of Zone Sets Number of Zones Number of Zone Members Two Ways to Display Zoning The MSA Fabric Switch 6 Management Utility allows you to display zoning in two ways: • Merged zones • Local zones To toggle between the Merged Zones display and the Local Zones display, expand the Zoning View drop-down list in the Zoning Configuration screen.
- Page 89 This view is a read/write single-switch display showing the zone sets, zones, and zone members for that switch. You can create, edit and remove zone sets, zones, and zone members using the Local Zones view.
- Page 90 IMPORTANT: The Zoning icon and its options are not displayed or accessible until Zoning is enabled. To enable zoning: 1. In the Switch Control tab of the System Information screen, select the Zoning Configuration On radio button. Figure 3-33 is an illustration of the Zoning Configuration option in the Switch Control tab.
-
Page 91: Creating Zone Sets
To change the view in the Zoning Configuration screen, expand the Zoning View drop-down box near the top-center of the screen. Figure 3-34: Zoning Configuration screen, Local Zones view 3-56 Modular SAN Array Fabric Switch 6 User Guide... -
Page 92: Creating Zones
2. Enter the name of the zone member 3. Select the WWPN from the port number list. 4. Enter the WWPN name, or if the device is already connected to the switch, select the name from the dropdown menu. 5. Click OK. - Page 93 1. Right-click the desired Zone Set and select Activate. The active Zone Set is shown in bold on the screen. 2. Click Apply. The selected Zone Set is now the active Zone Set used by the switch. Example Zoning Configuration Assume the following: •...
- Page 94 Web_Zone contains the following Zone Members: Server1, Disk1, Raid1, and Tape1. • Mail_Zone contains the following Zone Members: Server2, Disk2, Raid1, and Tape1 Modular SAN Array Fabric Switch 6 User Guide MSA Fabric Switch 6 Management Utility Zones Web_Zone Web_Zone...
-
Page 95: Troubleshooting
Preventive Maintenance Solutions Troubleshooting Guidelines If there is a problem accessing a device connected to the switch, the source of the problem can be the MSA Fabric Switch 6 or any of the connections between the host and device. Use this chapter to troubleshoot the MSA Fabric Switch 6. -
Page 96: Troubleshooting The Msa Fabric Switch 6
3. Inspect the cabling between the switch and attached Fibre Channel devices. Check for loose, dirty, broken, or bent cabling and connectors. If a Compaq- supported Small Form Factor Pluggable transceiver (SFP) is in use, check that it is properly inserted and that the cable is properly seated. -
Page 97: Global Status Indicator
Table 4-1: Global Status Indicator Label Color/Pattern Power Green/ON Green/OFF Fault Amber/ON Modular SAN Array Fabric Switch 6 User Guide Interpretation Possible Causes The unit is connected This is the normal to an AC power state when powered source and the internal power supply is functioning. -
Page 98: Reading The Ethernet Indicators
The network link is There is a network link established. Modular SAN Array Fabric Switch 6 User Guide Possible Causes Normal running state. This is normal if not done excessively. Expect to encounter this when devices are... - Page 99 Table 4-2: Ethernet Indicators Label Color/Pattern Green/OFF Modular SAN Array Fabric Switch 6 User Guide continued Interpretation There is no network link. Troubleshooting Possible Causes If this is off, then there is no connection to the network. One or more of...
-
Page 100: Fibre Channel Cable
Connections The following section describes the proper use of Compaq-supported Small Form Factor Pluggable Transceivers (SFP) and Fibre Channel cables. Port Stat... -
Page 101: Compaq-Supported Small Form Factor Pluggables (Sfp)
Compaq-supported Small Form Factor Pluggables (SFP) Use caution when handling SFPs. Take normal precautions to protect them from a static electrical discharge and any other damage: IMPORTANT: Always wear an anti-static wrist strap when handling Compaq-supported SFPs. They are static sensitive. •... -
Page 102: Temperature Control
The MSA Fabric Switch 6 is designed to work in a normal room temperature environment, between 10º and 40º C (50º F to 104 º F). Preventive Maintenance Solutions To protect the switch for longer use, Compaq recommends the following: • Periodically vacuum the external surfaces of the switch to remove dust. -
Page 103: Regulatory Compliance Notices
The rating label on the device shows which class (A or B) the equipment falls into. Class B devices have an FCC logo or FCC ID on the label. Class A devices do not have an FCC ID on the label. Modular SAN Array Fabric Switch 6 User Guide Regulatory Compliance Notices... -
Page 104: Modifications
Modifications The FCC requires the user to be notified that any changes or modifications made to this device that are not expressly approved by Compaq Computer Corporation may void the user's authority to operate the equipment. Cables Connections to this device must be made with shielded cables with metallic RFI/EMI connector hoods in order to maintain compliance with FCC Rules and Regulations. -
Page 105: European Union Notice
Norms (in brackets are the equivalent international standards): • EN55022 (CISPR 22) - Electromagnetic Interference • EN50082-1 (IEC801-2, IEC801-3, IEC801-4) - Electromagnetic Immunity • EN60950 (IEC950) - Product Safety Modular SAN Array Fabric Switch 6 User Guide Regulatory Compliance Notices... -
Page 106: Appendix B Electrostatic Discharge
Place parts on a grounded surface before removing them from their containers. • Avoid touching pins, leads, or circuitry. • Always make sure you are properly grounded when touching a static-sensitive component or assembly. Modular SAN Array Fabric Switch 6 User Guide Electrostatic Discharge... -
Page 107: Grounding Methods
If you do not have any of the suggested equipment for proper grounding, have an Authorized Compaq Reseller install the part. NOTE: For more information on static electricity, or for assistance with product installation, contact your Compaq authorized reseller. -
Page 108: Appendix C Command Line Interface
Most of the configuration commands used to set up and maintain the MSA Fabric Switch 6 can be controlled from the main menu’s first two options: Networking Parameters and Management. For more advanced functions, the MSA Fabric Switch 6 Management Utility offers a further level of complexity. This more advanced level of parameters operates from a command line interface (CLI). - Page 109 Displays/modifies the SNMP Mib2 settings Displays/modifies the switch settings Displays the switch state Displays the switch status Displays/modifies the temperature settings displays/modifies the download settings Displays the topology information Displays/modifies the SNMP trap settings Modular SAN Array Fabric Switch 6 User Guide...
-
Page 110: Invoking The Command Line Interface
The CLI can be called up by choosing 4.Command line interface on the main menu. It will respond with a “cmd>” prompt, as shown in the following figure. Figure C-1: Main menu Modular SAN Array Fabric Switch 6 User Guide Command Line Interface... -
Page 111: Using The Command Line Interface
By typing the Help command, you can access a list of all available commands along with a brief overview of the syntax. In addition, it is possible to assign values to various parameters by using the equal sign separated by spaces. Modular SAN Array Fabric Switch 6 User Guide... -
Page 112: Logging Out Of The Cli
Reset This command resets the switch. Beacon The Beacon command enables or disables the switch. Modular SAN Array Fabric Switch 6 User Guide Command Line Interface... - Page 113 Configuration backup writes the switch’s configuration files to files specified by “file” on the TFTP server specified by the IP address. Configuration restore reconfigures the switch based on the files specified by “file “ from the TFTP server specified by the IP address.
- Page 114 Figure C-5: Config command Exit Exits the command line interface and returns to the main menu. Syntax Exit Examples: cmd> Exit Fabric Displays all of the switches in the fabric. Syntax Fabric Modular SAN Array Fabric Switch 6 User Guide Command Line Interface...
- Page 115 Command Line Interface Example: Figure C-6: Fabric command Factdft Resets the switch in the factory default settings. CLI command factory defaults are: Table C-2: Factory Defaults CLI Command User ID Beacon User User Config User User Creditleak Engineer Engineer Engineer Engineer...
- Page 116 User Admin/engineer User PortCtl User User User User User User Na Na Na Snmp User User User Modular SAN Array Fabric Switch 6 User Guide continued Parameter log level filter log module filter console display level filter console display module filter...
- Page 117 Request timeout Request packet retries Data timeout Data packet retries Reset after download Modular SAN Array Fabric Switch 6 User Guide Default Value FC Switch 1 254 off off 1 5 1800 3600 syspkg.bin 127.0.0.1 5000ms 6 500ms 60 All traps removed...
- Page 118 The name of the command for which you want help. command Examples: Figure C-8: Help command initial screen Modular SAN Array Fabric Switch 6 User Guide > — Displays a description of the command specified Command Line Interface C-11...
- Page 119 Command Line Interface Figure C-9: Supported commands Hwcfg Displays the hardware configuration of the switch Syntax HwCfg C-12 Modular SAN Array Fabric Switch 6 User Guide...
- Page 120 Log DispModFilter = <level> display module filter Log PrtMsgLvl <prt> = <num> level Modular SAN Array Fabric Switch 6 User Guide Command Line Interface Display event-log settings Modify the event-log level Modify the event-log module Modify the event-log...
- Page 121 Logs the user out of the system. Syntax LogOut C-14 Modify the event-log min Modify TFTP server filename Modify TFTP server IP Display entries in the Upload event-log entries to information; w – warning; f – Modular SAN Array Fabric Switch 6 User Guide...
- Page 122 Displays the local and global name server (NS) table entries. Syntax NS [/d] NS All NS All [/d] Where setting the /d variable causes all entries to display without pausing to wait for user interaction. Modular SAN Array Fabric Switch 6 User Guide Command Line Interface C-15...
- Page 123 PortCtl <port_number> Heartbeat = <heartbeat_rate> PortCtl <port_number> Cost = <routing_cost> where port_number = a valid port number for the Fabric Switch between 1 and 6. Use the value ‘ ’ if you want the command to apply to all ports.
- Page 124 Description 5 -50 Sets the heartbeat rate between 5 and 50 seconds. Modular SAN Array Fabric Switch 6 User Guide — Sets the port type variable Description — Sets the port type...
- Page 125 100 -5000 Examples: Figure C-15: PortCtl command Figure C-16: PortCtl offline command Syntax: PortCtl <port_number> offline = <offline_state> C-18 — Sets the routing cost Sets the routing cost between 100 and 5000. Modular SAN Array Fabric Switch 6 User Guide...
- Page 126 PortCtl <port_number> public = <public_state> Figure C-18: Portctl type command Syntax: PortCtl <port_number> Type = <port_type> Figure C-19: PortCtl speed command Syntax: PortCtl <port_number> Speed = <port_speed> Figure C-20: PortCtl heartbeat command Modular SAN Array Fabric Switch 6 User Guide Command Line Interface C-19...
- Page 127 Syntax PortStatS PortStatS <port_number> PortStatS /r PortStatS <port_number> /r where port_number = a valid port number for the Fabric Switch between 1 and 6. —Displays statistics for all ports on the switch. PortStatS C-20 Display statistic for all ports Display statistic for specified ports...
-
Page 128: Port Status
PortStatS <port_number> switch. — Resets the statitics counters for all ports on the switch. PortStatS /r PortStatS <port_number> on the switch. Examples: Figure C-22: Portstats command PortStatUs Displays port status. Syntax PortStatUs PortStatUs <port#> —Displays port status for all ports on the switch. - Page 129 Figure C-23: Portstatus command Figure C-24: Portstatus with port number Syntax: PortStatUs <port_number> PortTp Continuously display the throughput for all of the ports. Press any key to stop the display. Syntax PortTp C-22 Modular SAN Array Fabric Switch 6 User Guide...
- Page 130 This command displays or modifies the MIB2 system strings. System contact can contain three pieces of information: name, email address, and phone number. Use “|” to separate the name, email address, and phone number fields. For example, JohnDoe|jdoe@dotcom.com|555-1212 Modular SAN Array Fabric Switch 6 User Guide Command Line Interface C-23...
- Page 131 Figure C-27: SNMP command Figure C-28: SNMP name = command C-24 — Sets the SNMP Name for the switch to the text — Sets the SNMP Contact for the switch to the — Sets the SNMP Location for the switch to the...
- Page 132 Command Line Interface Figure C-29: SNMP con command Figure C-30: SNMP loc command Modular SAN Array Fabric Switch 6 User Guide C-25...
- Page 133 Example: Figure C-31: Swstate command C-26 Display switch control Set desired switch domain Set switch priority Turns address translation Turns fabric address Clear cumulative up time Turn force In-Order- Set Force In-Order- Modular SAN Array Fabric Switch 6 User Guide...
- Page 134 Figure C-32: Swstate command ports data information Swstatus Displays the switch status. Syntax Swstatus Example: Figure C-33: Swstatus command Modular SAN Array Fabric Switch 6 User Guide Command Line Interface C-27...
- Page 135 Command Line Interface Temp Displays the current temperature of the switch and the threshold setting for it. It also allows you to modify the switch temperature threshold. Syntax Temp Temp = <temperature_threshold> — Displays the current temperature of the switch and the current threshold Temp setting.
- Page 136 TftpDl DataRetry = <data_retries> switch will request the server to download a data packet before giving up to the number typed in place of the req_retries variable Modular SAN Array Fabric Switch 6 User Guide —...
- Page 137 Variables Description reset_state Sets switch to automaticly reboot after a new boot image has been down loaded to it. Sets switch tonot automaticly reboot after a new boot image has been downloaded to it. TftpDl ChangePrimary —...
- Page 138 — Displays the information for all of the switches in the network Topology /d without pausing and prompting the user to continue. Topology <domain_Id_number> switch whose domain ID number is typed in place of the domain_ Id_number variable. Modular SAN Array Fabric Switch 6 User Guide Command Line Interface —...
- Page 139 Valid range for ‘ip’ is 0 – 255. Valid range for ‘port’ is 1-2147483647, normally 162. Syntax Traps Traps Add <ip_address,port_number> Traps Delete <ip_address,port_number> Traps Filter <ip_address,port_number> Traps State <ip_address,port_number> C-32 Modular SAN Array Fabric Switch 6 User Guide...
- Page 140 SNMP trap recipient. The command variables are defined as follows: Modular SAN Array Fabric Switch 6 User Guide — This command is used to add new...
- Page 141 Filters for traps of the type “Notify”. Filters for traps of the type “Info”. Filters for traps of the type “Debug”. Filters for traps of the type “Mark”. Lowest level of severity. Modular SAN Array Fabric Switch 6 User Guide — This...
- Page 142 Examples: Figure C-37: Traps command Figure C-38: Traps add command Modular SAN Array Fabric Switch 6 User Guide Description The IP address of the SNMP trap recipient whose state you want to set. The port number of the SNMP trap recipient whose state you want to set.
- Page 143 Command Line Interface Figure C-39: Traps delete command Figure C-40: Traps filter command Figure C-41: Traps state command C-36 Modular SAN Array Fabric Switch 6 User Guide...
-
Page 144: Setting Up Zoning
Setting up Zoning Zoning is a function of the MSA Fabric Switch 6 that allows you to create isolated Fibre Channel networks with a limited number of connected devices. By limiting the number of devices in a zone, you can obtain more robust performance and enhance your access protection. - Page 145 Each zone set is assigned a unique zone set name when it is defined. The MSA Fabric Switch 6 allows storing of multiple zone sets. However, only one of these zone sets can be active at a time. The other zone sets can be used as backup, trials, or other user-defined configurations.
-
Page 146: Naming Rules For Zone Members, Zones, And Zone Sets
There are zoning limitations for individual switches and fabrics. See Table C-3 for maximum limitations. Table C-3: Switch and Fabric Zoning Limitations Item Number of Zone Sets Number of Zones Number of Zone Members Modular SAN Array Fabric Switch 6 User Guide Maximum Command Line Interface C-39... -
Page 147: Using The Cli To Configure Zoning
This section describes how to use the CLI to configure zone members, zones, and zone sets and apply the new or edited zone configurations to the switch. To ensure uninterrupted operation of the MSA Fabric Switch 6, a three-stage process was developed for configuring zoning using CLI: •... - Page 148 (zones), and last create the individual entities (zone members). After you have created your zone members using their WWPN, you can assign more user-friendly names to your zone members. Modular SAN Array Fabric Switch 6 User Guide Zones Web_Zone...
- Page 149 3. Display the pending table to verify that it was cleared. cmd> zone pending Zone table is empty. C-42 ,” you can use “ cmd> zn pn Modular SAN Array Fabric Switch 6 User Guide .” For a list of the CLI abbreviations,...
- Page 150 Web_Zone 210000010241ff73 210000010249a7ab Zone member [210000010241ff73] added to zone [Web_Zone]. Zone member [210000010249a7ab] added to zone [Web_Zone]. Changes will only take effect after a ‘zone write’ command!! Modular SAN Array Fabric Switch 6 User Guide Command Line Interface C-43...
- Page 151 1. Display the zone members. cmd> zone pending displayzm WWPN 1000000102421303 2100005004d02f78 210000010241ff73 210000010249a7ab 100000a0c991a47a 200000600819ae48 C-44 Name [WWN-1000000102421303] [WWN-2100005004d02f78] [WWN-210000010241ff73] [WWN-210000010249a7ab] [WWN-100000a0c991a47a] [WWN-200000600819ae48] Modular SAN Array Fabric Switch 6 User Guide...
- Page 152 Renamed zonemember [WWN-100000a0c991a47a] to [Server2]. Changes will only take effect after a ‘zone write’ command cmd> zone renzm WWN-200000600819ae48 Disk2 Renamed zonemember [WWN-200000600819ae48] to [Disk2]. Changes will only take effect after a ‘zone write’ command!! Modular SAN Array Fabric Switch 6 User Guide C-45...
- Page 153 = [2100005004d02f78] zone member = [210000010241ff73] zone member = [210000010249a7ab] zone [Mail_Zone] contains 4 member(s) zone member = [210000010241ff73] zone member = [210000010249a7ab] zone member = [100000a0c991a47a] zone member = [200000600819ae48] C-46 Modular SAN Array Fabric Switch 6 User Guide...
- Page 154 Viewing the Zone Members in the pending table To display the zone members in the pending table: cmd> zone pending displayzm WWPN 1000000102421303 2100005004d02f78 210000010241ff73 210000010249a7ab 100000a0c991a47a 200000600819ae48 Modular SAN Array Fabric Switch 6 User Guide Command Line Interface Name [Server1] [Disk1] [Tape1] [Raid1] [Server2] [Disk2] C-47...
- Page 155 = [1000000102421303] zone member = [2100005004d02f78] zone member = [210000010241ff73] zone member = [210000010249a7ab] zone member = [210000010241ff73] zone member = [210000010249a7ab] zone member = [100000a0c991a47a] zone member = [200000600819ae48] Modular SAN Array Fabric Switch 6 User Guide...
- Page 156 = [210000010241ff73] zone member = [210000010249a7ab] zone [Mail_Zone] contains 4 member(s) zone member = [210000010241ff73] zone member = [210000010249a7ab] zone member = [100000a0c991a47a] zone member = [200000600819ae48] Modular SAN Array Fabric Switch 6 User Guide Command Line Interface C-49...
-
Page 157: Laser Precautions And Fibre Cables
WARNING: To reduce the risk of injury from laser radiation or damage to the equipment, observe the following precautions: • Allow only Compaq Authorized Service Technicians to repair the equipment. • Do not open any panels, operate controls, make adjustments, or perform procedures to a laser device other than those specified herein. -
Page 158: Fibre Channel Cable
2 meters to 500 meters. These cables are for use with Shortwave SFPs only. However, three multi-mode Fibre Channel cable option kits are available from Compaq if longer lengths are desired. Each kit contains a multi-mode Fibre Channel cable with a connector attached to each end. The Modular SAN Array 1000 storage systems and associated host bus adapters ship standard with 2m and 5m Fibre Channel cables, respectively. - Page 159 Fibre Channel cable should be coiled and tied out of the way, being careful not to coil the cable in a tight loop with a bend radius of less than 3 inches (7.62 cm). Modular SAN Array Fabric Switch 6 User Guide Laser Precautions and Fibre Cables...
-
Page 160: Finding The Msa Fabric Switch 6 Management Utility Version Number
The current version of the MSA Fabric Switch 6 Management Utility is displayed on the MSA Fabric Switch 6, Device Summary tab. It can also be found on the main menu of the command line interface, labeled “StorageWorks MSA Fabric Switch 6 Management Utility.”... -
Page 161: Updating The Switch Using The Web Browser Interface
The update will occur automatically following the reset. Updating the Switch using the Command Line Interface The MSA Fabric Switch 6 can also be updated using the command line interface. Use command to set the MSA Fabric Switch 6 TFTP parameters and to start tftpdl the download process. - Page 162 StorageWorks MSA Fabric Switch 6 once the transfer is complete. The boot file name needs to be set for a successful update. This will be provided along with the download file at the Compaq website: www.compaq.com/storageworks Typically, both the timeout and retry parameters do not require resetting unless the network used is overloaded with other traffic.
-
Page 163: Updating The Switch 6 Using The Boot Menu
Updating the Fabric Switch MSA Fabric Switch 6 Management Utility Updating the Switch using the Boot Menu The MSA Fabric Switch 6 can also be updated using the Boot Menu. The Boot Menu is accessible immediately after the MSA Fabric Switch 6 is powered up or reset. The... -
Page 164: Index
SFPs 4-7 troubleshooting 4-2 command prompt C-3 defined C-4 help menu, illustrated C-4 invoking C-3 Modular SAN Array Fabric Switch 6 User Guide logout screen, illustrated C-5 main menu C-3 main menu, illustrated C-3 syntax C-4 Command Line Interface (CLI) - Page 165 Index community names restoring 2-10 retrieving 2-10 setting new 2-10 Compaq authorized reseller xi Compaq website xi configuration methods of 2-2 overview 2-2 connecting a terminal to 2-3 connection, problems 4-6 connectors RJ-45 Ethernet 1-4 RS-232 DB-9 serial port 1-4...
- Page 166 3-34 system information panel 3-31 system information screen 3-11 task selection toolbar 3-5 full duplex communications 1-3 Modular SAN Array Fabric Switch 6 User Guide gateway address MSA Fabric Switch 6 configuration 2-9 setting 2-9 grounding methods B-2...
- Page 167 3-5 indicators global status indicator 1-4 progress 3-7 switch status 3-6 installation procedure, MSA Fabric Switch 6 1-5 IP address MSA Fabric Switch 6 configuration 2-7 setting 2-7 logout screen, illustrated C-5 Modular SAN Array Fabric Switch 6 User Guide...
- Page 168 2-10 network parameters 2-6 network parameters, illustrated 2-6 Modular SAN Array Fabric Switch 6 See MSA Fabric Switch 6 MSA Fabric Switch 6 Compaq supported SFPs 4-7 components 1-3 components of 1-4 configuration 1-1 connection problems 4-6 defined 1-2...
- Page 169 UI configuration of the switch 2-3 logging in to 2-5 tftp changing IP address E-2 file name parameters E-4 parameters E-2 server IP address E-2 tools conductive field service type B-2 Modular SAN Array Fabric Switch 6 User Guide...
- Page 170 4-6 SFPs 4-7 temperature control problems 4-8 user interfaces, listed 2-2 versions, Switch Management Utility, finding E-1 Modular SAN Array Fabric Switch 6 User Guide warnings defined 1-1, D-1 websites Compaq xi Windows NT setting up HyperTerminal properties 2-4...
Need help?
Do you have a question about the 230934-002 and is the answer not in the manual?
Questions and answers