Table of Contents
Advertisement
User Guide
Selected Version
About This Manual
Getting Started
Copy
Print
Scan
Document Server
Web Image Monitor
Adding Paper and Ink
Troubleshooting
Specifications for the Machine
Legal and Contact Information
For information not found in this manual,
see the online manuals available on our
web site (https://www.ricoh.com/) or via the
control panel.
For safe and correct use, be sure to read Safety Information
separately provided before using the machine.
Advertisement
Table of Contents

Related Manuals for Ricoh IM CW2200


Summary of Contents for Ricoh IM CW2200
- Page 1 Legal and Contact Information For information not found in this manual, see the online manuals available on our web site (https://www.ricoh.com/) or via the control panel. For safe and correct use, be sure to read Safety Information separately provided before using the machine.
-
Page 3: How To Read The Manuals
How to Read the Manuals Symbols Used in the Manuals This manual uses the following symbols: Indicates points to pay attention to when using functions. This symbol indicates points that may result in the product or service becoming unusable or result in the loss of data if the instructions are not obeyed. Be sure to read these explanations. -
Page 4: Table Of Contents
TABLE OF CONTENTS How to Read the Manuals..........................1 Symbols Used in the Manuals........................1 1. About This Manual Abbreviated Names of Options........................9 2. Getting Started Turning On and Off the Power........................11 Turning On the Main Power........................11 Turning Off the Main Power........................12 Energy Saving Mode...........................13 Guide to Names and Functions of Components....................15 Front and Left View............................ - Page 5 Registering Settings as a Program......................45 Changing the Contents of the Program......................46 Logging In from the Control Panel........................48 Logging In by Entering the User Name and Password................49 Logging In Using an IC Card........................50 Logging In Using a Mobile Device......................50 Authenticating Using the User Code......................
- Page 6 Installing the Printer Driver for Network Connection (macOS)..............93 Installing the PPD file............................93 Registering the Machine in [Printers & Scanners]..................94 Specifying the Option Settings........................96 Basic Procedure for Printing Documents......................98 Printing a Document in Windows....................... 98 Printing a Document in macOS........................ 100 Changing a default values of the printer settings (Windows)..............102 Combining and Printing Multiple Pages on a Single Sheet of Paper............
- Page 7 7. Web Image Monitor Using Web Image Monitor...........................137 What You Can Do on the Web Image Monitor..................138 Web Image Monitor Screen........................139 Specifying Web Image Monitor Help..................... 140 8. Adding Paper and Ink Loading Paper into the Paper Input Location....................143 Loading Paper Roll into the Paper Input Location...................144 Loading Paper into the Paper Bypass Location..................157 Specifying Regular Sizes..........................
- Page 8 Checking the Indicators, Icons, and Messages on the Control Panel............197 When an Icon is Displayed with a Message..................197 When the [Check Status] Indicator is lit or flashing................198 When the Machine Cannot Be Operated....................200 When the Machine Does Not Respond Correctly to an Operation on the Control Panel....200 When Paper Cannot Be Fed Properly.....................
- Page 9 Specifications for the Main Unit....................... 264 Specifications for the Document Server....................268 Specifications for Printer........................... 269 Specifications for Scanner........................270 Specifications for Paper Input Location 2....................274 Specifications for Wireless LAN Board....................275 Specifications for Device Server Option....................275 The Setting Values of the Transmission Function..................277 Send Email..............................
- Page 10 Trademarks (User Guide)..........................294...
-
Page 11: About This Manual
1. About This Manual Abbreviated Names of Options In the manuals, the abbreviated names of options are used. The abbreviated names and corresponding product names are as follows: Options that can be attached to the machine differ depending on the machine type. page 281 "Machine Options"... - Page 12 1. About This Manual...
-
Page 13: Getting Started
2. Getting Started Turning On and Off the Power To turn the machine on and off, press the main power switch on the left side of the machine. Turning On the Main Power • Do not press the main power switch repeatedly. When you turn the power on or off, wait at least 10 seconds after confirming that the main power indicator on the right side of the control panel has turned on or off. -
Page 14: Turning Off The Main Power
2. Getting Started • When the power is turned on, the screen may show that the machine is performing an auto restart. Do not turn off the main power while the machine is processing. It takes about 4 minutes until the machine restarts. -
Page 15: Energy Saving Mode
Turning On and Off the Power Energy Saving Mode When the machine is not operated for a specified period of time, the machine enters the "Energy Saving mode" automatically. "Energy Saving mode" has two modes, "Low Power mode" and "Sleep mode", and the machine enters the Low Power mode first. - Page 16 2. Getting Started • When the service call message appears • When the "Add Ink" message appears • When ink is being replenished • When one of the menus in the "Settings" screen is displayed • When data is being processed •...
-
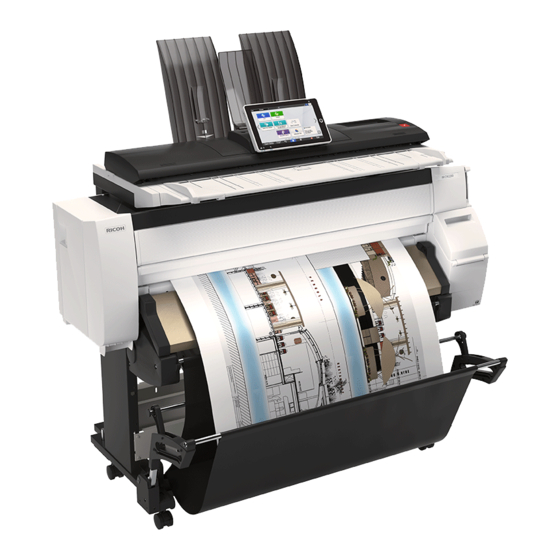
Page 17: Guide To Names And Functions Of Components
Guide to Names and Functions of Components Guide to Names and Functions of Components • Do not obstruct the machine's vents. Doing so can result in fire as the internal components are overheated. Front and Left View D0CWIA0401 1. Control panel page 19 "Names and Functions of the Control Panel"... -
Page 18: Front And Right View
2. Getting Started 4. Rewind button Press this button to load the paper roll or to remove misfed paper. 5. Paper Input Location 2 Load a paper roll here. 6. Paper Input Location 1 Load a paper roll here. 7. Paper output location The printouts are delivered here. - Page 19 Guide to Names and Functions of Components 1. Original table Place originals here scanning side down. 2. Original cover Open to clear jammed originals. 3. Original stacker Originals are stacked here. 4. Stacker support Use to output originals to the front side. 5.
-
Page 20: Rear View
5. USB2.0 Interface Type B Use the port to connect the machine and the computer with the USB cable. • (mainly Europe) When touching the machine, you may experience a static shock which is harmless to humans. For details, refer to the following: https://www.ricoh-europe.com/support/health-safety/ricoh-static-shock.html... -
Page 21: Names And Functions Of The Control Panel
Names and Functions of the Control Panel Names and Functions of the Control Panel The touch panel (Smart Operation Panel) that displays the operation screen of the machine is referred to as the "Control Panel". • On both sides of the control panel, interfaces for connecting external devices and slots to insert an SD card/USB flash memory device are provided. - Page 22 27 "Intuitive Screen Operation Using Fingertips" 3. NFC tag Used to connect the machine and a smart device with the RICOH Smart Device Connector. See "Using the Machine Functions from a Mobile Device", User Guide (Full Version). page 50 "Logging In Using a Mobile Device"...
-
Page 23: Led Indicators
Names and Functions of the Control Panel LED Indicators D0CWIA5708 1. Media access indicator Flashes when data is being read from or written to an SD card. While the machine is accessing the SD card or USB flash memory device, do not turn the power off or remove the media. -
Page 24: Setting The Output Basket
2. Getting Started Setting the Output Basket • Open the output basket before you start printing. • Hold the bars with both hands. If you hold the bars with only one hand, you might drop the bars. • If the machine is installed near an air conditioner or heater, the delivered paper might not be stacked properly due to the air from the air conditioner or heater. - Page 25 Setting the Output Basket D0CWIA0404 Make sure the output basket is open before you start printing. Printed paper is output as shown in the illustration. D0CWIA0040 Close the output basket Push the output basket towards the machine. D0CWIA0405...
-
Page 26: Changing The Display Language
2. Getting Started Changing the Display Language You can change the language used on the display. English is set as default. On the Home screen, press the change language widget. Select the language you want to display. Press [OK]. -
Page 27: How To Use The Home Screen
How to Use the Home Screen How to Use the Home Screen Press [Home] ( ) at the bottom center of the screen to display the Home screen on which icons for each function are shown. On the Home screen, you can register frequently used shortcuts and widgets. •... - Page 28 2. Getting Started 3. Help When the machine is connected to the Internet and Help is available for the screen that is displayed or the error that has occurred, press this icon to display a Help screen. Select the [Accept cookies] check box in the control panel browser to display Help properly. See "Browser Settings", User Guide (Full Version).
-
Page 29: Intuitive Screen Operation Using Fingertips
How to Use the Home Screen 11. [Home] Press to display the Home screen. 12. [Back] Press to return to the previous screen. 13. Date/Time and Ink remaining The current date and time is displayed. To display the information about Ink remaining, specify [Display Time/Remaining Ink] of [System Bar Settings] to [Remaining Ink]. - Page 30 2. Getting Started DZB181 Drag (for moving an icon) Press and hold an icon, and then slide your finger while pressing on the screen to move the icon. DZB182 Long tap (for displaying the available menu screen) Press and hold on a blank area on the screen to display the menu screen. On the Home screen you can add a folder or change the wallpaper from the menu.
- Page 31 How to Use the Home Screen DZB185 Pinch-out (for zooming in the screen) Touch the screen with your thumb and forefinger, and spread them apart. You can also zoom in the screen by tapping the screen twice quickly. When you quickly tap the screen twice again, the screen returns to full display.
-
Page 32: How To Use The "Settings
2. Getting Started How to Use the "Settings" Press [Settings] on the Home screen to change the settings of the machine, edit the address book, or confirm various information. The "Settings" screen consists of the menus shown below. D0CWPA5103 1. System Settings Specify the operation panel display, machine operation settings, operation sounds, timer, network settings and other settings. - Page 33 How to Use the "Settings" 3. Paper Input Location/Paper Settings Specify the size and type of paper set in the paper input location. See "Paper Input Location/Paper Settings", User Guide (Full Version). 4. Basic Settings When Installing You can configure the settings easily when installing the machine. •...
- Page 34 2. Getting Started 8. Inquiry Confirm the contact for requesting repair of the machine or ordering consumables. 9. Maintenance You can adjust the print head position and print start position, and cut the paper roll. 10. Counter Display and print the total number of sheets printed for each function. See "Checking the Counter of the Machine for Each Color Category", User Guide (Full Version).
-
Page 35: How To Use The Copy Screen
How to Use the Copy Screen How to Use the Copy Screen You can select from one of two types for the Copy screen: Refer to page 33 "How to Use the Copy Screen (Standard)" or page 35 "How to Use the Copy Screen (No Scrolling Screen)"... - Page 36 2. Getting Started D0CWPA5108 1. Copy function keys Press a key to select the function to assign to the key. Flick up and down on the screen to display the keys out of the visible area. The keys with assigned functions are displayed in yellow or with in the upper left corner.
-
Page 37: How To Use The Copy Screen (No Scrolling Screen)
How to Use the Copy Screen 6. [Start] Press to perform copying. 7. Other keys for Copy function Press to select the functions whose keys are out of the visible area of the screen. The key of the function that is currently configured is displayed with in the upper left corner. -
Page 38: Changing The Layout Or Display Of The Keys Of The Copy Function
2. Getting Started 7. Other keys for Copy function Press to select the functions whose keys are out of the visible area of the screen. The key of the function that is currently configured is displayed with in the upper left corner. 8. - Page 39 How to Use the Copy Screen Hiding a key Press and hold the key to hide, drag it to "Hide the Keys", and then press [OK]. DZX027 Displaying a hidden key Press "Hidden Key List" to display the hidden keys. Press and hold the key to display, drag it to the location to display, and then press [OK].
-
Page 40: How To Use The Scanner Screen
2. Getting Started How to Use the Scanner Screen There are five kinds of functions and settings on the Scanner screen. D0CZPM1334 1. Destination type selection You can switch between [Scan to Email] and [Scan to Folder]. The items displayed in the address book and destination entry screen for manual entry also change when you switch the destination type. - Page 41 How to Use the Scanner Screen Switching to change the key layout mode Long-press any key and press [OK] on the screen below to switch to the key sorting mode and enable changing of the key layout. Changing the key layout Long-press a key to change the layout, drag it to a new location, and then press [OK].
- Page 42 2. Getting Started DZX028 Confirming the initial placement of the keys Press [Menu] ( [Change Key Layout] [Check the key layout of the factory defaults] on the Scanner screen. After confirming, press [Back]. Resetting the key layout to the default Press [Menu] ( [Change Key Layout] [Reset Layout]...
-
Page 43: Adding A Frequently Used Application Or Widget To The Home Screen
Adding a Frequently Used Application or Widget to the Home Screen Adding a Frequently Used Application or Widget to the Home Screen You can use a frequently used icon or widget easily by adding it to the Home screen. You can organize the icons on the Home screen as you like by changing their order or using folders. -
Page 44: Adding An Icon/Widget To The Home Screen
2. Getting Started Adding an Icon/Widget to the Home Screen Press the application list icon on the Home screen. DZC187 Press and hold the icon or widget to be added to the application list screen. • Select the [WIDGET] tab to add a widget, or select the [PROGRAM] tab to add a program. After the screen changes to the Home screen, move the icon or widget to the desired position and release it. -
Page 45: Creating A Folder To Organize Icons
Adding a Frequently Used Application or Widget to the Home Screen • To delete an icon or widget, press and hold the icon and move it to the trash icon, and then release • When you delete a shortcut icon of a function or program from the Home screen, the function or program is not deleted. -
Page 46: Registering Frequently Used Settings As A Program
2. Getting Started Registering Frequently Used Settings as a Program You can register a "program" made of a combination of the functions used in the Copy or Scanner. • You can load the registered program easily from the application screen. D0CWPA5119 •... -
Page 47: Registering Settings As A Program
Registering Frequently Used Settings as a Program Registering Settings as a Program First, configure the settings to be registered on the Copy or Scanner screen, and then register them. On the Home screen, press [Copy] or [Scanner]. If the icon is not displayed on the Home screen, add the icon from the application list screen. page 41 "Adding a Frequently Used Application or Widget to the Home Screen"... -
Page 48: Changing The Contents Of The Program
2. Getting Started Even if you select [Do not Place], you can add shortcuts to the program to the Home screen after the program registration is complete. Press [Exit]. Changing the Contents of the Program You can change a part of the program and overwrite it or change the contents and register them as a new program. - Page 49 Registering Frequently Used Settings as a Program • To register the contents as a new program, select a number that is not programmed. Enter a program name and select an icon. Press [Prev. Screen] [OK]. Press [Place]. Even if you select [Do not Place], you can add shortcuts to the program to the Home screen after changing the settings of the program is complete.
-
Page 50: Logging In From The Control Panel
2. Getting Started Logging In from the Control Panel When the machine is configured by the administrator to restrict use by unauthorized users, you must authenticate your login information before starting the operation. The authentication methods are described below. • When Basic Authentication, Windows Authentication, or LDAP Authentication is configured on the machine, enter the user name and password for authentication to log in to the machine before starting operation. -
Page 51: Logging In By Entering The User Name And Password
Logging In from the Control Panel • If the machine is not used for a specified period, the user is automatically logged out (Auto Logout). The default setting for Auto Logout is 3 minutes. The period of Auto Logout can be changed by [Auto Logout Timer] of [System Settings] or the Auto Logout setting can be disabled. -
Page 52: Logging In Using An Ic Card
Logging In Using a Mobile Device Log in to the machine using the RICOH Smart Device Connector app on your mobile device. You need a mobile device that supports Bluetooth Low Energy (BLE). - Page 53 Logging In from the Control Panel Enable the Bluetooth function on your mobile device. Start the RICOH Smart Device Connector application on the mobile device, and then flick left or right to display the login screen. If the login screen is not displayed, press [Settings] [Navigation Display Item], and then enable the display of [Login to MFP] on RICOH Smart Device Connector.
-
Page 54: Authenticating Using The User Code
2. Getting Started • To log out from the machine, hold the mobile device over the Bluetooth label on the control panel or press [Logout] at the top right on the screen. • If another user holds a mobile device over the card reader while you are still logged in, you are automatically logged out and the new user logs in. - Page 55 Logging In from the Control Panel Press [Address Book] on the Home screen. Select the login user from the address book, and then press [Edit]. D0CWPA5113 Press the [User Management / Others] tab [User Management]. Enter the new password in [Login Password], and then re-enter the password in [Confirm Login Password] for confirmation.
-
Page 56: Placing Originals On The Original Table
2. Getting Started Placing Originals on the Original Table • Place one original at a time on the original table. • When inserting an original, push it lightly against the rollers. Pushing it with force may cause an original jam. •... -
Page 57: Stopping Originals From Feeding In
Placing Originals on the Original Table Support the original with your hands until it feeds in. D0CWIA5722 • After inserting an original, do not try to handle it. • When loading long or thick originals, use both hands to support the original as it feeds until half of it is scanned so feeding is not interrupted. -
Page 58: Placing Rolled Originals
2. Getting Started • See "When Paper or an Original Is Jammed", User Guide (Full Version). Placing Rolled Originals When placing rolled originals, you can use the output basket. Check that the output basket is in basic mode. D0CWIA0404 Adjust the original guides to the original size. Place the trailing edge of the rolled original on the output basket. -
Page 59: Copy
3. Copy Basic Procedure for Copying Documents Set the original on the original table to make a copy. Get the output basket ready in advance. For details, see the following section: page 22 "Setting the Output Basket" You can specify output locations for originals. If the rear original stackers are installed, originals are ejected onto the original stackers. - Page 60 3. Copy Select the color mode on the Copy screen. Press [ ] or [ ] in [Quantity] to specify the number of copies. DZC207 You can enter this using the keyboard after pressing [Quantity] or a number. Press the paper input location select key, and then select the paper input location and paper size to use as necessary.
- Page 61 Basic Procedure for Copying Documents Specify the Original Orientation. Depending on the settings, the screen shown above is displayed when you place an original or press [Start]. If you do not want this screen to appear when you place originals or press [Start], clear the [Check the orientation of the original every time after pressing [Start]] check box.
-
Page 62: Specifying The Length Of Copy Paper Cut
3. Copy Specifying the Length of Copy Paper Cut Specify the length to cut the paper loaded in the paper input location. The paper loaded in the paper input location is cut and delivered after copying. There are three types of applications that paper cut methods as described below. •... - Page 63 Basic Procedure for Copying Documents • You cannot specify Synchro Cut together with Stamp function. • You can copy with a margin when Synchro Cut is specified. • See "Copying with Margins", User Guide (Full Version). • Depending on the original length and paper type, copy paper length may be different from the original.
- Page 64 3. Copy Paper roll width Preset Preset 841 mm 594 mm 420 mm 297 mm 728 mm B1 JIS B2 JIS 515 mm B2 JIS B3 JIS 364 mm B3 JIS B4 JIS 914 mm 36 × 48 24 × 36 880 mm 1,189 mm 594 mm...
- Page 65 Basic Procedure for Copying Documents Paper roll width Preset Preset 36 inch 36 × 48 24 × 36 30 inch 30 × 42 21 × 30 24 inch 24 × 36 18 × 24 18 inch 18 × 24 12 × 18 12 inch 12 ×...
-
Page 66: Scanning The Original At A Certain Width
3. Copy Enter the length to cut the roll paper, and the press [OK]. Place the original. page 57 "Basic Procedure for Copying Documents" The original is fed into the machine automatically, and copying starts. If the original is not fed automatically, press [Start]. - Page 67 Basic Procedure for Copying Documents Position of printout when [Wide Position of printout when [Wide Scan] is not selected. Scan] is selected. When an original is smaller than The image is printed on the top The image is printed on the top the paper: left area of the paper.
-
Page 68: Reserving A Copy Job While Executing Another Copy Job
3. Copy Reserving a Copy Job While Executing Another Copy Job When [Reserve] is displayed on the execution screen of the current copy job, you can scan the original of another copy job to execute after the current job is completed (Job Preset). You can make reservations for up to eight jobs each in the Copier and Document Server functions. - Page 69 Basic Procedure for Copying Documents Press [Copy] on the Home screen. Press [High Speed Copy] on the Copy screen. Place the original. page 57 "Basic Procedure for Copying Documents" The original is fed into the machine automatically, and copying starts. If the original is not fed automatically, press [Start].
-
Page 70: Making Enlarged Or Reduced Copies
3. Copy Making Enlarged or Reduced Copies You can enlarge or reduce the original when copying with the following methods: • Enlarging or reducing at a specified reduction ratio or into a specified size (Zoom/Reduce/ Enlarge/Size Magnification) • Enlarging or reducing according to the paper size (Auto Reduce/Enlarge) Enlarged or reduced from the top right. - Page 71 Making Enlarged or Reduced Copies D0CWPA5206 Specifying a size (Size Magnification) Press [Specify Copy Size], enter the length of the original and copied image, and then press [OK]. Place the original. page 57 "Basic Procedure for Copying Documents" The original is fed into the machine automatically, and copying starts. If the original is not fed automatically, press [Start].
-
Page 72: Enlarging Or Reducing According To The Paper Size
3. Copy Enlarging or Reducing According to the Paper Size The original is enlarged or reduced to fit on the specified paper size (Fit to Paper Size). DZB236 To copy a document whose size cannot be detected, specify [Original Size] on the Copy screen. For the original size detected automatically, see the following section: page 185 "Recommended Original Size and Weight"... -
Page 73: Specifying A Combination Of Original Sizes And Paper Sizes When Copying
Making Enlarged or Reduced Copies Select the paper input location, and then select a preset cut size. When the orientations of the original and paper in the paper input location do not match, the machine rotates the copied image automatically. To reduce an original of A2 (C) size to A3 (11 × 17) size, for example, you can select either A3 (11 ×... - Page 74 3. Copy Press [Settings] on the Home screen. Press [Copier / Document Server Settings] on the Settings screen. D0CWPA5207 Press [Reduce / Enlarge]. Press [User Auto Reduce/Enlarge] of the desired original size. Select the paper size to which to copy the original of the size specified in Step 4. Press [OK].
-
Page 75: Correcting The Vertical And Horizontal Magnification When Copying
Making Enlarged or Reduced Copies Press [Copy Ratio] on the Copy screen, and then press [Others]. D0CWPA8052 Press [User Auto Red./Enlg.]. Press [Original Orientation], and then specify the Original Orientation. If the key is not displayed, select it from [Original Setting]. Place the original. - Page 76 3. Copy Calculating the correction value D0CWIA6007 The dimensions of the original image is "a" and the dimensions of the copied image is "b". To make the dimensions of the copied image the same as the original image, calculate the percentage of the correction using the following formula: (a-b) ×...
- Page 77 Making Enlarged or Reduced Copies Enter the vertical and horizontal correction value, and then press [OK]. Place the original. page 57 "Basic Procedure for Copying Documents" The original is fed into the machine automatically, and copying starts. If the original is not feeds automatically, press [Start].
-
Page 78: Combining And Copying A Multi-Page Original Onto A Single Sheet Of Paper
3. Copy Combining and Copying a Multi-page Original onto a Single Sheet of Paper You can copy multiple sheets in an original to save paper. DZB253 The arrangement of copied pages and copy ratio varies depending on the original orientation and combined pages. - Page 79 Combining and Copying a Multi-page Original onto a Single Sheet of Paper If the key is not displayed, select it from [Combine]. Specify the original orientation and number of pages to combine on one side of a sheet. Press [OK]. Press the paper input location select key, and then select the paper input location and a preset cut size.
- Page 80 3. Copy • You can configure the following settings in [Settings] [Copier / Document Server Settings] [Edit / Stamp] [Erase]: • [Erase Original Shadow in Combine]: Determine whether to erase the boundary margin around each original to maintain the margin See "Edit / Stamp", User Guide (Full Version).
-
Page 81: Copying In Page Order Or For Each Page Number
Copying in Page Order or for Each Page Number Copying in Page Order or for Each Page Number When copying two or more copies of multi-page originals, you can specify the page order as described below. Sort Copies in the order of the original. DZB241 Rotate Sort Copies in the order of the original and outputs by rotating each copy set. - Page 82 3. Copy Press [ ] or [ ] under [Quantity] on the Copy screen to specify the number of copies. DZC207 You can enter this using the keyboard after pressing [Quantity] or a number. Press [Sort] on the Copy screen. Select the function to specify.
-
Page 83: Print
4. Print Installing the Printer Driver by Using Device Software Manager Installer Device Software Manager is a support utility for driver installation in Windows. Device Software Manager helps you to detect the latest driver via the internet automatically according to the computer you are using and install it with a simple procedure. - Page 84 4. Print On the "Quality Improvement Program" screen, select [I will participate in the Quality Improvement Program] or [I will not participate in the Quality Improvement Program], and then click [Next]. On the "Driver Update Notification Setting" screen, specify whether to display the message about the driver update, and then click [Next].
-
Page 85: Installing Device Software Manager From The Downloaded File
Installing the Printer Driver by Using Device Software Manager Installer • If "Could not verify publisher" is displayed at the beginning of installation, continue the installation. When the installation is complete, click [Finish]. When you are prompted to restart your computer, restart it by following the instructions that appear. - Page 86 4. Print Select [Network], and then click [Next]. D0CWDA6202 • Network: Search for devices connected to the network. Select this machine from among the detected devices, and then click [Next]. D0CZDM0202 The installation of the driver starts. • If "The publisher could not be verified" is displayed at the beginning of installation, continue the installation.
- Page 87 Installing the Printer Driver by Using Device Software Manager Installer • Double-click the Device Software Manager icon created on the Finder of the computer to update the printer driver. • See "Updating the Driver (Windows)", User Guide (Full Version).
-
Page 88: Installing The Printer Driver For Network Connection (Windows)
4. Print Installing the Printer Driver for Network Connection (Windows) When the machine and the computer are connected to the same network, the installer searches for the machine to install the printer driver. If the installer cannot find the machine, specify the IP address or machine name to install the printer driver. -
Page 89: Installing The Postscript 3 Printer Driver From The Downloaded File
Installing the Printer Driver for Network Connection (Windows) On the "End User License Agreement" screen, click [Agree and Go to Next]. D0CHDA6203 Select this machine from among the detected devices, and then click [Next]. D0CZDM0202 Printer driver installation starts. When the installation is complete, click [Finish]. Installing the PostScript 3 Printer Driver from the Downloaded File Double-click the downloaded file. -
Page 90: Installing The Printer Driver For Windows
4. Print Select [Network], and then click [Next]. D0CWDA6202 • The search detects devices connected to the network. • If the error screen is displayed, see page 89 "If the Machine Cannot Be Found". Select this machine from among the detected devices, and then click [Next]. D0CZDM0202 Printer driver installation starts. -
Page 91: If The Machine Cannot Be Found
Clear the [Query the printer and automatically select the driver to use] check box, and then click [Next]. Searching for the TCP/IP port starts. When the "Additional port information required" screen is displayed, select [RICOH Network Printer C model], and then click [Next]. Click [Have Disk...] [Browse...] to specify the driver (INF file), and then click [OK]. - Page 92 4. Print Confirm and perform , and then click [OK]. If the machine still cannot be found, specify the IP address or machine name to install the printer driver. Click [Click if you cannot find the device]. DZC089 Select [Specify device IP address] or [Specify device name], and then click [Next]. When specify the machine IP address 1.
- Page 93 Installing the Printer Driver for Network Connection (Windows) DZC091 2. When the machine is detected, click [Next]. Printer driver installation starts. When specify the machine name 1. Select the machine to use, and then click [Next]. DZC094 2. On the "Printer Preference" screen, select one of the port names from among "Port Name", and then click [Next].
- Page 94 4. Print D0CWDA6204 Printer driver installation starts. For details about the procedure for specifying the IP address after installing the printer driver, see the following section: See "When You Cannot Print a Document even if the Printer Driver is Installed", User Guide (Full Version).
-
Page 95: Installing The Printer Driver For Network Connection (Macos)
Installing the Printer Driver for Network Connection (macOS) Installing the Printer Driver for Network Connection (macOS) Install the PPD file (printer driver) under macOS, and then register the machine on the computer from the system preferences. • You need an administrator name and a password (phrase). For details, consult your network administrator. -
Page 96: Registering The Machine In [Printers & Scanners]
4. Print Enter the administrator's user name and password, and then click [Install Software]. D0DXMA6202 The installation of the PPD file starts. When the installation is complete, click [Close]. Registering the Machine in [Printers & Scanners] Register the PPD file of the machine in the system preferences to enable printing. Select [System Preferences...] from the Apple menu. - Page 97 Installing the Printer Driver for Network Connection (macOS) Click (IP), and configure the information of the machine. D0DXMA6204 • Address: Enter the IP address of the machine. • Protocol: Select [HP Jetdirect - Socket]. • Use: Check that the machine name is displayed. If "Generic PostScript Printer" is displayed, the entered IP address may not be correct.
-
Page 98: Specifying The Option Settings
4. Print Check that the machine name is added to the [Printers & Scanners] screen. D0CWMA6213 Close the system preferences screen. Specifying the Option Settings If the option configuration of the machine is not automatically reflected, select the option installed on the machine in [Printers &... - Page 99 Installing the Printer Driver for Network Connection (macOS) Click [Options], select the option installed on the machine, and then click [OK]. • If the usable options are not displayed, the IP address has not been entered correctly or the PPD file has not been registered properly. To enter the IP address or register the PPD file, see page 94 "Registering the Machine in [Printers &...
-
Page 100: Basic Procedure For Printing Documents
4. Print Basic Procedure for Printing Documents Specify the printer driver and configure the Document Size, Paper Type, and other settings to print a document. • If you send a print job via USB 2.0 while the machine is in Low Power mode or Sleep mode, an error message may appear after the print job is completed. - Page 101 Basic Procedure for Printing Documents D0CWDA5606 • Job Type: Select [Normal Print] to execute printing immediately. You can make a partial print as a test and proceed to print the rest of the document (Sample Print). See "Making a Partial Print as a Test and Printing the Rest of the Document", User Guide (Full Version).
-
Page 102: Printing A Document In Macos
4. Print • Color Mode: Select the print color. You can print in universal color by using the following settings: • [Image Quality] tab [Barrier-free Color Management:] [On] You can configure some advanced settings using the [Input/Output] to [Image Quality] tabs. D0CWDA5607 The caution icon ( ) indicates that there are disabled items. - Page 103 Basic Procedure for Printing Documents Specify Paper Size, Orientation, and other settings. D0CWMA5613 • Copies: Enter the print quantity. • Paper Size: Select the size of the document to print. • Orientation: Specify the orientation of the document. Select [Portrait] or [Landscape]. Select a category from the pop-up menu, and then specify the paper input location and paper type.
-
Page 104: Changing A Default Values Of The Printer Settings (Windows)
4. Print When the paper of the specified size is not loaded on the machine, printing is performed following the settings of the machine. Job Log • Job Type: Select [Normal Print] to execute printing immediately. You can make a partial print as a test and proceed to print the rest of the document (Sample Print). -
Page 105: Combining And Printing Multiple Pages On A Single Sheet Of Paper
Combining and Printing Multiple Pages on a Single Sheet of Paper Combining and Printing Multiple Pages on a Single Sheet of Paper You can print multiple pages on a single sheet at a reduced size (Combine 2 Originals). For example, you can reduce an original of A4 size to A5 size and print two pages on an A4 sheet. You can print up to 16 pages on a single sheet and specify the order to arrange the pages on the sheet. - Page 106 4. Print Specify Paper Size, Orientation, Paper Type, and other settings. page 98 "Basic Procedure for Printing Documents" Select [Layout], and then specify the number of pages to combine and the order of the pages. Configure the following settings: • Pages per Sheet: Select the number of pages to combine. •...
-
Page 107: Printing Documents Stored In The Printer From The Control Panel
Printing Documents Stored in the Printer from the Control Panel Printing Documents Stored in the Printer from the Control Panel To print a document stored from the printer driver in the machine, perform the print operation on Quick Print Release of the control panel. The file administrator also can delete unneeded documents and unlock documents locked by entering an invalid password. -
Page 108: Printing From A Usb Flash Memory Device Or Sd Card Directly
4. Print Printing from a USB Flash Memory Device or SD Card Directly You can connect a memory storage device to the media slot of the machine and print the files stored on it. Use this to print external data easily. •... -
Page 109: Printing From A Memory Storage Device Or Scan Application
Printing from a USB Flash Memory Device or SD Card Directly Printing from a Memory Storage Device or Scan Application On the Home screen, press [Print/Scan (Memory Storage Device)] On the Print/Scan (Memory Storage Device) screen, press [Print from Storage Device] DZX460 Insert a memory storage device in the media slot on the side of the control panel. - Page 110 4. Print Press [Print Settings] to specify the settings of Finishing as necessary. D0CWPA5619 • Full Color: Select whether to print in color. The machine may print a document that appears to be black-and-white in color printing mode. To print a document in full black-and-white, select [Black and White].
-
Page 111: Scan
5. Scan Scanning Documents and Sending the Scanned Data by E-mail Scan a document and attach the scanned data to an e-mail and send it from the machine. • Configure the SMTP server and network settings in advance. See "Configuring the Settings to Send E-mails from the Machine", User Guide (Full Version). •... - Page 112 5. Scan Select [Scan to Email] on the scanner screen. D0CWPA5501 Press [Send Settings] on the scanner screen. Press [Sender] and specify the sender. • When authentication is activated on the scanner function in [System Settings] [Settings for Administrator] [Authentication/Charge] [Application Authentication Management] and a logged in user is operating the machine, the logged in user becomes the sender.
- Page 113 Scanning Documents and Sending the Scanned Data by E-mail D0CWPA5503 • When specifying an e-mail address by entering it manually or selecting it from the scanner records, you can register the e-mail address in the address book before sending the e-mail. •...
- Page 114 5. Scan • If you want to change the registered contents of the specified destination or register a new destination, press [Add/Edit Address Book] to change or newly register a destination on the address book screen. See "Registering E-mail Addresses in the Address Book", User Guide (Full Version). D0CWPA5506 After changing the address or registering a new address on the address book screen, specify the address again on the scanner screen.
-
Page 115: Scanning Documents And Sending The Scanned Data To A Folder
Scanning Documents and Sending the Scanned Data to a Folder Scanning Documents and Sending the Scanned Data to a Folder To send the data of a scanned original to a shared folder on a computer, create the shared folder on the computer in advance and register the destination folder in the address book. - Page 116 5. Scan When the screen shown above is displayed, fill in the sheet as follow: Computer name LAPTOP-5955S09U DHCP server enable/disable setting IP address 192.168.0.152 DZC523 Enter "set user" and press the [Enter] key. Enter a space between "set" and "user". Check the domain name, workgroup name and login user name, and write down the information in [2] on the check sheet.
-
Page 117: Creating A Shared Folder (Windows)
Scanning Documents and Sending the Scanned Data to a Folder Creating a Shared Folder (Windows) Create a shared folder on the Windows Desktop and specify the access permissions of the folder. • If you are creating a shared folder for the first time on this computer, you must enable the file sharing function. - Page 118 5. Scan Select the [Users] check box, and then click [OK]. DZC319 Click [Locations], select the name of the domain or work group the user belongs to ([2] on the check sheet) and then click [OK]. Click [Find Now]. From the Search results, select the login user name of the computer to be added ([2] on the check sheet) and then click [OK].
-
Page 119: Confirming The Computer Information (Macos)
Scanning Documents and Sending the Scanned Data to a Folder Click [OK] to close all windows. The access permissions on the folder have been successfully configured. If you want to specify access permissions for the folder to allow other users or groups to access the folder, configure the folder as follows: 1. -
Page 120: Creating A Shared Folder (Macos)
5. Scan Computer name User's MacBook Computer login user name User DZC526 Click the Apple menu and select [System Preferences]. In [Network], click an Ethernet connection name or [Wi-Fi] and write down the displayed IP address in [1] on the check sheet. The required information on the computer is configured. - Page 121 Scanning Documents and Sending the Scanned Data to a Folder Select the check boxes of [Share files and folders using SMB] and the user account to use for file sharing and then click [Done]. D0CWMA8129 When the [Authentication] screen is displayed, enter the password of the selected account and then click [Done].
-
Page 122: Registering The Created Shared Folder In The Address Book
5. Scan Select the folder added in Step 6 and confirm that the permission of the user to access the folder is set to "Read & Write". D0CWMA8131 • To register a shared folder in the machine's address book, you need the computer's IP address, and the user name and password of a user who has access permissions for the shared folder. - Page 123 Scanning Documents and Sending the Scanned Data to a Folder Enter the information of the destination in the input boxes displayed on the [Name] tab, and select the title to classify the destination. Press the [Destinations] tab, and then press [Folder]. Select [SMB (Send to Shared Folder on PC)] in [Protocol].
-
Page 124: Basic Procedure For Performing Send To Folder
5. Scan If necessary, press the [User Management / Others] tab and specify the settings. D0CWPA5508 Press [OK]. Press [Home] ( ) after specifying the settings. • The connection test may take time. • Even if the connection test was successful, the machine may fail to transfer the file if you do not have write privileges for the file or there is not enough free hard disk space. - Page 125 Scanning Documents and Sending the Scanned Data to a Folder Press [Send Settings] and configure the scan settings according to the purpose of the scanned data. See "Scanning an Original with Suitable Quality and Density", User Guide (Full Version). page 127 "Specifying the File Type or File Name When Scanning a Document" Press , select [Search Address Book] or [Specify by Reg.
-
Page 126: Scanning An Original With Suitable Quality And Density
5. Scan Scanning an Original with Suitable Quality and Density Specify the quality and density to scan on the [Send Settings] screen. Press [Scanner] on the Home screen. Press [Send Settings] on the scanner screen and specify the original type (quality), density and resolution. - Page 127 Scanning an Original with Suitable Quality and Density • You can select only [Gray Scale], [Full Color: Text / Photo], or [Full Color: Glossy Photo] when [PDF (JPEG 2000)] is specified in [File Type]. page 127 "Specifying the File Type or File Name When Scanning a Document" •...
- Page 128 5. Scan • You can also specify the quality and resolution from the scanner screen. Press items on the screen to specify them. D0CWPA5512...
-
Page 129: Specifying The File Type Or File Name When Scanning A Document
Specifying the File Type or File Name When Scanning a Document Specifying the File Type or File Name When Scanning a Document Specify the settings in [Send Settings] on the scanner screen. Press [Scanner] on the Home screen. Press [Send Settings] on the scanner screen. Press [File Type], and select the file type to save the scanned document. - Page 130 5. Scan • Multi-page: PDF, PDF (JPEG 2000), PDF/A, TIFF If you select a multi-page file type when scan multiple originals, scanned pages are combined and sent as a single file. • Selectable file types differ depending on the scan settings and other conditions. For details about file types, see page 129 "Notes about and limitations of file types".
-
Page 131: Notes About And Limitations Of File Types
Specifying the File Type or File Name When Scanning a Document D0CWPA5514 Notes about and limitations of file types Depending on the file format you select, the following limitations will apply: TIFF If you select TIFF as the file format, the data is not compressed and thus results in larger files. PDF (JPEG 2000) You cannot select [PDF (JPEG 2000)] in the following cases: •... - Page 132 5. Scan...
-
Page 133: Document Server
6. Document Server Storing Documents in Document Server You can store documents scanned by the machine in the document server. You can also store them using the printer driver. See "Storing Documents to Print in the Machine", User Guide (Full Version). •... - Page 134 6. Document Server • Target Fldr. to Store: Select the "Shared Folder" created in the factory default configuration or a user folder created by a user to store the document. To select a user folder, create it in advance. If you select a password-protected folder, enter the password, and then press [OK]. See "Organizing Document Server Using Folders", User Guide (Full Version).
-
Page 135: Printing Documents In Document Server
Printing Documents in Document Server Printing Documents in Document Server You can print the documents stored in the document server with the same settings, paper size, color mode, and other settings specified when the documents were scanned. You can also change the print settings or specify a page to print. -
Page 136: Changing The Print Settings To Print A Document
6. Document Server Select the document to print. D0CWPA5308 • Press [User Name] or [File Name] on the left side of the screen to search for a document. • If the document is password protected, enter the password and press [OK]. •... - Page 137 Printing Documents in Document Server On the Home screen, press [Document Server]. On the document server screen, select the desired folder. • Press [Search by Folder No.] or [Search by Folder Name] to search for a folder. • If you select a password-protected folder, enter the password, and then press [OK]. Select the document to print.
-
Page 138: Specifying A Page To Print
6. Document Server Specifying a Page to Print On the Home screen, press [Document Server]. On the document server screen, select the desired folder. • Press [Search by Folder No.] or [Search by Folder Name] to search for a folder. •... -
Page 139: Web Image Monitor
7. Web Image Monitor Using Web Image Monitor Web Image Monitor is a screen to confirm the machine status and settings on the computer. When the machine and a computer can be connected to a network, you can access to Web Image Monitor by entering the IP address of the machine on the address bar of the Web browser. -
Page 140: What You Can Do On The Web Image Monitor
7. Web Image Monitor To change the settings, click [Login] at the top right on the screen and enter the User Name and Password. Recommended Web Browser Windows macOS Internet Explorer 11 or later Safari 3.0 or later Firefox 52 or later Firefox 52 or later Google Chrome version 50 or later Google Chrome version 50 or later... -
Page 141: Web Image Monitor Screen
Using Web Image Monitor • When logged in (as an Administrator) The administrator can change all settings of the machine. What you can do Function Not logged in User Administrator Machine status Machine settings Machine setting change Job list Job history Access to Address Book File operation in Document Server Network settings... -
Page 142: Specifying Web Image Monitor Help
7. Web Image Monitor 1. Menu Menu items described below are displayed. • Status/Information: Displays the machine status, option configuration, counter, and job status. • Device Management: Manages the machine settings and Address Book. • Print Job/Stored File: Operates the files stored in the printer driver or document server. •... - Page 143 Using Web Image Monitor Click [Configuration] on the "Device Management" menu on Web Image Monitor. D0CWAA8027 Click [Webpage] under the "Webpage" category. In "Download Help File", select the operating system and displayed language, and then click [Download]. Unzip the downloaded zip file and store it in the Web server. Enter the path to the Help file stored in the Web server in "URL"...
- Page 144 7. Web Image Monitor...
-
Page 145: Adding Paper And Ink
8. Adding Paper and Ink Loading Paper into the Paper Input Location • When replacing paper or removing jammed paper, make sure not to trap or injure your fingers. • There is a paper cutter inside the machine. Do not touch areas other than those specified in this manual when replacing or replenishing the roll paper, removing misfed paper, or cleaning the platen. -
Page 146: Loading Paper Roll Into The Paper Input Location
8. Adding Paper and Ink Loading Paper Roll into the Paper Input Location This section explains how to load a paper roll into the paper input location. • Bring the paper holder flush against the paper edge to fasten the paper. •... - Page 147 Loading Paper into the Paper Input Location DHJ348 • The corners are folded DHJ350 • The paper curls away from the paper roll DHJ351 • The edge is dented...
- Page 148 8. Adding Paper and Ink DHJ352 • The paper has holes in it DHJ349 • The paper is torn DHJ353 • The paper is loose...
- Page 149 Loading Paper into the Paper Input Location D0CWIA5726 • If you cut off the paper edges of a paper roll that is installed in the paper input location, be careful not to cut the cloth part of the output basket. •...
- Page 150 8. Adding Paper and Ink Names of the parts of the paper holder D0CWIA5728 1. Left flange 2. Spool 3. Paper roll adjustment levers 4. Right flange 5. Lock lever Paper roll direction When loading the paper roll to the paper holder and machine, make sure that the edge of the paper feeds from bottom of the roll toward the back..
- Page 151 Loading Paper into the Paper Input Location Lift up the paper input location cover until it clicks. D0CWIA0021 Lock the paper input location cover while it is open. D0CWIA0022 Remove bar A, and then hook it in front of the output basket. D0CWIA0410 1.
- Page 152 8. Adding Paper and Ink D0CWIA0024 Pull bar B forward. D0CWIA0411 1. Bar B A space opens in front of the paper input location. D0CWIA0026 Press down the rewind button on the right of the paper input location for one second or more.
- Page 153 Loading Paper into the Paper Input Location D0CWIA0027 Hold the left and right flanges firmly, and then remove the paper roll or spool from the paper input location. D0CWIA0028 Place the paper roll or spool on a flat surface. D0CWIA0029...
- Page 154 8. Adding Paper and Ink Raise the lock lever on the left flange. D0CWIA0030 Remove the left flange from the spool. D0CWIA5760 1. Spool Remove both the right flange and spool from the paper roll. D0CWIA0032...
- Page 155 Loading Paper into the Paper Input Location Prepare the paper roll for replacement. D0CWIA5730 Insert a spooling flange to touch the paper roll from the right of it. Set the paper roll as shown in the illustration. Place the paper roll on a flat horizontal surface, and then slowly insert the flange into the paper roll.
- Page 156 8. Adding Paper and Ink Hold both flanges and place the paper roll on the paper input location. D0CWIA0036 Be sure to place the spool so that its right edge is covered by the black shutter. Load the paper so the edge of the paper is fed from bottom of the roll toward the back. D0CWIA0407 Make sure that the flange does not touch the guide plate.
- Page 157 Loading Paper into the Paper Input Location Lift bar A up and hook it. D0CWIA0412 1. Bar A Lower the paper input location cover. D0CWIA0038 When a message appears that confirms that bar A has returned to the correct position, press [Exit].
- Page 158 8. Adding Paper and Ink If the paper loading settings screen does not appear, open, and then close the paper input location cover. If the paper roll is not fed correctly and it is rewound, remove the paper roll and set it again. Make sure that the size of the paper that is loaded is displayed correctly on the [Printer] screen.
-
Page 159: Loading Paper Into The Paper Bypass Location
Loading Paper into the Paper Input Location Loading Paper into the Paper Bypass Location Use the paper bypass location to copy onto paper sizes that cannot be loaded on the paper input location. • If the paper is curled, load it so that it curls facing downward. CPT042 •... - Page 160 8. Adding Paper and Ink D0CWIA5733 Open the front cover. D0CWIA7510 Pull up the paper holding lever on the right of the machine. D0CWIA5735...
- Page 161 Loading Paper into the Paper Input Location Place the paper with the printable side up and align the right side of the paper with the paper set position on the right side of the platen. D0CWIA5736 1. Paper set position Insert paper under the rollers until it bumps against the back of the paper bypass location.
- Page 162 8. Adding Paper and Ink D0CWIA5002 Close the front cover. D0CWIA5738 Check if the settings on the screen are correct, and then press [Start Feed]. If the paper type and thickness are different from those displayed, press [Change Settings]. Select the proper items according to the paper type and thickness you want to use, and then press [OK].
-
Page 163: Specifying Regular Sizes
Loading Paper into the Paper Input Location • When [Film: Matte] is specified for the paper type or when [Prevent Paper Abrasion] is specified, load the paper, and then specify the paper abrasion setting in [Settings] [System Settings] [Machine] [Print Action/Image Quality Adjustment] [Prevent Paper Abrasion]. - Page 164 8. Adding Paper and Ink Press [Paper Input Location/Paper Settings]. D0CWPA5120 Press [Paper Size/Paper Type] [Paper Size/Paper Type]. Press one paper input location to set. Press [Paper Size]. D0CWPA5121 To specify for the paper bypass location, press [Paper Size: Printer]. Choose one paper size from the list shown, and then press [OK].
-
Page 165: Specifying Custom Sizes
Loading Paper into the Paper Input Location Specifying Custom Sizes With the printer function, you can print on a custom size paper roll. This section explains how to specify the paper size from the control panel of the machine. If you load a regular size paper roll, the machine detects the paper size automatically. Specifying a custom size roll of paper When using RP-GL/2 or RTIFF as a printer language, you can specify a custom size roll of paper from the control panel as follows:... -
Page 166: Specifying Paper Type And Thickness Settings
8. Adding Paper and Ink Press [Custom] from the list shown. Press the value in the "A" or "B" field, and then enter the new value. Specify the values within the range of numbers inside "< >", and then press [Done]. Press [OK] three times. - Page 167 Loading Paper into the Paper Input Location Press one paper input location to set. Press [Paper Type/Thickness]. D0CWPA5125 Choose one paper type and paper thickness from the list shown, and then press [OK]. Press [OK]. After completing the configuration, press [Home] (...
-
Page 168: Recommended Paper Sizes And Types
8. Adding Paper and Ink Recommended Paper Sizes and Types The recommended paper sizes and types for each paper input location are as described below. • If you use paper that curls, either because it is too dry or too damp, a paper jam may occur. •... - Page 169 Recommended Paper Sizes and Types Paper type and weight Paper size Paper capacity Recycled Paper Paper roll 51–94 g/m (14–25 lb.) Diameter: 176 mm or less Thin Paper–Plain Paper Core: 50.8 mm, 76.2 mm Width: 297 mm, 364 mm, 420 mm, 440 mm, 490 mm, 515 mm, 594 mm, 610 mm (24 inches), 620 mm, 625 mm, 660 mm, 680 mm, 707...
- Page 170 8. Adding Paper and Ink Paper type and weight Paper size Paper capacity Film: Matte Paper roll 51–190 g/m (14–51 lb.) Diameter: 176 mm or less Thin Paper–Thick Paper 1 Core: 50.8 mm, 76.2 mm Width: 297 mm, 364 mm, 420 mm, 440 mm, 490 mm, 515 mm, 594 mm, 610 mm (24 inches), 620 mm, 625...
- Page 171 Recommended Paper Sizes and Types Paper type and weight Paper size Paper capacity Inkjet Plain Paper roll 51–125 g/m (14–33 lb.) Diameter: 176 mm or less Thin Paper–Middle Thick Core: 50.8 mm, 76.2 mm Width: 297 mm, 364 mm, 420 mm, 440 mm, 490 mm, 515 mm, 594 mm, 610 mm (24 inches), 620 mm, 625 mm, 660 mm, 680 mm, 707...
- Page 172 8. Adding Paper and Ink Paper type and weight Paper size Paper capacity Translucent Paper (vellum) Paper roll 51–94 g/m (14–25 lb.) Diameter: 6.9 inches or less Thin Paper–Plain Paper Core: 2 inches, 3 inches Width: 11 inches, 12 inches, 14 inches, 15 inches, 17 inches, 18 inches, 22 inches, 24 inches, 30 inches, 34...
- Page 173 Recommended Paper Sizes and Types Paper type and weight Paper size Paper capacity Coated Paper Paper roll 80–190 g/m (21–51 lb.) Diameter: 6.9 inches or less Plain Paper–Thick Paper 1 Core: 2 inches, 3 inches Width: 11 inches, 12 inches, 14 inches, 15 inches, 17 inches, 18 inches, 22 inches, 24 inches, 30 inches, 34...
-
Page 174: Paper Bypass Location
8. Adding Paper and Ink Paper Bypass Location (mainly Europe and Asia) Paper type and weight Paper size Paper capacity Plain Paper Cut paper 1 sheet 51–94 g/m (14–25 lb.) Regular size: Thin Paper–Plain Paper A0 , A1, A2, A3, A4 , B1 JIS , B2 JIS, B3 JIS, B4 JIS , 880 ×... - Page 175 Recommended Paper Sizes and Types Paper type and weight Paper size Paper capacity Recycled Paper Cut paper 1 sheet 51–94 g/m (14–25 lb.) Regular size: Thin Paper–Plain Paper A0 , A1, A2, A3, A4 , B1 JIS , B2 JIS, B3 JIS, B4 JIS , 880 ×...
- Page 176 8. Adding Paper and Ink Paper type and weight Paper size Paper capacity Special Paper Cut paper 1 sheet 51–79 g/m (14–21 lb.) Regular size: 95–220 g/m (25–59 lb.) A0 , A1, A2, A3, A4 , B1 JIS , B2 JIS, B3 JIS, B4 JIS , Thin Paper, Middle Thick–...
- Page 177 Recommended Paper Sizes and Types Paper type and weight Paper size Paper capacity Coated Paper (CAD) Cut paper 1 sheet 80–125 g/m (21–33 lb.) Regular size: Plain Paper–Middle Thick A0 , A1, A2, A3, A4 , B1 JIS , B2 JIS, B3 JIS, B4 JIS , 880 ×...
- Page 178 8. Adding Paper and Ink Paper type and weight Paper size Paper capacity Inkjet Plain Cut paper 1 sheet 51–125 g/m (14–33 lb.) Regular size: Thin Paper–Middle Thick A0 , A1, A2, A3, A4 , B1 JIS , B2 JIS, B3 JIS, B4 JIS , 880 ×...
- Page 179 Recommended Paper Sizes and Types (mainly North America) Paper type and weight Paper size Paper capacity Plain Paper Cut paper 1 sheet 51–94 g/m (14–25 lb.) Regular size: Thin Paper–Plain Paper • Engineering E (34 × 44) , D (22 × 34), C (17 × 22), B (11 ×...
- Page 180 8. Adding Paper and Ink Paper type and weight Paper size Paper capacity Translucent Paper (vellum) Cut paper 1 sheet 51–94 g/m (14–25 lb.) Regular size: Thin Paper–Plain Paper • Engineering E (34 × 44) , D (22 × 34), C (17 × 22), B (11 ×...
- Page 181 Recommended Paper Sizes and Types Paper type and weight Paper size Paper capacity Film: Matte Cut paper 1 sheet 51–190 g/m (14–51 lb.) Regular size: Thin Paper–Thick Paper 1 • Engineering E (34 × 44) , D (22 × 34), C (17 × 22), B (11 ×...
- Page 182 8. Adding Paper and Ink Paper type and weight Paper size Paper capacity Coated Paper Cut paper 1 sheet 80–220 g/m (21–59 lb.) Regular size: Plain Paper–Thick Paper 2 • Engineering E (34 × 44) , D (22 × 34), C (17 × 22), B (11 ×...
-
Page 183: Notes On Special Paper
Recommended Paper Sizes and Types Notes on Special Paper Paper Type Note Setting translucent • When copying or printing an original or data that contains a lot of paper images, such as photos, onto the translucent (vellum) paper, let the printouts dry for about an hour before stacking them. -
Page 184: Paper Storage
8. Adding Paper and Ink • Art paper • Aluminum foil • Carbon paper • Conductive paper • Translucent (vellum) paper for electrophotography • Paper with perforated lines • Envelopes • Tab stock • OHP transparencies Do not copy or print onto sides that are already printed. Paper causing paper jam Do not use the following kinds of paper. -
Page 185: Handling Paper
Recommended Paper Sizes and Types • Do not store paper where it will be exposed to direct sunlight. • Store paper in a dry environment (humidity: 70% or less). • Store on a flat surface. • Do not store paper vertically. •... -
Page 186: Saving Printouts
8. Adding Paper and Ink Humidity State of paper Try this... Low humidity Part of the image is lost, or a • Improve the environment multi-sheet feed or wrinkling where the machine is occurs on both translucent placed (e.g., install an air (vellum) and normal paper. -
Page 187: Recommended Original Size And Weight
Recommended Original Size and Weight Recommended Original Size and Weight This section describes the sizes and weights of originals that can be placed, and missing image area. The following regular original sizes are detected automatically: (mainly Europe and Asia) Original size Original weight A0 –A4 64–190 g/m... -
Page 188: Originals That Should Be Scanned Using The Carrier Sheet
8. Adding Paper and Ink CPT036 1. Front curl: R 50 mm (2.0 inches) or more 2. Back curl: R 50 mm (2.0 inches) or more 3. Height: 20 mm (0.8 inches) or less 4. Original feed direction Originals that should be scanned using the carrier sheet The following types of originals should be mounted on the carrier sheet. - Page 189 Recommended Original Size and Weight • Perforated or torn originals • Curled, folded, or creased originals • Originals with any kind of coating, such as thermal fax paper, art paper, aluminum foil, carbon paper, or conductive paper • Originals with indexes, tags, or other projecting parts •...
-
Page 190: Adding Ink
8. Adding Paper and Ink Adding Ink The following messages may appear depending on the amount of ink. • When "Check Print Cartridge replacement." appears, approximately 35% of the original amount of ink remains in the print cartridge. • When "Printing is not possible even if only one cartridge is depleted." appears, approximately 20% of the original amount of ink remains in the print cartridge. - Page 191 Adding Ink • Push in the print cartridge until the lever clicks. If it does not click into place, ink may leak inside the machine. D0CWIA5003 Check on the screen to see which print cartridge needs to be replaced. D0CWPA5701 If you have turned off the screen, press [Check Status] and then press [Check] on the [Machine Status] tab.
-
Page 192: Precautions When Storing Ink
8. Adding Paper and Ink • The reductions shown by the remaining ink indicator vary depending on the capacity of the cartridge. • If, after replacing the print cartridge, add ink messages continue to appear, turn off the machine's power, and then turn it back on again. •... - Page 193 Adding Ink If you want to discard your used print cartridge, please contact your local sales office. If you discard it by yourself, treat it as general plastic waste material. (mainly North America) Please see our local company website for information on the recycling of supply products, or you can recycle items according to the requirements of your local municipalities or private recyclers.
-
Page 194: Replacing An Ink Collector Unit
8. Adding Paper and Ink Replacing an Ink Collector Unit The ink collector unit needs to be replaced soon when the "Ink Collector Unit almost full." message is displayed. Prepare a replacement ink collector unit. See "Contact Information", User Guide (Full Version). See the animation displayed on the control panel of the machine for the procedure to replace the ink collector unit. -
Page 195: Precautions When Replacing The Ink Collector Unit
Replacing an Ink Collector Unit If you have turned off the screen, press [Check Status] and then press [Check] under [Machine Status] tab. Precautions When Replacing the Ink Collector Unit • The following explains the warning messages on the plastic bag used in this product's packaging. - Page 196 8. Adding Paper and Ink...
-
Page 197: Troubleshooting
9. Troubleshooting Alert Sounds The machine notifies you with an alert sound when a paper jam occurs, the original is left on the machine, or another problem occurs. Listen to the alert sound for one of the patterns described below, and perform the required procedure accordingly. - Page 198 9. Troubleshooting *1 The factory default sound pattern is used as an example in the table above. • You cannot pause an alert sound that has started. The machine continues to emit the sound until the preset sound pattern is completed. •...
-
Page 199: Checking The Indicators, Icons, And Messages On The Control Panel
Checking the Indicators, Icons, and Messages on the Control Panel Checking the Indicators, Icons, and Messages on the Control Panel The machine notifies you of the machine condition or status of an application with the [Check Status] indicator or a message displayed on the control panel. Check the status and resolve the problem accordingly. -
Page 200: When The [Check Status] Indicator Is Lit Or Flashing
9. Troubleshooting Icon Condition Solution and reference Paper is jammed. See the animated illustration displayed on the control panel, and remove the jammed paper. See "When Paper or an Original Is Jammed", User Guide (Full Version). An original has jammed. See the animated illustration displayed on the control panel, and remove the jammed original. - Page 201 Checking the Indicators, Icons, and Messages on the Control Panel Flashing in yellow Maintenance on the machine needs to be performed soon. Perform the required procedure accordingly. You can display the status confirmation screen with [Check Status]. On the screen, check the detailed status of the machine or application.
-
Page 202: When The Machine Cannot Be Operated
9. Troubleshooting When the Machine Cannot Be Operated • If a message is displayed on the screen, check the message. • page 206 "When a Message Appears and the Machine Cannot Be Operated" • When confirming or changing the settings in [Settings], press [Home] ( ) after completing the operation to close [Settings]. - Page 203 When the Machine Cannot Be Operated Condition Cause Solution and reference Some icons are not The functions other than the The time required for a function to start up displayed when the copy function are starting varies depending on the function. Wait a machine is turned on.
- Page 204 9. Troubleshooting Condition Cause Solution and reference The key is unresponsive, A malfunction is temporarily Turn off the power of the machine, wait for or another key is occurring on the machine. 10 seconds or more after confirming that activated. the main power indicator is turned off, and There is a device or then turn on the power again.
-
Page 205: When Paper Cannot Be Fed Properly
When the Machine Cannot Be Operated Condition Cause Solution and reference The screen changes to The machine is not Check if you can display a web page in Web Browser when you connected to the network [Web Browser]. If a web page cannot be press [Help] ( ), but correctly. -
Page 206: When The Machine Does Not Respond Correctly To An Operation From A Computer
9. Troubleshooting Condition Cause Solution and reference The edge of the paper The paper input location • Raise the paper input location cover roll cannot be fed back cover is not raised when the before setting the paper roll. into the machine paper roll is set in Paper page 143 "Loading Paper into the automatically when it is... - Page 207 When the Machine Cannot Be Operated Condition Cause Solution and reference You cannot access the There is a problem with the Check the cable connecting the machine machine using Web connection between the and the computer, and disconnect and then Image Monitor.
-
Page 208: When A Message Appears And The Machine Cannot Be Operated
9. Troubleshooting When a Message Appears and the Machine Cannot Be Operated Message Condition Solution and reference "Service Call" The machine needs to Consider repairing the machine. be repaired. SCxxx-xx Contact Serial No. of Machine "Functional Problems" A malfunction that Prepare for maintenance or consider repairing requires maintenance or the machine. - Page 209 When a Message Appears and the Machine Cannot Be Operated Message Condition Solution and reference "Please wait." The machine is Wait a while and do not turn off the power of preparing to perform a the machine. function or executing the image stabilization process.
- Page 210 9. Troubleshooting • "Cover Open" • "Replace Print Cartridge" • "Ink Collector Unit is full." • "No paper." • page 11 "Turning On and Off the Power"...
-
Page 211: When A Message Appears While Using The Copy Function
When a Message Appears While Using the Copy Function When a Message Appears While Using the Copy Function Message Condition Solution and reference "Cannot Detect Original An original is not placed Place the original correctly. Size" correctly on the page 54 "Placing Originals on the Original machine. -
Page 212: When A Message Appears While Using Document Server
9. Troubleshooting When a Message Appears While Using Document Server For details about the messages that are displayed when printing a document, see the descriptions of the messages that are displayed in the copy function. page 209 "When a Message Appears While Using the Copy Function" Message Condition Solution and reference... - Page 213 When a Message Appears While Using Document Server Message Condition Solution and reference "The selected folder is The wrong password Request the file administrator to unlock the locked. Please contact was entered 10 times folder. The file administrator can unlock the file administrator."...
-
Page 214: When A Message Appears While Using The Printer Function
9. Troubleshooting When a Message Appears While Using the Printer Function • When confirming or changing the settings in [Settings], press [Home] ( ) after closing [Settings]. Messages that Appear without Error Codes Message Cause Solution and reference "Address Book is The address book is Try again later. - Page 215 When a Message Appears While Using the Printer Function Message Cause Solution and reference "Auto-registration of The maximum Delete a user that is no longer necessary from the user information has number of items that address book. failed." can be registered has been exceeded and the authentication...
- Page 216 9. Troubleshooting Message Cause Solution and reference "Data storage Printing a document If the message persists even after you have turned the error." as Test Print, Locked power off and then on, consider repairing the machine. Print, Hold Print, Store Print, or storing the document in Document Server...
- Page 217 When a Message Appears While Using the Printer Function Message Cause Solution and reference "Exceeded max. The number of Erase documents that are no longer needed. number of files of documents stored in See "Erasing Documents from Document Server", User Document Server.
- Page 218 9. Troubleshooting Message Cause Solution and reference "Hardware Problem: An error is Turn off the power of the machine, wait for 10 seconds HDD" occurring on the or more after confirming that the main power indicator hard disk of the is turned off, and then turn on the power.
- Page 219 When a Message Appears While Using the Printer Function Message Cause Solution and reference "Information for user In LDAP Consult the user administrator. User administrator: authentication is authentication, the Delete the corresponding user from the address book, already registered same name is and register the user again after resolving the duplicate for another user."...
- Page 220 9. Troubleshooting Message Cause Solution and reference "Paper size and type The paper input • To cancel printing, press [Cancel Printing]. are mismatched." location loaded • To proceed with printing on the specified paper, with paper of the "Change the setting load the paper and then check that the paper size size or type to continue the...
-
Page 221: Messages That Appear With Error Codes
When a Message Appears While Using the Printer Function Message Cause Solution and reference "You do not have a Authentication Specify the authentication information in the printer privilege to use this information is not driver. For the authentication information, consult the function. - Page 222 9. Troubleshooting Message Cause Solution and reference "99: Error" When printing a file from an Check the data to print. SD card or USB flash memory device, the file to print is in an unsupported format or corrupt. An error occurred while Check the settings of the RTIFF Menu processing RTIFF.
- Page 223 When a Message Appears While Using the Printer Function Message Cause Solution and reference "CM: The job was A timeout error occurred in • Check that the machine can cancelled because of a PostScript 3 or PDF printing, communicate properly with the PC. timeout error with PS3/ so printing was canceled by •...
-
Page 224: When A Message Appears While Using The Scanner Function
9. Troubleshooting When a Message Appears While Using the Scanner Function • When confirming or changing the settings in [Settings], press [Home] ( ) after closing [Settings]. Messages that Appear on the Control Panel Message Cause Solution and reference "All the pages are The original was placed When scanning on the original table, place detected as blank. - Page 225 When a Message Appears While Using the Scanner Function Message Cause Solution and reference "Cannot access the An SD card or USB flash • Check that the external media is Memory Storage memory device is formatted in FAT16 or FAT32, and write Device."...
- Page 226 9. Troubleshooting Message Cause Solution and reference "Connection with PC has The machine or the Check that the machine or the computer is failed. Check the computer is not connected to the network correctly. For details settings." connected to the about your network environment, consult the network correctly.
- Page 227 When a Message Appears While Using the Scanner Function Message Cause Solution and reference "Exceeded max. email The file size per page • Specify a lower value in [Send Settings] size. Sending email has has exceeded the [Resolution], or select a smaller paper been cancelled.
- Page 228 9. Troubleshooting Message Cause Solution and reference "Not all of the image will The scaling factor Specify a smaller value in [Send Settings] be scanned. Check the specified in [Scan Ratio] [Scan Ratio]. ratio and then press is too large. [Start] again."...
- Page 229 When a Message Appears While Using the Scanner Function Message Cause Solution and reference "The program is recalled. A folder destination • You cannot recall a destination specified Cannot recall the folder specified with a with a protection code in a program. destination(s) with protection code is Specify this destination individually.
-
Page 230: Messages That Appear On The Computer
9. Troubleshooting Message Cause Solution and reference "Authentication with the The user name or • Please check the SMTP authentication destination has failed. password is incorrect. user name and password. Check settings. To check • Please check the destination folder ID the current status, press and password. - Page 231 When a Message Appears While Using the Scanner Function Message Cause Solution and reference "Cannot add any more The maximum number of Delete scanning modes that are no longer scanning mode." scanning modes that necessary. can be registered exceeds the maximum number (50).
- Page 232 9. Troubleshooting Message Cause Solution and reference "Error has occurred in the The scan condition Specify the scan condition within the range scanner." specified in the that can be specified on the machine. application exceeds the page 264 "List of Specifications" range that can be specified on the machine.
- Page 233 When a Message Appears While Using the Scanner Function Message Cause Solution and reference "Insufficient memory. The memory allocated • Reduce the scan size or resolution. You Reduce the scanning for the scanner function may be able to resolve the error also by area."...
- Page 234 9. Troubleshooting Message Cause Solution and reference "Scanner is not ready. The cover is open. Check whether the cover is closed. Check the scanner and the options." "Scanning has been The amount of available • Clear the [Specify scanning area] check aborted because space on the hard disk box in the TWAIN driver.
- Page 235 When a Message Appears While Using the Scanner Function Message Cause Solution and reference "User Authentication in The authentication Register the SNMPv3 authentication SNMPv3 connection has information is registered information in Network Connection Tool that is failed." incorrectly in Network installed on the computer with the TWAIN Connection Tool when driver.
-
Page 236: When Other Messages Appear
9. Troubleshooting When Other Messages Appear • When confirming or changing the settings in [Settings], press [Home] ( ) after closing [Settings]. Message Cause Solution and reference "Administrator The User When specifying Basic, Windows, or LDAP Authentication for Management authentication, configure the User Management User Management privilege is disabled privilege in [Settings]... - Page 237 When Other Messages Appear Message Cause Solution and reference "Internal cooling fan is The fan installed in You may hear a rotating noise while the fan is active." the vent for cooling active, but you can continue using the machine as the interior of the usual.
-
Page 238: Messages That Appear When Machine Login Fails
9. Troubleshooting Message Cause Solution and reference "You do not have the The logged-in user Consult the user administrator. The user privileges to use this does not have the administrator can change the access permissions in function." privileges to use the the address book. - Page 239 When Other Messages Appear Message Cause Solution and reference "Authentication has An operation in the Check whether another user is logged in to the failed." TWAIN supporting machine, and then perform the operation. application was B/W/L0103-000 performed from the computer while a user was logged in to the machine or performing the login procedure.
- Page 240 9. Troubleshooting Message Cause Solution and reference "Authentication has Web Image Monitor or Try again later. failed." another method was used to edit or create a B/W/L0207-001 backup of the address book. "Authentication has The account is locked Request the user administrator to unlock the failed."...
- Page 241 When Other Messages Appear Message Cause Solution and reference "Authentication has The login name attribute Check whether [Login Name Attribute] is failed." is not specified, or an specified correctly. attribute on which the L0400-210 See "Verifying Users to Operate the Machine information cannot be (User Authentication)", User Guide (Full obtained is specified.
- Page 242 9. Troubleshooting Message Cause Solution and reference "Authentication has [Off] is specified in the Select the server in [Settings] [System failed." authentication settings of Settings] [Settings for Administrator] the LDAP server. [Authentication/Charge] [Administrator L0406-201 Authentication/User Authentication/App Auth.] [Register/Change/Delete LDAP Server], and then press [Register/Change] and set [Authentication] to a setting other than [Off].
- Page 243 When Other Messages Appear Message Cause Solution and reference "Authentication has The user registered on • Delete the older user that is redundant, or failed." the machine has the change the login name. same name as another W/L0511-000 • If the message is displayed after switching user distinguished by the the authentication server, delete the user W0517-000...
- Page 244 9. Troubleshooting • Check whether the name in "Group" is correctly specified including the case-sensitivity in [Settings] [System Settings] [Settings for Administrator] [Authentication/Charge] [Administrator Authentication/User Authentication/App Auth.] [User Authentication Management] [Windows Authentication]. • Select the user in the address book, press [Edit], and then check that [Unavailable] is specified for each function under the [User Management / Others] tab [User Management] [Available...
-
Page 245: Messages That Appear When The Ldap Server Is Unavailable
When Other Messages Appear • Check that the representative account is registered in the following setting items, and then execute [Connection Test]. Select the server in [Settings] [System Settings] [Settings for Administrator] [Authentication/Charge] [Administrator Authentication/User Authentication/App Auth.] [Register/Change/Delete LDAP Server], press [Register/Change] and set [Authentication] to [Kerberos Authentication] See "Registering the LDAP Server", User Guide (Full Version). -
Page 246: Messages That Appear When There Is A Problem With The Certificate
9. Troubleshooting Message Cause Solution and reference "LDAP server The user name or Select the user in the address book, press authentication has failed. password is incorrect. [Edit], and specify the correct user name and Check the settings." password in [User Management / Others] tab [User Management] [LDAP Authentication Info]. - Page 247 When Other Messages Appear Message Cause Solution and reference "Signature cannot be set The device certificate Use a valid device certificate for the digital because the Digital used for the digital signature in PDF or PDF/A. Signature's device signature in PDF or See "Scanning an Original as a PDF with certificate is not currently PDF/A is not currently...
-
Page 248: Messages That Appear When An Application Site Cannot Be Used
9. Troubleshooting Messages that Appear When an Application Site Cannot Be Used Message Cause Solution and reference "A server error has An unexpected error • See the server maintenance information in occurred." has occurred on the [Information]. server. • Check whether the Network/Interface ([DNS Configuration], [Control Panel: "Cannot connect to Cannot connect to the... -
Page 249: When Print Results Are Not Satisfactory
When Print Results Are Not Satisfactory When Print Results Are Not Satisfactory Checking Whether the Print-heads Scratch the Paper Set Prevent Paper Abrasion mode if the prints have smeared ink. • Setting Prevent Paper Abrasion mode may result in lower print quality and speed. Depending on the type of paper, images to be printed, or the print quality, the print-heads may scratch the paper, causing the ink to smear. -
Page 250: If The Printout Is Smeared With Dots Of Ink That Are 1 To 2 Mm In Diameter
9. Troubleshooting • For details about printing the test pattern, see page 249 "Print Nozzle Check Pattern". • For details about head cleaning, see page 250 "Clean Print-heads". • For details about head flushing, see page 251 "Flush Print-heads". If the Printout Is Smeared with Dots of Ink That Are 1 to 2 mm in Diameter If your printouts are smeared by unwanted spots of ink that are about 1 to 2 mm in diameter, you need to clean the print-heads. -
Page 251: Adjusting The Print Quality
Adjusting the Print Quality Adjusting the Print Quality Print Nozzle Check Pattern Print the test pattern to check for non-firing nozzles. To check the print results of the test pattern, proceed to Step 5. • Printing the test pattern consumes ink. Perform this function only when necessary. •... -
Page 252: Clean Print-Heads
9. Troubleshooting Press [Exit]. Check the print results of the test pattern. • Normal print results: DNK008 • If a nozzle is not firing: DNK009 The print results of the test pattern correspond to, from left to right, [Black (K1)], [Black (K2)], [Yellow (Y1) &... -
Page 253: Flush Print-Heads
Adjusting the Print Quality • Cleaning may be incomplete if ink in a cartridge gets too low or runs out during cleaning. • An error will occur and head cleaning will not be possible if: • There is a misfeed. •... - Page 254 9. Troubleshooting Use this function only if repeated head cleaning fails to reactivate a mis- or nonfiring nozzle. Perform this function on a color basis. • Flushing consumes ink. Perform this function only when necessary. • Perform no other operations during flushing. •...
-
Page 255: Adjustment
Adjusting the Print Quality Adjustment Auto Adjust Head Position If printing produces misaligned verticals or blurred colors, printing the test pattern will re-calibrate the machine. The test pattern differs depending on the print quality. • Printing the test pattern consumes ink. Perform this function only when necessary. •... - Page 256 9. Troubleshooting Press [Exit]. If Auto Adjust Head Position has failed, perform Manual Adjust Head Position. Press [Home] ( ) after completing the operation. • Auto Adjust Head Position cannot be performed when "Paper Type" is set to [Film: Matte]. Perform Manual Adjust Head Position.
- Page 257 Adjusting the Print Quality Check the settings for preventing paper abrasion, paper type, and paper thickness. • Adjustment results vary depending on the Prevent Paper Abrasion mode's status. If you perform an adjustment while Prevent Paper Abrasion mode is enabled and do not want to print using this mode, cancel Prevent Paper Abrasion mode, and then perform the adjustment again.
- Page 258 9. Troubleshooting CHU018 Each vertical line is made of an upper part and lower part. If the print head is not properly positioned, the vertical line will be displayed as two disconnected lines, so that the line looks misaligned. • If you still cannot determine the adjustment value, locate the square that is between adjacent squares whose lines form symmetry.
- Page 259 Adjusting the Print Quality Press [Adjustment] [OK] [Exit]. To check the results of adjustment, print the test pattern again. Press [Home] ( ) after completing the operation. • For details about Prevent Paper Abrasion mode, see page 247 "Checking Whether the Print-heads Scratch the Paper".
- Page 260 9. Troubleshooting Press [Print Test Sheet] for the paper input location of the print position you want to adjust. D0CWDA5808 Press [Start]. Check the optimal adjustment value based on the print results of the test sheet. • Measure the margins between the center of the printed lines and the paper edges. CQA006 •...
- Page 261 Adjusting the Print Quality Enter the adjustment values, and then press [OK]. • Press [ ] and [ ] to enter the adjustment value of "Top Margin". • Press [ ] and [ ] to enter the adjustment value of "Left Margin". Press [Close].
- Page 262 9. Troubleshooting Press [Print Test Sheet] for the paper input location of the paper feed you want to adjust. D0CWDA5810 Press [Start]. Press [Exit]. Check the optimal adjustment value based on the print results of the test sheet. • The optimal adjustment value is the number next to the square pattern that has the faintest color closest to gray and aligned horizontals on both sides.
- Page 263 Adjusting the Print Quality CQA009 Press the paper input location of the paper feed you want to adjust. D0CWDA5811 Enter the adjustment value with [ ] [ ], and then press [OK]. Press [Close]. To check the results of adjustment, print the test sheet again. Press [Home] ( ) after completing the operation.
- Page 264 9. Troubleshooting • The machine is performing maintenance operations. • The machine has run out of paper. • The ink collector unit is full. Press [Settings] on the Home screen. Press [Maintenance] [Cut Paper]. Select the paper input location and length to cut paper, and then press [Start]. D0CWDA5812 The cutting length is set to [Short] when you select [Paper Input Location in Use].
-
Page 265: 10. Specifications For The Machine
10. Specifications for The Machine Model-Specific Information This section explains how you can identify the region your machine belongs to. There is a label on the rear of the machine, located in the position shown below. The label contains details that identify the region your machine belongs to. Read the label. D0CWIA0409 The following information is region-specific. -
Page 266: List Of Specifications
10. Specifications for The Machine List of Specifications Specifications for the Main Unit Item Specifications Nozzles • Black: 768 nozzles • Cyan, magenta, and yellow: 384 nozzles per color Configuration Console Memory 6 GB (4 GB on the main unit and 2 GB on the control panel) Hard disk size 320 GB Color... - Page 267 List of Specifications Item Specifications Maximum original size (mainly Europe and Asia) 914.4 × 33,000 mm (mainly North America) 36 × 1299.2 inches Originals Sheet Copy size page 166 "Recommended Paper Sizes and Types" Paper weight page 166 "Recommended Paper Sizes and Types" Missing image area (Copy) Print area...
- Page 268 10. Specifications for The Machine Item Specifications Preset reproduction ratio (mainly Europe and Asia) Preset reproduction ratios (%): • Enlargement: 400.0, 282.8, 200.0, 141.4 • Full size: 100 • Reduction: 70.7, 50.0, 35.4, 25.0 (mainly North America) Preset reproduction ratios (%): •...
- Page 269 1 W or less Power consumption Maximum: 121 W (Complete system) The complete system of the IM CW2200 consists of the main unit, paper (mainly Europe input location 2, file format converter, wireless LAN board, and card and Asia) reader.
-
Page 270: Specifications For The Document Server
10. Specifications for The Machine Item Specifications Noise emission (Sound Stand-by: 36 dB pressure level: Complete Copying: B&W: 60 dB / Color: 60 dB system) Noise emission (Sound pressure level) • Sound power levels and sound pressure levels are actual values measured in accordance with ISO 7779. -
Page 271: Specifications For Printer
List of Specifications Item Specifications Capacity (Memory Sorting) The following minimum numbers of sheets can be accommodated: A0: 100 A1: 100 A2: 200 A3: 400 A4: 400 • After the documents have been stored up to the maximum, no more document can be stored. Delete unneeded documents. -
Page 272: Specifications For Scanner
10. Specifications for The Machine Item Specifications Network protocol TCP/IP (IPv4, IPv6) USB interface • Transmission spec: USB 2.0 Standard • Connectable device: Devices corresponding to USB 2.0 Standard Operating system • Windows 8.1/10 • Windows Server 2012/2012 R2/2016/2019 • macOS 10.14 - 11 Fonts •... - Page 273 List of Specifications Item Specifications Image sensor type Fixed contact image sensor Scan type Sheet Original sizes that can be Black & White scanned • Length: 210-2,774 mm (8.3-109.3 inches) • Length: 210-15,000 mm (8.3-590.5 inches) (When the file format converter is installed) •...
- Page 274 10. Specifications for The Machine Item Specifications Tone • Black & White: 2 tones • Full Color/Gray Scale: 256 tones Basic scanning resolution: 200 dpi Image compression type for TIFF (MH, MR, MMR) black and white (two-value) Image compression type for JPEG gray scale/full color Interface...
- Page 275 List of Specifications • Selecting [100.0%] for [Scan Ratio] under [Send Settings] • Selecting [200 dpi], [300 dpi], [400 dpi], or [600 dpi] for [Resolution] under [Send Settings] • Selecting other than [Preview] • Specifying [PDF File Type: PDF/A Fixed] under [Settings] [System Settings] [Settings for Administrator]...
-
Page 276: Specifications For Paper Input Location 2
10. Specifications for The Machine Item Specifications Operating system • Windows 8.1/10 • Windows Server 2012/2012 R2/2016/2019 (TWAIN scanner runs in 32-bit compatible mode on a 64-bit operating system, so TWAIN scanner is not compatible with 64-bit applications. Use 32-bit applications. IC card Authentication System is not compatible with 64-bit operating system.) *1 The maximum resolution depends on the scan size. -
Page 277: Specifications For Wireless Lan Board
List of Specifications Specifications for Wireless LAN Board • Note that the available channels (frequency ranges) and locations to use the wireless LAN are subject to the regulations of the country or region where the printer is used. Be sure to use the wireless LAN according to the applicable regulations. - Page 278 10. Specifications for The Machine Item Specifications Operating systems • Windows 8.1/10, Windows Server 2012/2012 R2/2016/2019 • macOS 10.14 - 11 Protocol • Port 9100, IPP, LPR IPP does not support SPL. • The device server option allows simultaneous connection of up to eight sessions of printing protocols.
-
Page 279: The Setting Values Of The Transmission Function
The Setting Values of the Transmission Function The Setting Values of the Transmission Function • Depending on the type or settings of a document or original, you may not be able to specify or enter the maximum number of destinations or characters. Send Email Item Value... -
Page 280: Send To Folder
10. Specifications for The Machine Send to Folder Item Value Remarks Maximum number of characters 256 characters in a path name specified for the SMB protocol Maximum number of characters 64 characters in a user name specified for the SMB protocol Maximum number of characters 64 characters in a password specified for the... -
Page 281: Broadcast Transmission
The Setting Values of the Transmission Function Broadcast Transmission Item Value Remarks Total number of destinations that can be specified for Send Email and Send to Folder Number of destinations that can Up to 100 items can be be specified when sending a specified when entering an item document by Send Email manually (including the items... -
Page 282: Printable Area And Margin
10. Specifications for The Machine Printable Area and Margin Print area Print area DZX710 1. Leading edge: 3 mm (0.12 inches) 2. Trailing edge Paper input location 1-2: 3 mm (0.12 inches) Paper bypass location: 18 mm (0.71 inches) 3. Right edge: 3 mm (0.12 inches) 4. -
Page 283: Machine Options
Machine Options Machine Options Guide to Functions of the Machine’s External Options D0CWIA8401 Option Description Use to set a paper roll onto the paper input location. Paper holder This is useful to change quickly to a different size paper roll from the paper holder. -
Page 284: Other Options
10. Specifications for The Machine Allows you to download documents that are stored in the Document Server to the computer. Other Options Carrier sheet Use to load bent, folded, creased, thin or pasted originals. CBA051... -
Page 285: Functions Requiring Optional Configurations
Functions Requiring Optional Configurations Functions Requiring Optional Configurations When options are installed, the functions and interface of this machine can be expanded. Copy Function Function/Reference Option Rotate Sort Paper Input Location 2 page 79 "Copying in Page Order or for Each Page Number"... -
Page 286: Others
10. Specifications for The Machine Others Functions Option Quick Card Authentication NFC card reader See "Logging in to the Machine Using an IC Card or a Smart Device", User Guide (Full Version). -
Page 287: Function Compatibility
Function Compatibility Function Compatibility Function Compatibility : Simultaneous operations are possible. : Operation is enabled when the relevant function key is pressed and remote switching (of the scanner/external extension) is done. : Operation is performed automatically once the preceding operation ends. : The operation must be started once the preceding operation ends. - Page 288 10. Specifications for The Machine Function Compatibility The symbols in the cells have the following meanings: Blank: These modes can be used together. ×: These modes cannot be used together. The first mode selected will be the mode you are working in. : These modes cannot be used together.
-
Page 289: 11. Legal And Contact Information
11. Legal and Contact Information Environmental Regulations ENERGY STAR Program (mainly North America) ® ENERGY STAR Program Requirements for Imaging Equipment ® This company is a participant in the ENERGY STAR Program. This machine is compliant with the regulations specified by the ®... - Page 290 11. Legal and Contact Information • The machine can print jobs from computers while in Sleep mode. Specification (mainly Europe and Asia) Specification Reduced electrical consumption in Low Power mode 46.0 W Time of switch into Low Power mode 1 minute Time of switch out from Low Power mode 3.0 seconds Reduced electrical consumption in Sleep mode...
-
Page 291: User Information On Electrical And Electronic Equipment (Mainly Europe)
Environmental Regulations • The machine enters sleep mode directly in the following situations: • [Low Power Mode Timer] and [Sleep Mode Timer] are set to the same time • [Sleep Mode Timer] is set shorter than [Low Power Mode Timer] •... -
Page 292: Environmental Advice For Users (Mainly Europe)
11. Legal and Contact Information Note for the Battery and/or Accumulator Symbol (For EU countries only) (mainly Europe) In accordance with the Battery Directive 2006/66/EC Article 20 Information for end-users Annex II, the above symbol is printed on batteries and accumulators. This symbol means that in the European Union, used batteries and accumulators should be disposed of separately from your household waste. - Page 293 For details about the return program, please refer to the Web page below or consult your service person. https://www.ricoh-return.com/ Energy efficiency The amount of electricity a machine consumes depends as much on its specifications as it does on the way you use it.
-
Page 294: Notes For Wireless Lan And Bluetooth
11. Legal and Contact Information Notes for wireless LAN and Bluetooth This product uses a control panel equipped with wireless LAN and Bluetooth functions. The product uses the 2.4 GHz frequency range for communication. Communications using radio waves may be interrupted by noise or interference. If you want to use this product for external communication, please be aware that communication failures may occur. -
Page 295: Copyright Information About Installed Software
Copyright Information about Installed Software Copyright Information about Installed Software Open source software is used in the machine and applications that can be downloaded from the Application Site. You can check their copyright information in the following settings or applications. •... - Page 296 Bluetooth SIG, Inc. and any use of such marks by Ricoh Company, Ltd. is under license. FeliCa is a registered trademark or a trademark of Sony Group Corporation or its affiliates.
- Page 297 Trademarks (User Guide) • The product names of Windows 10 are as follows: ® ® Microsoft Windows 10 Home ® ® Microsoft Windows 10 Pro ® Microsoft® Windows 10 Pro for Workstations ® ® Microsoft Windows 10 Enterprise ® ® Microsoft Windows 10 Education...
- Page 298 MEMO D0CW-7043...
- Page 300 ©2022 D0CW-7043...
Need help?
Do you have a question about the IM CW2200 and is the answer not in the manual?
Questions and answers