Classe Audio CDP-100 Owner's Manual
Classe cd player owner's manual cdp-100
Hide thumbs
Also See for CDP-100:
- Manuel du propriétaire (32 pages) ,
- Owner's manual (56 pages) ,
- Owner's manual (34 pages)
Table of Contents
Advertisement
Quick Links
Download this manual
See also:
Owner's Manual
Advertisement
Table of Contents

Related Manuals for Classe Audio CDP-100


Summary of Contents for Classe Audio CDP-100
- Page 1 Owner’s Manual CDP-100 CD Player...
- Page 2 WARNING:TO REDUCETHE RISK OF FIRE OR ELECTRIC SHOCK, DO NOT EXPOSE THIS APPLIANCE TO RAIN OR MOISTURE. CAUTION: TO REDUCE THE RISK OF ELECTRICAL SHOCK, DO NOT REMOVE COVER. NO USER-SERVICEABLE PARTS INSIDE. REFER SERVICING TO QUALIFIED PERSONNEL. The lightning flash with arrowhead symbol, within an equilateral triangle, is intended to alert the user to the presence of uninsulated dangerous voltage within the product’s enclosure that may be of sufficient magnitude to constitute a risk of electric shock to persons.
-
Page 3: Important Safety Instructions
Important Safety Instructions Caution: Please read and observe all warnings and instructions in this owner’s manual and all those marked on the unit. Retain this owner’s manual for future reference. 1. Do not attempt to service this product yourself. Do not open the cover for any reason. There are no user-serviceable parts inside. -
Page 4: Table Of Contents
Contents Welcome to the Classé family...5 a word about installation... 5 Unpacking and Placement...6 unpacking your CD player... 6 placement ... 6 ventilation ... 6 custom installations... 6 serial number ... 6 register your purchase! ... 7 operating voltage... 7 warm up/break-in period... -
Page 5: Welcome To The Classé Family
You will find the warranty registration card at the end of the separate warranty policy booklet, enclosed. a word about installation Every effort has been made to make the Classé CDP-100 simple and straightforward to install and use. Still, we have no way to evaluate other variables such as the size and shape of your room, its acoustics, and the associated equipment you have chosen to use with your CD player. -
Page 6: Unpacking And Placement
CD player Carefully unpack your CD player according to the supplied instructions, and Important! placement As with any digital component, it is best to place the CDP-100 somewhat ventilation Your Classé CD player generates a certain amount of heat in the course of custom installations Drawings are included in this manual to facilitate special installations and serial number The serial number for your CD player is found on the rear of the unit. -
Page 7: Register Your Purchase
It will take only a minute or so. Please complete the card now, before you forget. operating voltage The CDP-100 CD player is set at the factory (internally) for 100V, 120V, 230V, or 240V AC mains operation, as appropriate for the country in which it is to be sold. -
Page 8: Warm Up/Break-In Period
Depending on the degree of cooling involved, you should expect a brief warm-up period before the CD player’s sound quality is at its best. Unless your CD player was allowed to become quite chilled, subsequent thermal re-stabilization should not take long. Fortunately, you should never have to repeat the initial 300 hour break-in period. -
Page 9: Special Design Features
flexible and versatile graphical user interface (GUI) while maintaining a clean, uncluttered appearance. The CDP-100 provides a range of controls that might otherwise require dozens of buttons and knobs on the front panel. Despite this power and flexibility, it remains simple to operate in day-to-day use. -
Page 10: Extraordinary Longevity
We are confident that your new Classé CD player will give you many years of trouble-free reliability and musical enjoyment, just as previous Classé products... -
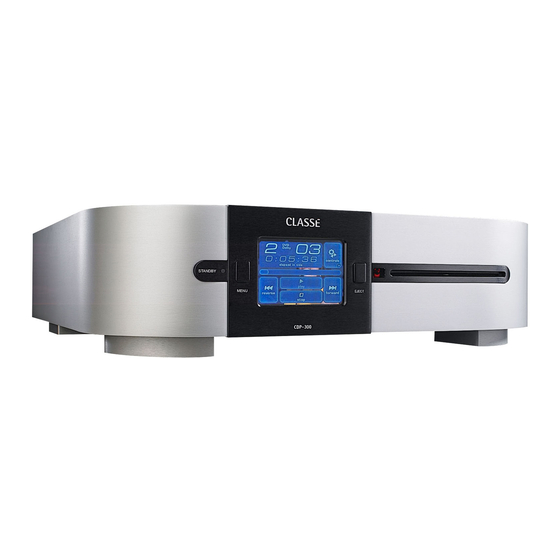
Page 11: Front Panel
Front Panel Standby button & LED indicator The front panel Standby button will toggle the player between its fully operational status and a standby mode that leaves the player off, yet ready to respond to system commands via any of the supported control options (e.g. - Page 12 LCD touchscreen of the CDP-100. LCD touchscreen Most of your interaction with the CDP-100 will be with the front panel LCD touchscreen (and with the CDP-100’s supplied remote control). It will usually display the information you are accustomed to seeing on the front of most CD players (track number, time, etc.), as well as the basic...
-
Page 13: Rear Panel
Rear Panel Coaxial digital output This output provides a S/PDIF digital audio signal for use with a processor or external digital-to-analog (D/A) converter. Connect this output to a corresponding coaxial digital input on your preamplifier/processor. Doing so allows you to feed the signal in its digital form directly to your A/V preamplifier for further digital processing. - Page 14 These pin assignments are consistent with the standard adopted by the Audio Engineering Society (AES14-1992). If you are using your Classé CD player with a Classé preamplifier, you’re all set – just take standard balanced interconnect cables and plug them in.
- Page 15 The Menu System. For example, your dealer can program Trigger Out1 to toggle your Classé power amplifier between operate and standby with your CDP-100. -inch mono mini-jacks in order 8 th...
- Page 16 AC Mains Power switch The main power switch for the CDP-100 is located at the right side of the rear panel. The player should be in standby mode before being switched off. Switching the unit on puts it in standby mode.
-
Page 17: The Remote Control
The Remote Control Your new CD player comes with a versatile remote control which can control both the CDP-100 itself and several aspects of the rest of a Classé-based system. The keys are arranged in logical groups according to their functions. - Page 18 • Home returns you to the normal display of track, time, and transport controls shown on the LCD screen on the front panel of the CDP-100. This provides a quick way to get back to normal operation, regardless of how deep you might be in the menu system.
- Page 19 • F1/F2/F3/F4 keys are available for controlling aspects of the CDP-100 not covered by the other buttons on the remote control. You are able to choose what the CDP-100 should do in response to receiving the infrared signal that a particular “Fkey”...
-
Page 20: The Menu System
The Menu System Your CDP-100 includes a versatile touchscreen LCD display which supports both an attractive information display and a flexible menu system. While its use is quite intuitive, it is also quite extensive. This section of the owner’s manual outlines the many capabilities found in the menu system. -
Page 21: Controls Menu
A sequence number appears to the left of each track, indicating its place in the playlist. The CDP-100 is capable of storing thousands of playlists. If there is a song on the disc that you prefer to skip over, simply scroll to the track in question by pressing the up or down arrows along the right side, and then press the large button with the track number you do not want to hear. -
Page 22: Main Menu System
CDP-100 works within the context of your particular system. triggers Each of the CDP-100 trigger outputs may be programmed as to its “logic level,” which is to say, whether its voltage is low (essentially 0V), or high (approximately 12VDC) when the trigger is activated. -
Page 23: Display Setup
The “remote Fkeys” menu allows you to define how your CDP-100 will respond to seeing one of these fkey signals.) status The status screen provides several items of information on the currently playing disc, as well as access to information on the software used in, and the internal sensors of, the CDP-100. -
Page 24: Display Setup Menu
For example, if you reduce the timeout to its minimum setting, the backlighting will illuminate the display as soon as you interact with any of the CDP-100 controls, and stay on for only three seconds—just long enough for you to check on something. -
Page 25: Language
CDP-100’s operation is as intuitive to use in every country as it is in our home country of Canada. -
Page 26: Troubleshooting
• Check that the main power switch on the rear of the unit is on. • Your display may be set to timeout, and the CDP-100 may simply be in pause or stop mode. Touch the screen to reactivate it so you can see the state of the unit, or simply press the Play key on the remote control. - Page 27 The screen shows an error message and the Load button does not eject the disc (or the player shows some other anomalous behavior). • Press the Standby button so the screen dims and the blue light goes on. • Using the rear panel power switch, turn off the unit for at least thirty seconds.
-
Page 28: Care And Maintenance
Care and Maintenance To remove dust from the cabinet of your CD player, use a feather duster or a soft, lint-free cloth. To remove dirt and fingerprints, we recommend isopropyl alcohol and a soft cloth. Dampen the cloth with alcohol first and then lightly clean the surface of the CD player with the cloth. -
Page 29: Specifications
Specifications Classé Audio reserves the right to make improvements without notice. ■ Frequency response ■ Signal-to-noise ratio ■ Channel separation ■ Distortion (THD + noise) ■ Maximum output voltage (0dBFS signal) ■ Analog output ■ Digital output (S/PDIF) ■ Digital-to-analog conversion ■... -
Page 30: Dimensions
Dimensions ������� ����� ������ ���� ������ ����... - Page 32 Classé Audio 5070 François Cusson Lachine, Quebec Canada H8T 1B3 +1 (514) 636-6384 +1 (514) 636-1428 (fax) http://www.classeaudio.com email: cservice@classeaudio.com Copyright © 2005 Classé Audio, Inc. Printed in Canada. v1.7 020305...
Need help?
Do you have a question about the CDP-100 and is the answer not in the manual?
Questions and answers