EVS LSM VIA Installation And Configuration Manual
Hide thumbs
Also See for LSM VIA:
- User manual (232 pages) ,
- User manual (276 pages) ,
- Installation and configuration manual (56 pages)
Table of Contents
Advertisement
Advertisement
Table of Contents

Related Manuals for EVS LSM VIA


Summary of Contents for EVS LSM VIA
- Page 1 INSTALLATION AND CONFIGURATION MANUAL Version 1.1 - January 2021...
- Page 3 This manual and the information contained herein are the sole property of EVS Broadcast Equipment SA and/or its affiliates (EVS) and are provided “as is” without any expressed or implied warranties, including, but not limited to, the implied warranties of merchantability and fitness for a particular purpose.
- Page 4 EVS Broadcast Equipment SA Issue 1.1.C - January 2021 User Manuals on EVS Website The latest version of the user manual, if any, and other user manuals on EVS products can be found at the EVS download center, on the following webpage: https://www.evs.com/en/download-area.
-
Page 5: Table Of Contents
INSTALLATION AND CONFIGURATION MANUAL LSM-VIA 1.1 Table of Contents TABLE OF CONTENTS WHAT'S NEW 1. PRODUCT OVERVIEW 2. PREREQUISITES 2.1. Overview 2.2. How to Set up the Monitor Connectivity on LSM-VIA Workstation 3. UPGRADING LSM-VIA 4. MANAGING LICENSES 4.1. License Code 4.2. -
Page 7: What's New
INSTALLATION AND CONFIGURATION MANUAL LSM-VIA 1.1 What's New In the Installation and Configuration Manual the icon has been added next to the text to highlight information on new or updated features. The changes linked to new and updated features in version 1.1 are listed below. XClient-VIA upgrade RPM files can be copied via TeamViewer or FTP transfer. -
Page 9: Product Overview
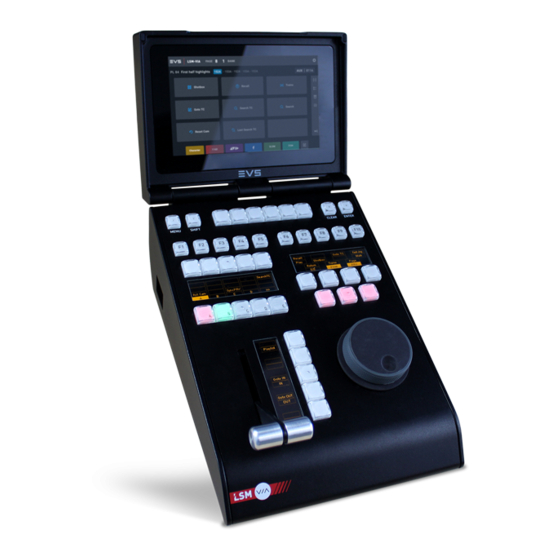
The LSM-VIA Viewer and the LSM-VIA Remote Panel both communicate and control the XT-VIA server via an Ethernet connection. The user can access any EVS video server (XT3, XT4K) on the same XNet network as the XT-VIA server connected to LSM-VIA. - Page 10 EVS Broadcast Equipment SA Issue 1.1.C - January 2021 1. Product Overview...
-
Page 11: Prerequisites
The LSM-VIA option must have been selected in the VIA Controller Settings area during the Multicam configuration (Channels tab): • 2 EVS Remote must have been assigned to RS422 ports from the Port settings area during the Multicam configuration. 2. Prerequisites... - Page 12 EVS Broadcast Equipment SA Issue 1.1.C - January 2021 Prerequisite on the LSM-VIA Workstation A prerequisite is applicable to the LSM-VIA workstation. • The appropriate configuration for the monitor connectivity has to be defined on the LSM-VIA workstation. See section "How to Set up the Monitor Connectivity on LSM-VIA Workstation" on page 5.
-
Page 13: How To Set Up The Monitor Connectivity On Lsm-Via Workstation
1. On the LSM-VIA workstation, open a Linux command line by selecting Applications > Favorites > Terminal. 2. Log in with administrator rights (sudo) on the workstation 3. Execute the script enable-kvm.sh stored in /opt/evs/scripts/ The configuration required for KVM connection is applied. NOTE If you need to restore the initial configuration for Mini-DP use, execute the script disable-kvm.sh stored in the folder /opt/evs/scripts/. -
Page 14: Upgrading Lsm-Via
EVS Broadcast Equipment SA Issue 1.1.C - January 2021 Upgrading LSM-VIA Upgrade Process The LSM-VIA upgrade is executed in three steps: Upgrading the LSM-VIA dependencies on the LSM-VIA workstation Upgrading the LSM-VIA application on the LSM-VIA workstation Upgrading the LSM-VIA Remote Panel connected to the LSM-VIA workstation This third step is performed automatically when you switch on the Remote Panel and associate it with the upgraded LSM-VIA application. - Page 15 Check the release notes to see whether an upgrade of the dependencies is required. 1. Double-click the file evs-lsmvia-dependencies-<LSM-VIA version number>-1.el7.centos.x86_64.rpm. 2. In the authentication dialog box displayed, a. enter the password (evs123) of the user (evs) you are logged in with. b. Click Authenticate. 3. Upgrading LSM-VIA...
- Page 16 4. When the installation is complete, the installation procedure ends with the following message confirming the upgrade. Click OK. Step 2 - Upgrading LSM-VIA Application 1. Double-click the file evs-lsmvia-<LSM-VIA version number>- 1.el7.centos.x86_64.rpm. 2. Follow the same installation process as described in steps 2 to 4 for installing the LSM-VIA dependencies.
- Page 17 1. Double-click the LSM-VIA Configuration shortcut to open the LSM-VIA configuration tool. 2. In the Infrastructure tab, define the IP address of the EVS server to work with as described in the section "IP Address" on page 16. 3. Double-click the LSM-VIA shortcut to start the LSM-VIA application on the workstation.
- Page 18 EVS Broadcast Equipment SA Issue 1.1.C - January 2021 6. In the same way, enter the IP address, subnet mask and default gateway for the LSM- VIA Remote Panel. 7. Tap Connect on the Remote Panel touchscreen. When the connection is being initialized, the version of the Operating System is checked.
- Page 19 INSTALLATION AND CONFIGURATION MANUAL LSM-VIA 1.1 Upgrading the LSM-VIA Version 10. When the version on the LSM-VIA workstation does not correspond to the version on the Remote Panel, a message is displayed. Tap Update to launch the update process on the Remote Panel. During the update, messages inform about installation progress.
-
Page 20: Managing Licenses
2. Generate the locking code by selecting the first option. The screen will display the device's unique locking code. 3. Send this code to EVS support, in order to receive the specific license file for this device. 4. Managing Licenses... - Page 21 INSTALLATION AND CONFIGURATION MANUAL LSM-VIA 1.1 4. When you receive the file containing the license key from the EVS Support, install the license as follows: a. From the LSM-VIA Licensing Manager, select the Install a license option. b. Drag & drop the file or enter the file path on the displayed screen.
-
Page 22: Configuring Lsm-Via
EVS Broadcast Equipment SA Issue 1.1.C - January 2021 Configuring LSM-VIA 5.1. Introduction About the LSM-VIA Settings The settings of LSM-VIA allow you to configure different parameters. Each time you upgrade (or downgrade) the LSM-VIA application, you do not need to redefine configuration parameters on the LSM-VIA workstation. - Page 23 The transition between playlist elements is always a Mix. NOTE Should the parameter correspond to a parameter available in the Multicam configuration module of the controlled EVS server, the Multicam parameter will not be taken into account. 5. Configuring LSM-VIA...
-
Page 24: Infrastructure Settings
Issue 1.1.C - January 2021 5.2. Infrastructure Settings XT-VIA Server Settings IP Address This setting specifies the IP Address of the EVS video server to be controlled by LSM- VIA. Number of Operators Description This setting allows up to 4 LSM operators to work independently on the same server from their respective LSM- VIA workstation and remote. - Page 25 INSTALLATION AND CONFIGURATION MANUAL LSM-VIA 1.1 Operator Selection Description Allows to select the operator when working with several operators. The number of available players on the server is divided by the number of operators. If there are more players than operators, the first operator(s) get(s) more players.
- Page 26 EVS Broadcast Equipment SA Issue 1.1.C - January 2021 Xsquare Settings IP Address This setting specifies the IP Address of the machine hosting the Xsquare to be used for export purposes. Login This field is used to enter the login of the Xsquare user.
-
Page 27: System Settings
INSTALLATION AND CONFIGURATION MANUAL LSM-VIA 1.1 Enable DYVI Macros Description Allows the use of DYVI macros from the Remote Panel. The DYVI macros, if appropriately configured, will be available as functions to be mapped to Remote Shortcut buttons/keys. So, the operator will be able to trigger the DYVI macros from the Remote Panel console or touchscreen. - Page 28 EVS Broadcast Equipment SA Issue 1.1.C - January 2021 Automake Clip for Cam Context When creating clips, the clip corresponding to the camera on which IN/OUT points have been marked is always saved. It is possible to do automatically the same action on the other cameras.
- Page 29 INSTALLATION AND CONFIGURATION MANUAL LSM-VIA 1.1 Post Roll Duration (secs) Description Specifies the duration of the Post Roll. When the Post Roll function is activated from the Live screen or Clip screen, the playout will continue for the duration defined by the Post Roll Duration parameter •...
- Page 30 EVS Broadcast Equipment SA Issue 1.1.C - January 2021 Default Freeze on Mark Points Description Specifies whether Multicam will freeze or not when it reaches a mark point set on the clip and/or the record train that is being played back.
- Page 31 INSTALLATION AND CONFIGURATION MANUAL LSM-VIA 1.1 Default Playlist Speed Description Defines the default speed value that the playlist elements will have when added to a playlist. Possible Values • Unknown: means that the speed of the previous element in the playlist will be used as a reference for the current element.
- Page 32 EVS Broadcast Equipment SA Issue 1.1.C - January 2021 Audio Effect Duration Availability This setting is only available if the license code 112 is valid. Description Sets the duration of audio transition effect. The specified value is used as default value when a clip is added to a playlist in Playlist Edit mode.
- Page 33 INSTALLATION AND CONFIGURATION MANUAL LSM-VIA 1.1 Default Playlist Load Mode Description Determine the way a playlist will be loaded. Possible Values • Always: the playlist is always loaded in PGM+PRV. • Conditional: the playlist is loaded in PGM+PRV, except in Multi-PGM mode when a single PGM is controlled, then only the first playlist element is loaded on the controlled channel.
- Page 34 Remote Panel. Possible Values From 1x to 20x (integer numbers) Default value Default Channel Mode Description Specifies the default mode to control the channels of the EVS server. Possible Values Multi-PGM, PGM+PRV Default value Multi-PGM Recall Clip Toggle...
-
Page 35: Starting Lsm-Via
INSTALLATION AND CONFIGURATION MANUAL LSM-VIA 1.1 Starting LSM-VIA How to Start LSM-VIA Starting LSM-VIA consists in launching the application on both the LSM-VIA workstation (LSM-Viewer) and the LSM-VIA Remote Panel. 1. Double-click the LSM-VIA icon on the desktop of the LSM-VIA workstation: 2. - Page 36 NOTE • If you switch off the Remote Panel, the Viewer will still be able to communicate with the EVS server. You can switch on the Remote Panel and connect again at any time. • If you close the LSM-VIA Viewer, the LSM-VIA application on the Remote Panel will request you to quit the application.
-
Page 37: Recovery Process Of The Remote Panel
INSTALLATION AND CONFIGURATION MANUAL LSM-VIA 1.1 Recovery Process of the Remote Panel Introduction Should the Remote Panel crash or no longer react to any command, you will have to perform a recovery process of the Remote Panel. The recovery consists in reinstalling a minimalist version of the Remote Panel, and then updating the LSM-VIA components on the Remote Panel from the LSM-VIA workstation. -
Page 38: Upgrading The Remote Panel Operating System (Factory Install)
Upgrading the Remote Panel Operating System (Factory Install) When required by EVS, you may have to manually update the Operating System installed on the Remote Panel. Use a USB stick formatted in FAT32 with up to 4GB memory. 1. Extract the content of the Factory Install version of the Operating System archive (*.tar.gz) at the root location of a USB stick (unzipped content). - Page 39 INSTALLATION AND CONFIGURATION MANUAL LSM-VIA 1.1 NOTE This update of the Remote Panel Operating System will update the recovery partition on the Remote Panel at the same time. 8. Upgrading the Remote Panel Operating System (Factory Install)
-
Page 40: Deploying Xclient-Via
EVS Broadcast Equipment SA Issue 1.1.C - January 2021 Deploying XClient-VIA USB Key Preparation 1. Download Rufus on https://rufus.ie./ 2. Launch Rufus and select the USB device 9. Deploying XClient-VIA... - Page 41 INSTALLATION AND CONFIGURATION MANUAL LSM-VIA 1.1 3. Select you LSM-VIA iso image. Please contact the EVS Support team to confirm or obtain the right image version. 9. Deploying XClient-VIA...
- Page 42 EVS Broadcast Equipment SA Issue 1.1.C - January 2021 4. Check all the parameters and click Start. 9. Deploying XClient-VIA...
- Page 43 INSTALLATION AND CONFIGURATION MANUAL LSM-VIA 1.1 5. Select the Write in DD image mode option and click OK. 6. Wait a few minutes until the USB stick is ready to be used. Client Installation 1. Plug the USB key on the computer. 2.
- Page 44 EVS Broadcast Equipment SA Issue 1.1.C - January 2021 c. From the next screen, select LSM-VIA Server. The installation process starts: 9. Deploying XClient-VIA...
- Page 45 4. After the reboot, you will be asked to enter the serial number (available at the front of your computer). 5. At the end of this process, restart your computer to finalize the installation. If you have any question(s), please contact us: support@evs.com. 9. Deploying XClient-VIA...
- Page 48 Belgium www.evs.com/contact EVS Broadcast Equipment is continuously adapting and improving its products in accordance with the ever changing requirements of the Broadcast Industry. The data contained herein is therefore subject to change without prior notice. Companies and product names are To learn more about EVS go to www.evs.com...
Need help?
Do you have a question about the LSM VIA and is the answer not in the manual?
Questions and answers