EVS LSM-VIA User Manual
Hide thumbs
Also See for LSM-VIA:
- User manual (232 pages) ,
- Installation and configuration manual (48 pages) ,
- Installation and configuration manual (56 pages)
Table of Contents
Advertisement
Advertisement
Table of Contents

Related Manuals for EVS LSM-VIA


Summary of Contents for EVS LSM-VIA
- Page 1 USER MANUAL LSM-VIA Version 1.4 | January 2022...
- Page 3 You will find the full list of addresses and phone numbers on the following webpage: https://evs.com/contact/offices. User Manuals on EVS Website The latest version of the user manual, if any, and other user manuals on EVS products can be found at the EVS download center, on the following webpage: https://download-area.evs.com. LSM-VIA | Disclaimer |...
-
Page 5: Table Of Contents
What's New 1. Introduction 1.1. Product Overview 1.2. Starting LSM-VIA 2. Touring the User Interface 2.1. LSM-VIA Remote Panel Console 2.2. LSM-VIA Remote Panel Touchscreen 2.3. LSM-VIA Viewer 3. Defining Channel Control 3.1. Selecting the Channel Control Mode 3.2. Selecting the Controlled Channel 3.3. - Page 6 6.2. Clip Specific Functions and Interfaces 6.2.1. Overview 6.2.2. The Clip Screen on the Remote Panel Touchscreen 6.2.3. The Clip Grid on LSM-VIA Viewer 6.2.4. The Search Window on the LSM-VIA Viewer 6.2.5. Clip Mode Commands on the Remote Panel Console 6.3.
- Page 7 7.2.1. Overview 7.2.2. Playlist Modes 7.2.3. The Playlist Screen on the Remote Panel Touchscreen 7.2.4. The Playlist Grid on the LSM-VIA Viewer 7.2.5. The Playlist Pane on the Viewer 7.2.6. Playlist Mode Commands on the Remote Panel Console 7.3. Managing Playlists 7.3.1.
- Page 8 8.1.1. The Recall Screen 8.1.2. Connecting to a Network Server 8.1.3. Recalling Clips or Playlists by LSM ID from the Remote Panel 8.1.4. Recalling Media by LSM ID from the LSM-VIA Viewer 8.2. Accessing Network Record Trains 8.2.1. The Trains Screen 8.2.2.
-
Page 9: What's New
See section "The Playlist Pane on the Viewer" on page 139. The loaded media (clip or train) is shown on the Live screen and on the Clip screen. • See section "LSM-VIA Remote Panel Touchscreen" on page 11. Commands on the Remote Panel Assignable shortcuts keys •... - Page 10 The Home shortcut behavior used from the Clip grid has changed: it displays the 4 first CAM of the first bank of the current page and selects the first clip or clip angle. • See section "The Clip Grid on LSM-VIA Viewer" on page 65. Clip Management 2nd lever range function, PGM Speed, VarMax, Loop The 2nd Lever, PGMSpeed and the VarMax functions are available to play the loaded clip in a different speed range.
- Page 11 Active Directory users. • See section "Extracting Logs" on page 260. A setting is available to disable the pop-up display for Info and Success notifications. • See section "Viewing and Managing Notifications" on page 258. LSM-VIA | What's New |...
-
Page 13: Introduction
The LSM-VIA Viewer is mainly used for content management. It gives access to the list of clips and the list of playlists from the whole network, as well as to a visual representation of the active playlist. - Page 14 The operator relies on the Multiviewer of the XT-VIA server to view the requested IN and/or OUT channels. 2 | January 2022 | Issue 1.4.G...
-
Page 15: Starting Lsm-Via
Switch on the Remote Panel using the power switch at the back of the Remote Panel, above the power supply. On the Remote Panel touchscreen, in the IP Address field, enter the IP address of the LSM-VIA workstation. When you enter three digits for an octet, the focus shifts directly to the next octet. Otherwise, you can tap the octet you want to edit. - Page 16 Remote Panel touchscreen. (Optional) In the LSM-VIA Viewer, you can select the Remote Panel in the Sync field so that the page and bank navigation is synchronized between LSM-VIA Viewer and LSM-VIA Remote Panel. You are now ready to start working in LSM-VIA.
- Page 17 LSM-VIA on the Remote Panel. The Network Configuration screen opens, allowing you to directly restart LSM-VIA on the Remote Panel if the LSM-VIA Viewer is still open on the workstation. • If you switch off the Remote Panel, the Viewer will still be able to communicate with the EVS server.
-
Page 18: Touring The User Interface
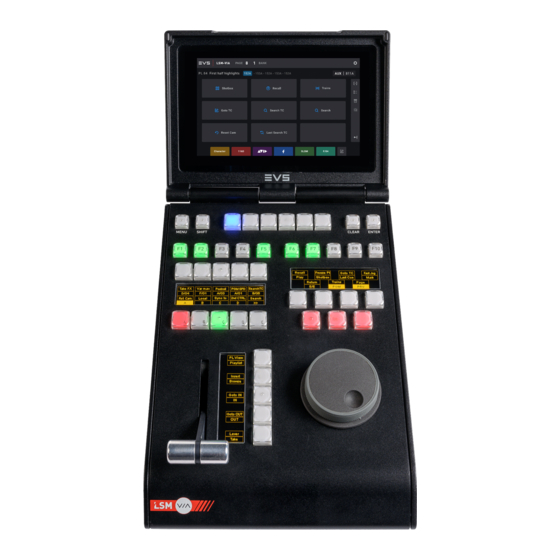
2.1. LSM-VIA Remote Panel Console The LSM-VIA Remote Panel console features the areas highlighted on the screenshot below. This section does not detail all key functions since they vary depending on the activated mode. The specific key functions will be detailed further in this manual. - Page 19 'Page' in this screenshot. In this case, you press SHIFT and then the corresponding key to send a Page command. CLEAR • delete a selected clip, bank, playlist, etc. ENTER • confirm/validate an action. LSM-VIA | 2. Touring the User Interface |...
- Page 20 Function Keys (3) These keys mainly allow you to access the various pages, banks, and positions in the banks, as well as to save and load clips stored on these positions, or to change the active playlist. Some of them can also be used from the Main menu.
- Page 21 "Clip Mode Commands on the Remote Panel Console" on page 72 • "Playlist Mode Commands on the Remote Panel Console" on page 145 • "Edit Audio and Edit Video Modes Commands on the Remote Panel" on page 193 LSM-VIA | 2. Touring the User Interface |...
- Page 22 Moving the jog clockwise browses forward, and moving it counter-clockwise browses backwards. When using the Fast Jog mode, the browsing speed of the jog dial is multiplied by a factor defined in the LSM-VIA configuration tool. 10 | January 2022 | Issue 1.4.G...
-
Page 23: Lsm-Via Remote Panel Touchscreen
• Specific Modes: These modes rather relate to a specific function called from the Remote Panel, such as Shotbox, Recall, ..The screens displayed are described in the corresponding sections of the current manual. LSM-VIA | 2. Touring the User Interface |... - Page 24 This field specifies to which server the displayed record trains correspond. Currently, it is always Local as the displayed record trains are always those of the local server, that is the server specified in the LSM-VIA configuration tool. 12 | January 2022 | Issue 1.4.G...
- Page 25 Controlled Channel Field This read-only field shows the following information: • Smallest controlled PGM controlled by LSM-VIA (on the left). This makes it easier for the user to know the PGM some actions will be applied to. • LSM ID of the clip angle or the train loaded on the smallest controlled PGM (on the right).
-
Page 26: Lsm-Via Viewer
2.3. LSM-VIA Viewer Overview At startup, the LSM-VIA Viewer screen shows the Clip grid (3). It features the areas highlighted on the screenshot below. The Playlist pane (4) can be displayed on the right of the screen. The Playlist grid or the Search window used for searching and filtering purposes can be accessed and displayed on the LSM-VIA Viewer. - Page 27 The Help button gives access to a menu with the following options: • About: displays a window with the LSM-VIA version number, support phone numbers. • Extract Logs: extracts the logs to a dedicated folder. See section "Extracting Logs" on page 260.
- Page 28 See section "Connecting to a Network Server" on page 229. Sync Field In this field, select the Remote Panel (of the local server) the LSM-VIA Viewer has to be synchronized to. By default, the LSM-VIA Viewer is not synchronized to a Remote Panel, and the value is None.
- Page 29 The Playlist Grid The Playlist grid and its various areas are meant to display information specific to playlists. See section "The Playlist Grid on the LSM-VIA Viewer" on page 137 for more information. The Search Window The Search window lists all the clip angles from the entire XNet network. It provides searching and filtering tools to restrict the list of elements and more easily find the one(s) you need.
- Page 30 The Playlist Pane (4) The Playlist pane can be opened on the right-side of the screen. It displays the active playlist. See section "The Playlist Pane on the Viewer" on page 139 for more information. How to Select the Focused Pane To move the focus from the Clip grid/Playlist grid/Search window to the Playlist pane, or vice versa, •...
-
Page 31: Defining Channel Control
(such as jogging back to a certain action on all outputs) or individually (PGM 1, 2, or 3). When you open LSM-VIA and connect the Remote Panel, the default channel control mode is applied. This default mode is configured in the LSM-VIA Configuration tool. See Installation and Configuration manual for more information. - Page 32 How to Change the Channel Control Mode From the Clip or Playlist screen, press The main menu is displayed on the touchscreen: The currently active control mode is displayed on a blue background. On the Remote Panel console or touchscreen, press or tap: ◦...
-
Page 33: Selecting The Controlled Channel
When you enter the PGM+PRV control mode, both PGM and PRV channels are controlled by default. • When you are in PGM-only control, press the PGM key to take control on both PGM and PRV: LSM-VIA | 3. Defining Channel Control |... - Page 34 • When you are in PRV-only control, press the PRV key to take control on both PGM and PRV: Display on Remote Panel with PGM+PRV Control • The OSD displays FULL CTRL on both PGM and PRV monitors. • On the right operational block, PGM and PRV are displayed on a yellow background (active) and the corresponding PGM and PRV keys are steady red (active).
- Page 35 When you enter the Multi-PGM control mode, all PGM channels are controlled by default. • When you are in one PGM control, press the All key on the left operational block to regain the control of all PGMs: LSM-VIA | 3. Defining Channel Control |...
-
Page 36: Multi-Operator Mode
Multi-Operator Mode Description This feature allows up to 4 operators to work independently on the same server from their respective LSM-VIA workstation and remote. This mode has the following main characteristics: • All operators share the clips and playlist pages. - Page 37 • The number of available players on the server is divided by the total number of LSM-VIA connected to the server. If there are more players than LSM-VIA (operators), the first operator(s) get(s) more players.
- Page 38 • 4 operators in a 6IN/6OUT configuration: PGM1 and PGM2 are for Operator 1, PGM3 and PGM4 are for Operator 2, PGM5 is for Operator 3 and PGM6 is for Operator 4. • 3 operators in a 6IN/6OUT configuration: PGM1 and PGM2 are for Operator 1, PGM3 and PGM4 are for Operator 2, PGM5 and PGM6 are for Operator 3.
-
Page 39: Commands On The Remote Panel
Changing the current channel control mode • Adding a log point in the logs • Restarting the LSM-VIA application How to Access the Main Menu To access the main menu from the Remote Panel console, press LSM-VIA | 4. Commands on the Remote Panel |... - Page 40 Quits the LSM-VIA application and opens the Network Configuration screen from which you can start the application. See section "How to Quit LSM-VIA on the Remote Panel" on page 4. PGM + PRV Sets the channel control mode to PGM+PRV.
-
Page 41: Commands On Left Operational Block
The Sync to function allows you to synchronize the timecode and speed of the controlled PGM with another one. Press this button and then select the PGM to be used as a reference. This function is not available with network trains. See section "Synchronizing Record Trains" on page 55. LSM-VIA | 4. Commands on the Remote Panel |... - Page 42 PGM+PRV Mode Functions In PGM+PRV mode, the left operational block gives directly access to the cameras. A / B / C / D / E Pressing a CAM key allows you to load the live camera on the controlled channel. The CAM keys are available on keys A to D.
-
Page 43: Commands On Right Operational Block
ID from the Remote Panel" on page 232. It also allows you to connect to a remote server and to navigate through its pages and banks. See section "Accessing Network Servers" on page 227. LSM-VIA | 4. Commands on the Remote Panel |... - Page 44 The Fast Jog function allows you to browse the loaded media (record train, clip or playlist) at a speed from 2x to 20x faster than normal. The speed is defined in the LSM-VIA configuration tool, with the Fast Jog parameter.
- Page 45 Page The Page function, available with the key combination SHIFT + Page key + a function key (F1 to F0), allows you to access a page on the EVS server. See section "Navigating in Pages and Banks" on page 75.
-
Page 46: Commands On Bottom Operational Block
The PRV function is only available in PGM+PRV mode. This key is used to gain control on the PRV only when you are controlling both PGM+PRV or PGM only. See section "Selecting the Controlled Channel" on page 21. 4.4. Commands on Bottom Operational Block Overview Multi-PGM... - Page 47 Playing Clips" on page 123. When you are in a playlist, this function allows you go back to the IN point of the current playlist element. See section "Browsing a Playlist" on page 222. LSM-VIA | 4. Commands on the Remote Panel |...
- Page 48 In Conditional mode, when a playlist is loaded on a single PGM, this allows to select another PGM to control. The duration of the take effect is defined by the Effect Duration for Take parameter stored in the LSM-VIA configuration. 36 | January 2022 | Issue 1.4.G...
-
Page 49: Commands From The Assignable Shortcut Keys
• The secondary function, displayed in the upper part of the touchscreen button, is available when you tap/press SHIFT and then the given button or key. A color is assignable to each function. LSM-VIA | 4. Commands on the Remote Panel |... - Page 50 The Dyvi macros have been created with the appropriate structure on the Dyvi side. On the Dyvi interface, inside the Global Macros folder, create a folder named LSM-VIA. Create 6 macros inside the folder and name them Macro01, Macro02, and so on.
- Page 51 To map a secondary function, or press The button is highlighted Tap the desired button. A blue line is then displayed above the currently selected shortcut button. Select the function category on the left of the screen. LSM-VIA | 4. Commands on the Remote Panel |...
- Page 52 Select a function by tapping it on the touchscreen. The function is displayed on the button. (primary function) (secondary function) With some functions (Record Trains, Add to Playlist), another screen is displayed when you tap the Function button. ◦ Record Trains: it lists all the record trains from the network with their LSM ID. So, you can map a record train to a shortcut button.
- Page 53 Tap Clear Shortcuts or press The Clear Shortcuts message is displayed. The Button option is selected by default. Tap Yes, clear. Both the shortcuts to the primary and the secondary functions, with their assigned colors, are cleared: LSM-VIA | 4. Commands on the Remote Panel |...
- Page 54 How to Clear all the Shortcuts To clear the function(s) and color(s) assigned to all the Shortcut buttons, Tap Clear Shortcuts or press The Clear Shortcuts message is displayed. Tap All. Tap Yes, clear. All the shortcuts to primary and secondary functions, with their assigned colors, are cleared. 42 | January 2022 | Issue 1.4.G...
-
Page 55: Working With Record Trains
The Live screen appears on the touchscreen at startup and when a train is loaded on the smallest controlled PGM. It features the areas highlighted on the following screenshot. Application Bar Playlist Summary Operational Parameters Specific Function Buttons LSM-VIA | 5. Working with Record Trains |... - Page 56 The Fast Jog mode allows you to browse the loaded media (record train, clip or playlist) at a speed from 2x to 20x faster than normal. The speed is defined in the LSM-VIA configuration tool, with the Fast Jog parameter.
- Page 57 See section "The Trains Screen" on page 236. Export Playlist This button is used to export a playlist to VIA Xsquare targets. See section "Exporting Playlists" on page 166. LSM-VIA | 5. Working with Record Trains |...
-
Page 58: Changing The Camera Assignment To A
Flatten Playlist This button is used to flatten the active playlist to the local server. See section "Flattening a Playlist" on page 168. Reset Cam The Reset Cam function allows you to reset the default camera assignment on the controlled PGM. See section "Changing the Camera Assignment to a PGM"... - Page 59 For CAM A to D, press the camera key to assign to the PGM • For CAMs above D, ◦ if the server has been configured in 5 IN, press E ◦ otherwise, first press E (>>) then the requested CAM key LSM-VIA | 5. Working with Record Trains |...
- Page 60 How to Change the Camera Assigned to the PRV In PGM+PRV, change the camera assigned to the PRV as follows: Press PRV on the right operational block to get the PRV control. Select the camera to be assigned to PRV on the left operational block. 48 | January 2022 | Issue 1.4.G...
- Page 61 On the left operational block, select the PGM to which you want to assign another camera. Press The left operational block now displays the CAMs. On the left operational block, select the camera to be assigned to the PGM. Press LSM-VIA | 5. Working with Record Trains |...
- Page 62 How to Reset the Default Camera Assignment Whatever the control mode, you can reset the default camera assigned to one or more controlled play channels as follows: Take control on the channel(s) for which you want to reset the camera assignment: ◦...
-
Page 63: Playing And Browsing A Record Train
By default, the playout does not freeze on the mark points when clips or record trains are being played. This can be changed from the LSM-VIA configuration tool. LSM-VIA | 5. Working with Record Trains |... - Page 64 Possible Actions on Record Trains In order to ... Proceed as follows browse back in the record train browse forward in the record train (before the live point) You can use the jog in association with the Fast Jog option to multiply the browsing speed up to 20x. See section "Fast Jog"...
- Page 65 • PGM Speed mode • VarMax mode See section "LSM-VIA Remote Panel Console" on page 6. The Second Lever Range mode, the PGM Speed mode and the VarMax mode are all mutually exclusive. LSM-VIA | 5. Working with Record Trains |...
- Page 66 How to Go to a Given Timecode in the Train To jump to a specific timecode in a train loaded on the smallest controlled PGM, Select the Goto TC function: The Go To TC screen opens on the touchscreen: Enter the requested timecode in one of the following ways: ◦...
-
Page 67: Synchronizing Record Trains
Press the PGM you want to use as a reference for timecode and play speed. The keys of the available PGM blink red. The timecode and speed of the controlled PGM gets directly synchronized to the timecode and speed of the reference PGM. LSM-VIA | 5. Working with Record Trains |... -
Page 68: Adding Markers On A Record Train
5.6. Adding Markers on a Record Train How to Add Mark IN and Mark OUT on a Record Train When you browse a record train, you can use the following commands to add mark IN and/or mark OUT points in order to create a clip, and to find them back easily. See also "Creating Clips" on page 78. In order to ... -
Page 69: Managing Mark Points On Trains
Once this marking is done, you can use the mark points to quickly and easily retrieve those specific moments and use them. Up to 999 mark points can be set. They are linked to the workstation and they are lost after LSM-VIA reboot. - Page 70 PGM. The system memorizes the trains that were loaded on the controlled PGM at the time of the Mark action. A message is displayed on the top right of the touchscreen and the LSM-VIA Viewer screen. How to Add Mark Points on Trains in Playback Mode Make sure the Default Mark Points parameter has been set to Playback.
- Page 71 Load a train on the smallest controlled PGM. Browse to the mark point you want to delete. The Mark key button lights up in red. Delete the mark point: The mark point is deleted on all the record trains. LSM-VIA | 5. Working with Record Trains |...
- Page 72 A message is displayed on the top right of the touchscreen and the LSM-VIA Viewer screen. How to Delete all the Mark Points Load a train on the smallest controlled PGM. Make sure you are not on a mark point. The Mark key button must be lit up in green.
-
Page 73: Working With Clips
On each page, the first 9 banks are used for clips. The last bank (10) is used for playlists. When the EVS server operates in 6-channel mode, this makes it possible to store 900 clips with up to 6 camera angles per clip, which results in 5,400 clips on an EVS video server. -
Page 74: Clip Specific Functions And Interfaces
The number of the EVS video server within the network structure is also added to define the precise location of the clip. For example if clip 129C is stored on the machine allocated with the network number 2, the clip will be identified as 129C/02. - Page 75 The Fast Jog mode allows you to browse the loaded media (record train, clip or playlist) at a speed from 2x to 20x faster than normal. The speed is defined in the LSM-VIA configuration tool, with the Fast Jog parameter.
- Page 76 • Conditional: the playlist is loaded on a single PGM when the selected Channel Control mode is Multi PGM controlling a single PGM. Otherwise, it is loaded in PGM+PRV. See section "Loading a Playlist" on page 218. PGM+PRV / Multi-PGM The parameter is used to select the Channel Control mode.
-
Page 77: The Clip Grid On Lsm-Via Viewer
The Clip Grid on LSM-VIA Viewer Overview of the Clip Grid on LSM-VIA Viewer The Clip Grid on the LSM-VIA Viewer is displayed when a clip bank is selected. It contains the areas highlighted on the screenshot below: Application Bar (1) See section "LSM-VIA Viewer"... - Page 78 The Clip grid shows the clips from 2 banks from one page at a time, in a 4-camera view. Shortcuts are available to navigate between the pages and banks. See section "How to Navigate in Pages and Banks from the LSM-VIA Viewer" on page 76. Color Code...
- Page 79 See section "How to Navigate in Pages and Banks from the LSM-VIA Viewer" on page 76. Shortcuts Available from the LSM-VIA Viewer Clip Grid This list gives a complete overview of all the possible shortcuts on the LSM-VIA Viewer Clip grid. Press / click...
- Page 80 Open / Close the Playlist pane "The Playlist Pane on the Viewer" on page 139 Toggle focus between Clip grid / Playlist CTRL+TAB "LSM-VIA Viewer" on page 14 Pane Clip Management Shortcuts Clear the Name field Name the selected clip "Naming a Clip"...
- Page 81 ALT+P "Browsing and Playing Clips" on page controlled channels Recall media by LSM ID "Recalling Media by LSM ID from the LSM-VIA Viewer" on page 234 Back to local ALT+L "Connecting to a Network Server" on page 229 Activate / deactivate the Loop mode ALT+Y "Browsing and Playing Clips"...
-
Page 82: The Search Window On The Lsm-Via Viewer
6.2.4. The Search Window on the LSM- VIA Viewer Overview of the Search Window The Search window lists all the clip angles from the entire XNet network. It provides searching and filtering tools to restrict the list of elements and to more easily find the one(s) you need. Element grid (1) This area displays the list of clip angles from the entire XNet network, or the list of elements resulting from a search. - Page 83 To leave the Search window, do one of the following actions: • Press • Click the button at the bottom left of the Clip grid. To go back to the Clip grid, do one of the following actions: LSM-VIA | 6. Working with Clips |...
-
Page 84: Clip Mode Commands On The Remote Panel Console
• Press • Click 1 at the top left of the Search. 6.2.5. Clip Mode Commands on the Remote Panel Console When a clip is loaded, some specific functions are available from the console. Multi-PGM 72 | January 2022 | Issue 1.4.G... - Page 85 The Push function allows you to easily send a copy of a clip to another machine on the network, via the GbE network or the SDTI network. It is only displayed when a clip is loaded on the smallest controlled PGM. See section "Pushing Clips to Network Servers" on page 254. LSM-VIA | 6. Working with Clips |...
-
Page 86: Managing Clips
Managing Clips The current chapter mainly describes how a clip can be created, deleted, copied, archived from the Remote or from LSM-VIA Viewer. It also explains how you can search for clips or add mark points on clips. The following operations are allowed on a distant clip, even if the Clip Edit by Network parameter has not been set to Yes on that server. -
Page 87: Navigating In Pages And Banks
How to Synchronize the Navigation To make sure the page and bank selection is automatically synchronized between the Remote Panel and the LSM-VIA Viewer, you need to select the Remote Panel you want to use in the Viewer application: • On the toolbar, Sync field, select the Remote Panel to be synchronized: Clips and Playlist Banks •... - Page 88 On the Remote Panel touchscreen, the active page and bank are displayed in the App bar: How to Navigate in Pages and Banks from the LSM-VIA Viewer You can reach a given page and bank from the navigation bar at the bottom of the main window, or thanks to shortcuts.
- Page 89 To display the playlists, you do not need to select a page. Simply select the PL bank. Click the BANK button. Click the PL bank. How to Navigate Using Shortcuts Shortcuts are available to navigate in pages and banks from LSM-VIA Viewer. See section "The Clip Grid on LSM-VIA Viewer" on page 65. LSM-VIA | 6. Working with Clips |...
-
Page 90: Creating Clips
Principles for Clip Creation Clip-Related Settings The following settings applied to clip creation in LSM-VIA. Clip Default Duration If you create a clip based only on a IN or OUT point, it is created with the default clip duration defined in the configuration tool, with the Default Clip Duration setting. - Page 91 You can create a clip locally from a local or a remote train. When the record trains are loaded on the play channels, create a clip as follows: In the record train, jog to the requested position for IN. LSM-VIA | 6. Working with Clips |...
-
Page 92: Selecting Clips
Selecting Clips from the LSM-VIA Viewer Clip Grid Introduction A single clip, or clip angle, can be selected from the LSM-VIA Viewer Clip grid. See section "Navigating in Pages and Banks" on page 75 to know how to navigate to other pages and banks. - Page 93 + click all the CAM angles you want all existing angles between two press + click the first CAM angle, then the last CAM angles angle If you then switch to Clip mode, all the angles from the selected clips become selected. LSM-VIA | 6. Working with Clips |...
- Page 94 Selecting Clips from the LSM-VIA Viewer Search Window Introduction One or several clip angles can be selected from the LSM-VIA Viewer Search window. In case of multiselection, the number of selected clips is displayed at the bottom of the LSM-VIA Viewer screen: 82 | January 2022 | Issue 1.4.G...
-
Page 95: Deleting Clips
Growing clip angles. How to Delete a Clip from the Remote Panel When you delete a clip, you delete all clip angles on a clip position. Select the requested page and bank the clip is stored on. LSM-VIA | 6. Working with Clips |... - Page 96 If a single clip angle cannot be deleted, you will receive an error notification even if all other clips and clip angles could be deleted. How to Delete a Clip or Clip Angle from the LSM-VIA Viewer Select the clip(s) (Clip mode) or the clip angle(s) (CAM mode) to delete.
-
Page 97: Searching For Clips
The Quick Text Search function and the Advanced Search filters are used from the Search window of the LSM-VIA Viewer to filter the list of network clips based on any metadata. Then, you can select multiple clips, load a clip, or insert clips into a playlist. - Page 98 The timecode displayed is the current one from the smallest controlled PGM. Select the resource type you want to search by tapping How to Search for Clips and/or Trains on any Timecode from the Search TC Screen A search by TC can be performed from the Search TC screen once you have configured the Search TC function.
- Page 99 Press Browse to enter the Browse mode in case it has been deactivated (for example to browse through a clip or train): The Browse mode is activated. Use the jog to browse through the results list from one result to the next one, or to the previous one. LSM-VIA | 6. Working with Clips |...
- Page 100 Searching for Network Clips from the Search Window From the LSM-VIA Viewer, a Search window allows you to see all the clip angles from the XNet network in a list view. From this Search window, powerful search tools allow you to search for network clips and easily find the result you want by restricting the list of elements displayed.
- Page 101 Click the Select Visible Columns button at the top right of the Element grid. The list of available columns is displayed. It contains the default columns (general metadata) and the metadata columns (metadata related to the EVS video servers): LSM-VIA | 6. Working with Clips |...
- Page 102 Select the columns you want to see. Click on again to close the window. Use the Reset button at the top of the Select Columns menu to return to the default configuration. Ordering Columns The columns of the Element grid can be re-ordered: •...
- Page 103 Click any column header until no triangle is displayed. Performing a Global Search Context of Use The Global Search function, or Quick Text Search, is used to perform a search based on free text entered in the Quick Text Search field. LSM-VIA | 6. Working with Clips |...
- Page 104 The field is located at the top of the Element grid: The search is performed on text metadata fields, such as the name of the element. As far as you have typed 2 characters, and provided that this matches an entry in the grid, a list of proposals is displayed under the Quick Text Search field.
- Page 105 How to Hide or Display the Advanced Search Filters Area To hide, or display the Advanced Search Filters area, • Click the button. The numbers on the button represent: • : the number of applied filters • : the number of selected filters. LSM-VIA | 6. Working with Clips |...
- Page 106 To select the Advanced Search filter fields to display at the top of the grid, Click The list of available filters is displayed. It contains the default metadata columns and metadata columns related to the EVS video servers: 94 | January 2022 | Issue 1.4.G...
- Page 107 • a list of predefined options (e.g. Frame rate, Rating, ...) • a list of options linked to your system (e.g. Owner) • a date (e.g. Creation date, Modification date) • a number (e.g. Page) LSM-VIA | 6. Working with Clips |...
- Page 108 • time (e.g. Duration) • a true value (boolean) (e.g. Is archived) • free text As soon as the filter criteria have been set, • The filter is automatically applied and the search returns the corresponding results in the grid. •...
- Page 109 USER MANUAL With the current version of LSM-VIA, from the Net Numbers field, you will have access to a list of 29 servers, would they be available or not on the network. The different search criteria are displayed as follows: Click Apply.
- Page 110 The search criterion is displayed on the button. For example: How to Apply a Filter or Remove an Applied Filter (Activate / Deactivate the Filter) Once search criteria have been defined, they are displayed next to the Filter type. To apply or deactivate a filter, •...
- Page 111 No more advanced search filter is applied and only the default filter fields are displayed. How to Reset all the Applied Filters To clear all the applied filters at once, including Quick Text Search and Advanced Search filters, LSM-VIA | 6. Working with Clips |...
-
Page 112: Copying And Moving Clips
Clips can be moved from the local server to the local server or a remote server from the Remote Panel or from the Viewer. With the current version of LSM-VIA, remote clips cannot be moved to the local or a remote server. - Page 113 The clip name displayed is the name of the angle loaded on the smallest controlled PGM, if it has a name. Tap Copy to copy the clip to the selected position: ◦ Clip to copy all the clip angles: LSM-VIA | 6. Working with Clips |...
- Page 114 ◦ Cam to copy the controlled CAM angles of the clip: The screen shows the involved CAM: ◦ Short to copy the clip without its guardbands: ◦ Long to copy the clip with its guardbands: Validate your action: press or tap The clip angles (Clip mode) or the controlled CAM angles (CAM mode) of the selected clip are copied to the selected position.
- Page 115 USER MANUAL With the current version of LSM-VIA, only local clips can be moved. See section "Loading Clips" on page 118 for other ways to load a clip. Select an empty clip position: press a non colored Function key The following screen is displayed on the touchscreen: After a system reboot, the default options are selected (Copy, Clip, Long).
- Page 116 • If only the secondary CAM (=) is selected, it becomes the principal pref cam (*), and the next smallest cam becomes the secondary pref cam. How to Copy or Move a Clip from the LSM-VIA Viewer Select ◦ the Clip view to copy or move all the angles of a clip: ◦...
-
Page 117: Managing Mark Points On Clips
Once this marking is done, you can use the mark points to quickly and easily retrieve those specific moments and use them. Up to 999 mark points can be set. They are linked to the workstation and they are lost after LSM-VIA reboot. - Page 118 A mark point is set on all the controlled clip angles, at the current timecode of the clip loaded on the smallest controlled PGM. A message is displayed on the top right of the touchscreen and the LSM-VIA Viewer screen. If different types of media are loaded on controlled PGMs (Clips & trains), the mark points are only set on the type of media loaded on the smallest controlled PGM.
- Page 119 Delete the mark point: The mark point is deleted on all the clip angles. A message is displayed on the top right of the touchscreen and the LSM-VIA Viewer screen. How to Delete all the Mark Points Load the required clip on the smallest controlled PGM.
-
Page 120: Editing Clips
Keywords and rating can be assigned to a loaded clip. With the current version of LSM-VIA, this is done from the Metadata window which can be displayed on the Remote Panel touchscreen thanks to the Metadata function of the console. - Page 121 This area displays the metadata, keywords an rating, associated with the loaded clip. How to Add Keyword(s) to a Clip When you add keywords in the current version of LSM-VIA, you add them to the clip angle loaded on the first controlled PGM (PGM or PGM1), not on all clip angles.
- Page 122 Open the Metadata window by pressing the Metadata key: Select the keywords: ◦ From the touchscreen, tap the keyword box. The corresponding Metadata box is highlighted in blue. ◦ From the Remote Panel console Press the Function key corresponding to the keyword ID shown in the Metadata grid. For example: press for the Goal keyword The corresponding Metadata box is highlighted in light gray.
- Page 123 In the Metadata window, on the Clip Metadata pane, do one of the following actions: • Tap the keyword to be deleted in the Clip Metadata pane. • tap the keyword in the Keyword grid. LSM-VIA | 6. Working with Clips |...
- Page 124 How to Add a Rating to a Clip When you define a rating in the current version of LSM-VIA, you define it on the clip angle loaded on the first controlled PGM (PGM or PGM1), not to all clip angles.
-
Page 125: Naming A Clip
Make sure the focus is on the Clip grid, not on the Playlist pane. See section "How to Select the Focused Pane" on page 18. Type a name for the clip. It is entered in the Name field of the LSM-VIA Viewer: LSM-VIA | 6. Working with Clips |... -
Page 126: Editing The Clip Duration
Select Clip or CAM view: Select the clip you want to name. See section "Selecting Clips" on page 80. Associate the name with the selected clip angle (CAM view) or with the selected clip (Clip view) by pressing 6.4.3. Editing the Clip Duration How to Edit the IN or OUT Point It is possible to edit a clip angle and define new Short IN and/or Short OUT points between the Protect IN and the Protect OUT points. -
Page 127: Restriping A Clip
00:10, talking at 00:20, and so on. Limitation With the current version of LSM-VIA, it is not possible to restripe a remote clip. How to Restripe a Clip from the LSM-VIA Viewer Make sure the focus is on the Clip grid. - Page 128 To modify ◦ the LTC timecode and/or date: Type in the new timecode for the Short IN point and/or the date of the clip in the corresponding fields. ◦ The user-defined timecode and/or date: Type in the new timecode for the Short IN point and/or the date of the clip in the corresponding fields.
-
Page 129: Changing The Pref Cam Of A Clip
Changing the Pref Cam of a Clip Principles In the Clip grid of the LSM-VIA Viewer, the primary preferred camera is represented with a *. The secondary preferred camera is represented with a =. Another clip angle can be set as primary pref cam or secondary pref cam. -
Page 130: Loading, Browsing And Playing Clips
The clip angles are loaded on the controlled play channels according to the loading behavior rules. The clip Function key is red on the Remote Panel console. How to Load a Clip in Clip Mode by Direct Selection from the LSM-VIA Viewer Clip Grid Select the desired clip. ◦... - Page 131 In CAM mode, the clip is loaded on the smallest PGM controlled by the first connected Remote Panel. In case no Remote Panel is connected to LSM-VIA, the clip is loaded on the smallest PGM of the server. How to Load a Clip Angle by Direct Selection from the LSM-VIA Viewer Search Window Select the desired clip angle from the LSM-VIA Viewer Search window.
- Page 132 PGMs controlled by the Remote Panel, regardless of the Viewer pane which has the focus on. In case no Remote Panel is connected to LSM-VIA, the Recue command applies to the media loaded on the smallest PGM of the server.
- Page 133 PRV, then the next available clip angle, and so on. When the Recall Clip Toggle mode is not activated, pressing several times the Function key will load the preferred camera angle (*) of that clip on its IN point. LSM-VIA | 6. Working with Clips |...
- Page 134 How to Change the Loaded Clip Angle Using the CAM Keys in PGM+PRV Mode PGM+PRV or PGM only When you control both PGM and PRV or only the PGM, you can change the clip angle loaded on the PGM as follows: • To select CAM A, B, C or D, press the corresponding key on the console.
-
Page 135: Browsing And Playing Clips
Recalling a Clip with its LSM ID See sections "Recalling Clips or Playlists by LSM ID from the Remote Panel" on page 232 and "Recalling Media by LSM ID from the LSM-VIA Viewer" on page 234. 6.5.2. Browsing and Playing Clips Default Settings Values •... - Page 136 PGMs controlled by the Remote Panel, regardless of the Viewer pane which has the focus on. In case no Remote Panel is connected to LSM-VIA, the Play/Pause command applies to the media loaded on the smallest PGM of the server.
- Page 137 The Go To TC screen opens on the touchscreen: Enter the requested timecode in one of the following ways: ◦ press the function keys on the Remote Panel, ◦ use the numeric pad on the touchscreen. LSM-VIA | 6. Working with Clips |...
-
Page 138: Transferring And Archiving Clips
The Goto TC action is automatically launched as soon as you have entered the 8 digits of a timecode. • To clear the field: • To navigate within the TC value: Validate your action by pressing or tapping The media is loaded at the selected TC. You can leave the Goto TC screen at any time in one of the following ways: •... -
Page 139: Exporting Clips
VIA Xsquare has been configured from the Infrastructure Settings and it can be joined. Limitation With the current LSM-VIA version, the export can only be requested in CAM mode. Exporting a Clip How to Export a Local or Remote Clip from the Remote Panel Console The clip angle loaded on the smallest controlled PGM can be exported as follows: Load the clip angle to be exported on the smallest controlled PGM. - Page 140 The Export screen opens on the touchscreen. On the right-side, the list of targets which have been defined in VIA Xsquare are displayed. Select the target(s) to send the clip to: You can still cancel the operation by tapping Cancel or by pressing the blinking red key.
-
Page 141: Archiving A Clip
Flag the clip for archiving: How to Flag Clip(s) for Archive from LSM-VIA Viewer From the LSM-VIA Viewer, you can request the archiving of any selected clip either from the Clip grid or from the Search window. Select the clip angle(s) to be archived. - Page 142 Archive Status The archive status can be seen on the Clip grid of the LSM-VIA Viewer and on the Remote Panel console. Status Remote Panel Console LSM-VIA Viewer Not flagged Archive Key Display: normal black no icon in the corner of the clip:...
-
Page 143: Working With Playlists
Playlist 11 for instance is stored on Page 1 and is the first playlist on that Playlist bank. The number of the EVS video server within the network structure is also added to define the precise location of the playlist. For example if playlist 14 is stored on the machine allocated with the network number 2, the playlist will be identified as 14/02. -
Page 144: Playlist Specific Functions And Interfaces
See section "The Playlist Screen on the Remote Panel Touchscreen" on page 135. On the LSM-VIA Viewer, the Playlist pane can be opened on the right-side of the screen. It displays the active playlist. See section "The Playlist Pane on the Viewer" on page 139. - Page 145 On the touchscreen, the browsed playlist element is on a blue background and the playlist displays as follows: On the LSM-VIA Viewer, if the active Playlist of the first connected Remote is loaded on any channel of the local server, •...
- Page 146 • the current playlist element is on a red background • the next playlist element is on a green background. On the LSM-VIA Viewer, the playlist displays as follows: • the current playlist element is on a red background • the next playlist element is on a green background.
-
Page 147: The Playlist Screen On The Remote Panel Touchscreen
Application Bar (1) This area is displayed in Live mode, Clip mode, Playlist mode. See section "LSM-VIA Remote Panel Touchscreen" on page 11. Playlist Summary (2) The Playlist Summary features the following information about the active playlist, from left to right: •... - Page 148 Playlist Elements (3) A playlist element features the following information from left to right: • Position in the playlist • Clip LSM ID • Clip name (if defined) • TC IN of the clip If the User TC has been selected for the clip used, it is written in yellow. •...
-
Page 149: The Playlist Grid On The Lsm-Via Viewer
Application Bar (1) See section "LSM-VIA Viewer" on page 14. Toolbar (2) See section "LSM-VIA Viewer" on page 14 for the description of the Server field and the Sync field Hide Empty Playlists This command is only displayed with the Playlist grid. - Page 150 Playlist Grid (3) The Playlist grid shows all the 90 playlists slots of the selected server. It can be filtered to only show the actual playlists. Playlist Summary The Playlist Summary features the following information about each playlist, from left to right: •...
-
Page 151: The Playlist Pane On The Viewer
To display playlists, simply select the playlist bank. The page number relates to the clips displayed in the Clip grid. See section "How to Navigate in Pages and Banks from the LSM-VIA Viewer" on page 76. 7.2.5. The Playlist Pane on the Viewer... - Page 152 Overview of the Playlist Pane on the Viewer On the LSM-VIA Viewer, the Playlist pane provides a vertical view of the active playlist to the right of the Clip grid. Playlist Summary (1) The Playlist Summary features the following information about the active playlist, from left to right: •...
- Page 153 ◦ Audio transition effect duration field. The field is not available for editing when both transition durations are linked. LSM-VIA | 7. Working with Playlists |...
- Page 154 This button is used to mute the audio tracks from the LSM-VIA Viewer. ◦ : audio is not muted. ◦ : the audio tracks of the element have been muted from the LSM-VIA Viewer or from the Remote Panel. Clip LSM ID Clip name (if defined) TC IN of the clip If the User TC has been selected for the clip used, it is displayed in yellow.
- Page 155 Aux clip name (if defined) Aux clip duration Playlist duration Graphical representation of the Aux clip duration towards the playlist duration. If the Aux clip duration is shorter than the playlist duration, this is represented by a red line: LSM-VIA | 7. Working with Playlists |...
- Page 156 Shortcuts Available from the Playlist Pane This list gives a complete overview of all the possible shortcuts on the LSM-VIA Viewer Playlist pane. Press / click See Section Move the selection within the Playlist pane. Up / Down "Selecting Playlist Elements" on page 159 Select multiple playlist elements.
-
Page 157: Playlist Mode Commands On The Remote Panel Console
The audio is also affected by this effect, making it unusable and, therefore, muted. Press Film FX to activate the mode and apply the effect. Press Film FX to deactivate the mode. The Film FX mode is automatically deactivated when exiting a playlist. LSM-VIA | 7. Working with Playlists |... - Page 158 Next The Next function is used to immediately jump to the next playlist element. Used while the playlist is paused, the Next function loads the next element on its IN point and the playlist remains paused. Used while the playlist is rolling on air, it will start the transition of the next element with the transition effect listed on the playlist.
- Page 159 See section "Changing the Camera Angle of a Playlist Element" on page 176. Add Cut The Add Cut function allows you to split a playlist element into two elements at a selected point. See section "Adding Cuts in Playlist Elements" on page 180. LSM-VIA | 7. Working with Playlists |...
- Page 160 Edit Audio The Edit Audio function is available with the key combination SHIFT + Edit Audio. It is displayed provided that the Advanced Audio Editing setting has been selected from the configuration tool. The Edit Audio key activates the Edit Audio mode which gives access to advanced audio editing functions, such as the possibility to define a different audio effect duration.
-
Page 161: Managing Playlists
• edit the effect duration of an element • set an audio split • set an audio swap or mute an audio track • set/update/delete the AUX clip of the playlist LSM-VIA | 7. Working with Playlists |... -
Page 162: Selecting The Active Playlist
Playlist grid: see section "How to Change the Active Playlist from the Viewer" on page 152. • use the Recall function: see section "Recalling Media by LSM ID from the LSM-VIA Viewer" on page 234. Display of the Active Playlist •... - Page 163 USER MANUAL • The active playlist is displayed on Playlist pane of the LSM-VIA Viewer. How to Change the Active Playlist from the Remote Panel Console Select a playlist by selecting its page, bank (PL/10) and position. The playlist must not be empty.
-
Page 164: Adding Clips To A Playlist
Tap New PL to select a new empty active playlist at the selected position: Validate your action: press or tap The selected playlist is now your active playlist. How to Change the Active Playlist from the Viewer Select the playlist in the Playlist grid in one of the following ways: ◦... - Page 165 Insert in Playlist: By default, when a clip is inserted into a playlist from the Remote Panel, it is inserted before the active element in the playlist. This can be changed from the LSM-VIA configuration tool. • Default Playlist Speed:...
- Page 166 If you want to add another clip angle in the playlist, change the clip angle. Add the loaded clip angle at the end of the active playlist by pressing Each time you add a clip angle to the playlist, you will see: •...
- Page 167 How to Insert a Clip in the Loaded Playlist By default, playlist elements are inserted before the active element in the playlist. This setting can be changed from the LSM-VIA configuration tool. Load a playlist. See section "Loading a Playlist" on page 218.
- Page 168 Select one or several clip(s) or clip angle(s) in the Clip grid. See section "Selecting Clips" on page 80. Click in the playlist pane where you want to insert the clip(s). When the playlist is empty, the button only appears when a clip has been selected. Clip(s) or clip angles are inserted into the playlist.
- Page 169 How to Add Clips to the Active Playlist from the Viewer Search Window Select one or several clip angle(s) in the Search window. Click in the playlist pane where you want to insert the clip(s). Clip(s) or clip angles are inserted into the playlist. LSM-VIA | 7. Working with Playlists |...
-
Page 170: Selecting Playlists
With the current version of LSM-VIA, clips are inserted according to the list order, not the selection order. 7.3.3. Selecting Playlists Introduction A single playlist can be selected from the Playlist grid of the LSM-VIA Viewer screen. See section "Navigating in Pages and Banks" on page 75 to know how to navigate to and from the playlist grid (playlist bank view). -
Page 171: Selecting Playlist Elements
Selecting Playlist Elements Introduction A single playlist element can be selected from the Playlist pane of the LSM-VIA Viewer screen. It is then highlighted as described in section "The Playlist Pane on the Viewer" on page 139. A multiselection is possible as well. Then, the number of selected playlist elements is displayed at the bottom of the Playlist pane. -
Page 172: Copying Playlists
7.3.6. Copying Playlists Principles • You can copy a local or remote playlist from the LSM-VIA Viewer or from the Remote Panel to the local EVS server. • Playlist metadata are kept when a playlist is copied. • The AUX clip, if any, is kept when a playlist is copied. - Page 173 Select an empty playlist position where you want to copy the playlist : press a non colored Function key The following screen is displayed on the touchscreen: Tap Copy PL to copy the playlist to the selected position: LSM-VIA | 7. Working with Playlists |...
- Page 174 The following screen is displayed on the touchscreen: In case the playlist to copy is a remote playlist, it appears as follows: With the current LSM-VIA version, it is not possible to copy a local playlist to a remote server. Validate your action: press or tap The selected playlist is copied to the selected position and it becomes the active playlist.
-
Page 175: Deleting Playlists
Select an empty playlist position. or press With the current LSM-VIA version, it is not possible to copy a playlist to a remote server. Paste the playlist by pressing The selected playlist is copied to the selected position but it does not become the active playlist. - Page 176 Press Clear and the playlist position to be deleted: A message appears on the touchscreen: Confirm the action by pressing or tapping How to Delete a Playlist from the Viewer Select the playlist to delete from the Playlist grid. ◦ click the playlist line in the Playlist grid ◦...
-
Page 177: Making Remote Clips Local In A Playlist
A remote clip inserted several times in a playlist will be copied locally only once and will refer the same local LSM ID. How to Make Remote Clips Manually Local • Press Make Loc During the Make Local process, the Make Loc key display has a blinking yellow background. LSM-VIA | 7. Working with Playlists |... -
Page 178: Exporting Playlists
Once the process ends, the Make Loc function is no more available as there is no more remote clip. 7.3.9. Exporting Playlists Introduction Active playlists can be exported to one or several VIA Xsquare targets. The Export Playlist function is available from the Live Screen. One or several VIA Xsquare targets can also be mapped to assignable Shortcut keys of the Remote Panel for export purpose. - Page 179 The active playlist is sent to the corresponding target. The job is managed by VIA Xsquare. Various targets may have been assigned to different Shortcut buttons. So, you can use several Shortcut buttons in a row to export the playlist to several targets. LSM-VIA | 7. Working with Playlists |...
-
Page 180: Flattening A Playlist
F lattening a Playlist Introduction Active playlists can be flattened to the local EVS video server. The Flatten Playlist function is available from the Live Screen. It can also be mapped to an assignable Shortcut key of the Remote Panel. See section "Commands from the Assignable Shortcut Keys" on page Audio swaps and AUX clip are taken into account in the flattened file. -
Page 181: Editing Playlists
The job is managed by VIA Xsquare. 7.4. Editing Playlists A playlist can be created from the Remote or from LSM-VIA Viewer. Then, various editing actions are possible from one interface or the other, or from both. Behavior with a Remote Playlist A remote playlist cannot be edited. -
Page 182: Moving Playlist Elements
• set/update/delete the AUX clip of the playlist A remote playlist cannot be deleted. A remote playlist can only be loaded, browsed and played out. 7.4.1. Moving Playlist Elements How to Move Playlist Elements from the Viewer Select the playlist element(s) in the Playlist pane. It is highlighted in blue. - Page 183 USER MANUAL Click in the Playlist pane where you want to move the clip(s). Clip(s) are moved within the playlist. LSM-VIA | 7. Working with Playlists |...
-
Page 184: Sorting Playlist Elements By Tc In
Sorting Playlist Elements by TC IN Introduction From the Playlist pane of the LSM-VIA Viewer, it is possible to sort the playlist elements by TC IN. The sorting is done on the TC displayed in the TC IN column. This operation will change the order of the playlist elements, and reset the transitions to the default values. -
Page 185: Adding A Playlist Into Another Playlist
The transition effects and the elements speed defined in the source playlist are kept in the destination playlist. A playlist can be added to the active playlist without any impact on the playout. These actions can be done from the LSM-VIA Viewer. How to Insert a Playlist into Another Playlist To insert a playlist into another playlist, Make sure you set the requested playlist as the active playlist. - Page 186 Click in the playlist pane where you want to insert the playlist. 174 | January 2022 | Issue 1.4.G...
- Page 187 Copy the playlist: press In the Playlist grid, select the destination playlist. Paste the copied playlist: press The first playlist is appended at the end of the second one. LSM-VIA | 7. Working with Playlists |...
-
Page 188: Changing The Camera Angle Of A Playlist Element
7.4.4. Changing the Camera Angle of a Playlist Element Context of Use From the Remote Panel, you can replace a playlist element with another camera angle if the material is still available in a local or remote record train. The Other Angle is an option only present when a local playlist is in Playlist Edit mode and in PGM+PRV. It searches for the local and network trains that include the TC IN of the playlist element to replace and load them on the PRV channel, at the TC IN of the loaded playlist element. - Page 189 Browse mode is activated ◦ tap the page number on the touchscreen or swipe the screen horizontally and then tap the train of your choice LSM-VIA | 7. Working with Playlists |...
- Page 190 The selected result is displayed on a blue background and the record train is loaded on the PRV channel. To browse through a result, Press Browse to deactivate the mode. Browse through the train with the jog. Validate your action by pressing or tapping A clip is automatically created with the TC IN and TC OUT of the clip used in the playlist and it replaces the element in the playlist.
-
Page 191: Clearing In/Out Points Of Playlist Elements
The Playlist Edit mode is enabled. See also section "Browsing a Playlist" on page 222. Browse through the playlist element to the place where you want to set the new IN point, or a new OUT point. LSM-VIA | 7. Working with Playlists |... -
Page 192: Adding Cuts In Playlist Elements
Set a new IN point by pressing and/or set a new OUT point by pressing If the playlist element duration is too short, first clear the IN or OUT point to be able to access the guardband material, then set the new IN or OUT point at the desired position. See also "Clearing IN/OUT Points of Playlist Elements"... - Page 193 How to Add Cut to a Playlist Element Load the playlist. Browse to the playlist element. The Playlist Edit mode is enabled. Browse through the playlist element to the position where you want to add a cut. LSM-VIA | 7. Working with Playlists |...
-
Page 194: Editing Playlist Element Speed
By default, when an element is added to a playlist, the playlist element speed is set to 100%. The default playlist element speed can be edited from the LSM-VIA configuration tool. Afterwards, the playlist element speed can be individually edited from the Remote Panel or the Viewer as described hereafter. - Page 195 How to Edit the Playlist Element Speed from the Viewer To edit the speed of a playlist element, Click in the Speed field of the element: Enter a value for playlist element speed, e.g. Possibles values are: ◦ from 0 to 400% LSM-VIA | 7. Working with Playlists |...
-
Page 196: Deleting Playlist Elements
◦ Unknown How to Edit the Speed of Several Playlist Elements at Once from the Viewer Select the playlist element(s) in the Playlist pane. The number of selected items is displayed at the bottom of the pane. Click in the Speed field: Enter a value for playlist element speed, e.g. -
Page 197: Transition And Audio Operations
This chapter describes the ways to apply transition effects between playlist elements, how to define an audio split, how to swap or mute audio tracks, and how to assign an auxiliary audio clip to a playlist. LSM-VIA | 7. Working with Playlists |... -
Page 198: Transition Effects
However, you can change the type of transition effect, or its duration, as explained in section "Adding Transition Effects in a Playlist" on page 189. With the current version of LSM-VIA, the type of the audio transitions is tied to the type of the video transitions. - Page 199 Playlist with 1:00 sec Effect Duration In a playlist, the video and audio effects end at the OUT point of an element. The total duration of the playlist is shortened by the length of the effect. LSM-VIA | 7. Working with Playlists |...
- Page 200 The last images of the previous element is gradually replaced by the first images of the next element. The wipe effect is shown as a vertical line moving across the video. The direction of the Wipe effect (left to right, right to left) is defined in the LSM-VIA configuration. By default, it is Vert. L>R.
- Page 201 USER MANUAL The color of the Fade effect is defined in the LSM-VIA configuration. Possible values are: Black (default), White. In the drawing below, the previous element is displayed in red, the next element is green, and the fade in...
- Page 202 Video Transition Effect - Wipe Type When a Wipe video transition effect is selected, its direction is, by default, from Left to Right. This can be changed from the LSM-VIA configuration tool. How to Edit a Transition Effect from the Remote Panel...
- Page 203 The values range from 0 frame (0%) to 20 seconds (100%). (optional) Repeat steps 2 to 4 for other playlist elements. Confirm the operation and exit the Transition Effect Duration mode by pressing or by pressing LSM-VIA | 7. Working with Playlists |...
- Page 204 You can also edit the transition effect duration of all the playlist elements at once by pressing before entering the Transition Effect Duration mode ( ). The playlist must be in Edit mode. How to Edit the Transition Effect of a Playlist Element from the Viewer To edit simultaneously the video and the audio transition effect, proceed as follows: Click the arrow next to the effect type for the element you want to edit: Select the desired effect from the menu:...
-
Page 205: Edit Audio And Edit Video Modes
Availability of the Edit Audio and Edit Video Modes The Edit Audio and the Edit Video functions are available from the Remote Panel console in Playlist Edit mode provided that the Advanced Audio Editing setting has been selected from the configuration tool: LSM-VIA | 7. Working with Playlists |... - Page 206 Edit Audio Mode When the Edit Audio mode is activated, some specific functions are available from the console: A. Advanc(e) The A. Advanc(e) function is used to advance the beginning of the audio transition for the selected playlist element. See sections "Using the Audio Split Mode" on page 195 and "Advancing or Delaying a Transition in Audio Split Mode"...
- Page 207 The Audio Split mode makes it possible to: • Apply transition effect durations which are different on the audio and video tracks. See section "Extending or Reducing a Transition in Audio Split Mode" on page 196. LSM-VIA | 7. Working with Playlists |...
- Page 208 The audio or the video transition duration of a playlist element can be changed from the Remote Panel or from the LSM-VIA Viewer. Transition Mode With the current version of LSM-VIA, video and audio transitions are Center Cut. This means that the transition is extended / reduced equally in both directions. 196 | January 2022 | Issue 1.4.G...
- Page 209 To edit the audio transition effect duration of a playlist element without impacting the video transition effect duration, Load the playlist by pressing See also section "Loading a Playlist" on page 218. Browse to the playlist element: The Playlist Edit mode is enabled. LSM-VIA | 7. Working with Playlists |...
- Page 210 See also section "Browsing a Playlist" on page 222. Enter the Edit Audio mode by pressing The Edit Audio key display is highlighted and the Audio Effect Duration function (A. Fx Dur) becomes available. Enter the Audio Transition Effect Duration mode by pressing The A.
- Page 211 The values range from 0 frame (0%) to 20 seconds (100%). (optional) Repeat steps 2 to 4 for other playlist elements. Confirm the operation and exit the Video Transition Effect Duration mode by pressing by pressing LSM-VIA | 7. Working with Playlists |...
- Page 212 You can also edit the video effect duration of all the playlist elements at once by pressing before entering the Video Transition Effect Duration mode ( ). The playlist must be in Edit mode. How to Edit an Audio Transition Effect Duration from the Viewer To edit the audio transition effect duration of a playlist element without impacting the video transition effect duration, Click the Link button:...
- Page 213 You can also edit the video effect duration of several playlist elements at once. Select the elements. See section "Selecting Playlist Elements" on page 159. Follow the above procedure from the bottom of the Playlist pane: LSM-VIA | 7. Working with Playlists |...
- Page 214 Advancing or Delaying a Transition in Audio Split Mode Description You can advance or delay the beginning of the audio transition compared to the video transition of a playlist element, or you can advance or delay the beginning of the video transition compared to the audio transition.
- Page 215 The Edit Audio key display is highlighted and the Audio Delay function (A. Delay) and the Audio Advance function (A. Advanc) become available. To enter ◦ the Audio Delay mode, press The A. Delay key display is highlighted ◦ the Audio Advance mode, press The A. Advanc key display is highlighted LSM-VIA | 7. Working with Playlists |...
- Page 216 Move the lever to select the offset of the audio transition towards the video transition. The values range from 0 frame (0%) to 40 seconds (100%). The scale is as follows: • every 2 frames from 0 to 8 seconds •...
- Page 217 To delay or advance the beginning of the video transition effect of a playlist element, Load the playlist by pressing See also section "Loading a Playlist" on page 218. Browse to the playlist element: The Playlist Edit mode is enabled. See also section "Browsing a Playlist" on page 222. LSM-VIA | 7. Working with Playlists |...
- Page 218 Enter the Edit Video mode by pressing The Edit Video key display is highlighted and the Video Delay function (V. Delay) and the Video Advance function (V. Advanc) become available. To enter ◦ the Video Delay mode, press The V. Delay key display is highlighted ◦...
- Page 219 The Audio Swap Screen Purpose The Audio Swap screen shows the matrix with all the IN and OUT audio tracks of the current playlist element and its actual audio status. It is available from the Remote Panel. LSM-VIA | 7. Working with Playlists |...
- Page 220 From here, you can check the audio status of a playlist element, swap some audio tracks, or mute some audio output tracks. Accessing and Leaving the Audio Swap Screen Prerequisites The Advanced Audio Editing setting must have been selected from the configuration tool to allow users to define an audio swap or to mute an audio track.
- Page 221 (2, 4, 8 or 16). On the matrix (3c), blue dots are displayed at the intersection of the IN track and the OUT track it is routed to. LSM-VIA | 7. Working with Playlists |...
- Page 222 By default, IN 1 is routed to OUT 1, IN 2 to OUT 2, ... Tracks are highlighted in blue when an audio swap has just been set but not yet saved. A Mute button is available next to each OUT track. When the track has been muted, the button turns orange as well as the intersection dot.
- Page 223 The Edit Audio key display is highlighted and the Swap function becomes available. Enter the Swap mode by pressing The Swap key display is highlighted and the Audio Swap screen is displayed on the remote touchscreen. LSM-VIA | 7. Working with Playlists |...
- Page 224 How to Set an Audio Swap Enter the Audio Swap mode as described in section "How to Enter the Audio Swap Mode" on page 210. To swap audio tracks, tap the bullet at the intersection of the IN and OUT tracks. The audio swap is highlighted as follows until you confirm the action: (optional) Repeat step 5 to swap several audio tracks if needed.
- Page 225 The audio mute is shown on the Remote Panel touchscreen The audio mute is indicated on the OSD. How to Mute the Audio Tracks from the LSM-VIA Viewer • Click the Mute button for the playlist element you want to mute.
-
Page 226: Adding An Auxiliary Audio Clip To A Playlist
By default, when an AUX clip is added to a playlist, it is played out from the the audio outputs assigned to the PRV channel. This can be changed from the LSM-VIA configuration tool. Other values are: ◦ PRV outputs and outputs 7/8 or outputs 15/16 ◦... - Page 227 In the Playist grid of the Viewer, the AUX clip LSM ID and duration are displayed for each playlist where an AUX clip has been set. If the AUX clip duration covers the whole playlist duration, this is represented as follows: If the AUX clip duration is shorter than the playlist duration, this is highlighted in red: LSM-VIA | 7. Working with Playlists |...
- Page 228 Adding an Auxiliary Clip from the Remote Panel How to Add an Auxiliary Clip from the Remote Panel Make sure you set the requested playlist as the active playlist. See section "Adding Clips to a Playlist" on page 152. Load a clip. Set the clip as the AUX clip for the active playlist by pressing How to Remove an Auxiliary Clip from the Remote Panel Make sure you set the requested playlist as the active playlist.
- Page 229 Set the clip as the AUX clip for the active playlist. How to Remove an Auxiliary Clip from the Viewer Click in the AUX Clip field The field is highlighted and a Remove button is available: Remove the AUX clip from the active playlist. LSM-VIA | 7. Working with Playlists |...
-
Page 230: Loading, Browsing And Playing Playlists
Playlist Conditional and Always Modes - Loading Behavior The Conditional or Always mode determines the way a playlist will be loaded. By default, the Always mode is active. The default setting can be changed from the LSM-VIA configuration tool The table below summarizes the playlist loading behavior. - Page 231 How to Load a Playlist in Playout Mode on the Active Element To load a playlist in Playout mode, on the TC IN of the element where it was in Edit mode, Select the playlist by selecting its page, bank (PL/10) and position. LSM-VIA | 7. Working with Playlists |...
- Page 232 The loading behavior follows the control mode and the controlled players of the first connected Remote, regardless of whether the LSM-VIA Viewer is synchronized to the Remote or not. If there is no Remote connected to the Viewer, the playlist will be loaded in PGM+PRV.
- Page 233 When a playlist is loaded and displayed in the Playlist pane, you can load it on the TC IN of a selected element. Select the playlist element. The playlist element line is highlighted in blue. Load the playlist in Playout mode on this element by pressing The playlist is loaded on the selected element. LSM-VIA | 7. Working with Playlists |...
-
Page 234: Browsing A Playlist
PGMs controlled by the Remote Panel, regardless of the Viewer pane which has the focus on. In case no Remote Panel is connected to LSM-VIA, the Recue command applies to the media loaded on the smallest PGM of the server. - Page 235 When you have loaded a playlist, you can easily move to the IN / OUT points of the current playlist element. To... press... + load the frame matching the IN point + load the frame before the OUT point LSM-VIA | 7. Working with Playlists |...
-
Page 236: Playing A Playlist
The PGM Speed mode, the VarMax mode and the Second Lever Range mode are mutually exclusive. See section "LSM-VIA Remote Panel Console" on page 6. How to Play a Playlist from the Remote Panel When a playlist is loaded, you can play it as follows. - Page 237 Move the lever or press The Loop key display is highlighted on the console. L is displayed on the OSD. How to Play a Playlist from the LSM-VIA Viewer To play a playlist, Load the playlist. See section "Loading a Playlist from the Viewer" on page 220.
- Page 238 PGMs controlled by the Remote Panel, regardless of the Viewer pane which has the focus on. In case no Remote Panel is connected to LSM-VIA, the Play/Pause command applies to the media loaded on the smallest PGM of the server.
-
Page 239: Operations On Network
8.1. Accessing Network Servers The list of online servers of the XNet, which means the local server and the remote ones, is available from the Recall screen of the Remote Panel, and from the LSM-VIA Viewer. 8.1.1. The Recall Screen Purpose The list of servers available on the network is displayed in the Recall screen of the Remote Panel touchscreen. - Page 240 It also gives information on the server currently connected to (local or remote) and the smallest controlled PGM (displayed on a red background). List of Servers (2) This area displays all the online servers on the XNet with their Net ID and name. Up to 8 server buttons are displayed by page.
-
Page 241: Connecting To A Network Server
The local server is displayed on a gray box. Validate your action: press on the console or tap on the touchscreen. You can navigate through the pages and banks of the server. See section "Navigating in Pages and Banks" on page 75. LSM-VIA | 8. Operations on Network |... - Page 242 To close the Servers screen without selecting a server, do one of the following actions: • press X in the top right corner • press • press to go back to the local server. LSM-VIA is connected to the selected server. 230 | January 2022 | Issue 1.4.G...
- Page 243 Display on the LSM-VIA Viewer On the LSM-VIA Viewer, the active page and bank are displayed at the bottom of the screen. The first time you connect to that server, Page 1 Bank 1 is displayed.
-
Page 244: Recalling Clips Or Playlists By Lsm Id From The Remote Panel
In the Clip grid, the selection is blue for local clips, and purple for remote clips. See section "The Clip Grid on LSM-VIA Viewer" on page 65. How to Connect Back to Local Server You can quickly connect to the local server when you are connected to a remote server. - Page 245 The local server is displayed on a gray box. Select the clip or playlist LSM ID in one of the following ways: ◦ press the function keys on the Remote Panel, (clip) (playlist) ◦ use the numeric pad on the touchscreen. LSM-VIA | 8. Operations on Network |...
-
Page 246: Recalling Media By Lsm Id From The Lsm-Via Viewer
Recalling Media by LSM ID from the LSM- VIA Viewer Introduction From the LSM-VIA Viewer, you can easily load a local or remote train or clip, or you can make a playlist active by simply typing its LSM ID. Writing Rules for a Train LSM ID •... - Page 247 The preferred clip angle will be loaded on the smallest PGM controlled by the first connected Remote Panel, the secondary clip angle is loaded on the next PGM, ... In case no Remote Panel is connected to LSM-VIA, the preferred clip angle will be loaded on the smallest PGM of the server.
-
Page 248: Accessing Network Record Trains
8.2. Accessing Network Record Trains 8.2.1. The Trains Screen Overview of the Trains Screen The Trains screen displays all the record trains from the online servers of the XNet, which means the local server and the remote ones. By default, they are sorted by LSM ID. Each record train is represented by a box identified with: •... - Page 249 To access the Trains screen, • press on the console To leave the Trains screen, do one of the following actions: • on the upper left corner of the Trains screen. • press on the Remote Panel. LSM-VIA | 8. Operations on Network |...
- Page 250 Navigating through the Trains Screen You can navigate through the pages of the Trains screen in one of the following ways: • Tap the page number from the ribbon to display the corresponding page. In case more than 9 pages exist, tap >> to be able to access more pages. •...
-
Page 251: Setting Filters To Record Trains
Select the Trains function by pressing The Trains screen opens on the touchscreen. Tap the Define Filter button at the bottom right: The Trains - Define Filter screen is displayed. When no filter has been defined yet, it is empty. LSM-VIA | 8. Operations on Network |... - Page 252 Tap an empty box, where you want to map a record train. The Trains - Camera Selection screen is displayed: Tap the box of the required record train. The train is mapped to the selected box in the Define Filter screen. 240 | January 2022 | Issue 1.4.G...
- Page 253 Tap the Color button: The color palette is displayed: Select a color: Tap a color square, or Tap the first square (white square) to restore the default color (gray). The color is assigned to the selected box. LSM-VIA | 8. Operations on Network |...
-
Page 254: Loading A Record Train From The Trains Screen
Tap the Close button: Possible Actions on the Filters Button Description Tap Update to change the record train mapped to the selected box. Tap Color to be able to select a color for the selected box. Tap Clear to remove the record train mapped to the selected box. Tap Clear Filter if you want to remove all record trains mapped to boxes in the Define Filter screen. - Page 255 USER MANUAL Tap the box of the record train to be loaded. ◦ with Filter mode activated: ◦ with Filter mode disabled: LSM-VIA | 8. Operations on Network |...
-
Page 256: Loading Back The Local Record Train (Back To Local)
If filters had been defined on remote record trains before the corresponding server went disconnected, filter boxes are still displayed but not available. The box of the loaded record train is highlighted (blue by default). If a colored filter had been associated with the record train, the box is colored accordingly and highlighted. -
Page 257: Using The Shotbox For Quick Actions
The Shotbox allows users to have a quick access to frequently-used media (local or remote clips or playlists). You can currently map local or remote clips or playlists to boxes in the Shotbox, so, you will be able to quickly load or play these clips or playlists very rapidly during operation. LSM-VIA | 8. Operations on Network |... -
Page 258: The Shotbox Screen
8.3.2. The Shotbox Screen Overview of the Shotbox Screen The Shotbox differs slightly in use mode or edit mode, but it contains the same areas highlighted on the screenshot below. Title bar (1) Page title and button to leave the page. Controlled Channel (2) •... - Page 259 Shotbox button on the console: To leave the Shotbox, do one of the following actions: • on the upper left corner of the Shotbox page. • press on the Remote Panel. • press the Shotbox button once again. LSM-VIA | 8. Operations on Network |...
-
Page 260: 8.3.3.Adding Media To The Shotbox
How to Lock the Shotbox If the Shotbox is not locked, which is the case by default, it will close when you: • perform a command that requires the touchscreen to be updated. • press E/E to go back to the train head. If the Shotbox is locked, it will remain open on the touchscreen if you perform any action. - Page 261 If a specific CAM angle of a clip is loaded, it is automatically mapped to the selected box. Go to step 8. If you want to create a link to another media, you first need to unload the media. LSM-VIA | 8. Operations on Network |...
- Page 262 By default, the local server is selected (blue highlighted). Go to step 5. Tap the EVS server where the requested media is stored. The local server is displayed on a gray box. Enter the media LSM ID in one of the following ways: ◦...
- Page 263 Its LSM ID is shown next to the PGM name: Enter the Shotbox Edit mode by pressing Tap the box where you want to store the quick link to your media. The loaded media is now mapped to the selected box in the Shotbox. LSM-VIA | 8. Operations on Network |...
- Page 264 Possible Actions in Edit Mode In Shotbox Edit mode, the following commands are available in the toolbar when a box is selected. Button Description Tap Update to change the media mapped to the box. Tap Color to be able to select a color for the box. Tap Clear to remove the media mapped to the box.
-
Page 265: Loading Media From The Shotbox
PGM. • A mapped clip CAM angle is loaded on the smallest controlled PGM. If you control more than one channel, other CAM angles from the same clip are loaded on the additional controlled channels. LSM-VIA | 8. Operations on Network |... -
Page 266: Pushing Clips To Network Servers
• A mapped clip (all its angles) is loaded as follows: ◦ the CAM angle corresponding to the preferred CAM (as set at mapping) is loaded on the smallest controlled PGM. ◦ other CAM angles from the same clip are loaded on the additional controlled channels. Media Playout Behavior •... - Page 267 Clip to push all the clip angles: ◦ Cam to push the controlled CAM angles of the clip: ◦ Short to push the clip without its guardbands: ◦ Long to push the clip with its guardbands: Validate your action: press or tap LSM-VIA | 8. Operations on Network |...
- Page 268 The clip is pushed to the selected server. The sender and the receiver get notifications. How to Define Favorite Target Servers Access the Push screen by pressing The Push screen opens on the touchscreen. Set up to 5 favorite target servers by taping the star. The star of the server(s) set to favorite(s) is highlighted in blue (or white if the server box is selected): 256 | January 2022 | Issue 1.4.G...
- Page 269 From the Clip screen on the Remote Panel touchscreen, tap The clip is pushed to the selected server(s) with the settings (Clip/CAM - Short/Long) used for the last Push action. The sender and the receiver get notifications. LSM-VIA | 8. Operations on Network |...
-
Page 270: Maintenance
(red) Temporary Notification Messages Each time a notification is issued, a colored rectangle pops up at the top right of the LSM-VIA Viewer and of the Remote Panel touchscreen. The color corresponds to the issued notification type. The Display Info & Success Notifications setting allows you to enable or disable the pop-up display for these two types of notifications. - Page 271 USER MANUAL It is accessible by clicking the Notification icon at the top right of the LSM-VIA Viewer. • If the Notification pane does not contain any message, the Notification icon looks as follows: • If the Notification pane contains at least one message, a circle having the color of the most urgent...
-
Page 272: Extracting Logs
In order to ... tap ... clear all notifications Click the Clear x notifications button at the bottom of the Notification pane: 9.2. Extracting Logs About Logs If you face an issue during the live production, you can set directly thereafter a reference point that will be added to the logs you will provide to the Support team. - Page 273 USER MANUAL How to Extract Logs for the LSM-VIA System Make sure the LSM-VIA application is started on the XClient-VIA and the remote is connected to the XClient-VIA. So, you will extract the logs from the Remote Panel or from the Viewer after you have logged in. In this case, the full logs (from the LSM-VIA Remote Panel and from the LSM-VIA workstation) are extracted whatever the device from which you extract the logs.
- Page 274 In case of an Active Directory user, the log extraction for the whole environment must be done manually after the extraction from the remote or the LSM-VIA Viewer. The Getlogs tool will not only retrieve the logs extracted in the previous step for LSM-VIA but also all the other logs.
- Page 275 Plug a USB key onto the XClient-VIA and copy the archive package to it. • Transfer the archive package with Filezilla (sftp connection). Alternative Procedure in Case of Problems In some cases, you may not be able to collect all the LSM-VIA logs: • The LSM-VIA application cannot be started. •...
Need help?
Do you have a question about the LSM-VIA and is the answer not in the manual?
Questions and answers