
Subscribe to Our Youtube Channel
Related Manuals for Lowenstein Medical elisa 300


Summary of Contents for Lowenstein Medical elisa 300
- Page 1 Azeer Intinsive Care Azeer Anesthesia Ventilators Elisa Family LEON MRI Workstation Proven, intuitive, stable. Specially developed for use in a cardiac cathlabs or MRI ƒ For all patient groups...
- Page 2 300 elisa 500 Instructions for Use Compendium Supplement D Basic Manual Supplement E Supplement A Supplement F Supplement B Supplement C...
- Page 3 300 elisa 500 Instructions for Use Basic Manual...
- Page 4 Serial number system: The coding system contains the code for the product group (03 or 05), the year of manufacture (YY) and a 4-digit numeric code (ZZZZ) for unique identification. 03YYZZZZ elisa 300 05YYZZZZ elisa 500 UDI system: The coding system contains the Global Trade Identification Number (GTIN), the code for the product group (03 or 05), the year of manufacture (YY) and a 4-digit numeric code (ZZZZ) for unique identification.
-
Page 5: Table Of Contents
Contents | 0 Contents About this manual About this manual Safety information in these instructions for use Intended use Areas of application Differences between elisa 300 and elisa 500 General safety instructions General safety instructions 3.1.1 Safety standards 3.1.2 Safety functions 3.1.3... - Page 6 Standby mode 7.1.1 Battery symbol 7.1.2 Patient symbol 7.1.3 Select patient interface 7.1.3.1 Tube compensation 7.1.4 Dynamic view of the lung 7.1.5 Shortcuts: Toolbox 7.1.5.1 Help function 7.1.5.2 Screenshot 7.1.6 Home Basic Instructions for Use elisa 300-500 SW 2.09.x Rev. 11...
- Page 7 7.4.3 Battery 7.4.4 System test 7.4.5 Settings 7.4.5.1 Date / Time 7.4.5.2 Display brightness 7.4.5.3 Alarm volume / brightness 7.4.5.4 Extras Service Measurements and graphics Curve presentation Instant View window Basic Instructions for Use elisa 300-500 SW 2.09.x Rev. 11...
- Page 8 Annual maintenance 11.4.2 Maintenance every 6 years 11.4.3 Maintenance every 12 years 11.5 Additional maintenance and repair information Technical specifications 12.1 Function chart of the elisa 300 / elisa 500 ventilator 12.2 General 12.3 Supply 12.4 Technical data 12.5 Control unit 12.6...
- Page 9 Adjustment ranges 13.1.3 Default alarm limits 13.1.3.1 Default alarm limits of the ALPV mode 13.1.3.2 Default alarm limits of the WOBOV mode 13.1.3.3 Default alarm limits of the CPR mode Basic Instructions for Use elisa 300-500 SW 2.09.x Rev. 11...
- Page 10 0 | Contents - This page is intentionally left blank. - Basic Instructions for Use elisa 300-500 SW 2.09.x Rev. 11...
-
Page 11: About This Manual
About this manual | 1 About this manual About this manual Safety information in these instructions for use Basic Instructions for Use elisa 300-500 SW 2.09.x Rev. 11... -
Page 12: Safety Information In These Instructions For Use
300 to elisa 800VIT LeoCap IFU Supplement C elisa 300 to elisa 800VIT LeoLyzer IFU Supplement D elisa 300 to elisa 800VIT Pulse oximetry and LeoClac IFU Supplement E elisa 300 to elisa 800VIT External interfaces IFU Supplement F... - Page 13 About this manual | 1 “Warning” refers to a situation which may cause injuries to the Warning user or the patient. “Caution” refers to a situation which may cause damage to the Caution equipment. Basic Instructions for Use elisa 300-500 SW 2.09.x Rev. 11...
- Page 14 1 | About this manual - This page is intentionally left blank. - Basic Instructions for Use elisa 300-500 SW 2.09.x Rev. 11...
-
Page 15: Use
Use | 2 Intended use Areas of application Differences between elisa 300 and elisa 500 Basic Instructions for Use elisa 300-500 SW 2.09.x Rev. 11... - Page 16 For a description of the device functions, please refer to chapter “5.1 General description of the equipment functions”. Areas of application elisa 300 / elisa 500 is approved for stationary use and patient transport within health care facilities. The ventilator must not be used: •...
- Page 17 Use | 2 Differences between elisa 300 and elisa 500 Hardware options elisa 300 elisa 500 Screen diagonal 12.1 " 15 " BF interfaces 2 x BF interface 4 x BF interface Software options elisa 300 elisa 500 Cuffscout function...
- Page 18 2 | Use - This page is intentionally left blank. - Basic Instructions for Use elisa 300-500 SW 2.09.x Rev. 11...
-
Page 19: General Safety Instructions
General safety instructions | 3 General safety instructions General safety instructions 3.1.1 Safety standards 3.1.2 Safety functions 3.1.3 Work carried out on the device Basic Instructions for Use elisa 300-500 SW 2.09.x Rev. 11... - Page 20 Software version 2.09.x Safe operation In order to guarantee the safe operation of elisa 300 / elisa 500, the system must only be used as described. Before putting the system into operation, users must familiarise themselves with these instructions for use and with Supplement A (Manoeuvres, Functions, Ventilation Modes).
- Page 21 All accessories used must have an EC declaration of conformity in compliance with the medical device directive 93/42/EEC and they must have passed the elisa 300 / elisa 500 system test. The device Warning shall only be applied within the scope of its intended use.
- Page 22 3 | General safety instructions Classification elisa 300 / elisa 500 is a Class IIb device according to Directive 93/42/EEC con- cerning medical devices, Annex IX, section 3.1, rule 9 and section 3.2, rule 11, as well as according to Regulation (EU) 2017/745 on medical devices, Annex VIII, rule 12.
- Page 23 300 / elisa 500 is exclusively designed for use in an electrical environment according to VDE 0100 part 710 or EN 60601-1. elisa 300 / elisa 500 must not be used if there are doubts concerning the quality and function of the protective earthing of the electrical installation.
- Page 24 Warning Electromagnetic compatibility: elisa 300 / elisa 500 is only intended for use in an electromagnetic environment in which radiated RF disturbances are controlled. The users of elisa 300 / elisa 500 can contribute towards avoiding electromagnetic interference by maintaining the minimum distance between portable and mobile high frequency communications equipment (transmitter) and elisa 300 / elisa 500.
- Page 25 9.5 “Error messages during power up test”. Alarms were implemented in the ventilator as safety functions in order to warn the user if the patient is at risk. Basic Instructions for Use elisa 300-500 SW 2.09.x Rev. 11...
- Page 26 If the system test was bypassed, the system cannot determine the correct values of the currently used breathing circuit which are necessary for optimal compli- ance and resistance compensation. In this case, the measurement values of the last Basic Instructions for Use elisa 300-500 SW 2.09.x Rev. 11...
-
Page 27: Work Carried Out On The Device
The maintenance intervals and measures are described in chapter 11 “Maintenance”. Never carry out repair, service or maintenance work if a patient is connected to the device. Warning Basic Instructions for Use elisa 300-500 SW 2.09.x Rev. 11... - Page 28 3 | General safety instructions - This page is intentionally left blank. - Basic Instructions for Use elisa 300-500 SW 2.09.x Rev. 11...
-
Page 29: Components And Assembly
Installing the valve bar 4.2.5 Battery Cart (option) Breathing circuit Tube hanger Respiratory gas humidification 4.6.1 Connection with an active respiratory gas humidifier 4.6.2 Connection with a passive HME filter Basic Instructions for Use elisa 300-500 SW 2.09.x Rev. 11... - Page 30 4 | Assembly System overview The standard components of the intensive care ventilator elisa 300 / elisa 500 are: Intensive care ventilator with integrated control unit including the valve bar and the rechargeable battery elisa 300 elisa 500 Furthermore, the ventilation system can be expanded to include the following...
- Page 31 Exhaust gas port (on the side of the device) Alarm LED The ventilator and the connected accessories must not be cov- ered during operation or while the internal power supply system is charging. Caution Basic Instructions for Use elisa 300-500 SW 2.09.x Rev. 11...
-
Page 32: Back
Detailed view of the interfaces: Picture Designation Assignment A and B PDMS/Monitor interface (configurable) 1 and 2 Serial interface, type BF (configurable) 3 and 4 Serial interface, type BF (configurable) (elisa 500 only) Basic Instructions for Use elisa 300-500 SW 2.09.x Rev. 11... -
Page 33: Side View
Do not touch interfaces A or B or C and the patient at the same Remark time. 4.2.3 Side view The elisa 300 / elisa 500 control unit can be tilted manually by approx. 30°. elisa 500 elisa 300 Cover of the turbine air filter Tilting the control unit Basic Instructions for Use elisa 300-500 SW 2.09.x... -
Page 34: Valve Bar
4 | Assembly 4.2.4 Valve bar The elisa 300 / elisa 500 valve bar enables a quick exchange of all patient-side connections and is composed of the 3 following elements: Inspiratory valve Expiratory valve Expiratory flow sensor elisa 300 elisa 500 4.2.4.1... - Page 35 Sealing ring expiratory valve Check the proper fit of the sealing ring. Expiratory flow sensor Sealing plate Sealing ring expiratory flow sensor Check the proper fit of the sealing ring. Basic Instructions for Use elisa 300-500 SW 2.09.x Rev. 11...
-
Page 36: Removing The Valve Bar
4.2.5 Battery elisa 300 / elisa 500 can be equipped with a maximum of two batteries. One bat- tery is usually included in the delivery. To insert or change a battery, remove the battery compartment cover on the back of the ventilator. -
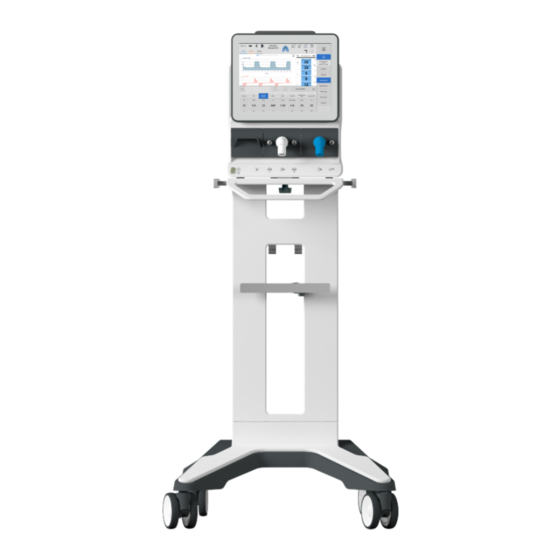
Page 37: Cart (Option)
Fasten the ventilator using the locking mechanism on the bottom of the platform. Accessories can be attached to the rails on the sides as well as to the height-ad- justable standard rail in the middle. Basic Instructions for Use elisa 300-500 SW 2.09.x Rev. 11... -
Page 38: Breathing Circuit
10 kg, which is limited to 5 kg per standard rail. Caution Breathing circuit Operate elisa 300 / elisa 500 only in conjunction with breathing circuits and ac- cessories that meet the requirements specified in chapter 3.1 “General safety instructions”. Compliance, resistance and leakage of the tubing system used are measured individually in the system test. -
Page 39: Tube Hanger
Respiratory gas humidification For warming and humidifying the respiratory gases, elisa 300 / elisa 500 can be combined with various accessories for respiratory gas conditioning. Use only equipment that meets the requirements specified in chapter 3.1 “General safety... -
Page 40: Connection With An Active Respiratory Gas Humidifier
Warning Do not fasten the respiratory gas humidifier to the handles on the side of the ventilator unit. Warning Basic Instructions for Use elisa 300-500 SW 2.09.x Rev. 11... -
Page 41: Connection With A Passive Hme Filter
Remark ventilation system. Residual drug build-up from nebulization may cause high flow re- sistance, which may eventually block ventilation. Warning Regularly check the filter for increased resistance or clogging. Warning Basic Instructions for Use elisa 300-500 SW 2.09.x Rev. 11... - Page 42 5 | General information - This page is intentionally left blank. - Basic Instructions for Use elisa 300-500 SW 2.09.x Rev. 11...
-
Page 43: General Information
5.1.2.7 Home 5.1.2.8 Symbols / Functions 5.1.2.9 Help function 5.1.3 Adjust the ventilation screen Configuration Symbols Abbreviations and terms used in the instructions for use and in the user guidance Basic Instructions for Use elisa 300-500 SW 2.09.x Rev. 11... -
Page 44: General Description Of The Equipment Functions
300 / elisa 500 units are equipped with various alarm signalling devices. The ventilator unit features an independent watchdog function for monitoring purposes which outputs an alarm when the electric or pneumatic components of the ventilation system fail. -
Page 45: Layout Of The Ventilation Screen
H Button bar (if a value has been selected: selector) K Enter button (confirms selected actions or parameters) L Home, Status and Trends tabs M Number of configured views (max. 9 views) N Instant View window P Ventilation screen Basic Instructions for Use elisa 300-500 SW 2.09.x Rev. 11... -
Page 46: General Operations
E Indication of the magnitude of the available range of values and of the position within this range F “Critical” range of values (Figure 3), displayed with a different colour. Basic Instructions for Use elisa 300-500 SW 2.09.x Rev. 11... - Page 47 General information | 5 Figure 1 Figure 2 Figure 3 To prevent the adjustment of potentially hazardous settings, a Remark warning is displayed, which must be acknowledged separately. Basic Instructions for Use elisa 300-500 SW 2.09.x Rev. 11...
-
Page 48: Views
Tapping the “Restart Graphs” button will unfreeze the graphs. Alternatively, you can swipe to select another view or you can select the Home, Status or Trends tab. 5.1.2.7 Home With the Home button, you return to the main screen. Basic Instructions for Use elisa 300-500 SW 2.09.x Rev. 11... -
Page 49: Symbols / Functions
To view Help, touch the Help button: the button colour changes. Next, tap the function/parameter for which you need additional information. Close the Help window with the “X” button or by tapping anywhere on the screen. Basic Instructions for Use elisa 300-500 SW 2.09.x Rev. 11... -
Page 50: Adjust The Ventilation Screen
Tap and hold a view/function to display an additional window where you can ad- just specific parameters. The window opened in this way can be closed with the “X” button or by tapping anywhere on the screen outside the new window. Basic Instructions for Use elisa 300-500 SW 2.09.x Rev. 11... - Page 51 Some of the sub-menus support the “Drag and Drop” feature for configuration. To make a parameter “draggable”, touch it with your finger until a coloured circle appears. Then drag the parameter to its new position on the screen. Basic Instructions for Use elisa 300-500 SW 2.09.x Rev. 11...
-
Page 52: Configuration
Nebulizer port Side panel Release lever for valve bar Caution: exhaust gas port Rear panel HDMI port for connection of projector Network interface USB interface (2x) Type BF applied part Basic Instructions for Use elisa 300-500 SW 2.09.x Rev. 11... - Page 53 Weight in kg IP22 Protection class according to DIN EN 60529 elisa 300 and elisa 500 fulfil the requirements of Directive 93/42/EEC con- cerning medical devices and of Regulation (EU) 2017/745, provided they are operated according to the instructions for use.
-
Page 54: Abbreviations And Terms Used In The Instructions For Use And In The User Guidance
Ventilation modes Volume-controlled ventilation Pressure limited ventilation (VCV with pressure limitation) VC-SIMV Synchronised intermittent mandatory ventilation – volume controlled Optional VCV Optional VCV Flexible VCV Flexible VCV Pressure-controlled ventilation Basic Instructions for Use elisa 300-500 SW 2.09.x Rev. 11... - Page 55 Compliance of the respiratory system plus the patient, meas- ured value C20/Cstat Ratio of the last 20% of the compliance to the overall compli- ance during inspiration (determined by a PEEPfinder manoeu- vre) Carbon dioxide Basic Instructions for Use elisa 300-500 SW 2.09.x Rev. 11...
- Page 56 Respiratory rate, breaths per minute, measured value Flow Flow in general, measured value Flow insp. Maximum flow measured during inspiration in L/min Flow exp. Maximum flow measured during expiration in L/min Basic Instructions for Use elisa 300-500 SW 2.09.x Rev. 11...
- Page 57 Minimum inspiratory sevoflurane concentration, adjustable alarm limit Invasive ventilation Paediatric Patient category: Children Compensat. Tube compensation level Compens. C Extent of the compliance compensation Compens. R Extent of the resistance compensation Basic Instructions for Use elisa 300-500 SW 2.09.x Rev. 11...
- Page 58 Low-flow PV manoeuvre to determine a secure window for the ventilator settings PEEP max Maximum positive end-expiratory pressure, adjustable alarm limit PEEP min minimum positive end-expiratory pressure, adjustable alarm limit Basic Instructions for Use elisa 300-500 SW 2.09.x Rev. 11...
- Page 59 PS Ramp Time between PEEP and PS pressure level, configured value PS TImax maximum inspiratory time with pressure support Resistance of the respiratory system plus the patient, measured value Basic Instructions for Use elisa 300-500 SW 2.09.x Rev. 11...
- Page 60 Anatomical dead space as part of the expiratory tidal volume VTds (%) Anatomical dead space as a percentage of the expiratory tidal volume V´CO Measured volume of the eliminated CO per minute Tidal volume, configured value Upper inflection point Basic Instructions for Use elisa 300-500 SW 2.09.x Rev. 11...
- Page 61 Work of breathing performed by the patient (share of the total work of breathing) WOB vent Work of breathing performed by the ventilator (share of the total work of breathing) or AC Alternating current or DC Direct current Basic Instructions for Use elisa 300-500 SW 2.09.x Rev. 11...
- Page 62 5 | General information Basic Instructions for Use elisa 300-500 SW 2.09.x Rev. 11...
-
Page 63: Preparing The System For Use
Internal power supply (rechargeable battery) Gas supply Switching power on and off 6.3.1 Automatic patient detection APD Power up test System test 6.5.1 Select the patient category 6.5.2 Performing a system test Leakage test Basic Instructions for Use elisa 300-500 SW 2.09.x Rev. 11... - Page 64 The power cord is protected against accidental disconnection. This retainer clos- es automatically when the cord is plugged into the power input. To disconnect elisa 300 / elisa 500 from the power supply, first release the red locking mechanism at the mains plug. Then remove the mains plug.
- Page 65 For test purposes of the internal supply system, the ventilator can be operated with a test lung. After disconnection from the mains, Remark ventilation must continue without interruption and the “power failure” alarm must be triggered. Basic Instructions for Use elisa 300-500 SW 2.09.x Rev. 11...
-
Page 66: Gas Supply
Warning If in doubt, provide suitable water traps and/or oil separators. elisa 300 / elisa 500 has been designed to allow operation without O supply at any time. In this case, AIR will be supplied by the turbine integrated in the device. -
Page 67: Switching Power On And Off
Switching power on and off Switching power on If elisa 300 / elisa 500 is connected to the mains supply, the ON button is green. The device can be switched on at any time if the power supply is sufficient. - Page 68 The system test screen appears after a successful power up test. For a list of all alarm messages during the power up test, please Remark refer to chapter 9.5 “Error messages during power up test”. Basic Instructions for Use elisa 300-500 SW 2.09.x Rev. 11...
-
Page 69: System Test
The choice of the patient category affects the following functions: • default parameters • alarm limits • dynamic behaviour of the ventilation control Please refer to chapter 13 “Default parameters” for details on parameters and limit values. Basic Instructions for Use elisa 300-500 SW 2.09.x Rev. 11... -
Page 70: Performing A System Test
Then you can start ventilating a patient of the new pa- tient category. 6.5.2 Performing a system test Set up elisa 300 / elisa 500 with the breathing circuit and all accessories used during ventilation. Check the secure fit of the installed valve bar before performing the system test. - Page 71 3 l/mbar, the system test is terminated with an error message. For a list of all alarm messages during the system test, please refer Remark to chapter 9.6 “Error messages during system test”. Basic Instructions for Use elisa 300-500 SW 2.09.x Rev. 11...
-
Page 72: Leakage Test
“Leakage test” tab. This tab can only be selected when the device is in standby. The device starts the power up test; the system test can be started afterwards. The results are presented in the “System” menu on the “System test” tab. Basic Instructions for Use elisa 300-500 SW 2.09.x Rev. 11... -
Page 73: Operation | 7
7.2.1 Default ventilation Ventilation 7.3.1 Set ventilation mode 7.3.2 Change ventilation mode 7.3.3 Set ventilation parameters 7.3.4 Trigger 7.3.5 Backup ventilation 7.3.6 Set alarm limits 7.3.7 Overview of alarm limits Basic Instructions for Use elisa 300-500 SW 2.09.x Rev. 11... - Page 74 Reset to defaults 7.4.2 Lock and unlock the screen 7.4.3 Battery 7.4.4 System test 7.4.5 Settings 7.4.5.1 Date / Time 7.4.5.2 Display brightness 7.4.5.3 Alarm volume / brightness 7.4.5.4 Extras Service Basic Instructions for Use elisa 300-500 SW 2.09.x Rev. 11...
- Page 75 Interface Interface options, tube compensation Ventilation mode Currently selected ventilation mode Lung icon Dynamic view of the lung Toolbox Panel with up to 7 user-configured functions/manoeuvres and the Help function Basic Instructions for Use elisa 300-500 SW 2.09.x Rev. 11...
- Page 76 (Masimo or LeoCap) Multi-gas sensor LeoLyzer AnaConDa Cuffscout (elisa 500 only) Peso (elisa 500 only) IAP (elisa 500 only) flush Hygiene sensor System Miscellaneous Battery Gas supply System test Settings Extras Basic Instructions for Use elisa 300-500 SW 2.09.x Rev. 11...
- Page 77 “Ventilation” button and selecting “Stop ventilation”. Press “Enter” and then confirm the displayed prompt. This puts the device is in standby mode and you can choose between invasive and non-invasive ventilation. Basic Instructions for Use elisa 300-500 SW 2.09.x Rev. 11...
-
Page 78: Tube Compensation
Warning 7.1.3.1 Tube compensation elisa 300 / elisa 500 offers a tube compensation feature which can be activated to reduce the increased tube-related work of breathing of the spontaneously breathing patient. Tube compensation is adjustable by entering the tube size, by the degree of com- pensation and by switching the expiratory tube compensation on or off. - Page 79 In this case, a higher trigger sensitivity should be selected. Visible overshoots and undershoots are not transferred to the Remark patient via the tube. Basic Instructions for Use elisa 300-500 SW 2.09.x Rev. 11...
-
Page 80: Dynamic View Of The Lung
Via the shortcuts in the Toolbox you have direct access to individual functions of elisa 300 / elisa 500. On the configuration level, functions can be assigned to 7 buttons in the Toolbox; this does not affect the Help function. -
Page 81: Help Function
USB stick to be used can be selected. Only approved accessories may be connected to the USB inter- face (refer to separate accessory list). Caution 7.1.6 Home Touch this button to return to the main screen. Basic Instructions for Use elisa 300-500 SW 2.09.x Rev. 11... -
Page 82: Status
The first trend view provides the following information/functions: A Search function to define a time window. B Graphic trend of selected parameters (configurable) C Measured values (configurable) D Tabular trend (configurable) E Trend update Basic Instructions for Use elisa 300-500 SW 2.09.x Rev. 11... -
Page 83: Search Function To Define A Time Window
D P (es) D Peso/D PAW The following settings for the X-axis scaling are available: 1 hour 4 hours 12 hours 2 days 2 hours 8 hours 1 day 7 days Basic Instructions for Use elisa 300-500 SW 2.09.x Rev. 11... -
Page 84: Parameters (Configurable)
RC exp. Flow exp. P min MVe spont. % RSBI MVe mand. Pplateau RR spont. VTe spont. Flow insp. Flow exp. C dyn. Tplateau MV Leakage P0.1 RR mand. Cuff pressure Basic Instructions for Use elisa 300-500 SW 2.09.x Rev. 11... -
Page 85: Trend Update
Trend view 2 continues the tabular trend of view 1. Any modifications of the configuration of this view also affects the first trend view. You scroll through the measured values by a vertical swiping gesture. Basic Instructions for Use elisa 300-500 SW 2.09.x Rev. 11... -
Page 86: Selection "Same Patient" / "New Patient
If “New Patient” (B) is selected, the alarm limits, ventilation mode and the ven- tilation parameters are all reset to the elisa 300 / elisa 500 default values. The automatically activated default ventilation mode is the first mode on the tab bar. -
Page 87: Default Ventilation
Pinsp to a fixed value of 10 mbar The following options and associated values are additionally available for the initial adjustment of PEEP, rate, inspiratory time, and O Basic Instructions for Use elisa 300-500 SW 2.09.x Rev. 11... -
Page 88: Ventilation
Non-invasive: Mask Warning HFOT: Nasal device For a detailed description of the ventilation modes, please refer Remark to the separate document “Instructions for Use A – Manoeuvres, Functions, Ventilation Modes”. Basic Instructions for Use elisa 300-500 SW 2.09.x Rev. 11... -
Page 89: Set Ventilation Mode
The “Change Mode: Wizard” function is not available when the Remark current measured values cannot be used as the basis for an auto- matic switchover. The button is inactive. Basic Instructions for Use elisa 300-500 SW 2.09.x Rev. 11... -
Page 90: Set Ventilation Parameters
For a detailed description of the different ventilation parameters, Remark please refer to the separate document “Instructions for Use A – Manoeuvres, Functions, Ventilation Modes”. Basic Instructions for Use elisa 300-500 SW 2.09.x Rev. 11... -
Page 91: Trigger
A backup ventilation mode, which completely takes over the patient's ventilation in case of apnoea, is associated with each ventilation mode. Tap the “Backup” button to configure the backup ventilation parameters. Basic Instructions for Use elisa 300-500 SW 2.09.x Rev. 11... -
Page 92: Set Alarm Limits
Adapt the value by using the selector and confirm your entry with the Enter button. To cancel the entry, press the button of the selected parameter once again. Basic Instructions for Use elisa 300-500 SW 2.09.x Rev. 11... -
Page 93: Overview Of Alarm Limits
Upper alarm limit for the inspiratory CO concentration inISO max Upper alarm limit for the inspiratory isoflurane concentration inISO min Lower alarm limit for the inspiratory isoflurane concentration Basic Instructions for Use elisa 300-500 SW 2.09.x Rev. 11... -
Page 94: Other Alarms
T P min 10 s 0–30 s T Backup ventilation 30 s 5–120 s T Apnoea alarm 20 s 5–60 s T Leakage high 0–15 s T Disconnection 10 s 0–30 s Basic Instructions for Use elisa 300-500 SW 2.09.x Rev. 11... -
Page 95: Drug Nebulization
Warning 7.3.8 Drug nebulization Medication can be nebulized with elisa 300 / elisa 500 by means of a pneumatic nebulizer. The nebulizer can be activated in all ventilation modes. . For a detailed description of the nebulizer application, please re- Remark fer to the separate document “Instructions for Use –... -
Page 96: Configuration Options On The Ventilation Screen (End User)
Volume Cuff pressure Oesophag. pressure Cuff pressure Oesophag. pressure Pleth Y-axis right Curve 2 Curve 1 Pressure none Flow Pressure Volume Cuff pressure Oesophag. pressure Cuff pressure Oesophag. pressure Pleth Basic Instructions for Use elisa 300-500 SW 2.09.x Rev. 11... -
Page 97: Trend Graphs / Compressed Trend Graphs
The table below shows the values selectable for the “Fastwean” and the “Fast- protect” display fields: P0.1 etCO TPP i (es) RR spont. TPP e (es) D TPP (es) VTe spont. VT/IBW RSBI Pplateau WOB spont. Basic Instructions for Use elisa 300-500 SW 2.09.x Rev. 11... -
Page 98: Settings Under "System
(blue or green, depending on the selected screen colour) represent a battery in use. In the first 2 minutes after switching on elisa 300 / elisa 500, a minimum operating time on the internal power supply is indicat- Remark ed. -
Page 99: System Test
In addition, the “Night screen on” option activates a dimmed screen display with a reduced number of data. This option can be selected only when the device is in the night mode. Basic Instructions for Use elisa 300-500 SW 2.09.x Rev. 11... -
Page 100: Alarm Volume / Brightness
Alarm volume / brightness Alarm volume During normal operation (no alarms), elisa 300 / elisa 500 continuously measures the ambient noise level. When the ambient noise is very loud and an alarm occurs, the volume of the alarm tone is automatically adapted to the ambient noise level (Auto Volume ON). -
Page 101: Extras
Service The service menu is available in the system test screen and in the standby mode. It is only intended for authorised service technicians and secured with an access code. Basic Instructions for Use elisa 300-500 SW 2.09.x Rev. 11... - Page 102 7 | Operation - This page is intentionally left blank. - Basic Instructions for Use elisa 300-500 SW 2.09.x Rev. 11...
-
Page 103: Measurements And Graphics
Measurements and graphics | 8 Measurements and graphics Curve presentation Instant View window Loop view Data table or short data table Fastwean Fastprotect Basic Instructions for Use elisa 300-500 SW 2.09.x Rev. 11... -
Page 104: Curve Presentation
The conventional curve display shows pressure, flow, and volume over time. The display will be scaled to the selected time axis. The actual information displayed on your elisa 300 / elisa 500 depends on the configuration. All trigger points reached are identified by corresponding markers. (If you do not see these coloured markers, the function may have been disabled at the configu- ration level. -
Page 105: Instant View Window
The threshold values of the individual alarm limits are summarised in the follow- ing table: Basic Instructions for Use elisa 300-500 SW 2.09.x Rev. 11... -
Page 106: Loop View
The loop of the current breath is represented with a black line, the loop of the previous breath is displayed as a grey area. The scales of the loop view adapt au- tomatically. Basic Instructions for Use elisa 300-500 SW 2.09.x Rev. 11... -
Page 107: Data Table Or Short Data Table
Measurements and graphics | 8 Data table or short data table Basic Instructions for Use elisa 300-500 SW 2.09.x Rev. 11... -
Page 108: Fastwean
Touch the upper limit or the lower limit and adjust the corresponding value with the selector. These limits only apply to Fastwean, they do not affect other display elements, such as Fastprotect. The general alarms are also not affected. Basic Instructions for Use elisa 300-500 SW 2.09.x Rev. 11... -
Page 109: Fastprotect
Touch the upper limit or the lower limit and adjust the corresponding value with the selector. These limits only apply to Fastprotect, they do not affect other display elements, such as Fastwean. The general alarms are also not affected. Basic Instructions for Use elisa 300-500 SW 2.09.x Rev. 11... - Page 110 8 | Measurements and graphics The timer counts from 00:00 to 23:59 (hh:mm), then it starts counting days (1 to 999 days). After 999 days, the timer restarts from 00:00 hh:mm. Basic Instructions for Use elisa 300-500 SW 2.09.x Rev. 11...
-
Page 111: Errors, Alarms And Troubleshooting
9.2.5 Alarm verification in the presence of a partially blocked breathing circuit Alarm priorities Alarm messages during operation Error messages during power up test Error messages during system test Basic Instructions for Use elisa 300-500 SW 2.09.x Rev. 11... -
Page 112: Problems - Causes - Corrective Measures
/ prevent conden- sate in breathing circuit USB stick is not detected Incorrect or implausible format- The elisa 300 / elisa 500 ting. devices support only a FAT32-formatted USB stick. The USB stick needs to be formatted with a standard operating system (e.g., Windows). -
Page 113: Alarm System
In this case, the alarm with the highest priority and the number of additional alarms will be displayed. After 20 seconds all alarms are displayed again in full size. Basic Instructions for Use elisa 300-500 SW 2.09.x Rev. 11... -
Page 114: Alarm Pause
(B). New alarms occurring during an alarm pause will trigger a new Remark alarm! During absence of alarms, all alarms can be suppressed in advance Remark (C) for 2 minutes. Basic Instructions for Use elisa 300-500 SW 2.09.x Rev. 11... -
Page 115: Verification Of The Signalling Devices
When the breathing circuit is partially blocked, the “Airway pressure high” alarm will be output. The alarm condition is detected by a permanent plausibility monitoring of the PEEP valve. Basic Instructions for Use elisa 300-500 SW 2.09.x Rev. 11... -
Page 116: Alarm Priorities
Please note down the displayed error codes for service purposes. The alarm messages are sorted numerically in ascending order. The following rules apply: (*) only elisa 300 elisa 500 (**) only elisa 600 elisa 800 Basic Instructions for Use elisa 300-500 SW 2.09.x... - Page 117 - That Auto triggering is not the cause Respiratory rate #107 Rate high - Water condensation in breathing circuit > Alarm limit Consider: - Reviewing sedation protocol - Adjusting alarm limits or ventilator settings Basic Instructions for Use elisa 300-500 SW 2.09.x Rev. 11...
- Page 118 > 2 mbar over sure high humidity or medication nebulization) Plimit Consider: - Reviewing sedation protocol - Adjusting alarm limits or ventilator settings Information: - The safety valve is open Basic Instructions for Use elisa 300-500 SW 2.09.x Rev. 11...
- Page 119 - That the expiratory flow sensor is free of liquid #118 PEEP high Limit and medication residues (increased resistance of the filter caused by humidity or medication nebulization) Consider: - Changing the expiratory flow sensor Basic Instructions for Use elisa 300-500 SW 2.09.x Rev. 11...
- Page 120 - Adjusting alarm limits or ventilator settings The arterial Please check: oxygen saturation - Patient condition and breathing pattern #126 high is above the set Consider: alarm limit. - Adjusting alarm limits or ventilator settings Basic Instructions for Use elisa 300-500 SW 2.09.x Rev. 11...
- Page 121 Adapt: an O alarm limit alarm - O2 alarm settings #136 deviates more limits? Consider: than 5% from - Alternative FiO2 measurement method set ventilation parameter. Basic Instructions for Use elisa 300-500 SW 2.09.x Rev. 11...
- Page 122 - Ventilator will not adapt inspiratory time and trapping > 2 x RCexp PS-Endflow Continuous Continuous Information: #146 nebulization nebulization is - Switchover to continuous nebulization due to enabled enabled. high respiratory rate Basic Instructions for Use elisa 300-500 SW 2.09.x Rev. 11...
- Page 123 - Defects at cuff, e.g., caused during intubation #152 6–7 pressure cannot cuff - Defects at Cuffscout line and its connections be reached. Consider: - Replacing the pressure measuring line - Revising intubation - Exchanging tracheostomy tube Basic Instructions for Use elisa 300-500 SW 2.09.x Rev. 11...
- Page 124 - That gas supply is within working range inISO concentra- #156 inISO high - Contamination of LeoLyzer cuvette tion > Alarm limit Consider: - Performing a LeoLyzer zero adjustment - Adjusting alarm limits - Correcting gas supply Basic Instructions for Use elisa 300-500 SW 2.09.x Rev. 11...
- Page 125 Please check: Resistance Respiratory re- - The set diameter of the tube for correctness #162 high sistance is high. - That the breathing circuit and tube have no leaks Basic Instructions for Use elisa 300-500 SW 2.09.x Rev. 11...
- Page 126 - O2 concentrator, if used #169 O2 ctrl. low control value - O2 delivery setting at O2 concentrator, if used Consider: - Adjusting alarm limits or ventilator settings Delay: max. 30 s Basic Instructions for Use elisa 300-500 SW 2.09.x Rev. 11...
- Page 127 - Adjusting alarm limits or ventilator settings Alarm limits have been reset Alarm to default after Do the following: #175 limits have bronchoscopy - Re-evaluate and adapt alarm limits been reset mode was stopped. Basic Instructions for Use elisa 300-500 SW 2.09.x Rev. 11...
-
Page 128: Sensor
Decide: if ventilation with low oxygen concentration is a hazard: - Disconnect the patient from this ventilator - Put this ventilator out of service - Continue ventilation with another ventilator - Contact an authorised service agent. Basic Instructions for Use elisa 300-500 SW 2.09.x Rev. 11... - Page 129 - Safe operation cannot be guaranteed Do immediately: - Disconnect the patient from this ventilator - Put this ventilator out of service - Continue ventilation with another ventilator Contact an authorised service agent. Basic Instructions for Use elisa 300-500 SW 2.09.x Rev. 11...
- Page 130 Air inlet - Failure of AIR gas supply is only detected in case of #214 sure sensor pressure flow deviation error Ventilator is operating safely. - Contact an authorised service agent. Basic Instructions for Use elisa 300-500 SW 2.09.x Rev. 11...
- Page 131 Decide: If ventilation with low oxygen is a hazard: - Disconnect the patient from this ventilator - Put this ventilator out of service - Continue ventilation with another ventilator - Contact an authorised service agent. Basic Instructions for Use elisa 300-500 SW 2.09.x Rev. 11...
- Page 132 - Safe operation cannot be guaranteed Do immediately: - Disconnect the patient from this ventilator - Put this ventilator out of service - Continue ventilation with another ventilator - Contact an authorised service agent. Basic Instructions for Use elisa 300-500 SW 2.09.x Rev. 11...
- Page 133 - The Paux2 function is disabled Paux2 pres- #228 sure sensor - Other device functions are not affected. sure error error Ventilator is operating safely. - Contact an authorised service agent. Basic Instructions for Use elisa 300-500 SW 2.09.x Rev. 11...
- Page 134 Decide: If ventilation with low oxygen is a hazard: - Disconnect the patient from this ventilator - Put this ventilator out of service - Continue ventilation with another ventilator - Contact an authorised service agent. Basic Instructions for Use elisa 300-500 SW 2.09.x Rev. 11...
- Page 135 - Disconnect the patient from this ventilator sure error sensor error - Put this ventilator out of service - Continue ventilation with another ventilator - Contact an authorised service agent. Basic Instructions for Use elisa 300-500 SW 2.09.x Rev. 11...
- Page 136 Decide: If ventilation with low oxygen is a hazard: - Disconnect the patient from this ventilator - Put this ventilator out of service - Continue ventilation with another ventilator - Contact an authorised service agent. Basic Instructions for Use elisa 300-500 SW 2.09.x Rev. 11...
- Page 137 Decide: If pure oxygen concentration is a hazard: error sensor error - Disconnect the patient from this ventilator - Put this ventilator out of service - Continue ventilation with another ventilator - Contact an authorised service agent. Basic Instructions for Use elisa 300-500 SW 2.09.x Rev. 11...
- Page 138 - Two redundant sensors measure implausible values Air flow Air flow - The accuracy of the measured values may be #260 error sensor error impaired Ventilator is operating safely. - Contact an authorised service agent. Basic Instructions for Use elisa 300-500 SW 2.09.x Rev. 11...
- Page 139 - Put this ventilator out of service - Continue ventilation with another ventilator - Contact an authorised service agent. (*) elisa 300 elisa 500 only (**) elisa 600 elisa 800 only Basic Instructions for Use elisa 300-500 SW 2.09.x Rev. 11...
-
Page 140: Control Unit
- If the temperature gets too high, the control unit will is defective. switch off Ventilator is operating safely. If the alarm recurs or persists: - Contact an authorised service agent. Basic Instructions for Use elisa 300-500 SW 2.09.x Rev. 11... - Page 141 Do the following: failure unit is defec- - Exchange the control unit tive. The new control unit will initialize automatically. If the alarm recurs or persists: - Contact an authorised service agent. Basic Instructions for Use elisa 300-500 SW 2.09.x Rev. 11...
- Page 142 - Exchange the control unit tive. The new control unit will initialize automatically. If the alarm recurs or persists: - Contact an authorised service agent. (*) elisa 300 elisa 500 only (**) elisa 600 elisa 800 only Power Management Alarms Prior- Alarm Code...
- Page 143 Overload - Additional functions be may disabled #407 supply Ventilator is operating safely. overload Delay: If the alarm recurs or persists: 15 seconds max. - Contact an authorised service agent. Basic Instructions for Use elisa 300-500 SW 2.09.x Rev. 11...
- Page 144 #414 Battery fective. Charging - Battery is connected correctly electronics is not possible. If the alarm recurs or persists: #415 - Contact an authorised service agent. Delay: 15 seconds max. Basic Instructions for Use elisa 300-500 SW 2.09.x Rev. 11...
- Page 145 - The current measurement in the power supply #422 defective. fault module is implausible If the alarm recurs or persists: Delay: - Contact an authorised service agent. 15 seconds max. Basic Instructions for Use elisa 300-500 SW 2.09.x Rev. 11...
- Page 146 Visual alarm (**) ventilator unit - Now the control unit generates the visual failed. alarms Ventilator is operating safely. If the alarm recurs or persists: - Contact an authorised service agent. Basic Instructions for Use elisa 300-500 SW 2.09.x Rev. 11...
- Page 147 Delay: - Replace defective CO2 sensor if applicable 30 seconds max. - Use external CO2 monitoring if required If the alarm recurs or persists: - Contact an authorised service agent. Basic Instructions for Use elisa 300-500 SW 2.09.x Rev. 11...
- Page 148 Do the following, if alarm recurs or persists: - Disconnect patient from ventilator - Continue ventilation with another ventilator - Put this ventilator out of service - Contact an authorised service agent. Basic Instructions for Use elisa 300-500 SW 2.09.x Rev. 11...
- Page 149 - That the sensor is correctly applied to the not Con- the Patient. finger nected - That the skin is not too strongly pigmented If the alarm recurs or persists: Contact an authorised service agent. Basic Instructions for Use elisa 300-500 SW 2.09.x Rev. 11...
- Page 150 - Document the replacement in the hygiene intake filter maximum period management of service. (*) elisa 300 elisa 500 only (**) elisa 600 elisa 800 only Basic Instructions for Use elisa 300-500 SW 2.09.x Rev. 11...
- Page 151 - Replace the sensor - Contact an authorised service agent. LeoLyzer Wait for sensor Do the following: sensor temperature to - Wait until LeoLyzer temperature is within #581 temperature stabilize. operating range Basic Instructions for Use elisa 300-500 SW 2.09.x Rev. 11...
- Page 152 Security valve #641 Valve error - Disconnect patient from ventilator error. - Continue ventilation with another ventilator - Put the ventilator out of service - Contact an authorised service agent. Basic Instructions for Use elisa 300-500 SW 2.09.x Rev. 11...
- Page 153 - Check measuring cell in expiratory flow error sensor for damage Delay: - Replace expiratory flow sensor if required 30 seconds max. If the alarm recurs or persists: - Contact an authorised service agent. Basic Instructions for Use elisa 300-500 SW 2.09.x Rev. 11...
- Page 154 If alarm recurs or persists in system test: - Put this ventilator out of service - Continue ventilation with another ventilator - Contact an authorised service agent. Basic Instructions for Use elisa 300-500 SW 2.09.x Rev. 11...
- Page 155 Do immediately: control valve is - Disconnect patient from ventilator disturbed. - Continue ventilation with another ventilator - Put this ventilator out of service - Contact an authorised service agent. Basic Instructions for Use elisa 300-500 SW 2.09.x Rev. 11...
- Page 156 - Disconnect patient from ventilator (**) of the ventilator - Continue ventilation with another ventilator unit are incom- - Put this ventilator out of service patible. - Contact an authorised service agent. Basic Instructions for Use elisa 300-500 SW 2.09.x Rev. 11...
- Page 157 Check that: 40%. - You can hear alarms at every workplace - You can hear alarms in noisy environment (*) elisa 300 elisa 500 only (**) elisa 600 elisa 800 only elisa 800 VIT Alarms Prior- Alarm mes- Code...
- Page 158 9 | Alarms and troubleshooting elisa 300 elisa 500 – Control Unit Alarms Pri- Alarm Code Cause Corrective measure ority message Information: The internal - Control unit was automatically re- power supply of started #711 Power failure the control unit Ventilator is operating safely.
- Page 159 Alarms and troubleshooting | 9 elisa 300 elisa 500 – Turbine Alarms Pri- Alarm Code Cause Corrective measure ority message Information: - Only single-gas operation with oxygen is possible - Oxygen supply must be stable and powerful A turbine Check that:...
- Page 160 If the alarm recurs or persists: - Disconnect patient from ventilator - Continue ventilation with another ventilator - Put this ventilator out of service - Contact an authorised service agent. Basic Instructions for Use elisa 300-500 SW 2.09.x Rev. 11...
- Page 161 - The filter is clean #738 intake intake filter Do, if required: filter is polluted. - Insert a new turbine intake filter If the alarm recurs or persists: - Contact an authorised service agent. Basic Instructions for Use elisa 300-500 SW 2.09.x Rev. 11...
- Page 162 - Without a filter, the inside of the ventilator can turbine intake filter #741 become contaminated intake is loose or Do immediately: filter missing. - insert turbine intake filter correctly Basic Instructions for Use elisa 300-500 SW 2.09.x Rev. 11...
- Page 163 Please note down the displayed error codes for service purposes. Code Error message Corrective measure #201 Pressure, flow or voltage meas- Do not use ventilator, switch OFF, urement error contact authorised service agent #269 (sensor problem) Basic Instructions for Use elisa 300-500 SW 2.09.x Rev. 11...
- Page 164 Remaining usage time on #868 battery 1 Connect device to the mains < 5 min Capacity of battery 1 #869 is insufficient for number Connect device to the mains of accessory devices Basic Instructions for Use elisa 300-500 SW 2.09.x Rev. 11...
- Page 165 24 V power controller of contact authorised service agent ventilator unit is incorrect #906 Do not use ventilator, switch OFF, Various power manager errors contact authorised service agent #910 Basic Instructions for Use elisa 300-500 SW 2.09.x Rev. 11...
- Page 166 Press <Acknowledge> to continue with a reduced #1005 maximum flow cannot be maximum flow reached Fault of the internal O flow measurement #1006 Repeat system test Flow measurement outside operating range Basic Instructions for Use elisa 300-500 SW 2.09.x Rev. 11...
- Page 167 - Check expiratory flow sensor Fault of the internal #1045 inspiratory pressure measurement Repeat system test #1047 Pressure measurement outside operating range #1052 Internal fault process gas valve Repeat system test #1055 Basic Instructions for Use elisa 300-500 SW 2.09.x Rev. 11...
- Page 168 Resistance : - Rule out use of coaxial breathing circuits <value> [mbar/l/s] - Check breathing circuit for kinks #1101 sensor reports error and Repeat system test cannot be activated #1102 Basic Instructions for Use elisa 300-500 SW 2.09.x Rev. 11...
- Page 169 - Repeat system test #1111 - Check correct assembly inspiratory valve, or Fault safety valve replace valve #1114 - If the problem persists, contact an authorised service agent Basic Instructions for Use elisa 300-500 SW 2.09.x Rev. 11...
- Page 170 9 | Alarms and troubleshooting - This page is intentionally left blank. - Basic Instructions for Use elisa 300-500 SW 2.09.x Rev. 11...
- Page 171 Machine cleaning with disinfection 10.2.2.3 Sterilisation of the valve bar 10.2.2.4 Visual inspection of the valve bar 10.2.2.5 Components of the valve bar 10.3 Disposal of elisa 300 / elisa 500 Basic Instructions for Use elisa 300-500 SW 2.09.x Rev. 11...
-
Page 172: General Information
Contact the manufacturer if you have questions concerning cleaning agents or disinfectants. Avoid patient contamination: • Clean elisa 300 / elisa 500 and sterilise the connected acces- sories after each patient. • Comply with the general hygiene regulations of the hospital Warning or the national hygiene recommendations. -
Page 173: Cleaning And Disinfection
• Ecolab SANI-CLOTH® ACTIVE If you want to disinfect the display surface during operation, lock the screen first. Remark For further information, please refer to chapter 7.4.1 “Lock and unlock the screen”. Basic Instructions for Use elisa 300-500 SW 2.09.x Rev. 11... -
Page 174: Valve Bar
Warning valves must be replaced if required. The three-part PEEP membrane (expiratory valve) remains as- Remark sembled for reprocessing. Basic Instructions for Use elisa 300-500 SW 2.09.x Rev. 11... - Page 175 Expiratory valve adapter Inspiratory valve adapter Expiratory flow sensor adapter Flushing nozzle connections Remark Observe the instructions for use of the washer disinfector. Basic Instructions for Use elisa 300-500 SW 2.09.x Rev. 11...
-
Page 176: Sterilisation Of The Valve Bar
Therefore, do not sterilise the valve bar with ethylene oxide. Warning All silicone parts of the valve bar must be replaced after 500 ster- ilisation cycles or during annual maintenance, whichever occurs first. Warning Basic Instructions for Use elisa 300-500 SW 2.09.x Rev. 11... -
Page 177: Visual Inspection Of The Valve Bar
Do not disassemble the PEEP membrane. This is neither allowed nor necessary. Sealing ring expiratory valve Check the proper fit of the sealing ring. Basic Instructions for Use elisa 300-500 SW 2.09.x Rev. 11... -
Page 178: Components Of The Valve Bar
Check that the three-part PEEP membrane is complete and that the three com- ponents are intact (sectional view). Do not disassemble the PEEP membrane. This is neither allowed Remark nor necessary. Expiratory valve membrane Disc Silicone disc Basic Instructions for Use elisa 300-500 SW 2.09.x Rev. 11... -
Page 179: Disposal Of Elisa 300 / Elisa 500
Before disposing of the elisa 300 / elisa 500 ventilator, the device must be cleaned and disinfected according to chapter 10.2. Do not dispose of the elisa 300 / elisa 500 and of the rechargeable batteries with the domestic waste. Consult an authorized, certified electronic waste recycling company for the proper disposal. - Page 180 10 | Cleaning, disinfection and sterilisation, disposal - This page is intentionally left blank. - Basic Instructions for Use elisa 300-500 SW 2.09.x Rev. 11...
- Page 181 Air filter cassette for turbine 11.3.1 Exchanging the air filter cassette 11.4 Maintenance intervals 11.4.1 Annual maintenance 11.4.2 Maintenance every 6 years 11.4.3 Maintenance every 12 years 11.5 Additional maintenance and repair information Basic Instructions for Use elisa 300-500 SW 2.09.x Rev. 11...
- Page 182 11.1 General elisa 300 / elisa 500 has been designed as an intensive care ventilator that requires little maintenance. The user does not have to perform any calibration. Mainte- nance of the elisa 300 / elisa 500 must be performed annually by an authorised service technician according to the service interval indication.
- Page 183 11.3 Air filter cassette for turbine elisa 300 / elisa 500 is a device with turbine technology that draws in room air to deliver patient ventilation. The air entering the turbine is conducted through a HEPA quality fine filter. The filter efficiency of the fine filter meets the requirements of the HEPA H13 filter class, which means that 99.95% of all particles in the aspirated room air are cap-...
- Page 184 Finally introduce the snap arms of the turbine filter cover on the left and close it by pressing on the right side of the cover until you feel it lock into place. Basic Instructions for Use elisa 300-500 SW 2.09.x...
- Page 185 Lithium coin cell battery CR2032 11.4.3 Maintenance every 12 years After 12 years or 50,000 hours of operation: Have preventive maintenance per- formed by a service technician authorised by the manufacturer. Basic Instructions for Use elisa 300-500 SW 2.09.x Rev. 11...
- Page 186 For further information about maintenance and repair, please refer to the elisa 300 / elisa 500 Technical Manual. The Technical Manual is available for use by your service technician. This manual is available in English and German. Basic Instructions for Use elisa 300-500 SW 2.09.x Rev. 11...
- Page 187 Technical specifications | 12 Technical specifications 12.1 Function chart of the elisa 300 / elisa 500 ventilator 12.2 General 12.3 Supply 12.4 Technical data 12.5 Control unit 12.6 Default parameters 12.7 Increments and maximum performance range 12.8 Instant View window / data table(s) 12.9...
- Page 188 12 | Technical specifications 12.1 Function chart of the elisa 300 / elisa 500 ventilator Exhaust Gas Port Mixing Non-return Proportional Flow Sensor Section Valve Valve Check Valve Flow Sensor Filter Silencer Turbine Sensor Flow Sensor Pressure Sensor Expiratory Valve (PEEP Valve) Safety...
- Page 189 Technical specifications | 12 Dimensions and weight Ventilator elisa 300: 315 x 245 x 405 mm W x D x H elisa 500: 360 x 245 x 455 mm Weight, net: 10 kg Cart W x D x H 585 x 704 x 922 mm...
- Page 190 0 to 99% (without condensation) At high humidity levels, it is not possible to completely rule out condensation. If the device is constantly operated at high humidity levels, corrosion can be expected. Caution Basic Instructions for Use elisa 300-500 SW 2.09.x Rev. 11...
-
Page 191: Supply
The operating pressure is set via the electromechanical expira- Remark tory valve. All volume, flow and leakage data on the patient side refer to Remark BTPS, all others refer to STPD. Basic Instructions for Use elisa 300-500 SW 2.09.x Rev. 11... -
Page 192: Technical Data
140 hPa. Patient category: Adults, Children Max. 100 mbar inspiratory pressure: Max. inspiratory flow: Adults: 180 l/min for each gas (elisa 300: 150 l/min) Children: 120 l/min for each gas Device compliance: < 2.0 ml/mbar* Insp. resistance: < 1.5 mbar/l/s* Exp. -
Page 193: Control Unit
Alarm messages on screen Intensive care Alarm bar at the top of the monitor (yellow or red, ventilator depending on severity) Adjustment range 20–100% Power indicator Mains supply green LED of ON button Basic Instructions for Use elisa 300-500 SW 2.09.x Rev. 11... -
Page 194: Default Parameters
50 mbar 1.0 @ 10–50 mbar 102 – (2 mbar) 1 mbar 0 mbar – PEEP 0.1 @ 0.1–3.5 l/min Flow trigger OFF, 0.1 l/min 20.0 l/min 0.5 @ 3.5–20.0 l/min Basic Instructions for Use elisa 300-500 SW 2.09.x Rev. 11... - Page 195 Compens. C MV target (ALPV, WOBOV Adults 5 ml/kg/min 50 ml/kg/min 350 ml/kg/min only) VT/IBW Adults 1 ml/kg 5 ml/kg 15 ml/kg Acoustic alarm 100% Alarm 100% brightness Display 100% brightness Basic Instructions for Use elisa 300-500 SW 2.09.x Rev. 11...
- Page 196 + 1 increment 245 /min, 1 @ 2–100 /min RRmin spont OFF, 2 /min RRmax 5 @ 100–245 /min – 1 increment Plimit (abso- 1 mbar 10 mbar 120 mbar lute mode) Basic Instructions for Use elisa 300-500 SW 2.09.x Rev. 11...
- Page 197 7.0, OFF exISO max 1 mmHg 55, OFF 0.1 vol%, kPa OFF, 0.1 inISO min 1 mmHg OFF, 1 0.1 vol%, kPa 7.0, OFF inISO max 1 mmHg 55, OFF Basic Instructions for Use elisa 300-500 SW 2.09.x Rev. 11...
-
Page 198: Instant View Window / Data Table(S)
1 @ 0–100 ±10% or ±10 ml 0–4000 ml 5 @ 100–4000 (greater value) 1 @ 0–100 ±10% or ±10 ml VTe spont. 0–4000 ml 5 @ 100–4000 (greater value) Basic Instructions for Use elisa 300-500 SW 2.09.x Rev. 11... - Page 199 VT/IBW Adults 0.0–99.9 ml/kgBW 0.1 ml/kgBW (greater value) Leakage 0–100% ±10% ±10% or ±150 ml 0.0–50.0 l/min 1 l/min Leakage (greater value) 0.0–99.9 s 0.1 s ± 0.1 s Plateau Basic Instructions for Use elisa 300-500 SW 2.09.x Rev. 11...
- Page 200 0–9999 ml VTds 1 ml er's specifications according to manufactur- 0–100% VTds% er's specifications according to manufactur- 0–9999 ml VTalv 1 ml er's specifications according to manufactur- 0–100% VTalv% er's specifications Basic Instructions for Use elisa 300-500 SW 2.09.x Rev. 11...
- Page 201 0.0 to 99.9 mbar 0.1 mbar ± (0.5 mbar + 2%) Pmin (es) -10.0 to 99.9 mbar 0.1 mbar ± (0.5 mbar + 2%) WOB (es) 0–99.9 J/L 0.1 J/L ±20% Basic Instructions for Use elisa 300-500 SW 2.09.x Rev. 11...
-
Page 202: Data Transmission With Terminal Devices
Data transmission with terminal devices PDMS interfaces If you would like to operate elisa 300 / elisa 500 in combination with a terminal device, please contact your service technician. The service technician will also inform you about the terminal devices compatible with elisa 300 / elisa 500. Via the PDMS interfaces, data are sent from the ventilator to terminal devices such as: •... - Page 203 The control of the ventilation procedure is independent of the data communication between ventilator and terminal device. This Remark means that the ventilator continues ventilating the patient if a data communication problem occurs. Basic Instructions for Use elisa 300-500 SW 2.09.x Rev. 11...
-
Page 204: Guidance And Manufacturer's Declaration
Electromagnetic immunity: elisa 300 / elisa 500 is intended for use in the electromagnetic environment specified be- low. It is the responsibility of the customer or user to ensure that elisa 300 / elisa 500 is operated in such an environment. - Page 205 Portable and mobile RF communications equipment should be used no closer to elisa 300 / elisa 500, including cables, than the recommended separation distance calculated from the equation applicable to the frequency of the transmitter. (Mainstream sensor d = 1.2√...
- Page 206 RF compliance level above, the equipment should be observed to verify normal operation. If ab- normal performance is observed, additional measures may be necessary, such as re-orienting or relocating the system. Basic Instructions for Use elisa 300-500 SW 2.09.x Rev. 11...
- Page 207 Technical specifications | 12 Over the frequency range of 150 kHz to 80 MHz, field strengths should be less than 3 V/m. Basic Instructions for Use elisa 300-500 SW 2.09.x Rev. 11...
- Page 208 12 | Technical specifications - This page is intentionally left blank. - Basic Instructions for Use elisa 300-500 SW 2.09.x Rev. 11...
- Page 209 Adjustment ranges 13.1.3 Default alarm limits 13.1.3.1 Default alarm limits of the ALPV mode 13.1.3.2 Default alarm limits of the WOBOV mode 13.1.3.3 Default alarm limits of the CPR mode Basic Instructions for Use elisa 300-500 SW 2.09.x Rev. 11...
-
Page 210: Default Parameters
0.10 s PS TImax 4.0 s 3.0 s T_exp 4.0 s 2.0 s P min 5 mbar 5 mbar P max 35 mbar 30 mbar Byflow 3.0 l/min 3.0 l/min Basic Instructions for Use elisa 300-500 SW 2.09.x Rev. 11... -
Page 211: Adjustment Ranges
Refer to the separate tables for the exact values. Patient category Adults Children MVmin 2.5 l 0.5 l MVmax 12.0 l 5.0 l Vtmin (pressure modes) 150 ml 50 ml Vtmax Leakage (IV) Leakage (NIV) Basic Instructions for Use elisa 300-500 SW 2.09.x Rev. 11... - Page 212 FiO – 5% or 18% set FiO – 5% or 18% etCO 8.0 vol% or 8 kPa 8.0 vol% or 8 kPa etCO inCO RR spont. max RR spont. min Basic Instructions for Use elisa 300-500 SW 2.09.x Rev. 11...
-
Page 213: Default Alarm Limits Of The Alpv Mode
RRmax = 2.0 * (%MV / 6.0) = 2.0 * (%MV / VGF) 13.1.3.2 Default alarm limits of the WOBOV mode Patient category Adults Plimit WOBOV Pmax + 10 mbar Basic Instructions for Use elisa 300-500 SW 2.09.x Rev. 11... -
Page 214: Default Alarm Limits Of The Cpr Mode
Pmean max Pmean min Pplateau max PEEPmax PEEPmin set FiO + 5% set FiO – 5% or 18% etCO etCO inCO RR spont. max RR spont. min technical CO alarms inactive Basic Instructions for Use elisa 300-500 SW 2.09.x Rev. 11... - Page 215 Default parameters | 13 - This page is intentionally left blank. - Basic Instructions for Use elisa 300-500 SW 2.09.x Rev. 11...
- Page 216 Basic Instructions for Use elisa 300-500 | SW 2.09.x Language: English Item no.: CM-929501 Rev. 14 2021-01-26 Löwenstein Medical Innovation Niederhöchstädter Str. 62 61476 Kronberg, Germany T. +49 6173 9333-0 F. +49 6173 9333-29 info@loewensteinmedical.com www.loewensteinmedical.com © 2021 Löwenstein Medical Innovation GmbH & Co. KG | All rights reserved. Subject to technical changes.
- Page 217 300 elisa 500 Instructions for Use Supplement A Manoeuvres, Functions, Ventilation Modes...
- Page 218 Serial number system: The coding system contains the code for the product group (03 or 05), the year of manufacture (YY) and a 4-digit numeric code (ZZZZ) for unique identification. 03YYZZZZ elisa 300 05YYZZZZ elisa 500 UDI system: The coding system contains the Global Trade Identification Number (GTIN), the code for the product group (03 or 05), the year of manufacture (YY) and a 4-digit numeric code (ZZZZ) for unique identification.
- Page 219 Recruitment with PEEPfinder Functions A 3.1 Availability of the functions A 3.2 O2 Flush A 3.3 Automatic Suction Routine (ASR) A 3.3.1 Suction with open suction systems Instructions for Use elisa 300-500 | Supplement A | SW 2.09.x | Rev. 11...
- Page 220 Connecting the mainstream sensor IRMA CO A 3.10.8 Connecting the sidestream sensor ISA CO A 3.10.8.1 Respiratory gas humidification A 3.10.8.2 Drug nebulization A 3.10.9 Performing capnometry Instructions for Use elisa 300-500 | Supplement A | SW 2.09.x | Rev. 11...
- Page 221 A 4.1 Weaninganalyzer A 4.2 Availability of the weaning procedure A 4.2.1 Availability for the different patient categories A 4.3 A 4.3.1 SAT test (Spontaneous Awakening Trial) Instructions for Use elisa 300-500 | Supplement A | SW 2.09.x | Rev. 11...
- Page 222 Volume-adaptive BiLevel A 5.5.22 PC-APRV A 5.5.23 A 5.5.24 ALPV (Adaptive Lung Protection Ventilation) A 5.5.25 WOBOV (Work Of Breathing Optimized Ventilation) A 5.5.26 A 5.5.27 HFOT Instructions for Use elisa 300-500 | Supplement A | SW 2.09.x | Rev. 11...
- Page 223 Information about the “Manoeuvres, Functions, Ventilation Modes” manual A 1.2 Safety information in these instructions for use A 1.3 General safety instructions A 1.4 Options matrix Instructions for Use elisa 300-500 | Supplement A | SW 2.09.x | Rev. 11...
-
Page 224: A 1 About This Manual
For specific details concerning the devices elisa 300 / elisa 500, please refer to the separate document “Basic Instructions for Use – elisa 300 / elisa 500”. The configuration of the devices elisa 300 and elisa 500 will be carried out by your Service engineer. -
Page 225: Safety Information In These Instructions For Use
Software version 2.09.x Safe operation In order to guarantee the safe operation of elisa 300 / elisa 500, the system must only be used as described. Before putting the system into operation, users must familiarise themselves with the following instructions for use: •... -
Page 226: Options Matrix
500 Paux I: Cuffscout not available standard function Paux II: oesophageal pressure measurement not available standard Peso Paux II: IAP (intra-ab- not available standard dominal pressure) Instructions for Use elisa 300-500 | Supplement A | SW 2.09.x | Rev. 11... -
Page 227: Manoeuvre Availability
A 2.6.4 Settings A 2.6.5 Performing the PEEPfinder manoeuvre (inspiratory and expiratory) A 2.6.6 Evaluation A 2.6.7 Additional views / indices A 2.6.8 Recruitment with PEEPfinder Instructions for Use elisa 300-500 | Supplement A | SW 2.09.x | Rev. 11... -
Page 228: Inspiratory Hold (Insp. Hold)
• Flow active “Off” means that the valves are closed for the diagnosis and the pressure situation can be assessed directly without any additional flow. Instructions for Use elisa 300-500 | Supplement A | SW 2.09.x | Rev. 11... -
Page 229: Expiratory Hold (Exp. Hold)
The manoeuvre stops when the set maximum tidal volume V max or the set maximum pressure Plimit is reached. Instructions for Use elisa 300-500 | Supplement A | SW 2.09.x | Rev. 11... -
Page 230: Maximum Inspiratory Pressure (Mip)
Interval: Number of machine breaths between two sigh intervals • Cycle: Number of breaths with activated sigh function • Factor: Multiplier by which the tidal volume or P insp increases Instructions for Use elisa 300-500 | Supplement A | SW 2.09.x | Rev. 11... -
Page 231: Expiratory Sigh
The user can define the following settings: • Interval: Number of breaths with activated sigh function • Cycle: Number of breaths with activated sigh function • Factor: Multiplier by which PEEP increases Instructions for Use elisa 300-500 | Supplement A | SW 2.09.x | Rev. 11... -
Page 232: Recruitment Manoeuvre
By directly entering the delta pressure, the manoeuvre can also be Remark used to implement an open lung strategy. Only the PEEP needs to be increased for this purpose. Instructions for Use elisa 300-500 | Supplement A | SW 2.09.x | Rev. 11... - Page 233 (recruitment time). The remaining time of the manoeuvre is displayed in a bar chart. The manoeuvre can be terminated prematurely at any time with Remark the “Stop” and Enter buttons. Instructions for Use elisa 300-500 | Supplement A | SW 2.09.x | Rev. 11...
- Page 234 The safety parameters need to be adapted to the clinical sit- Warning uation; close monitoring must be ensured. Instructions for Use elisa 300-500 | Supplement A | SW 2.09.x | Rev. 11...
-
Page 235: Peepfinder Manoeuvre
• Patients unable to tolerate extended ventilation pauses • Patients susceptible to barotrauma or volutrauma • Patients with an inadequate depth of sedation and level of relaxation Instructions for Use elisa 300-500 | Supplement A | SW 2.09.x | Rev. 11... -
Page 236: A 2.6.3 Warnings And Remarks
Activating the PEEPfinder will disable some of the elisa 300 / elisa Remark 500 functions (e.g., drug nebulizer, hold manoeuvre, etc.) because they may influence the PEEPfinder manoeuvre. Instructions for Use elisa 300-500 | Supplement A | SW 2.09.x | Rev. 11... -
Page 237: Settings
The manoeuvre can be started with or without the recruitment Remark function. The user is required to adapt the safety settings to the different Remark clinical situations. Instructions for Use elisa 300-500 | Supplement A | SW 2.09.x | Rev. 11... -
Page 238: A 2.6.5 Performing The Peepfinder Manoeuvre (Inspiratory And Expiratory)
The manoeuvre can be terminated prematurely at any time with Remark the “Stop” and “Enter” buttons. Remark Duration of the manoeuvre: 2.5 minutes maximum Instructions for Use elisa 300-500 | Supplement A | SW 2.09.x | Rev. 11... -
Page 239: Evaluation
A 2.6.7 Additional views / indices The PEEPfinder manoeuvre provides two more views. The first view shows the PEEPfinder loop together with the ventilation curve. Instructions for Use elisa 300-500 | Supplement A | SW 2.09.x | Rev. 11... -
Page 240: A 2.6.8 Recruitment With Peepfinder
The manoeuvre is not available in NIV modes, during HFOT and in Remark purely spontaneous breathing modes (dimmed – message in info box). The recruitment manoeuvre cannot be combined with any other Remark manoeuvre. Instructions for Use elisa 300-500 | Supplement A | SW 2.09.x | Rev. 11... - Page 241 The safety parameters need to be adapted to the clinical sit- Warning uation; close monitoring must be ensured. Instructions for Use elisa 300-500 | Supplement A | SW 2.09.x | Rev. 11...
- Page 242 A 2 | Manoeuvres - This page is intentionally left blank. - Instructions for Use elisa 300-500 | Supplement A | SW 2.09.x | Rev. 11...
- Page 243 A 3.6.1 Connecting the intravesical pressure measuring kit A 3.6.2 IAP function A 3.7 Drug nebulization A 3.7.1 Intended use A 3.7.2 Nebulization A 3.7.3 Pneumatic nebulization Instructions for Use elisa 300-500 | Supplement A | SW 2.09.x | Rev. 11...
- Page 244 Integrating the multi-gas sensor LeoLyzer A 3.11.6 Sample gas outlet A 3.11.7 Connecting the multi-gas sensor LeoLyzer A 3.11.8 Performing a multi-gas measurement A 3.11.8.1 Multi-gas measurement Instructions for Use elisa 300-500 | Supplement A | SW 2.09.x | Rev. 11...
- Page 245 Checklist for verification of the entire elisa 300 / elisa 500 system with the AnaConDa system A 3.14 Bronchoscopy A 3.15 Nurse call A 3.15.1 Intended use A 3.15.2 Connection A 3.15.3 Function Instructions for Use elisa 300-500 | Supplement A | SW 2.09.x | Rev. 11...
- Page 246 A 3 | Functions - This page is intentionally left blank. - Instructions for Use elisa 300-500 | Supplement A | SW 2.09.x | Rev. 11...
- Page 247 Please contact your Service engineer if a particular function is not available. Individual functions may not be available in all countries or may Remark have to be purchased as options. Instructions for Use elisa 300-500 | Supplement A | SW 2.09.x | Rev. 11...
- Page 248 A 3.3 Automatic Suction Routine (ASR) The devices elisa 300 / elisa 500 offer suction manoeuvres for open or for closed suction systems to prevent conditions of hypoxia during endotracheal suctioning and to assist in performing the suction procedure.
- Page 249 Warning The inspiratory flow and the expiratory valve are reconnected 10 seconds after starting the suction phase. Instructions for Use elisa 300-500 | Supplement A | SW 2.09.x | Rev. 11...
- Page 250 Two different Cuffscout lines are available and either type can be used. Only the Cuffscout connecting lines included in the accessory list are approved for use with the Cuffscout function (see illustration). Warning Instructions for Use elisa 300-500 | Supplement A | SW 2.09.x | Rev. 11...
- Page 251 Slip the end with the non-return valve onto the Paux I port of elisa 500. The valve allows gas to flow through in only one direction. Therefore, the cuff pressure is maintained even if the Cuffscout line becomes disconnected. Instructions for Use elisa 300-500 | Supplement A | SW 2.09.x | Rev. 11...
- Page 252 The maximum service life of the Cuffscout connecting line is 29 Remark days. A 3.4.1.2 Cuffscout and test line Luer male cuff exchangeable elisa 500 future functions Instructions for Use elisa 300-500 | Supplement A | SW 2.09.x | Rev. 11...
- Page 253 Cuff pressure in the standby mode On completion of the ventilation procedure, the monitoring and control of the cuff pressure can be continued, e.g., for tracheotomised patients. For this function, Instructions for Use elisa 300-500 | Supplement A | SW 2.09.x | Rev. 11...
- Page 254 When this view is selected, the Cuffscout graph is also displayed on the night screen (see chapter “7.4.5.2 Display brightness” in the Basic Instructions for Use). Instructions for Use elisa 300-500 | Supplement A | SW 2.09.x | Rev. 11...
- Page 255 For manipulations at the tube (subglottic suctioning, repositioning of the tube, ...) a period of time can be specified in which the cuff pressure will be increased (Cuff max.). Instructions for Use elisa 300-500 | Supplement A | SW 2.09.x | Rev. 11...
- Page 256 Connecting the oesophageal catheter Use the Peso adapter to connect the oesophageal pressure measuring line to the II port of elisa 500 (see separate accessory list). Instructions for Use elisa 300-500 | Supplement A | SW 2.09.x | Rev. 11...
- Page 257 IAP function, use different pressure ranges and apply special calculation algorithms. If the wrong pres- Warning sure measurement procedure is activated by mistake, the displayed readings are useless. Instructions for Use elisa 300-500 | Supplement A | SW 2.09.x | Rev. 11...
- Page 258 At the same time, the user decides whether to display an oesophageal or a transpulmonary pressure curve (TPP). The colour for the additional pressure curve can also be selected. Instructions for Use elisa 300-500 | Supplement A | SW 2.09.x | Rev. 11...
- Page 259 No ventilation occurs during the manoeuvre. By taking suitable measures and through close monitoring, the user needs to protect the ventilated patient from possible complications. Warning Instructions for Use elisa 300-500 | Supplement A | SW 2.09.x | Rev. 11...
- Page 260 Check that the intravesical pressure measurement kit is connect- ed to the correct port and familiarise yourself with intravesical pressure measurement with a closed system. Warning Instructions for Use elisa 300-500 | Supplement A | SW 2.09.x | Rev. 11...
- Page 261 “IAP”. Activate and deactivate the function with the “On” and “Off” buttons. IAP is displayed as a numeric value and as a graphic trend. Instructions for Use elisa 300-500 | Supplement A | SW 2.09.x | Rev. 11...
- Page 262 ≥ 60% = operation with O Algorithms are implemented to compensate variations in the inspiratory oxygen concentration during pneumatic drug nebulization. Observe the intended use of the elisa 300 / elisa 500 instructions for use and the instructions for use of the nebulizer. A 3.7.2...
- Page 263 HME filter manufacturer and/or monitor the patient closely. It is not possible to start nebulization while the AnaConDa func- Remark tion is active; the nebulization function is disabled. Instructions for Use elisa 300-500 | Supplement A | SW 2.09.x | Rev. 11...
- Page 264 Remark Make sure that the nebulizer set is in an upright position. Alternatively, the nebulizer set can be integrated between the HME filter and the tube. Instructions for Use elisa 300-500 | Supplement A | SW 2.09.x | Rev. 11...
- Page 265 To achieve the best possible application of oxygen, volume and pressure during nebulization, the pneumatic nebulizer set should be included in the system test before use. This helps achieve an almost complete compensation for all parame- ters. Instructions for Use elisa 300-500 | Supplement A | SW 2.09.x | Rev. 11...
- Page 266 25/min. In order to prevent frequent switching between inspiratory syn- chronised and permanent nebulization, the device will analyse three consecutive breaths to determine whether the respiratory rate is above or below the value of 25/min. Instructions for Use elisa 300-500 | Supplement A | SW 2.09.x | Rev. 11...
- Page 267 Components which were set to “Off” at the configuration level Remark are not visible in this screen. When the period of service of an accessory has expired, the alarm window will display a message. Instructions for Use elisa 300-500 | Supplement A | SW 2.09.x | Rev. 11...
- Page 268 You can overwrite stored reference loops by selecting the corresponding button and saving another loop. The stored reference loops will be deleted when you select a new patient. A 3.10 Capnometry Instructions for Use elisa 300-500 | Supplement A | SW 2.09.x | Rev. 11...
- Page 269 The CO sensor used must be configured on the configuration level of elisa 300 / elisa 500 in order to be available for CO meas- urement. You can review the current interface configuration on Remark the standby or ventilation screen under the “Status”...
- Page 270 If the main power supply fails, the sensor continues to be powered from the elisa 300 / elisa 500 unit as long as the elisa 300 / elisa 500 battery maintains the ven- tilation function.
- Page 271 Check the temperature of the measuring cuvette. Cold cuvettes Remark may cause fogging of the windows, which may have an adverse effect on the measurement results. Instructions for Use elisa 300-500 | Supplement A | SW 2.09.x | Rev. 11...
- Page 272 Integrate the measuring cuvette between the Y-connector and HME filter close to the patient. After zeroing of the CO sensor, push it on to the measuring cuvette. Instructions for Use elisa 300-500 | Supplement A | SW 2.09.x | Rev. 11...
- Page 273 (e.g., for combination with heated tubing systems). The respective sampling line is first connected to the gas inlet of the sidestream CO sensor and then to the corresponding connection in the breathing circuit. Instructions for Use elisa 300-500 | Supplement A | SW 2.09.x | Rev. 11...
- Page 274 A ventilated patient must not be connected while the sensor is being zeroed. Warning Mainstream method: For zeroing, no CO is allowed in the ventilation system. Warning Instructions for Use elisa 300-500 | Supplement A | SW 2.09.x | Rev. 11...
- Page 275 Set the number of breaths for averaging of the etCO value. Start the measure- ment of the CO sensor by selecting the “On” button and confirm with the Enter button. Instructions for Use elisa 300-500 | Supplement A | SW 2.09.x | Rev. 11...
- Page 276 There are two configuration options for CO measurements: the Remark measurement starts when activated by the user or the measure- ment is activated by default. Instructions for Use elisa 300-500 | Supplement A | SW 2.09.x | Rev. 11...
- Page 277 For the continuous assessment of volumetric capnometry, a special template can be configured which includes the trend data of the determined dead spaces as percentages of the tidal volume and of VCO Instructions for Use elisa 300-500 | Supplement A | SW 2.09.x | Rev. 11...
- Page 278 Upper alarm limit for the expiratory CO concentration etCO Lower alarm limit for the expiratory CO concentration inCO Upper alarm limit for the inspiratory CO concentration Instructions for Use elisa 300-500 | Supplement A | SW 2.09.x | Rev. 11...
- Page 279 Multi-gas sensor LeoLyzer A 3.11.1 Intended use By connecting and activating the LeoLyzer multi-gas sensor, you expand the func- tionality of the elisa 300 / elisa 500 intensive care ventilator by multi-gas meas- urement. The gas measurement options are •...
- Page 280 Connect the sampling line to the airway adapter by turning the line clockwise. Connect the sampling line to the water trap by turning the line clockwise. Instructions for Use elisa 300-500 | Supplement A | SW 2.09.x | Rev. 11...
- Page 281 Via the sample gas outlet, the gas sample can be returned to the breathing circuit or disposed of in the residual gas filter or in the anaesthetic gas scavenging system. Please contact our field service department for the required accessories. Instructions for Use elisa 300-500 | Supplement A | SW 2.09.x | Rev. 11...
- Page 282 Set the number of breaths for averaging of the measured value / values. Start the measurement with LeoLyzer by selecting the “On” button and confirm with the Enter button. Instructions for Use elisa 300-500 | Supplement A | SW 2.09.x | Rev. 11...
- Page 283 When the “New patient” function is selected, the alarm limits for the multi-gas concentration are set to the default values. LeoLyzer auto-calibrates continuously. The user is not required to Remark perform calibrations. Instructions for Use elisa 300-500 | Supplement A | SW 2.09.x | Rev. 11...
- Page 284 A 3.12.1.1 Measurement For details of the SpO measurement, refer to the Instructions for Use, Supple- ment D – Pulse oximetry and LeoClac. Instructions for Use elisa 300-500 | Supplement A | SW 2.09.x | Rev. 11...
- Page 285 A 3.13.1 Intended use elisa 300 / elisa 500 is also suitable for use as an anaesthesia workstation. For the delivery of volatile anaesthetic agents during ventilation, the AnaConDa function is implemented in the device. The AnaConDa function can be enabled at the con- figuration level.
- Page 286 When working with the AnaConDa-S system, the minimum tidal volume applied may not be less than 300 ml. Continuous operation of elisa 300 / elisa 500 is allowed in combination with iso- flurane and sevoflurane. elisa 300 / elisa 500 may only be operated in conjunction with the anaesthetic agents sevoflurane and isoflurane.
- Page 287 Warning A 3.13.2.2 Patient safety elisa 300 / elisa 500 with AnaConDa may only be operated by qualified medical staff in order to guarantee an adequate intervention in the event of a device malfunction. You must undergo training for each system component before you are allowed to use the system for patient treatment.
- Page 288 Electrical connections between the devices are not allowed. Warning Accessories approved for use with elisa 300 / elisa 500 are specified in the “elisa 300 / elisa 500 list of accessories”. If employing different accessories, the user is required to test and demonstrate the safety of the system prior to its use. All...
- Page 289 All components shall only be applied within the scope of their respective intended use. A 3.13.4 Assembly First of all, perform a system test of the elisa 300 / elisa 500. System test A 3.13.4.1 Anaesthetic gas elimination Decide if you want to eliminate the anaesthetic gas via the hospital gas scavenging system or through the anaesthetic gas filter.
- Page 290 Place the anaesthetic gas filter (C) in the holder and unscrew the cap (D). Attach the 22mm/22mm adapter (E) to the exhaust gas port of elisa 300 / elisa 500. Then slip the 22-mm tube from the accessory kit (F) onto the adapter. To do this, remove the 22mm/30mm adapter from the tube;...
- Page 291 • AGSS receiving container with AGSS adapter • AGSS transfer hose • 22mm/22 mm adapter • Connection hose, 5 metres • AGSS coupler for terminal port Instructions for Use elisa 300-500 | Supplement A | SW 2.09.x | Rev. 11...
- Page 292 Attach the receiving container (A) to the handle or standard rail on the left of the cart (B). Attach the 22 mm/22 mm adapter (E) to the exhaust gas port of elisa 300 / elisa 500. Slip the AGSS transfer hose onto the adapter (F). Attach the other end of the hose to the inlet port of the receiving container (G).
- Page 293 If you are using a power strip to connect the devices to mains power, the power strip must comply with the particular electrical safety requirements of EN 60601-1. Warning Check that all connections are secure. Warning Instructions for Use elisa 300-500 | Supplement A | SW 2.09.x | Rev. 11...
- Page 294 If the AnaConDa function is activated while the AnaConDa (or AnaConDa-S) device and/or the residual gas filter are not con- nected, flow control and pressure control of the ventilation will Warning be impaired. Instructions for Use elisa 300-500 | Supplement A | SW 2.09.x | Rev. 11...
- Page 295 Correct AnaConDa system (AnaConDa or AnaConDa-S) selected? Activate the AnaConDa function and perform sedation with AnaConDa (or AnaConDa-S) according to the manufacturer's instructions and clinical circumstances. Instructions for Use elisa 300-500 | Supplement A | SW 2.09.x | Rev. 11...
- Page 296 Remark alarm limits. When adjusting the first alarm limit, the alarm criteri- on will be deactivated. Instructions for Use elisa 300-500 | Supplement A | SW 2.09.x | Rev. 11...
- Page 297 Connect the other end to the appropriate nurse call system. The nurse call function must be configured on the configuration level of elisa 300 / elisa 500 in order to be available for the trans- Remark mission of alarms. Please contact your service technician for de- tails.
- Page 298 A 3.15.3 Function When the nurse call adapter is connected to elisa 300 / elisa 500 and the BF in- terface has been configured accordingly, elisa will send alarms of categories 6 and 7 (“red” alarms) to the hospital nurse call system.
- Page 299 Availability for the different patient categories A 4.3 A 4.3.1 SAT test (Spontaneous Awakening Trial) A 4.4 SBT (Spontaneous Breathing Trial) A 4.4.1 SBT procedure A 4.5 P0.1 A 4.6 Instructions for Use elisa 300-500 | Supplement A | SW 2.09.x | Rev. 11...
-
Page 300: Weaninganalyzer ® | A
The SAT test collects the data for the weanability criteria, supporting the daily screening of the respiratory situation as part of the weaning protocol. Eight ques- tions have to be answered with YES or NO. Instructions for Use elisa 300-500 | Supplement A | SW 2.09.x | Rev. 11... -
Page 301: A 4.4 Sbt (Spontaneous Breathing Trial)
On completion of the SBT, the trend values are frozen and can be referred to and evaluated until the next SBT starts. Instructions for Use elisa 300-500 | Supplement A | SW 2.09.x | Rev. 11... -
Page 302: A 4.4.1 Sbt Procedure
60 SBT starts automatically when all target values by the cycle time remain in the target range for 5 minutes. Instructions for Use elisa 300-500 | Supplement A | SW 2.09.x | Rev. 11... -
Page 303: P0.1
(if configured) is displayed in the meas- urement value table. Depending on the configuration, P0.1 can also be displayed and assessed in the “Fastwean” display. Instructions for Use elisa 300-500 | Supplement A | SW 2.09.x | Rev. 11... -
Page 304: A 4.6 Wob
The parameters POB, POB spont., WOB vent. and WOB spont. are permanently measured and the value measured last is always displayed. (However, this applies to POB and POB spont. only in the PAPS ventilation mode) Instructions for Use elisa 300-500 | Supplement A | SW 2.09.x | Rev. 11... - Page 305 A 5.5.9 Flexible BiLevel A 5.5.10 PC-SIMV A 5.5.11 A 5.5.12 Dynamic PSV A 5.5.13 Proportional PSV A 5.5.14 PAPS (Proportional Adaptive Pressure Support) A 5.5.15 CPAP Instructions for Use elisa 300-500 | Supplement A | SW 2.09.x | Rev. 11...
- Page 306 Volume-adaptive BiLevel A 5.5.22 PC-APRV A 5.5.23 A 5.5.24 ALPV (Adaptive Lung Protection Ventilation) A 5.5.25 WOBOV (Work Of Breathing Optimized Ventilation) A 5.5.26 A 5.5.27 HFOT Instructions for Use elisa 300-500 | Supplement A | SW 2.09.x | Rev. 11...
- Page 307 19223:2019-07 by using the Help function. Tap the Help icon, then select the mode of interest. Under “Detailed Description” you will find the name as defined in the ISO standard 19223:2019-07. Instructions for Use elisa 300-500 | Supplement A | SW 2.09.x | Rev. 11...
- Page 308 A 5.3 Ventilation modes The ventilation modes available depend on the software revision, the device con- figuration and the selected patient settings (e.g., mask, tube, HFOT, etc.). Instructions for Use elisa 300-500 | Supplement A | SW 2.09.x | Rev. 11...
- Page 309 Dynamic BiLevel Dual BiLevel Optional BiLevel Flexible BiLevel PC-SIMV Dynamic PSV Proportional PSV CPAP VC-SIMV Optional VCV Flexible VCV VA BiLevel PC APRV ALPV WOBOV PAPS HFOT Instructions for Use elisa 300-500 | Supplement A | SW 2.09.x | Rev. 11...
- Page 310 Instant View window will not show any plateau measurement. The reading will be presented as “-”. In volume-controlled modes, the pneumatic drug nebulization is Remark not available for the patient category “Children”. Instructions for Use elisa 300-500 | Supplement A | SW 2.09.x | Rev. 11...
- Page 311 Vtmax alarm limit. I-Flow Inspiratory gas flow rate Tplateau Duration of the plateau during the inspiratory phase (No-flow phase) Flow support Extent of the resistance compensation Instructions for Use elisa 300-500 | Supplement A | SW 2.09.x | Rev. 11...
- Page 312 The adjustable ventilation parameters for each mode are summarised in the fol- lowing tables: PEEP Insp. Ramp PS Ramp Pinsp Tinsp Texp PS TImax Exp. trigger PS Endflow Rate Trigger Instructions for Use elisa 300-500 | Supplement A | SW 2.09.x | Rev. 11...
- Page 313 Insp. Ramp PS Ramp Pinsp Tinsp Texp PS TImax Exp. trigger PS Endflow Rate Trigger Byflow Pmax Pmin Flow support Vol. support Diameter Compens. R Compens. C Instructions for Use elisa 300-500 | Supplement A | SW 2.09.x | Rev. 11...
- Page 314 Texp PS TImax Exp Trigger PS Endflow Rate Trigger I-Flow* Tplateau* Byflow Pmax Pmin Height VT/IBW Flow Trigger MV support * as configured I-Flow or Tplateau. Instructions for Use elisa 300-500 | Supplement A | SW 2.09.x | Rev. 11...
- Page 315 The option of setting a mandatory and a spontaneous expiratory Remark pressure ramp must be enabled on the configuration level. Instructions for Use elisa 300-500 | Supplement A | SW 2.09.x | Rev. 11...
- Page 316 Depending on hospital policies, advanced adjustment parameters Remark may be deactivated on the configuration level, which means they are not available for users in the ward. Instructions for Use elisa 300-500 | Supplement A | SW 2.09.x | Rev. 11...
- Page 317 If spontaneous breathing activity does not occur within the cycle time, a mandatory BiLevel breath is triggered. Instructions for Use elisa 300-500 | Supplement A | SW 2.09.x | Rev. 11...
- Page 318 (f x Vt). In patients who stop breathing for short periods of time, the mandatory ventilation compo- nents provide an intelligent back-up system for apnoea ventilation. Instructions for Use elisa 300-500 | Supplement A | SW 2.09.x | Rev. 11...
- Page 319 (f x Vt). In patients who stop breathing for short periods of time, the mandatory ventilation components provide an intelligent back-up system for apnoea ventilation. Instructions for Use elisa 300-500 | Supplement A | SW 2.09.x | Rev. 11...
- Page 320 Although this is a mandatory mode, the patient is allowed to breathe sponta- neously during the inspiration and expiration phase. This enables the patient to increase the minute volume beyond the mandatory values set. Instructions for Use elisa 300-500 | Supplement A | SW 2.09.x | Rev. 11...
- Page 321 The tidal volume delivered is determined by the difference between the lower pressure level (PEEP) and the upper pressure level (Pinsp), and is dependent upon lung elasticity (compliance). Instructions for Use elisa 300-500 | Supplement A | SW 2.09.x | Rev. 11...
- Page 322 The Pmax and Pmin parameters determine a range in which the ventilator is allowed to automatically readjust the necessary pressure to achieve the desired tidal volume. Instructions for Use elisa 300-500 | Supplement A | SW 2.09.x | Rev. 11...
- Page 323 The Pmax and Pmin parameters determine a range in which the ventilator is allowed to automatically readjust the necessary pressure to achieve the desired tidal volume. Instructions for Use elisa 300-500 | Supplement A | SW 2.09.x | Rev. 11...
- Page 324 In contrast to conventional SIMV ventilation, the user defines a minimum minute volume by setting the respiratory rate and tidal volume. No mandatory breaths are initiated if the minute volume can be achieved by the patient's spontaneous Instructions for Use elisa 300-500 | Supplement A | SW 2.09.x | Rev. 11...
- Page 325 Depending on the current lung situation, the ventilator adapts the upper pressure level or the necessary pressure support of spontaneous breathing so that the set tidal volume is applied with the lowest possible inspiratory pressure. Instructions for Use elisa 300-500 | Supplement A | SW 2.09.x | Rev. 11...
- Page 326 This mixed form of ventilation combines a synchronised, pressure-controlled ven- tilation mode to ensure a specified minute volume with the possibility of achieving Instructions for Use elisa 300-500 | Supplement A | SW 2.09.x | Rev. 11...
- Page 327 The pressure rise time from the PEEP value to the PS pressure (PS) can be set via the PS ramp time. The shorter the ramp time, the higher the initial PS flow. Instructions for Use elisa 300-500 | Supplement A | SW 2.09.x | Rev. 11...
- Page 328 The pressure rise time from the PEEP value to the PS pressure (PS) can be set via the PS ramp time. The shorter the ramp time, the higher the initial PS flow. Instructions for Use elisa 300-500 | Supplement A | SW 2.09.x | Rev. 11...
- Page 329 The pressure rise time from the PEEP value to the PS pressure (PS) can be set via the PS ramp time. The shorter the ramp time, the higher the initial PS flow. Instructions for Use elisa 300-500 | Supplement A | SW 2.09.x | Rev. 11...
- Page 330 This ventilation mode relies on a stable respiratory drive. Warning Before activating proportional pressure support, bronchopleural fistulas and endotracheal tubes with a deflated cuff must be ruled out. Warning Instructions for Use elisa 300-500 | Supplement A | SW 2.09.x | Rev. 11...
- Page 331 As a measure to prevent pressure peaks resulting from potential overcompensation, both the upper pressure limit (Pmax) and the alarm limits need to be adapted to the patient condition. Warning Instructions for Use elisa 300-500 | Supplement A | SW 2.09.x | Rev. 11...
- Page 332 In contrast to the conventional PSV pressure support ASB, there is no min- imum support in the presence of little respiratory efforts. That is why the PAPS Instructions for Use elisa 300-500 | Supplement A | SW 2.09.x | Rev. 11...
- Page 333 When the differences exceed a given limit, a yellow “Resistance high” or “Resistance low” alarm will be displayed. Instructions for Use elisa 300-500 | Supplement A | SW 2.09.x | Rev. 11...
- Page 334 CPAP ventilation is a form of ventilation that combines the patient's spontaneous breathing with a constant overpressure (PEEP). The patients themselves can de- termine the depth of their respirations, the rate and the flow. Instructions for Use elisa 300-500 | Supplement A | SW 2.09.x | Rev. 11...
- Page 335 The patient can trigger additional mandatory breaths once the set trigger criterion has been reached. This changes the actual respiratory rate and the res- piratory minute volume. Instructions for Use elisa 300-500 | Supplement A | SW 2.09.x | Rev. 11...
- Page 336 When the pressure limit is reached, a message rather than a me- Remark dium priority alarm is output. Instructions for Use elisa 300-500 | Supplement A | SW 2.09.x | Rev. 11...
- Page 337 The system automatically generates an inspiratory pause (plateau) and its duration depends on the flow and times. The higher the I-Flow, the longer is the pause (plateau interval). Instructions for Use elisa 300-500 | Supplement A | SW 2.09.x | Rev. 11...
- Page 338 No mandatory breaths are initiated if the minute volume can be achieved by the patient's spontaneous breathing. Instructions for Use elisa 300-500 | Supplement A | SW 2.09.x | Rev. 11...
- Page 339 No mandatory breaths are initiated if the minute volume can be achieved by the patient's spontaneous breathing. Instructions for Use elisa 300-500 | Supplement A | SW 2.09.x | Rev. 11...
- Page 340 The Pmax and Pmin parameters determine a range in which the ventilator is allowed to automatically readjust the necessary pressure to achieve the desired tidal volume. Instructions for Use elisa 300-500 | Supplement A | SW 2.09.x | Rev. 11...
- Page 341 SwitchFlow is the expiratory flow which is checked for plausibility and which serves as the criterion for automatic switching to the upper pressure level. The user can adapt this flow to the current clinical situation. Instructions for Use elisa 300-500 | Supplement A | SW 2.09.x | Rev. 11...
- Page 342 Switching between both pressure levels guarantees a mandatory minute volume and facilitates spontaneous breathing at PEEP level on the lower pressure level, which increases the respiratory volume. Additional triggers start additional mandatory breaths. Instructions for Use elisa 300-500 | Supplement A | SW 2.09.x | Rev. 11...
- Page 343 (Pinsp) and lower CPAP level (PEEP) and the set respiratory rate (Rate). The tidal volume achieved depends mainly on the compliance and resistance of the patient's lungs. Instructions for Use elisa 300-500 | Supplement A | SW 2.09.x | Rev. 11...
- Page 344 When setting the parameters to ensure the alveolar minimum Remark ventilation (“Height” or “%MV”), the calculated mandatory rate and the calculated minute volume are displayed in the info bar. Instructions for Use elisa 300-500 | Supplement A | SW 2.09.x | Rev. 11...
- Page 345 After input of the body height, the calculated IBW value is dis- Remark played in the Workbench. Referring to automatic measurements of resistance and compliance, the WOBOV Instructions for Use elisa 300-500 | Supplement A | SW 2.09.x | Rev. 11...
- Page 346 Always use the parameter MV support to adapt the minute vol- ume setting. Do not adapt this setting by changing the patient’s body height (IBW). Warning Instructions for Use elisa 300-500 | Supplement A | SW 2.09.x | Rev. 11...
- Page 347 To continue ventilating the patient after the resuscitation inter- vention • select another mode • check the parameter settings and alarm limits and adapt them Warning to the clinical situation. Instructions for Use elisa 300-500 | Supplement A | SW 2.09.x | Rev. 11...
- Page 348 At the same time, the info bar continuously indicates the duration of the CPR mode. Beginning and end of the CPR ventilation are documented in the trend. Instructions for Use elisa 300-500 | Supplement A | SW 2.09.x | Rev. 11...
- Page 349 Ventilation modes and parameters | A 5 A 5.5.27 HFOT In the High Flow Oxygen Therapy mode, elisa 300 / elisa 500 can also be used as a flow generator for nasal CPAP therapy. For this application, the flow setting determines the therapeutic CPAP level.
- Page 350 Instructions for Use elisa 300-500 Supplement A | SW 2.09.x Language: English Item no.: CM-929001 Rev. 11 2021-01-26 Löwenstein Medical Innovation Niederhöchstädter Str. 62 61476 Kronberg, Germany T. +49 6173 9333-0 F. +49 6173 9333-29 info@loewensteinmedical.com www.loewensteinmedical.com © 2021 Löwenstein Medical Innovation GmbH & Co. KG | All rights reserved. Subject to technical changes.
- Page 351 Mainstream Sensor LeoCap Instructions for Use Supplement B...
- Page 352 The device operates according to the accompanying documentation and the equipment labelling if used according to the accompanying documentation. The device must be inspected at regular intervals. The device must not be used if found to be defective. Damaged, missing, clearly worn out, warped or contaminat- ed parts must be replaced immediately.
- Page 353 Contents General notes About this manual Intended use Order numbers sensor – details Theory of operation General safety instructions Safety information Symbols on the device and on the packaging Sensor operation Installation Connecting the sensor Checking the CO data on the device Functional description of the device Removing the sensor from the patient 4.5.1...
- Page 354 Disposal Maintenance and repair 8.1.1 Device maintenance 8.1.2 Repair Technical data Guidance and manufacturer's declaration Instructions for Use Supplement B – CO Sensor LeoCap Rev. 04...
-
Page 355: General Notes
The sensor is equipped with a reusable, sterilizable airway adapter (for adults/ children, or children/neonates), sensor cable and connector. The LeoCap sensor is only intended for use with the intensive care ventilators of the elisa family (elisa 300 – elisa 800VIT). Order numbers Description Picture Part no. -
Page 356: Co Sensor - Details
Description Picture Part no. Part no. Airway adapter for AZ-480110 0691531 adults/children (sterilizable) Airway adapter for AZ-480120 0691533 children/neonates (sterilizable) Holder LeoCap CO AZ-540615 0691532 sensor “Classic” for attachment to a standard rail Holder LeoCap CO AZ-540645 az-540645 sensor “Standard” for attachment to a standard rail sensor –... -
Page 357: Theory Of Operation
Theory of operation The sensor allows the continuous measurement of the CO concentration in the patient's respiratory airflow by infrared spectroscopy. The method is based on measuring the absorption of infrared light with a certain wavelength by CO molecules. The amount of measured light that passes through the respiratory gas to the sensor serves as the calculation basis. -
Page 358: Safety Information
Refers to dangerous situations which may occur when failing to observe the present instructions for use. “Warning” refers to a situation which may cause injuries to the Warning user or the patient. “Caution” refers to a situation which may cause damage to the Caution equipment. - Page 359 Sensor functions may be affected by equipment operated in the vicinity. Before use, check that the device operates normally when used in the vicinity of other equipment. Warning Keep magnetic objects away from the device. Magnetic objects may distort the waveform and cause incorrect readings. Warning Do not use the device in the vicinity of nuclear magnetic reso- nance equipment.
-
Page 360: Symbols On The Device And On The Packaging
Select the airway adapter taking into consideration the patient weight and ventilation volume. If an inappropriate airway adapter is used, the resistance in the breathing circuit increases, which leads Warning to incorrect measurements. Major changes of the operating temperature and considerable amounts of condensation in the airway adapter may lead to incor- rect measurements. -
Page 361: Sensor Operation
The device fulfils the requirements of Directive 93/42/EEC concerning medical devices , provided it is operated and of Regulation (EU) 2017/745 according to the instructions for use. 0123 is the notified body. Follow the instructions for use! Prohibition sign IP44 Protection class according to DIN EN 60529 The sensor must be disposed of in compliance with Directive 2002/96/ Sensor operation... - Page 362 300 / elisa 500 elisa 600 / elisa 800 Instructions for Use Supplement B – CO Sensor LeoCap Rev. 04...
- Page 363 Always connect type BF equipment to the intensive care ventilator before connecting it to the patient. Warning Be sure to connect the equipment only to the interfaces on the back of the intensive care ventilator intended for the respective purposes. Warning •...
-
Page 364: Checking The Co Data On The Device
The windows in the airway adapter should be arranged vertically with respect to ground. This orientation reduces or completely prevents contamination of the adapter windows by the patient’s Warning secretions. Follow the instructions for use (Basic Manual and Supplement A) of the respective intensive care ventilator. -
Page 365: Removing The Sensor From The Patient
Remark Calibration of the LeoCap sensor is an automatic routine function. Removing the sensor from the patient When removing the sensor, do not hold only the cable or only the sensor. The cable may break or the sensor may be damaged by excessive force. -
Page 366: Troubleshooting
Troubleshooting Problem Possible causes Remedy Environment causes Turn off the devices that electromagnetic inter- cause strong electromagnetic ference interference On the screen of the inten- sive care ventilator, select Measurement is not the “Status” tab and go the performed BF interface was not second view which shows the configured current configuration of the... -
Page 367: Recommended Cleaning Agents And Disinfectants
Application of high temperatures and chemical sterilization tech- niques, including immersion of the device in disinfecting solution is strictly prohibited! Caution Do not allow the pins of the device connector to become wet. This may cause a device failure. The interface cable may be damaged. Caution When disinfecting the interface cable by pulling it through a swab or cloth moistened with disinfectant, do not apply excess tension... -
Page 368: Disinfection Of Reusable Airway Adapters
Disinfection of reusable airway adapters Adapters are supplied non-sterile. Airway adapters must be repro- cessed (resterilized) before and after use. Caution Do not use rough brushes, sharp tools and abrasive materials for manual cleaning! Caution The adapters withstand at least 100 reprocessing cycles (unless damaged during use). -
Page 369: Cleaning And Disinfection
5.2.2 Cleaning and disinfection Recommended cleaning agents and disinfectants Cleaning agents: • Ionic, surface-active substances, 0.5% solution • Neutral soap solution • Neodisher Mediclean forte 1 %, manufacturer: Dr. Weigert Disinfectants: • Lysetol AF and Gigasept FF, manufacturer: Schülke & Mayr •... -
Page 370: Storage
Recommended stages for automated cleaning and disinfection Stage Temperature Duration Pre-rinsing Cold water 3 min Cleaning 65 °C 5 min Neutralizing Hot water 1 min Rinsing Cold distilled water 3 min Thermal disinfection 93 °C 44 min Drying 120 °C 12 min Packaging After cleaning and disinfection, put the adapter in sterile packaging. - Page 371 Disposal At the end of its service life or when its performance deteriorates, the device should be disposed of in compliance with the relevant applicable, local regulations for collection, storage and disposal of hospital waste. Dispose of the packaging material according to the local guidelines and the disposal guidelines valid in your facility.
- Page 372 Technical data Technical data Sensor type mainstream sensor Functional principle Non-dispersive infrared sensor (NDIR) Initialization time 20 s (at an ambient temperature of 25 °C) measuring range 0 – 20 vol% (0 – 150 mmHg) measuring ±(0.2 vol% + 2 % of reading)* or accuracy ±(1.5 mmHg + 2 % of reading)* measurement...
- Page 373 Operating conditions Ambient temperature 10 – 35 °C Relative humidity 10 – 90% (at ambient temperature of 25 °C) Storage conditions Ambient temperature 5 – 40 °C Relative humidity <80 % (at ambient temperature of 25 °C) Atmospheric pres- 390 – 900 mmHg sure Transport conditions Ambient temperature...
- Page 374 Guidance and manufacturer's declaration Electromagnetic environment: Refer to the appropriate chapter in the instructions for use of the connected intensive care ventilator. Electromagnetic emissions Emission Compli- Electromagnetic tests ance environment – guidance The device uses RF energy only for its RF emissions internal function.
- Page 375 ± 2 kV for ± 2 kV for Electrical fast power supply power supply The mains power quality should transient/burst lines lines be that of a typical commercial or hospital environment. IEC 61000-4- ± 1 kV for ± 1 kV for 4:2012 input/output input/output...
- Page 376 Electromagnetic Immunity IEC 60601 Compliance environment – test test level level guidance Portable and mobile RF com- munications equipment should be used no closer to any part of the device, including cables, than the recommended sepa- Conducted RF 3 Vrms ration distance calculated from IEC 61000-4- 150 kHz to 80...
- Page 377 (a) Field strengths from fixed transmitters, such as base stations for radio (cellular/ cordless) telephones and land mobile radios, amateur radio, AM and FM radio broad- cast and TV broadcast cannot be predicted theoretically with accuracy. To assess the electromagnetic environment due to fixed RF transmitters, an electro- magnetic site survey should be considered.
- Page 378 Instructions for Use Supplement B – CO Sensor LeoCap Language: English Item no.: CM-929051 Rev. 04 2021-01-13 Löwenstein Medical Innovation Niederhöchstädter Str. 62 61476 Kronberg, Germany T. +49 6173 9333-0 F. +49 6173 9333-29 info@loewensteinmedical.com www.loewensteinmedical.com © 2021 Löwenstein Medical Innovation GmbH & Co. KG | All rights reserved. Subject to technical changes.
-
Page 379: Instructions For Use Supplement B - Co
Multi-Gas Sensor LeoLyzer Instructions for Use Supplement C... - Page 380 The device operates according to the accompanying documentation and the equipment labelling if used according to the accompanying documentation. The device must be inspected at regular intervals. The device must not be used if found to be defective. Damaged, missing, clearly worn out, warped or contaminat- ed parts must be replaced immediately.
- Page 381 Contents General notes About this manual Intended use Scope of delivery Illustrations Theory of operation General safety instructions Safety information Symbols on the device and on the packaging Colour of the indicator lights and its meaning Operation Installation Connecting the device Sample gas outlet Multi-gas measurement Checking measurements...
- Page 382 Storage and transport Disposal Maintenance and repair Device maintenance 8.1.1 Maintenance schedule 8.1.2 Replacing the water trap 8.1.3 Replacing the rubber O-rings Repair Technical data Guidance and manufacturer's declaration Instructions for Use Supplement C – Multi-Gas Sensor LeoLyzer Rev. 02...
-
Page 383: General Notes
The device is suitable for all patient categories. The device is only intended for use with the intensive care ventilators of the elisa family (elisa 300 – elisa 800VIT) (hereinafter referred to as “intensive care ventilator”). Instructions for Use Supplement C – Multi-Gas Sensor LeoLyzer... -
Page 384: Scope Of Delivery
Scope of delivery Content Multi-gas sensor LeoLyzer Connecting cable Sampling line Airway adapter Water trap Illustrations Device components Instructions for Use Supplement C – Multi-Gas Sensor LeoLyzer Rev. 02... -
Page 385: Theory Of Operation
Front view O-rings LED display Rear view Interface cable connector Sample gas outlet Theory of operation The device allows the continuous measurement of CO , isoflurane and sevoflu- rane gas concentrations in the patient's respiratory air flow by infrared spectros- copy. -
Page 386: General Safety Instructions
The device is connected to the breathing circuit using the airway adapter and the sampling line. An infrared light source and a photo sensor are integrated in the device. The gas mixture to be analysed is conducted through a measuring cell. The light emitted by the infrared light source reaches the photo sensor after passing through the measuring cell. -
Page 387: Safety Information
Reusable consumables have a limited service life. Various operating conditions as well as cleaning, disinfection and sterilization procedures can adversely affect the material and reduce the service life. If signs of deterioration (cracks, deformation, discolouration, paint peeling off, etc.) are detected, you need to replace the con- sumables. - Page 388 Do not carry the device with a full water trap while in use, and do not remove the water trap while the device is operating to prevent liquid getting into the measuring path. Warning Do not turn the device even with a partially filled water trap. This can cause device malfunction.
- Page 389 Measurements may not be performed correctly until several min- utes after connection of the device because the temperature of the device is not yet stable. Caution Use only the specified airway adapter. Otherwise, the maximum performance cannot be guaranteed due to larger dead space, leak- age or an unsafe (electrical) connection, etc.
-
Page 390: Symbols On The Device And On The Packaging
Only healthcare personnel who have read these instructions for use and under- stand its content are allowed to use the device. Symbols on the device and on the packaging Attention, read accompanying documents! Sample gas Serial number Part number Medical Device Unique Device Identification Transport and storage at temperatures from +5 °C to +40 °C This side up... -
Page 391: Colour Of The Indicator Lights And Its Meaning
600 elisa 800 – interfaces on the back elisa 300 elisa 500 – interfaces on the back On the screen of the intensive care ventilator, select the “Status” tab and go the second view which shows the current configuration of the interfaces. -
Page 392: Connecting The Device
Always connect type BF equipment to the intensive care ventilator before connecting it to the patient. Warning Be sure to connect the equipment only to the interfaces on the back of the intensive care ventilator intended for the respective purposes. Warning Connecting the device •... -
Page 393: Sample Gas Outlet
Follow the instructions for use of the respective intensive care ventilator. Caution Sample gas outlet The sample gas outlet is located on the back of the device. Via the sample gas outlet, the gas sample can be returned to the breathing circuit or disposed of in the residual gas filter or in the anaesthetic gas scavenging system. -
Page 394: Zero Adjustment
Zero adjustment The device has an automatic zero calibration function. In the first 10 minutes after the device is switched on, calibrations are carried out every 90 seconds. After this time, zero calibration occurs if the device detects the need for it. In the first half hour after being switched on, the device automatically checks every 5 minutes whether a zero adjustment is required;... -
Page 395: Troubleshooting
4.11 Troubleshooting Problem Possible causes Remedy Turn off the devices that Unsuitable electromag- cause strong electro- netic environment magnetic interference On the screen of the intensive care ventilator, Measurement is not select the “Status” tab performed and go the second view BF interface was not which shows the current configured... -
Page 396: Recommended Cleaning Agents And Disinfectants
Do not reuse disposable accessories that are marked “single use”. Warning Do not sterilize. Caution Do not disinfect the cable by immersion in disinfecting solution. Caution Do not allow the pins of the device connector to become wet. This may cause a device failure. The interface cable may be damaged. Caution When disinfecting the interface cable by pulling it through a swab or cloth moistened with disinfectant, do not apply excess tension... - Page 397 soft cloth moistened with a cleaning agent or disinfectant mentioned above. Squeeze the cloth before wiping down the device to prevent liquid from en- tering the device. Use only distilled water to prepare the cleaning and disinfec- tion solution. Follow the instructions for use from the manufacturer’s of the cleaning agents and disinfectants.
- Page 398 After use, disposable items must be disposed of according to the guidelines valid in the medical facility. Caution Dispose of accumulated fluids and sample gas according to the local guidelines and the guidelines valid in your facility. Caution At the end of its service life or when its performance deteriorates, the device should be disposed of in compliance with the relevant applicable, local regulations for collection, storage and disposal of hospital waste.
- Page 399 Maintenance and repair Device maintenance Before performing any maintenance, ensure that the device and its accessories are properly disinfected. Caution To ensure the proper functioning of the device during its service life, perform regular maintenance. The user of the device is responsible for proper maintenance. Maintenance work is not covered by the warranty of the manufacturer or supplier.
- Page 400 Repair If a problem exists that can only be remedied by disassembling the electronic components, the device must be sent to an authorized service centre where repairs will be carried out by specialized technicians and with the appropriate equipment. Before sending the device to the service centre, check that it was properly disinfected.
- Page 401 Response time 2.5 s (sampling line 200 cm, sample flow rate (may vary with sample flow rate) 250 ml/min) Rise time 0.5 s Respiratory rate 0 – 160 breaths per minute Acceptable absolute accuracy of atmos- ± 2 mmHg pheric pressure Calibration No user calibration required Electrotechnical data...
- Page 402 The following factors may impair the CO , ISO and SEV measuring accuracy: Remark • mechanical damage of the device • cyclical pressure peaks of up to 10 kPa (100 cmH • leakage or internal venting of the sampled gas The respiratory rate (RR) has no influence on the measuring accu- Remark racy of the CO...
- Page 403 Electromagnetic immunity: Immunity IEC 60601 Compliance Electromagnetic environment – test test level level guidance Electrostatic Floors should be wood, concrete discharge or ceramic tile. If floors are (ESD) ± 8 kV contact ± 8 kV contact covered with synthetic material, ±...
- Page 404 NOTE 1 At 80 MHz and 800 MHz, the higher frequency range applies. NOTE 2 These guidelines may not apply in all situations. Electromagnetic propagation is affected by absorption and reflection from structures, objects and people. (a) Field strengths from fixed transmitters, such as base stations for radio (cellular/ cordless) telephones and land mobile radios, amateur radio, AM and FM radio broad- cast and TV broadcast cannot be predicted theoretically with accuracy.
- Page 405 For transmitters rated at a maximum output power not listed above, the recommend- ed separation distance D in metres (m) can be estimated using the equation applicable to the frequency of the transmitter, where P is the maximum output power rating of the transmitter in watts (W) according to the transmitter manufacturer.
- Page 406 Instructions for Use Supplement C – Multi-Gas Sensor LeoLyzer Language: English Item no.: CM-929081 Rev. 02 2021-01-13 Löwenstein Medical Innovation Niederhöchstädter Str. 62 61476 Kronberg, Germany T. +49 6173 9333-0 F. +49 6173 9333-29 info@loewensteinmedical.com www.loewensteinmedical.com © 2021 Löwenstein Medical Innovation GmbH & Co. KG | All rights reserved. Subject to technical changes.
- Page 407 Pulse Oximetry and LeoClac Instructions for Use Supplement D...
- Page 408 The device operates according to the accompanying documentation and the equipment labelling if used according to the accompanying documentation. The device must be inspected at regular intervals. The device must not be used if found to be defective. Damaged, missing, clearly worn out, warped or contaminat- ed parts must be replaced immediately.
- Page 409 Contents About this manual XPOD SpO sensor adapter Intended use Areas of application General safety instructions 2.3.1 Safety information Connection to the devices elisa 600 – elisa 800 (VIT) Cleaning Disposal Nonin finger sensor Intended use Areas of application General safety instructions 3.3.1 Safety information Connection to the devices elisa 600 –...
-
Page 410: About This Manual
About this manual These instructions for use describe the pulse oximetry and the LeoClac functions. The manufacturer reserves the right to further develop the functions and/or car- ry out changes in terms of technical progress. The manufacturer's contact details are stated on the back cover. If you intend to use the pulse oximetry function of intensive care ventilators elisa 600 - elisa 800 (VIT), you will need the XPOD SpO sensor adapter and a... -
Page 411: Areas Of Application
Areas of application • Do not use during magnetic resonance imaging or in an MR environment. • Do not use in hyperbaric oxygen therapy chambers. • Do not use in an explosive atmosphere or in the presence of flammable anaesthetics or gases. Warning •... -
Page 412: Connection To The Devices Elisa 600 - Elisa 800 (Vit)
Carefully route patient cables and connections to reduce the pos- sibility of entanglement or strangulation. Warning A functional tester cannot be used to assess the accuracy of an finger sensor. Caution Always inspect the device before use. Do not use a damaged de- vice. -
Page 413: Cleaning
Connect the XPOD SpO sensor adapter to the configured BF interface on the back of the ventilator. finger sensor sensor adapter Back Select the finger sensor size suitable for the patient. Connect the SpO finger sensor to the XPOD SpO sensor adapter. -
Page 414: Disposal
Disposal In compliance with the European Directive on Waste Electrical and Electronic Equipment (WEEE) 2002/96/EC, do not dispose of this product as unsorted mu- nicipal waste. Observe the local regulations and recycling instructions regarding disposal and recycling of the XPOD SpO sensor adapter. -
Page 415: Safety Information
“Warning“ refers to a situation which may cause injuries to the user or the patient. Warning “Caution” refers to a situation which may cause damage to the Caution equipment. 3.3.1 Safety information Always inspect the finger sensor before use. Do not use a dam- aged finger sensor. -
Page 416: Cleaning
Cleaning Wipe the finger sensor clean with a soft cloth. Use one of the recommended disinfectants for disinfection: • Chloroxylenol 3.0% • Disinfectant wipes (Lysol) Dry the finger sensor with a soft cloth or allow to air dry. Do not sterilize, autoclave or immerse the device in liquid of any kind. -
Page 417: Patient Safety
Patient safety The pulse oximetry function integrated in the elisa ventilator pro- vides additional information for the assessment of the ventilated patient. This information is not suitable as the sole basis for estab- lishing a diagnosis or making a therapeutic decision. The overall assessment with respect to diagnosis and therapy is the respon- sibility of the physician who is familiar with the possibilities and Warning... -
Page 418: Function
Function • Use the XPOD SpO sensor adapter to connect the SpO sensor to the inten- sive care ventilator (see chapter 4) • Apply the finger clip to the patient at a suitable site • Select the SpO function • Set pulse wave averaging •... -
Page 419: Safety Instructions
Safety instructions Observe the instructions and warning of the pulse oximetry chap- ter. Do not employ the automatic closed-loop control function if the clinical situation of the ventilated patient suggests a reduced Warning significance or accuracy of the SpO measurement. Activate the LeoClac function only when the patient condition warrants the continued acquisition of the SpO signal. -
Page 420: Application
Application Permanently adapting the inspired oxygen concentration to the patient require- ments is of particular importance in ventilation medicine. To prevent conditions of hypoxia as well as hyperoxia, the user is normally guided by non-invasive pulse oximetry data and spot-check measurements of the gas exchange by BGA. The LeoClac function assists clinical users in their routine tasks: they first define a range for the closed-loop control system regulating the inspiratory O level, then... - Page 421 • When the SpO signal is disturbed by low perfusion, artefacts or other prob- lems, the LeoClac function stops immediately. The corresponding alarm enables the user to respond to the situation by analysing and resolving the problem. If necessary, the inspired oxygen concentration can be readjusted manually. The user can define additional alarms for “O ctrl.
- Page 422 Besides the absolute alarm limits for the SpO value, the activated LeoClac func- tion can provide the user with relevant information about impending major SpO deviations when the alarm limits for “+SpO ctrl. min/max” are additionally de- fined. Alarm limits Upper alarm limit referred to the parameter “Target SpO ”...
- Page 423 - This page is intentionally left blank. - Instructions for Use Supplement D – Pulse Oximetry and LeoClac Rev. 01...
- Page 424 Instructions for Use Supplement D – Pulse Oximetry and LeoClac Language: English Item no.: CM-929611 Rev. 01 2021-01-13 Löwenstein Medical Innovation Niederhöchstädter Str. 62 61476 Kronberg, Germany T. +49 6173 9333-0 F. +49 6173 9333-29 info@loewensteinmedical.com www.loewensteinmedical.com © 2021 Löwenstein Medical Innovation GmbH & Co. KG | All rights reserved. Subject to technical changes.
- Page 425 300 elisa 500 elisa 600 elisa 800 elisa 800 External Communication Instructions for Use Supplement E...
- Page 426 Contents General information About this manual General safety instructions Schematic diagram elisa 600 – elisa 800 VIT External communication interfaces with Salvia protocol Introduction Layout of the external communication interfaces External medical equipment interface elisa@megs Interface specification 2.4.1 Configuration of the external receiving interface 2.4.2 EC Interface SALVIA 2.4.3...
-
Page 427: General Information
The present document “External Communication” is Supplement E to the In- structions for Use of the intensive care ventilators mentioned above. For specific details of the devices elisa 300 – elisa 800VIT, please refer to the corresponding Basic Instructions for Use. -
Page 428: Schematic Diagram Elisa 600 - Elisa 800 Vit
Schematic diagram elisa 600 – elisa 800 VIT Instructions for Use Supplement E – External Communication, Rev. 02... - Page 429 Schematic diagram elisa 300 – elisa 500 Instructions for Use Supplement E – External Communication, Rev. 02...
-
Page 430: External Communication Interfaces With Salvia Protocol Introduction
Layout of the external communication interfaces The devices elisa 300 – 800 VIT are equipped with a number of different commu- nication interfaces. The interfaces are located at the back of the devices. Instructions for Use Supplement E – External Communication, Rev. 02... - Page 431 Rear view of elisa 300 / elisa 500 elisa 300 elisa 500 Detailed view of the interfaces: Illustration Designation Assignment A and B PDMS/Monitor configurable for PDMS Salvia proto- col or PDMS Philips protocol 1 and 2 Type BF serial interface...
- Page 432 Rear view of elisa 600 Rear view of elisa 800 Instructions for Use Supplement E – External Communication, Rev. 02...
-
Page 433: External Medical Equipment Interface Elisa@Megs
Philips protocol. They can be used in parallel, which means, for example, that elisa 300 – 800 VIT can be integrated in a patient data management system and at the same time, measured values, configuration parameters and alarm data can be transferred to a patient monitor via one of the other interfaces. -
Page 434: Interface Specification
Interface specification 2.4.1 Configuration of the external receiving interface The receiving system must have a serial interface that corresponds to the speci- fied communication interface of the elisa (or elisa@megs). You may have to use an adapter for the 9-pin SUB-D socket (female) to connect the elisa (or elisa@megs) to the receiving system (hospital monitor or hospital information system). -
Page 435: Viewable Information
Viewable information The scope of viewable information depends on whether you use the SALVIA protocol or the Philips protocol. For a detailed specification of the SALVIA protocol with all the ventilation modes, parameters, measurements, ventilation curves, Remark and alarms that can be transmitted, please refer to this document: Salvia_Serial_Protocol_1_0_1_3.pdf For a detailed specification of the Philips protocol with all the ventilation modes, parameters, measurements, and alarms that can... - Page 436 Instructions for Use Supplement E – External Communication Language: English Item no.: CM-930601 Rev. 02 2020-01-26 Löwenstein Medical Innovation Niederhöchstädter Str. 62 61476 Kronberg, Germany T. +49 6173 9333-0 F. +49 6173 9333-29 info@loewensteinmedical.com www.loewensteinmedical.com © 2020 Löwenstein Medical Innovation GmbH & Co. KG | All rights reserved. Subject to technical changes.
- Page 437 Medical Equipment Interface elisa@megs Instructions for Use Supplement F...
- Page 438 The device operates according to the accompanying documentation and the equipment labelling if operated, maintained and repaired according to the accom- panying documentation. The device must be inspected at regular intervals. The device must not be used if found to be defective. Damaged, missing, clearly worn out, warped or contaminated parts must be replaced immediately.
- Page 439 Contents General notes About this manual Safety information in these instructions for use Intended use Safety instructions General safety instructions 3.1.1 Safety standards Components and assembly System overview Mounting the device Connection Operating elisa@megs Ports Port using the Philips protocol Port using the Salvia protocol Cleaning, disinfection, disposal General information...
- Page 440 - This page is intentionally left blank. - Instructions for Use Supplement F – elisa@megs Rev. 03...
-
Page 441: General Notes
General notes About this manual These instructions for use describe the intended use and the operation of the following product: Medical equipment interface elisa@megs The manufacturer reserves the right to further develop the device and/or carry out changes in terms of technical progress. The manufacturer's and distributor's contact details are stated on the back cover. -
Page 442: Use
It is impossible to control the devices elisa 300 to 800 via the medical equipment interface elisa@megs. The device is only approved for use with the devices elisa 300, 500, 600, 800 and 800 VIT. Instructions for Use Supplement F – elisa@megs... -
Page 443: Safety Instructions
Before putting the system into operation, users must familiarise themselves with these Instructions for Use, with the Basic Instructions for Use of elisa 300 to 500 or 600 to 800 and with the Instructions for Use Supplement E “External Communication”. -
Page 444: Safety Standards
Electromagnetic compatibility: elisa@megs is only intended for use in an electromagnetic environment in which radiated RF disturbances are controlled. The user of elisa@megs can contribute towards avoiding electromagnetic interference by maintaining the minimum dis- tance between portable and mobile high frequency communications equipment (transmitter) and elisa@megs. - Page 445 It is not permitted to connect the ventilator to the terminal device Warning via a network. Do not make any treatment-related decisions solely on the basis Warning of the transmitted parameters. Always refer to the parameters on the display of the ventilator in addition. If the terminal device indicates ventilation alarms, you need to de- Warning termine and eliminate the root cause at the patient.
-
Page 446: Components And Assembly
Components and assembly System overview Perspective views Front view Rear view showing bracket for attach- ment to standard rail Port connecting to the BF interface of elisa Top view Bottom view Mounting the device Use the bracket to secure the elisa@megs to the standard rail of the optional cart or to any other standard rail. -
Page 447: Connection
“Status” tab when you swipe to the second view. Use only one of the type BF data interfaces. Do not use one of Note the PDMS interfaces. Rear view of elisa 300 / elisa 500 elisa 300 elisa 500 Detailed view of the interfaces:... - Page 448 Rear view of elisa 600 Rear view of elisa 800 Detailed view of the interfaces: Picture Assignment 1 and 2 Type BF serial interface (blue colour coding) (configurable) Instructions for Use Supplement F – elisa@megs Rev. 03...
-
Page 449: Operating Elisa@Megs
Operating elisa@megs Ports Port 1 = Philips protocol Ports 2-5 = Salvia protocol Port using the Philips protocol Devices using the Philips protocol can be connected to port 1. If you need more information, please contact your service technician or the man- ufacturer. -
Page 450: Cleaning, Disinfection, Disposal
Cleaning, disinfection, disposal General information Important safety precautions: • Observe the instructions for use and data sheets of the clean- ing agents and disinfectants. Warning • Wear protective gloves and safety goggles. • Do not inhale fumes. Avoid damage: • Do not use any organic, halogenated or mineral oil based sol- vents, volatile anaesthetics, glass cleaners, acetone, sharp or abrasive cleaning agents, e.g., steel wool, silver polish or silver... -
Page 451: Disposal Of Elisa@Megs
The outer packaging (box) can be disposed of in the waste paper. Technical data General Application Use: Medical equipment interface for devices elisa 300 to elisa 800 VIT Area: Intensive care, recovery room, ventilation in general Use: stationary Dimensions and weight... -
Page 452: Guidance And Manufacturer's Declaration
IP22: Protected against solid objects with a diameter over 12.5 mm Note and against falling drops of water when the housing is tilted at an angle up to 15°. At high humidity levels, it is not possible to completely rule out condensation. - Page 453 Electromagnetic immunity: elisa@megs is intended for use in the electromagnetic environment specified below. It is the responsibility of the customer or user to ensure that elisa@megs is operated in such an environment. Electromagnetic Immunity IEC 60601 Compliance environment – test test level level guidance...
- Page 454 Electromagnetic Immunity IEC 60601 Compliance environment – test test level level guidance Portable and mobile RF communications equipment should be used no closer to elisa@megs, including cables, than the recommended separation distance calculated from the equation applicable to the frequency of the transmitter. 10 V d = 1.2√P 150 kHz to 80 MHz...
- Page 455 This is why an additional factor of 10/3 is used in order to calculate the recom- mended distance for transmitters in these frequency ranges. Field strengths from fixed transmitters, such as base stations for radio (cellular/ cordless) telephones and land mobile radios, amateur radios, AM and FM radio broadcast and TV broadcast cannot be predicted theoretically with accuracy.
- Page 456 Instructions for Use Supplement F – elisa@megs Language: English Item no.: CM-930501 Rev. 03 2021-01-26 Löwenstein Medical Innovation Niederhöchstädter Str. 62 61476 Kronberg, Germany T. +49 6173 9333-0 F. +49 6173 9333-29 info@loewensteinmedical.com www.loewensteinmedical.com © 2021 Löwenstein Medical Innovation GmbH & Co. KG | All rights reserved. Subject to technical changes.
- Page 457 Instructions for Use Compendium elisa 300-500 | SW 2.09.x Language: English Item no.: CM-932101 Rev. 01 2021-02-01 Löwenstein Medical Innovation Niederhöchstädter Str. 62 61476 Kronberg, Germany T. +49 6173 9333-0 F. +49 6173 9333-29 info@loewensteinmedical.com www.loewensteinmedical.com © 2021 Löwenstein Medical Innovation GmbH & Co. KG | All rights reserved. Subject to technical changes.
Need help?
Do you have a question about the elisa 300 and is the answer not in the manual?
Questions and answers