Advertisement
Quick Links
Advertisement

Related Manuals for Ultenic U10


Summary of Contents for Ultenic U10
- Page 1 User Manual U��...
- Page 2 注意事項: 本製品をご使用になる前に、本説明書のすべての内容をよくお読みください。 洗剤、灯油、割れたガラス、針、すす、濡れたもの、汚れた水、マッチなどを掃除機で吸い込まな いでください。 セメント、石膏、建材など、おもちゃのボールなど大きなものを掃除機で吸い込むと、掃除機の詰 まりやモーターの焼損などの故障の原因になりますので、な控えください。 掃除機は、火や高温になる場所には近づけないでください。 掃除機を使用する際は、フィルター組立と床ブラシヘッドのローラーブラシを必ず取り付けてくだ さい。 掃除機を使用する際には、吸込口を塞いだり、ローラーブラシの回転を妨げたりすると、モーター の故障の原因となりますので、ご注意ください。 ショートや製品焼損を避けるために、水やその他の液体を掃除機で吸い込まないでください。 新しい電池を使用するとき、または長期保管後に使用する場合は、電池を十分に充電してください。 長期間使用しない場合は、少なくとも3か月に1回電池を充電し、放電することを確かめて下さい。 掃除機が完全に充電され、清掃され、整備されることが必要になったら、速やかに充電器のプラグ を抜き、電源コードで引っ張らないでください。 掃除機を清掃するときは、乾いた布で拭いてください。ガソリンやシンナーなどのクリーナーは、 ハウジングにひびが入ったり、変色の原因になることがありますので使用しないでください。 掃除機を高温や低温などの極端な環境で使用したり、保管したりしないでください。掃除機は室内 で0~40℃の温度で使用することをお勧めします。涼しく乾燥した場所に保管し、長時間日光に当 てないようにしてください。 子供に本製品使用させたり、遊ばせたりしないでください。 満充電しても動作しない場合は、指定のサービスセンターで点検・修理を行ってください。許可な く分解しないでください。 古い電池パックは安全にリサイクルし、通常のゴミに捨てないでください。 電源コードが破損している場合は、危険を避けるために、メーカーの現地サービスセンターまたは 専門店から交換をします。...
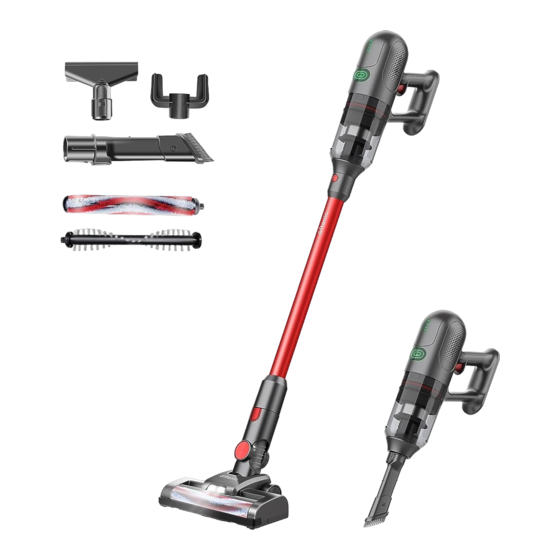
- Page 3 部品名 バッテリーパック バッテリーパックリリース 電源インジケーター ギヤインジケーターボタン ホコリセンサーインジケーター オン/オフスイッチ ダストコンテナ組立 リリースボタン 2-in-1吸引ブラシ ソファ吸引ブラシ アクセサリーラック 金属管組立 壁掛けブラケット リリースボタン 充電アダプター 床ブラシ組立 清潔ブラシ ホコリセンサーのインジケーターが点灯します: 1. 緑色はきれいであることを示しています 2. 赤色はゴミが多いことを示しています...
- Page 4 取り付け バッテリーパックの取り付け 「カチッ」というロック音が聞こえるまで、バ ッテリーパックを本体後部に差し込みます。正 しい方向に入っていることを確認します。 (1) ダストコンテナの設置 最初にダストコンテナをハンドヘルドユニット に入れ、ロックされるまで矢印の方向に回転さ せます。 (2) 床ブラシの接続 「カチッ」というロック音が聞こえるまで、床 ブラシを金属管に挿入します。 床ブラシ、金属管、ハンドヘルド 部品間の接続 金属管を本体に取付ける際は、「カチッ」とい うロック音が聞こえるまで金属管のプラグエン ドをハンドヘルド部品のソケットに差し込んで (4) ください。 床ブラシとハンドヘルド部品 の接続 「カチッ」というロック音が聞こえるま で、床ブラシをハンドヘルドコンポーネ ントに挿入します。 (5)...
- Page 5 アクセサリーとハンドヘルド部品の接続 「カチッ」というロック音が聞こえるまで、 アクセサリーをハンドヘルドコンポーネント に挿入します。 (6) アクセサリーと金属管コンポーネントの 接続 アクセサリーを金属管に取り付ける際は、「カチッ」 というロック音が聞こえるまで金属管に挿入してください。 (7) 本製品の保管 ラックを壁に固定し、装置の後部をラックに挿入し、金属管 上のアクセサリーラックにアクセサリーを挿入します。 注意事項: 1. 洗浄したフィルター組立部品は、乾燥後にのみ組み立てて (8) 、正常に使用できます。 �. フィルター組立部品は洗浄できます。最適な洗浄性能を得 るには、ダストコンテナのゴミを捨て、時間内にフィルタ ー組立部品を洗浄してください。フィルター組立部品は、 約10回使用した後に清掃してください。しかし、本製品の 性能を維持するために、本製品の使用状況に応じて3~6ヶ 月ごとにフィルター組立部品を交換することをお勧めしま す。...
- Page 6 取り外し 金属管の取り外し 金属管のリリースボタンを押して、金属管を 引き抜くだけです。 (9) 床ブラシの取り外し 床ブラシユニットのリリースボタンを押して 、床ブラシを引き出します。 (10) ダストコンテナの取り外し ダストコンテナを矢印の方向に回転させます。 ダストコンテナの上部がハンドヘルドユニット から離れると、ハンドヘルドユニットからダス トコンテナを取り外すことができます。 (11) 電池パックの取り外し バッテリーパックリリースボタンを押し、バッ テリーパックを手で持ち、バッテリーパック組 を引き出します。 (12) 注意: 1. バッテリー容量が減少し、本製品の使用時間が短くなった場合は、新しいバッテリーパックを購入 して交換できますので、新しく製品を購入する必要はありません。 2. バッテリーパックは本製品でしか使用できず、他の用途には使用できず、付属の充電アダプターで しか充電できません。バッテリーパックを分解したり、液体に接触させたりしないでください。バッ テリーパックを高温のものや火気のあるところに近づけたり、鋭利なものを入れたりしないでくださ い。 3. 子供がバッテリーパックを使用したり、遊んだりしないようにしてください。...
- Page 7 使用方法 本製品の起動と停止: 床ブラシが接続されている場合は、電源スイッチを押すとオートモードになり、通常の清掃に使 用できます。本製品は地面のほこりの量に応じて自動的にモーターの力を調節し、本製品のホコ リセンサーは同時に色を変えます(ほこりのない地面を掃除するときモーターの速度は低速に変 わり、消費電力は減り、電量は長持ちします);電源スイッチを再度押して、カーペット、内部の すき間および他の地面をきれいにするのに使用するより強い吸引の強力モードに切り換えます;本 製品をオフにするには再度電源スイッチを押して下さい。 床ブラシが接続されていないときは、電源スイッチを押すとオートモードになります(このとき 、本製品には自動調整機能がないので、集塵のための固定力でしか使用できません);電源スイッ チを再度押すと、本製品はカーペットや隙間などの地面をきれいにするより強い吸引の強力モー ドに切り替わります;電源スイッチを再度押すと、本製品はオフになります。 アクセサリーの使用 2-in-1アクセサリーを金属管または本体 に挿入し、 固定します。 2-in-1アクセサリーのブラシヘッドを押し戻します 。「カチッ」という音がしたら固定され、隅や階段 、キーボードなどの隙間を掃除します (13) 2-in-1アクセサリーのブラシヘッドを前方に押し出しま す。「カチッ」という音がすると固定され、家具や本 棚、カーテンなど掃除しにくい場所も掃除できるよう になります。 (14) 2-in-1アクセサリーを金属管に差し込んで、天井のお掃 除をします。 (15)...
- Page 8 電動床ブラシの使用方法 電動床ブラシは、短毛のカーペットや硬い床、タイルの上、車のシートやフットマットの上などにも 掃除機をかけることができます。 (16) 掃除機の充電について バッテリーパックが完全に充電されする後、本製品のオン/オフスイッチを押すと、バッテリーパック の上の3つの電源インジケーターランプが緑色に点灯し、バッテリーの電力が低下すると電源インジ ケーターランプが1つずつ消えていきます。 掃除機の電源が低下した場合は、速やかに充電してください。電圧が低すぎると、バッテリーを保護 するために自動的に電源が遮断されます。 この時、掃除機を充電する必要があります。 充電アダプターをAC電源ソケットに差し込み、出力端をバッテリーパックの充電ソケットに差し込ん でください。 バッテリーパック組の充電インジケーターランプが同時に点滅し、掃除機が充電中であることを示し ます(充電アダプターの入力電圧は100~240V、出力電圧はDC26Vです)。掃除機の充電器で他の家 電製品を充電しないでください。 充電インジケーター 充電ソケット 充電プラグ 充電アダプター (17) バッテリーパックの3つの電源インジケータランプがすべて緑色になると、掃除機のバッテリーは完 全に充電されます。 充電器をACコンセントから速やかに抜いてください(充電アダプターの出力がいっぱいになったら抜 いてください)。 注意: 1. 充電インジケーターランプが1秒間に2回の頻度で急速に点滅した場合は、サービスセンターに送っ てメンテナンスを受けてください。 2. 掃除機には特殊な充電遮断機能があります:掃除機の充電中は、スイッチボタンを押しても掃除機 を起動できません...
- Page 9 清掃と部品交換 HEPAフィルターは、掃除機の販売店で購入できます ダストボックスは使用後すぐに清掃することをお勧めします。 過剰な量のホコリが蓄積され、フィルタースポンジが詰まっている場合は、すぐに掃除して、必要に 応じて交換することができます。 長時間使用していると、ローラーブラシに髪の毛などの長い毛が絡まることがあるので、効果的に機 能するように掃除してください。 ダストボックスとフィルターシステムの清掃 ダストコンテナ組を図の矢印の方向に回 片手でダストコンテナを持ち、もう片方の手 転させ、ダストコンテナを取り出します。 でフィルタ組の金属ハンドルを握ってダスト (図18) 容器のフィルタ組立を取り出します。(図19) (18) (19) 図の矢印の方向に沿ってフィルタースポンジ ダストコンテナ(図20)からほこりを流 を取り出し、スポンジの洗浄や交換ができま します す。(図21) (20) (21) 清潔にしたHEPAフィルターは、風通しの良い フィルタ組立を取り外して清掃します。 場所に置いて乾燥させてから使用してくださ (図 22) い。(図23) (22) (23) 図の方向に沿ってフィルター部品とHEPAフィルターを取り出し、清掃(必要に応じて交換)した 後、逆の順序で組み立てます。...
- Page 10 ローラーブラシの清掃 床ブラシローラーカバーを外側で留めます。(図 24) ローラーブラシを溝から外して清掃します(洗浄不可)。(図25) ブラシIRセンサーのプローブに汚れが付着している場合は、清掃してください。(図26) 洗浄または交換したら、分解と逆の順序でブラシカバーを組み立て、ブラシカバーをリセット します。 (24) (25) (26) ローラーブラシ ローラーブラシカバー ローラーブラシカバー 赤外線センサー お問い合わせ 問題 原因 解決策 モーターが回らない バッテリーが切れています。 掃除機を充電してください。 ダストコンテナ内がホコリだら ダストコンテナ内のホコリを空にし、ダ けになっています。 ストコンテナの吸気口フィルターを清掃 ダストコンテナ器の吸気口のフ するか、交換してください。 ィルターが粉塵でいっぱいにな 吸引力の低下 電動床ブラシに付着しているものを清掃 っている。 してください。 電動床ブラシの空気導入管が詰 まっている、またはローラーブ ラシが詰まっている。 充電中に充電インジ 充電端子がバッテリーパックの 充電端子をバッテリーパックの充電側に ケータが点滅しない 充電端に完全に挿入されてい 完全に差し込んでください。...
- Page 11 技術的なパラメータ 定格電圧 DC ��.� V 定格入力電力 ���W 充電器の定格入力電圧 ���-���V ~ ��/��Hz 充電器の定格出力電圧 DC ��V 充電時間 �-�h 利用時間 ��-��min...
- Page 12 Precaution Please read all contents of this manual carefully before using this product. Please do not use the vacuum cleaner to vacuum detergents, kerosene, broken glasses, needles, soot, wet items, sewage, matches, etc. Please do not use the vacuum cleaner to vacuum cement, plaster, building materials etc., or toy balls and other large objects, as these can cause failures such as the vacuum cleaner being blocked, the motor burning out, etc.
-
Page 13: Product Overview
Product Overview Battery pack Battery pack release Power indicator Gear indicator button Dust sensor indicator On/Off switch Dust container Release button �-in-� fl at brush Sofa brush Accessory rack Metal tube Wall-mount bracket Release button Power adapter Floor brush Cleaning tool The dust sensor indicator light: �. - Page 14 Assembly Installation of the battery pack Insert the battery pack into the rear of the body until you hear a "click" locking sound. (Fig. 1) Check it goes in the right way (1) Installation of the dust container First put the dust container into the hand-held unit, and then rotate it in the direction of the arrow until it is locked (Fig.
- Page 15 Connection between accessories and handheld components Insert the accessory into the handheld component until you hear the "click" lock sound. (Fig. 6) (6) Connection between accessories and metal tube components When installing the accessories onto the metal tube, please insert it into the metal tube assembly until you hear the "click"...
- Page 16 Disassembly Removal of the metal tube First press the release button on the metal tube, and then just pull out the metal tube. (Fig. 9) (9) Removal of the floor brush First press the release button on the floor brush unit, and then just pull out the floor brush.
- Page 17 How to use Starting and shutting down of the machine: 1. When the floor brush is connected, press the power switch, and the machine will start and default to the automatic working mode, which can be used for normal cleaning of the ground. The machine will automatically adjust the motor power according to the volume of dust on the ground, and the dust sensor indicator light on the machine body will change colour at the same time (when cleaning dust-free ground, motor speed will change to low speed, the power...
- Page 18 Note: 1. When the charging indicator light flashes rapidly at a frequency of 2 times per sec, please contact Ultenic Support and Service via Email. 2. The vacuum cleaner has special charging cut-off function: when the vacuum cleaner is charging,...
- Page 19 Cleaning & Part Replacement The filters can be bought from the Ultenic official store in Amazon. It is recommended to clean the dust container immediately after each use. When an excessive amount of dust are accumulated, and the filter sponge is blocked, it needs to be cleaned immediately, and can be replaced if necessary.
- Page 20 Cleaning the roller brush Toggle the floor brush roller cover outward. (Fig. 24) Remove the roller brush from the slot to clean it (not washable).(Fig. 25) Clean the brush IR sensor probe if there is any fine dirt attached to it. (Fig. 26) Once cleaned or replaced, assemble the brush cover in reverse order of disassembly and reset the brush cover.
-
Page 21: Technical Parameters
Technical Parameters Rated voltage DC ��.� V Rated input power ���W Charger rated input voltage ���-���V ~ ��/��Hz Rated output voltage of charger DC ��V Charging time �-�h Usage time ��-��min... -
Page 22: Customer Service
Customer Service service-us@ultenic.com United States service-de@ultenic.com Deutschland service-fr@ultenic.com France España service-es@ultenic.com service-ca@ultenic.com Canada United Kingdom service-uk@ultenic.com service-it@ultenic.com Italia service-jp@ultenic.com 日本...
Need help?
Do you have a question about the U10 and is the answer not in the manual?
Questions and answers