Elmira Stove Works NORTHSTAR 1954 Installation And Operating Instructions Manual
Electric ranges; dual fuel ranges; gas ranges
Hide thumbs
Also See for NORTHSTAR 1954:
- Installation and operating instructions manual (32 pages) ,
- Installation and operating instructions for (32 pages) ,
- Features and specifications (1 page)
Table of Contents
Advertisement
Quick Links
Installation and Operating Instructions for
NORTHSTAR
Electric Ranges
Dual Fuel Ranges
NOTE: COOLING FAN
When the oven is heated,
a fan turns on to moderate the
temperature of the switches. The
fan will automatically shut off
when the oven cools.
This is a normal part of the
stove's operation.
Thank you for purchasing a Northstar Retro Range.
You have purchased a quality, world-class product.
Years of engineering experience have gone into its manufacturing.
To ensure that you will enjoy many years of trouble-free
operation, we have developed this User Guide.
It is full of valuable information on how to operate and maintain
your range properly and safely. Please read it carefully.
Gas Ranges
(Model 1954)
(Model 1947 & 1955)
(Model 1956)
#1704 -22
Advertisement
Table of Contents

Related Manuals for Elmira Stove Works NORTHSTAR 1954


Summary of Contents for Elmira Stove Works NORTHSTAR 1954
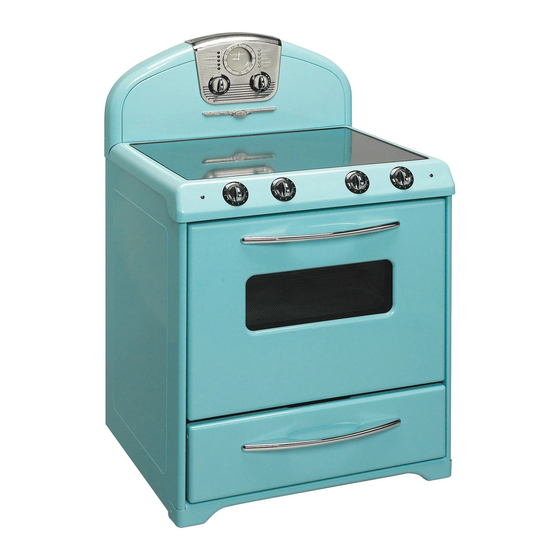
- Page 1 Installation and Operating Instructions for NORTHSTAR Electric Ranges (Model 1954) Dual Fuel Ranges (Model 1947 & 1955) Gas Ranges (Model 1956) NOTE: COOLING FAN When the oven is heated, a fan turns on to moderate the temperature of the switches. The fan will automatically shut off when the oven cools.
- Page 2 GAS RANGE WARNING WARNING: If the information in these instructions WARNING is not followed exactly, a fire or explosion may result causing property damage, personal injury NEVER cover any slots, holes or passages in the oven or death. bottom or cover an entire rack with materials such as aluminum foil.
-
Page 3: Table Of Contents
BEFORE USING YOUR RANGE READ THIS BOOK CAREFULLY If you received a damaged range: Immediately contact the dealer that sold you the range. Before you request service: Check Troubleshooting. It lists causes of minor operating problems that you may be able to correct yourself. TABLE OF CONTENTS &... -
Page 4: Anti-Tip Device
SAFETY INSTRUCTIONS Caution Do not store items of interest to children on console Anti-Tip Device above the range or on the back of the cooking surface. • All Ranges can tip. Children climbing to reach items could be seriously • Injury to Persons could result. injured. -
Page 5: I Nstructions R Ange C Ord I Nstallation
Frying Do not heat unopened food containers in the oven. Pressure could build up and the container could burst, causing Use as little oil as possible. Filling the pan too full of oil injury or damage to the range. can cause spillovers when food is added. Keep oven vent ducts unobstructed. -
Page 6: Gas
The new US revised electrical code states that all new for Mobile Home Construction and Safety, Title 24, HUD, construction must use a FOUR WIRE range power cord. Part 280); or when such standard is not applicable, the Existing construction in the USA may use a three wire Standard for Manufactured Homes Installations 1982 range power cord. - Page 7 Do not obstruct the flow of combustion and ventilation air * Identify the electrical circuits that could be affected by to the range. the installation of the Anti-Tip Bracket, then turn off the power to these circuits. Any openings in the wall, behind the range or the floor under the range must be sealed.
- Page 8 Tools Needed for Installation of Anti-Tip The Anti-Tip Bracket may be attached to a solid wood cabinet having a minimum wall thickness of ¾” Bracket: The thickness of the wall or floor may require use of * Screw Driver, #2 Red Robertson (square) longer screws, available at your local hardware store.
-
Page 9: Installing Range In To Cabinets
Location If possible, the range should be located to avoid the main “traffic path” through the kitchen or where an open door might block a passageway or create an awkward working situation. If possible, it should be so located where cabinet working space is available on either side. -
Page 10: Electrical & Gas Connection Locations
ELECTRIC COOKTOP If the range is not level, adjust leveling legs up or down with pliers or your fingers until range is level. Surface Elements NOTE: Oven must be level for satisfactory baking performance. Controls Electrical and Gas Connection Locations Control knobs must be pushed in before turning them to Dual Fuel Range 1947, 1955... -
Page 11: Selection & Use Of Pots & Pans
Cookware Pot Diameter The best cooking results and the most economical use of Select element to match pan diameter. The pot should electricity will be achieved by using smooth, flat-bottom be slightly larger than the element to obtain best energy usage, and avoid spillovers flowing directly onto element. - Page 12 with a clean, damp cloth (no detergent), taking care to • Any smearing or hazing on the surface may be removed avoid burning fingers. If there is detergent in the cloth, with a lightly dampened paper towel, and polished with a soft dry cloth.
-
Page 13: Canning
Top Burners (Models 1947, 1955, 1956) Any smearing or streaking on the surface may be removed with lightly dampened paper towel and polished with a Your gas range is equipped with “state of the art” “Sealed soft dry cloth. Gas Burners” and an “Auto-Reignition System”. The Metal Marks sealed gas burners spread the heat evenly across the bottom of the cooking utensil and provide infinite heat... -
Page 14: Gas Burner Cleaning
Flame Appearance 5. After cleaning the orifice opening and ports, replace the burner cap. Make sure cap is set straight on burner and The burners have been pre-adjusted at the factory to a that the tabs on cap fit into the grooves of burner base. clean blue flame. -
Page 15: Gas Supply System
GAS-SUPPLY PRESSURE REQUIREMENTS* Hot air and moisture escape from the oven Minimum Manifold Min. Gas-Supply Gas Type Pressure Pressure** through a vent in the center rear of the Natural Gas 5-in. Water Column 6-in. Water Column cooktop. Do not block Liquid Propane (LP) 10-in. - Page 16 to “LP”, or from “LP” to Natural Gas , please following the instructions below: Order the required conversion kit from the factory. SAVE THE ORFICES REMOVED FROM THE APPLIANCE FOR FUTURE USE. Burner Large Medium Small Nat. Gas #50 (1.75 mm) #55 (1.32 mm) #57 (1.09 mm) LP/Propane #64 (.91 mm) #65 (.89 mm)
-
Page 17: O Ven C Onversion M Odel 1956 To P
Replace Oven Bake Burner Cover 2. Pull the the oven 1. Align notches on the oven bake burner cover with shoulder broil bu screws in the bottom of the oven. Nat. Gas LP/Propane change Large Burner Takes 1.75 mm (#50) .91 mm (#64) Medium Burner Takes 1.32 mm (#55) .89 mm (#65) Small Burner Takes... - Page 18 the gas orifice spud, then remove by turning the propane gas B. Bracket A. Oven bake burner electrode bracket orifice spud counterclockwise and lifting out. Set propane gas B. Electrode bracket clip 7. Apply masking tape to the end of a 1/4" (6.4 mm) nut driver to orifice spud aside.
-
Page 19: Setting Clock
SETTING CLOCK – ALL MODELS 2. Pull the broil burner toward you until it slides out of the hole in 2. Pull the broil burner toward you until it slides out of the hole in the oven back, and pull the electrode out of the bracket. The the oven back, and pull the electrode out of the bracket. -
Page 20: Oven Light
TIMED BAKE (Oven turns off automatically): 1. Touch SELECT 3 times. COOKTIME will appear. Press UP until the proper cooktime has been reached. Set the oven selector to AUTO and the thermostat to the correct temperature. NOTE: On delayed bake and time bake allow an extra 12 minutes for oven to preheat. -
Page 21: Maintenance And Minor Repair
ssive Weight Hazard ople to move and install range. result in back or other injury. Automatic Door Lock Resetting Breakers als, tape, and film from range. INSTRUCTIONS In case of a stove malfunction, try resetting the breaker, at der range. Remove oven racks, and parts As soon as you program the oven for the self-cleaning n. -
Page 22: Drawer
Lubrication • DO NOT REMOVE THE DRAWER UNLESS ABSOLUTELY NECESSARY. Lubricate the following with white lubricant: • If removing drawer, pull it out to the stop. • Oven door hinges (if they squeak). • Slide the black nylon tab on each side towards you. •... -
Page 23: Tandard C Ooking T Ips
CONVECTION COOKING TIPS Roasting tips • Roast meats fat-side up in a shallow pan using a For Convection Models roasting rack. To learn how to use your convection oven to the best • Use a roasting pan that fits the size of the food to be advantage, refer to Convection Cooking on page 23. - Page 24 General Broiling Tips Oven Rack Positions 1. The surface of the food should be at least 3” (7.4 cm) away from the broil element. 2. For steaks and chops, slash fat evenly, at 2” (5 cm) intervals, around the outside edges of meat to prevent curling.
- Page 25 For Proper Cooking, Follow These Guidelines: • When using one rack, place the rack so the top of the food will be centered in the oven. • When using two racks, place racks in positions 3 and 1 (the closest to the oven bottom). •...
-
Page 26: Standard Oven Meat Roasting Chart
STANDARD OVEN MEAT ROASTING CHART ° - Roast at oven temperature of 325 ° *For chicken, set the oven temperature to 350 Preheating is not needed. - Place roasting pan on rack position 1 or 2. See page 20 for rack positions. APPROXIMATE MEAT APPROXIMATE... -
Page 27: Standard Oven Baking Chart
STANDARD OVEN BAKING CHART Approximate Approximate Food Oven Cooking Time Food Oven Cooking Time Temperature (Minutes) Temperature (Minutes) Breads, yeast Miscellaneous 375 ° F • loaf 30-40 375 ° F • apples, baked 50-60 400 ° F • rolls, pan 12-15 300 °... -
Page 28: Introduction To Convection Cooking
INTRODUCTION TO CONVECTION COOKING Preheating Welcome to convection cooking, the ultimate culinary technique that uses fan-circulated hot air to efficiently When preheating the oven is specified in a recipe, normal create delicious meals with appetite appeal. time is approximately 15 minutes. Air Flow BROIL ELEMENT The secret to convection cooking lies in maintaining... - Page 29 Bakeware Selection sure to leave at least one inch (2.5 cm) of space between the individual pans, and the diagram shown here indicates which Bakeware with lower sides allows for constant air circulation convection feature and rack position you should be using for around all surface areas of food, for more even cooking.
-
Page 30: Convection Poultry Roasting Chart
CONVECTION POULTRY ROASTING CHART Set Cooking Selections to: TRUE CONVECTION INTERNAL APPROXIMATE OVEN TEMPERATURE APPROXIMATE COOKING TIME RACK TEMPERATURE OF POULTRY FOOD WEIGHT PER LB. (500g) POSITION NOT PREHEATED WHEN COOKED Chicken, Whole 3 - 5 lb. 20-25 min 325°F/160°C 185°F/85°C (1.5 - 2.2 kg) Parts, Quarters... -
Page 31: Convection Quick Breads Baking Chart
CONVECTION QUICK BREADS BAKING CHART Set Cooking Selections to: TRUE CONVECTION PREHEATED APPROXIMATE SIZE OF RACK OVEN COOKING FOOD BAKING DISH POSITION TEMPERATURE TIME Yeast Breads Muffins Single Pan 375°F/190°C 18-25 min Multiple Pans 1, 3, 5 18-25 min Biscuits Single Sheet 425°F/220°C 8 min... -
Page 34: S Ervicing R Ange U
CLEANING GUIDE Part What To Use How To Clean • Soft sponge • Turn knobs to OFF and pull straight off control panel. Control Knobs • Warm, soapy water • Wash, rinse and dry thoroughly. Do not soak. • Replace knobs. Make sure all knobs point to OFF. Do Not Use steel wool or abrasive cleaners. - Page 35 RANGE TROUBLESHOOTING Before Calling For Service…PHONE OUR HELP LINE AT: 1-800-295-8498. You will need to provide a complete description of the problem, your appliance’s complete model and serial numbers and the purchase or installation date (see Warranty). This information is needed to properly identify parts needed. If your range should fail to operate, review the following list before calling for service.
- Page 36 1-800-295-8498 WARRANTY Your NorthStar Range is warranted by Elmira Stove Works to be free from defects in material and workmanship for a period of one year from the date of purchase. Elements, burners and smooth tops are warranted for five years.
Need help?
Do you have a question about the NORTHSTAR 1954 and is the answer not in the manual?
Questions and answers