Advertisement
Please contact us if you have any questions.
We will get back to you within 24 hours.
Email: support@dewenwils.com
Please attach your Order ID so that we can serve you better.


To reduce the risk of fire, electric shock, or personal injury, please strictly follow the instructions.
- Indoor use only. Avoid high humidity, high temperature, and areas with a high magnetic field.
- Always be sure to cut off the power before installing the receiver.
- Don't connect any device that may exceed the performance limits of the receiver.
- Don't install or repair the product Only authorized service personnel should undertake such installation and repairs.
- If the remote is not in use for an extended period time, remove batteries.
- Used batteries should be disposed of safely and properly.
- To prevent a choking hazard, keep packing materials away from children.
- Do not use the battery again if it is dropped or knocked out of shape.
Product Layout


- Program button (On/Off button)
- Indicator
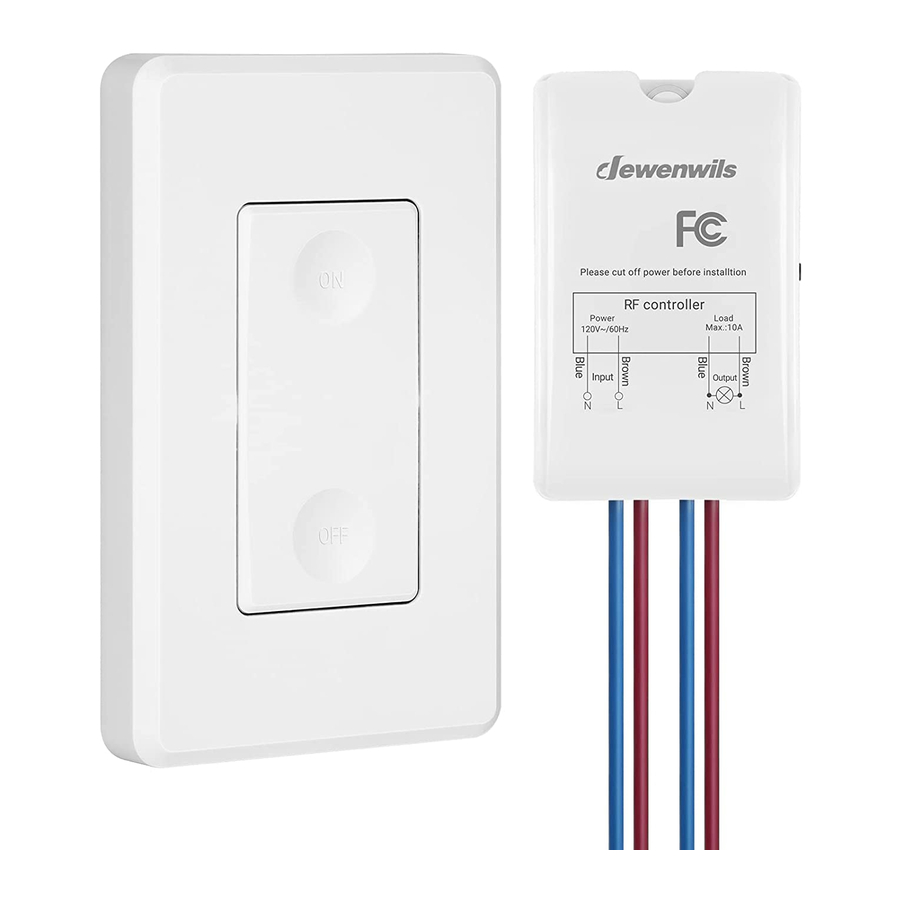
Wiring Diagram

- Turn off the power to the main circuit breaker or fuse box working area before installation.
- "L" Brown line is the hot wire."N"Blue line is the neutral wire. Do not connect the "L" (hot wire) and "N" (neutral wire) mistakenly.
- Connect the power to the "input" side, and the load to the "output" side carefully.
- The wireless switch kit only needs to connect with the hot wire and neutral wire. The "G" Green line (ground wire) just needs to be connected as normal.
- After connecting, use the wiring cap to cover it.
Operating Instructions
- Remove the isolation tab in the battery compartment of the transmitter.
- Press the ON/OFF button on the wall switch remote control to turn the receiver on and off.
Note:
- The program button of the receiver can also be used as a manual switch.
- The receiver will remain "OFF" after a power cut to save energy.
Mounting the Wall Switch
Shown as the figure

Canceling Programming
To remove a receiver from all transmitter parings (no remote transmitter can control it):

- Press the program button on the receiver for 6 seconds until the indicator light starts to flash rapidly. (Note: The light flashes from slowly to rapidly.)

![]()

- Release the program button and then press it again. The indicator light will be off. All the programming has been canceled.


Programming the Receiver
The receivers and transmitters have been pre-paired for immediately use, but there are few units may not be pre-programmed or programmed incorrectly, or you want to customize the configuration to meet your needs. To program a transmitter and receiver, please follow the steps below:

- Press the program button on the receiver for 3 seconds until the indicator light starts to flash slowly.

- Release the program button and then press the "on" or "off "button on the remote control.

- Programming / paring is successful when the indicator light stops blinking.


Note: Each set of ON or OFF button can be paired with and control several outlets; Each outlet can be paired and controlled by multiple transmitters.
Battery Replacement
- If you find the receiver is working abnormally or the indicator on the transmitter becomes dim, replace the remote battery with a new DC 12V (type 23A) battery, making sure the polarity +/- of the battery is correct.
- Low battery power may decrease readable wireless remote range.
- Remove batteries if the remote is not in use for an extended period of time.


Troubleshooting
In the case that one receiver is unresponsive to the remote control, please follow the steps below to resolve the issue:
- If the wire switch receiver is unresponsive to the remote control, please refer to the "Canceling Programming" and "Programming the Receiver" sections in the manual to reprogram the receiver.
- Make sure the receiver and appliance are properly connected and powered on.
- Replace the remote battery with a new 12V (23A) battery.
- The remote transmitter may be too far away to control the receiver.
- Make sure not to exceed the maximum load.
- "Canceling Program" is always prior to "Programming the Receiver" when you would like to make changes.
Specifications
- Input Voltage: 120VAC, 60Hz
- Max Power Rating: 1000W Tungsten
600W Fluorescent
200W LED Lamp - Transmission Frequency: 433.92MHz
- Remote Battery: 23A, 12V
- Remote Distance: 100ft (Free Area)
One Year Limited Warranty
DEWENWILS warrants this product to be free from defects in material and workmanship for a period of one year from the date of purchase. Warranty is void if damage is caused by misuse or improper installation.
Email: support@dewenwils.com.
Our dedicated customer service team will get back to you within 24 hours.


Documents / ResourcesDownload manual
Here you can download full pdf version of manual, it may contain additional safety instructions, warranty information, FCC rules, etc.
Advertisement


Need help?
Do you have a question about the HRLS11D and is the answer not in the manual?
Questions and answers