Table of Contents
Advertisement
Available languages
Available languages
Model No.
RG-M79A
GENERAL SAFETY INFORMATION
For Your Safety
To reduce the risk of injury, loss of life, electric shock, fire, malfunction, and damage to equipment or property, always
observe the following safety precautions.
Explanation of symbol word panels
The following symbol word panels are used to classify and describe the level of hazard, injury, and property damage
caused when the denotation is disregarded and improper use is performed.
WARNING
CAUTION
NOTICE
The following symbols are used to classify and describe the type of instructions to be observed.
This symbol is used to alert users to a specific operating procedure that must be followed in order to operate
this unit safely.
This symbol is used to alert users to a specific operating procedure that must not be performed.
This symbol is used to alert users not to disassemble the equipment.
This symbol is used to alert users to make sure of grounding when using the equipment with the grounding
terminal.
INSTALLATION INSTRUCTIONS
READ AND SAVE THESE INSTRUCTIONS
Thank you for purchasing this Panasonic product.
Please read these instructions carefully before attempting to
install, operate or service the Panasonic product. Please
carefully read the "GENERAL SAFETY INFORMATION".
Failure to comply with instructions could result in personal
injury or property damage. Please explain to users how to
operate and maintain the product after installation and this
manual should be presented to users. Please retain this
manual for future references.
See page 8 for Panasonic Warranty Sheet.
Denotes a potential hazard that could result in serious injury or death.
Denotes a hazard that could result in minor injury.
Denotes a hazard that could result in property damage.
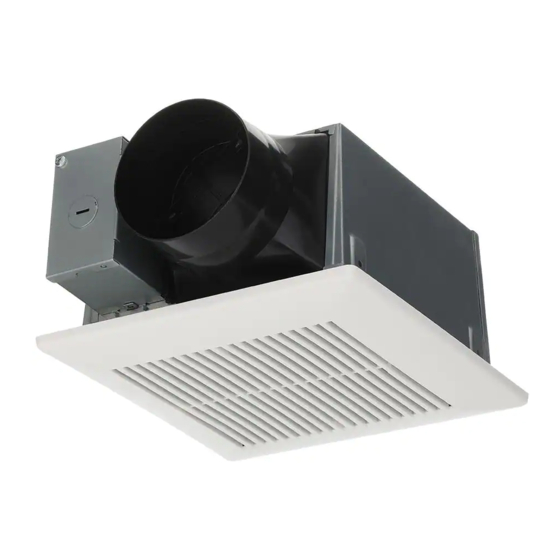
Ventilating Fan
M7 9 A 1 0 4 2 0 A
Advertisement
Table of Contents

Related Manuals for Panasonic RG-M79A


Summary of Contents for Panasonic RG-M79A
- Page 1 READ AND SAVE THESE INSTRUCTIONS Thank you for purchasing this Panasonic product. Please read these instructions carefully before attempting to install, operate or service the Panasonic product. Please carefully read the “GENERAL SAFETY INFORMATION”. Failure to comply with instructions could result in personal injury or property damage.
- Page 2 GENERAL SAFETY INFORMATION (CONTINUED) WARNING To reduce the risk of fire, electric shock or injury to persons, observe the following: Use this unit only in the manner intended by the manufacturer. If you have any questions, contact the manufacturer. Before servicing or cleaning unit, switch power off at service panel and lock the service disconnecting means to prevent power from being switched on accidentally.
-
Page 3: Supplied Accessories
GENERAL SAFETY INFORMATION (CONTINUED) Do not kink the supply wiring. (Cooking area) Do not install above or For general ventilating use only. Do not use to exhaust hazardous or inside this area explosive materials and vapors. Not for use in cooking area. (Fig. A) Floor The special-purpose or dedicated parts, such as mounting fixtures, Cooking... -
Page 4: Wiring Diagram
DIMENSIONS Unit: inches (mm) No. Part name Blade Blower/motor assembly Grille assembly Junction box Adaptor Damper Fan body WIRING DIAGRAM Fan body Junction box Capacitor White White White Neutral (114 C Fuse in motor) Switch Power supply Motor Thermally-protected I-Standard AC 120 V 60 Hz Yellow Yellow... - Page 5 INSTALLATION INSTRUCTIONS (CONTINUED) Stud 3 Wall Fan housing Fan housing 3 Long Joist screws hole (ST4.2X20) 3 Long screws (ST4.2X20) 3 Joist Key hole Ventilation duct Mastic or approved foil tape Adaptor Install exhaust duct housing Install the ventilation duct, secure it with a clamp and seal it with mastic or approved foil tape.
-
Page 6: Maintenance & Cleaning
INSTALLATION INSTRUCTIONS (CONTINUED) Plug connector Adaptor flanges Claw Blower/ motor assembly 2 Screws (ST4.2X8) CAUTION Before turning on the fan, make sure the connector is inserted at the correct position. Failure to properly connect will result in fan not working. The claw of the connector must latch to the rib completely. -
Page 7: Specifications
Warning Concerning Removal of Covers. The unit should be serviced by qualified technicians only. Your product is designed and manufactured to ensure a minimum of maintenance. Should your unit require service or parts, call Panasonic Call Center at 1-866-292-7299 (USA). Panasonic Corporation of North America Two Riverfront Plaza, Newark, NJ 07102 www.panasonic.com... - Page 8 DC Motor: For period of 6 years (72 months) LED Light Unit: For a period of 5 years (60 months) Service in the USA, can be obtained during the warranty period by contacting the selling Distributor or Panasonic Customer Call Center at 1-866-292-7299, toll free.
-
Page 9: Instrucciones De Instalación
LEA Y GUARDE ESTAS INSTRUCCIONES Gracias por adquirir este producto Panasonic. Por favor, lea cuidadosamente estas instrucciones antes de intentar instalar, operar o dar servicio al producto Panasonic. Por favor lea cuidadosamente la “INFORMACIÓN GENERAL DE SEGURIDAD”. No cumplir con las instrucciones podría provocar lesiones personales o daño a la propiedad. - Page 10 INFORMACIÓN GENERAL DE SEGURIDAD (CONTINUACIÓN) ADVERTENCIA Para reducir el riesgo de incendio, descarga eléctrica o lesiones a las personas, cumpla con lo siguiente: Use esta unidad sólo en el modo indicado por el fabricante. Si tiene preguntas, contacte al fabricante. Antes de dar mantenimiento o limpiar la unidad, corte el suministro de corriente en el panel de servicio y bloquee el dispositivo de desconexión para impedir que se reestablezca el suministro accidentalmente.
-
Page 11: Accesorios Suministrados
INFORMACIÓN GENERAL DE SEGURIDAD (CONTINUACIÓN) Proteja el cableado de alimentación contra bordes afilados, aceite, grasa, superficies calientes, productos químicos u otros objetos. No retuerza el cableado de alimentación. (Área para cocinar) No instalar arriba ni Sólo para uso de ventilación general. No lo utilice para extraer materiales dentro de esta área y vapores peligrosos o explosivos. -
Page 12: Diagrama De Cableado
DIMENSIONES Unidad: pulgadas (mm) Nombre de la pieza Aspa Ensamble extractor/motor Rejilla Caja de conexiones Adaptador Amortiguador Cuerpo del ventilador DIAGRAMA DE CABLEADO Cuerpo del ventilador Caja de conexiones Rojo Condensador Blanco Neutro Blanco Blanco Interruptor (114 C Fusible en motor) Suministro de corriente Motor Protegido térmicamente... - Page 13 INSTRUCCIONES DE INSTALACIÓN (CONTINUACIÓN) Travesaño 3 Pared Carcasa del ventilador Carcasa del ventilador 3 Tornillos Viga largos Orificio (ST4.2X20) 3 Tornillos largos (ST4.2X20) 3 Viga Orificio Conducto de ventilación Cinta adhesiva o Instale el conducto de metálica aprobada Adaptador escape Carcasa del ventilador Instale el conducto de ventilación, asegúrelo con una...
-
Page 14: Mantenimiento (Limpieza)
INSTRUCCIONES DE INSTALACIÓN (CONTINUACIÓN) Conector Rebordes Costilla adaptador Gancho Ensamble extractor/ motor 2 Tornillos (ST4.2X8) PRECAUCIÓN Antes de encender el ventilador, asegure que el conector está insertado en la posición correcta. Si no se conecta correctamente, el ventilador no funcionará. El gancho del conector debe estar enganchado por completo a la costilla. -
Page 15: Especificaciones
Este producto ha sido diseñado y fabricado para garantizar un mínimo de mantenimiento. En caso de que su equipo necesite servicio técnico o piezas, llame al Centro de Atención de Panasonic, al 1-866-292-7299 (EE. UU.). Panasonic Corporation of North America Two Riverfront Plaza, Newark, NJ 07102 www.panasonic.com... - Page 16 Si se produjera un problema relacionado con este producto durante o después del período de garantía, póngase en contacto con el Distribuidor o con el Departamento de Servicio al Cliente de Panasonic. Si no está satisfecho con la forma en que se maneja el problema, escriba a Panasonic Corporation of North America a la dirección que aparece anteriormente.
Need help?
Do you have a question about the RG-M79A and is the answer not in the manual?
Questions and answers
Grill install is not clear. Where do springs go exactly.
To install the grille springs for the Panasonic RG-M79A:
1. Insert the grille assembly mounting springs into the slots on the fan body as shown.
2. Mount the grille assembly to the fan body.
This answer is automatically generated
Wiring for fan and light. Two Romex wires coming in to fan/light. How to wire ?