Advertisement
Available languages
Available languages
Quick Links
USER MANUAL
Hereby, MOB, declares that item MO6424 is in Compliance with
the essential requirements and other relevant conditions of
Directive 2014/30/EU. The full text of the EU declaration of
conformity is available at the following internet address:
www.momanual.com.
MOB, PO BOX 644, 6710 BP (NL).
PO: 41-XXXXX
Made in China
Advertisement

Subscribe to Our Youtube Channel
Related Manuals for MOB MO6424


Summary of Contents for MOB MO6424
- Page 1 USER MANUAL Hereby, MOB, declares that item MO6424 is in Compliance with the essential requirements and other relevant conditions of Directive 2014/30/EU. The full text of the EU declaration of conformity is available at the following internet address: www.momanual.com. MOB, PO BOX 644, 6710 BP (NL).
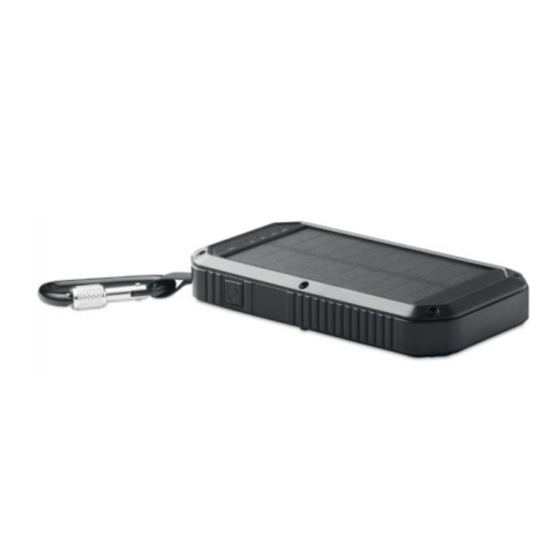
- Page 2 MO6424 Please carefully read this manual before operating your solar charger and keep it in a safe place for future reference. There are many helpful instructions to ensure you can use the solar charger safely and its fullest potential for years come.
- Page 3 Solar Panel: 5V,200mA Input: DC 5V/2A Output 1: DC 5V/1A, Output 2: DC 5V/2A, Output 3: DC 5V/2A Product size: 142x76x22mm LED lights: 21pcs in 504 LUMENS Operating Instructions: How to open and close Solar charger • Click power on/off button to open solar charger, the LED indicators will turn on.
- Page 4 • 1 LED indicator green. Which is keeping on when it being charged under sunlight • 2 LED indicator-blue,25% power • 3 LED indicator-blue,50% power • 4 LED indicator-blue,75% power • 5 LED indicator-blue,100% power • Connect the external device to solar charger directly, the LED indicator will turn on and start charging external device.
- Page 5 Bitte lesen Sie diese Anleitung sorgfältig durch, bevor Sie Ihre Solar-Powerbank in Betrieb nehmen, und bewahren Sie sie zum späteren Nachschlagen an einem sicheren Ort auf. Sie enthält viele hilfreiche Anweisungen, um sicherzustellen, dass Sie die Solar-Powerbank sicher nutzen und ihr volles Potenzial über Jahre hinweg nutzen können.
- Page 6 Technische Daten: Batterie Kapazität: 8000mAh Li-polymer Batterie Solar-Panel: 5V,200mA Eingang: DC 5V/2A Ausgang 1: DC 5V/1A, Ausgang 2: DC 5V/2A Ausgang 3: DC 5V/2A Produktmaße: 142x76x22mm LED-Leuchten: 21 St. in 504 LUMENS Gebrauchsanweisung: So öffnen und schließen Sie die Solar-Powerbank •...
- Page 7 Powerbank vollständig aufzuladen. Aufladen eines externen Geräts über das Solarladegerät Prüfen Sie, ob die Solar-Powerbank ausreichend geladen ist, indem Sie die Ein-/Ausschalttaste drücken. Dann wird der Ladezustand der Batterie durch die LED angezeigt: • 1 LED-Leuchten grün. Sie leuchtet, wenn unter Sonnenlicht aufgeladen wird.
- Page 8 • Setzen Sie die Solar-Powerbank niemals Stößen oder Schlägen aus. • Lassen Sie Kinder nicht mit der Solar-Powerbank spielen. • Die Solar-Powerbank ist nicht wasserdicht und sollte niemals in Wasser oder andere Flüssigkeiten getaucht werden. • Lassen Sie die Solar-Powerbank nicht in einem luftdichten Raum liegen, wenn es bei Sonnenschein aufgeladen wird, z.
- Page 9 Entrée micro USB pour recharger la batterie de la banque d’alimentation Panneau solaire Sortie USB 1 Sortie USB 2 Sortie USB 3 Lumières LED 10. Cordon Specifications: Capacité de la batterie: 8000mAh batterie Li-polymère Panneau solaire: 5V, 200mA Entrée: DC 5V/2A Sortie 1: DC 5V/1A, Sortie 2:...
- Page 10 d'ordinateur ou à un adaptateur secteur USB. • Les voyants LED bleus s'allument pour indiquer que le chargeur solaire est en cours de rechargement. • Lorsque le chargeur solaire est complètement chargé, les quatre indicateurs LED restent allumés en bleu. Déconnectez •...
- Page 11 Rappel: Une fois la protection de contrôle de température NTC déclenchée, le produit doit être rechargé avec le câble de charge pour activer la fonction de réutilisation. Sécurité: • N'essayez jamais d'ouvrir ou de démonter le chargeur solaire. • Ne soumettez jamais le chargeur solaire à des coups ou à des chocs.
- Page 12 1. Botón de encendido/apagado del cargador solar Indicador LED verde que muestra el estado de carga solar Indicadores LED azules que muestran el estado de carga de la batería y su indicación de la potencia Entrada micro USB para cargar la batería integrada del cargador solar Panel solar Salida USB 1...
- Page 13 • El indicador LED verde permanecerá encendido cuando el cargador solar se esté cargando bajo la luz solar. NOTA: Carga solar solo para emergencias. Evite la exposición prolongada bajo el sol abrasador. Carga del cargador solar desde una fuente de alimentación externa: •...
- Page 14 segundos, cuando el dispositivo externo esté completamente cargado. NOTA: Cuando el cargador solar está en uso y su nivel de carga de la batería es inferior al 10 %, el 1 indicador LED parpadeará para advertirle que debe retirar los dispositivos externos y cargar el cargador solar.
- Page 15 1. Pulsante di accensione/spegnimento del powerbank solare 2. Indicatore LED verde che mostra lo stato di carica solare 3. Indicatori LED blu che mostrano lo stato di carica della batteria e la visualizzazione della carica della batteria 4. Ingresso micro USB per caricare la batteria integrata del caricatore solare 5.
- Page 16 Carica tramite una fonte esterna • Collegare il cavo del caricatore solare alla porta USB di un computer o laptop o all'adattatore CA USB. • Gli indicatori LED blu si accendono per indicare che il caricatore solare è in carica. •...
- Page 17 accendere e spegnere le luci. Promemoria: Una volta attivata la protezione del controllo della temperatura NTC, il prodotto deve essere ricaricato con il cavo di ricarica per attivare la funzione di riutilizzo. Sicurezza: • Non tentare mai di aprire o smontare il caricatore solare. •...
- Page 18 Aan/uit-knop voor zonne-energiebank Groene LED-indicator die de oplaadstatus van zonne-energie aangeeft Blauwe LED-indicatoren die de oplaadstatus van de batterij en het batterijvermogen weergeven Micro-USB-ingang voor het opladen van de ingebouwde batterij van de zonnelader Zonnepaneel USB-uitgang 1 USB-uitgang 2 USB-uitgang 3 LED-verlichting 10.
- Page 19 LET OP: opladen op zonne-energie alleen voor noodgevallen. Vermijd langdurige blootstelling onder de brandende zon. De zonnelader opladen vanaf een externe stroombron: • Sluit de kabel van de oplader op zonne-energie aan op een USB-poort van een computer of laptop, of een USB- wisselstroomadapter.
- Page 20 knipperen om u te waarschuwen om externe apparaten uit te schakelen en de zonne-energiebank op te laden. LED lichten: Druk lang op de aan/uitknop om de lichten aan en uit te zetten. Zodra de NTC-temperatuurcontrolebescherming in werking is getreden, moet het product opnieuw worden opgeladen met de oplaadkabel om de functie te activeren voor hergebruik Herinnering: Zodra de NTC-temperatuurregelingsbeveiliging is geactiveerd,...
- Page 21 Przycisk włączania/wyłączania banku energii słonecznej Zielony wskaźnik LED, który pokazuje stan ładowania słonecznego Niebieskie wskaźniki LED, które pokazują stan naładowania baterii i wskaźnik naładowania baterii; Wejście Micro USB do ładowania wbudowanego akumulatora ładowarki słonecznej Panel słoneczny Wyjście USB 1 Wyjście USB 2 Wyjście USB 3 Światła LED 10.
- Page 22 • Kliknij przycisk włączania/wyłączania zasilania, aby otworzyć ładowarkę słoneczną, wskaźniki LED zaświecą się. • Wskaźniki LED wyłączą się po około 15 sekundach, gdy do ładowarki słonecznej nie będą podłączone żadne urządzenia. Ładowanie ładowarki słonecznej przez panel słoneczny: • Umieść ładowarkę słoneczną w słońcu. •...
- Page 23 • Czwarty wskaźnik LED-niebieski, 75% mocy • Piąty wskaźnik LED-niebieski, 100% mocy • Podłącz urządzenie zewnętrzne bezpośrednio do ładowarki słonecznej, wskaźnik LED włączy się i rozpocznie ładowanie urządzenia zewnętrznego. • Wskaźniki LED wyłączą się po około 15 sekundach, gdy urządzenie zewnętrzne zostanie w pełni naładowane. UWAGA: Gdy ładowarka słoneczna jest w użyciu, a jej poziom naładowania baterii jest niższy niż...
Need help?
Do you have a question about the MO6424 and is the answer not in the manual?
Questions and answers