urmet domus iPerTAlk 1375 Installation And Configuration Manual
Ip-pbx
Hide thumbs
Also See for iPerTAlk 1375:
- Quick start manual (24 pages) ,
- Quick user manual (16 pages) ,
- Installation handbook (13 pages)

Related Manuals for urmet domus iPerTAlk 1375


Summary of Contents for urmet domus iPerTAlk 1375
- Page 1 Mod. 1375 DS 1375-020E LBT 20692 IP-PBX IPERTALK COLLEGAMENTO Interactive Links Ref. 1375/10 - 1375/11 - 1375/12 - 1375/13 Ref. 1375/10A - 1375/11A - 1375/12A - 1375/13A INSTALLATION AND CONFIGURATION MANUAL...
-
Page 2: Table Of Contents
Interactive Links The document contains INTERACTIVE LINKS for faster and more efficient consultation. iPerTAlk IP-PBX Version: 2.2.3 or higher INDEX 1. GENERAL DESCRIPTION ..........................5 2. DESCRIPTION OF COMPONENTS ........................5 3. INSTALLATION ..............................6 4. DESCRIPTION OF LEDS, CONNECTORS AND BUTTONS ................ - Page 3 11.6.1 Connection of 1375/821 – 1375/822 external IP video stations ..........25 11.6.2 Configuration of 1375/821 – 1375/822 external IP video stations ........... 26 11.6.2.1 External IP video stations keys pairing and advanced configuration ........27 11.6.3 Forwarding Call/Video call from external IP video station to phone / videophone ....
- Page 4 11.21.1 IperCom Lines ........................61 11.21.2 Simultaneous calls on IperCom trunks .................. 62 11.21.3 Creating an inbound routing rule ................... 52 11.21.4 Enabling the Ipercom Network ....................63 12. SYSTEM CONFIGURATION ........................... 65 12.1 INBOUND ROUTING ........................... 65 12.2 OUTBOUND ROUTING ........................
-
Page 5: General Description
1. GENERAL DESCRIPTION iPerTAlk IP-PBX can be used to manage VoIP/SIP telephone installations by direct interconnection with remote VoIP operators. The iPerTAlk IP-PBX devices are differentiated in different models. The number and type of licenses in the system vary based on the device. iPerTAlk IP-PBX Ref. -
Page 6: Installation
3. INSTALLATION For the first installation of the device, proceed as follows: 1. Open flap (4) by making it slide outwards. 2. Undo the screw using a Phillips screwdriver and remove the front cover. 3. Fix the base to the wall with screws and wall anchors (provided in kit). DS1375-020E... - Page 7 4. By exerting a slight pressure, insert the battery (7) in the battery housing (8), following the correct polarity. 5. Connect the power supply to the power connector (9). According to the position of the device, use the pre-cut holes (A) on the right or on the left, arranged for passing through the power supply cable. 6.
-
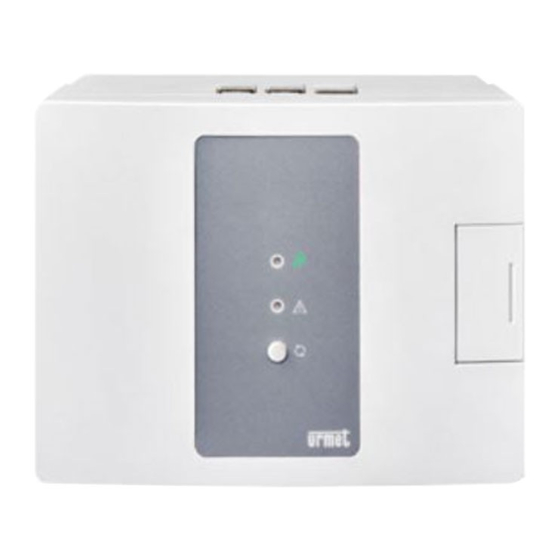
Page 8: Description Of Leds, Connectors And Buttons
4. DESCRIPTION OF LEDS, CONNECTORS AND BUTTONS 4.1 POWER LED (1) LED colour Description Green fixed Device powered LED off Device not powered 4.2 STATUS LED (2) LED colour Description Green fixed System working with installed license Red fixed System not working 1 blue flash Internet connection is not available (no communication with Cloud Urmet) 1 green flash... -
Page 9: Connection To The Network
6. CONNECTION TO THE NETWORK Follow the procedure below to make network connections. 1. Connect one end of the Ethernet cable to the LAN port on the switch and the other end to the LAN port (6) of the device. It is possible to use a switch already set up in the network or insert a newly installed one (see Ref. -
Page 10: Configuration And First Use
8. CONFIGURATION AND FIRST USE A PC (Windows, Linux or Mac) running a browser is needed to access iPerTAlk configuration. Use of the following browsers is recommended to ensure maximum compatibility: • Internet Explorer 11.x or higher; • Mozilla Firefox 50.x or higher; •... - Page 11 7. On the top menu, press System and select the Wizard to proceed with the guided and simplified configuration of all main parameters. The following table lists the configurable features. Refer to the installation and configuration booklet for more information. Step Wizard step Description...
- Page 12 10. Wait for the system to boot and login again. Open the Wizard page from the System menu. 11. To change the subnet that iPerTAlk self-assigned, select step 2 of the Wizard. 12. Select step 3 of the Wizard “VoIP telephones”. 13.
-
Page 13: Automatic And Manual Configuration Of User Terminals
14. Connect the telephone devices to the network where iPerTAlk is connected via the LAN network cable supplied and wait for them to appear on the “VoIP Phones” page. If the network where iPerTAlk is installed does not have a DHCP server, manually force the VLAN (5 default iPerTAlk) of the IP Terminals so that they can receive an address from iPerTAlk and then be detected. -
Page 14: Model Ref. 1375/806 - 1375/812
5. Press the SAVE button and the device will restart. When the device becomes available again, the PC can reach all the devices in the VLAN. 9.2 MODEL REF. 1375/806 - 1375/812 To configure VLAN mode through the telephone’s user interface, follow the procedure below: 1. -
Page 15: Telephone Functions
10. TELEPHONE FUNCTIONS The telephone functions on extensions described in the following paragraph can be configured/enabled/disabled through the Web interface of iPerTAlk or through the settings on the terminal. From the menu Telephone functions access the page State of Extensions and Lines and select Configure on the concerned extension. -
Page 16: Unconditional Forwarding, On No Answer And On Busy
The function activated on the terminal will be replicated on the iPerTAlk configuration displayed on the web page. 10.2 UNCONDITIONAL FORWARDING, ON NO ANSWER AND ON BUSY iPerTAlk allows forwarding all the calls addressed to an extension with three types of forwarding: —... -
Page 17: Transfer With Offer, Blind, In Ringing
possible to “resume the call”, namely to restart it, either from the same extension or from another one. Practically, setting a call in the “parking orbit” allows putting it on hold, freeing the terminal from its management. To park a call (for example in orbit 1): —... -
Page 18: Intercom
During a call, the terminal can receive many call waiting notifications at a time. The user engaged in the call can decide whether to put the current call on hold and answer the new one or end the current call and then manage the second one, which has remained active. 10.8 INTERCOM iPerTAlk supports the Intercom function if the terminals are enabled. -
Page 19: Pick Group And Direct Pick
— steady blue or steady green LED: free extension; — red LED flashing: the extension is ringing; — steady red LED: extension engaged in a conversation. Press the corresponding key to: 1 - call the extension associated with the key, when the key indicates its state as free (fixed blue or fixed green); 2 - answer the call addressed to the extension associated with the key (PICK or answer for absent extension), when the key indicates the ring state (flashing red);... -
Page 20: Selection Of Line Trunk For Outbound Calls
You can also set a trigger time that varies according to the telephone model. 10.17 SELECTION OF LINE TRUNK FOR OUTBOUND CALLS In iPerTAlk system, telephone lines are organised in trunks (usually each line device or VoIP provider represents a trunk) which can be selected by the user when dialling a number, in case he/she doesn’t want to use the default trunk. -
Page 21: Video Call Support
To set an Alarm/Appointment press the key and enter the required values in the displayed fields: — Target: the number to be automatically called (internal or external number). — Date: the date on which the service is to be activated. —... -
Page 22: Fax2Mail Service
11.4 FAX2MAIL SERVICE In order to use this service, the activation of the licence Fax2mail Service Ref. 1375/270 is required. Then it will be possible to define up to 5 virtual FAX modems. iPerTAlk allows receiving faxes from the public line and forwarding them to an email address through the virtual FAX Modem service. -
Page 23: Sending Sms
— sending a FAX: to access the page that allows sending a FAX, select the menu Messages → FAX. In this page, specify: ‹ Modem: select the modem for sending. ‹ Line: the line from which the FAX is to be transmitted. ‹... -
Page 24: External Ip Video Stations
To define the Provider, specify the following parameters: — Provider Name: name of the Provider that provides the service — URL Template: it represents the command sent to the provider to send an SMS (every service provider has its own); this string will be specified by the Provider and usually features the following fields: ‹... -
Page 25: Connection Of 1375/821 - 1375/822 External Ip Video Stations
11.6.1 CONNECTION OF 1375/821 – 1375/822 EXTERNAL IP VIDEO STATIONS Following is the diagram of the possible system connections: Use with PoE Switch with VLAN support. iPerTAlk VLAN 5 (tagged) PoE Switch Managed with VLAN Support Ref. 1375/702 VLAN 5 (untagged) 1375/821 1375/822... -
Page 26: Configuration Of 1375/821 - 1375/822 External Ip Video Stations
11.6.2 CONFIGURATION OF 1375/821 – 1375/822 EXTERNAL IP VIDEO STATIONS To configure the external IP video stations follow the steps below: Access the myTalk web interface by logging in as Installer. Select Wizard in the System Menu. Select step 8 of the Wizard, relevant to the easy configuration of the external IP video stations. If the “Endpoints Acquisition”... -
Page 27: External Ip Video Stations Keys Pairing And Advanced Configuration
If the status icon is red, although the status LED of the device is off, it is recommended to restart the device. At the end of the automatic configuration procedure, quit the Wizard to complete the configuration of the button functions following what indicated in the next paragraphs. -
Page 28: Forwarding Call/Video Call From External Ip Video Station To Phone / Videophone
In the “Description” field it is possible to assign a significant name to the device (e.g. EAST entry external IP video station). Under “Push button - Destination” enter the reference of the button to program (example 1) in the left text box. -
Page 29: Forwarding Call/Video Call From Phone/Videophone To External Ip Video Station
11.6.4 FORWARDING CALL/VIDEO CALL FROM PHONE/VIDEOPHONE TO EXTERNAL IP VIDEO STATION To make a call or video call from a telephone (IP or BCA) or videophone to the external IP video station, simply dial the number of the extension paired with the external IP video station (e.g. 203), specifying through the relevant button whether you wish to make a call or a video call, if using a videophone. -
Page 30: Sending The Door Opening Command In Standby (When Not Engaged In A Conversation)
11.6.7.2 SENDING THE DOOR OPENING COMMAND IN STANDBY (when not engaged in a conversation) If a conversation is not active, it is possible to send a door opening command to any external IP video station connected to iPerTAlk from any telephone (analogue or IP) or videophone part of the system. Using the keys of the telephone enter: *85*<extension paired to the external IP video station>*<command>... -
Page 31: Configuration Of Call Modules 1375/823 - 1375/824
Use with non-PoE Switch and without VLAN support iPerTAlk VLAN 5 (tagged) PoE Switch Unmanaged with VLAN Support INTERNET PORT VLAN 5 PC PORT VLAN 5 Power Injector 1375/805 VLAN 5 1375/806 1375/810 1375/812 1375/815 1375/816 1375/823 1375/824 To use this mode, it is necessary to configure in advance the PC port of the telephone (Ref. 1375/805, 1375/806, 1375/810, 1375/812, 1375/815 and 1375/816) with VLAN 5. - Page 32 Should the “Endpoints Acquisition” option be “Disabled”, the device - identified through the relevant Mac- address and model - will be displayed in the “Acquisition Entry Panel” section. Simply press on the “Add” button to configure the device and register it on iPerTAlk. Should the status icon be red, it is recommended to restart the device.
-
Page 33: Call Module Advanced Configurations
11.7.2.1 CALL MODULE ADVANCED CONFIGURATIONS iPerTalk allows carrying out some advanced configurations of the call module. Access the Extensions section (System → Advanced Configuration). Select the Mac-address relevant to the call module to be configured. Once the device is selected, the configuration page will open showing the following parameters: In the “Name”... -
Page 34: Phonebook Configuration (Administrator User Only)
11.7.2.2 PHONEBOOK CONFIGURATION (ADMINISTRATOR USER ONLY) IPerTAlk allows making calls from call modules only to extensions (up to a maximum of 6 destinations) that have been previously entered in the phonebook. It is in fact not possible to make direct calls by dialling the extension number. -
Page 35: Management Of Video Call To 1375/815 Telephones
11.7.5 MANAGEMENT OF VIDEO CALL TO 1375/815 TELEPHONES To be able to manage the video call with 1375/815 videophones it is necessary to configure some video parameters. Directly from the Videophone: — Press on the “Applications” icon — Press on “Telephone settings” —... -
Page 36: Max Ip Video Door Phone 1375/825
Where command is: 1 → to activate the electric lock 2 → to activate the dry contact For example, to activate the dry contact of an external station with extension 203, the command to enter is: *85*203 *2 All commands will have to be followed by the relevant call forwarding command. 11.8 MAX IP VIDEO DOOR PHONE 1375/825 The service requires activation of a licence for Video extensions / Urmet VPE Ref. -
Page 37: Configuration Of Ip Video Door Phone 1375/825
Use with non-PoE Switch and without VLAN support iPerTAlk VLAN 5 (tagged) PoE Switch Unmanaged with VLAN Support INTERNET PORT VLAN 5 PC PORT VLAN 5 Power Injector 1375/805 VLAN 5 1375/806 1375/810 1375/812 1375/815 1375/816 1375/825 To use this mode, it is necessary to configure the PC port of the telephone (1375/805, 1375/806, 1375/810, 1375/812, 1375/815 and 1375/816) with VLAN 5 in advance. -
Page 38: Advanced Configurations Of Ip Video Door Phone 1375/825
Should the “Endpoints Acquisition” option be “Disabled”, the device - identified through the relevant Mac- address and model - will be displayed in the “Acquisition Entry Panel” section. Simply press on the “Add” button to configure the device and register it on iPerTAlk. Should the status icon be red, it is recommended to restart the device. - Page 39 Once the device is selected, the configuration page will open showing the following parameters: In the “Name” field it is possible to assign a significant name to the device (e.g. NORTH entry call module). The “Gate Open Free” field allows activating gate opening and door opening keys displayed in the video door phone interface.
-
Page 40: Configuration Of Switchboard Call (Main Telephone)
11.8.3 CONFIGURATION OF SWITCHBOARD CALL (MAIN TELEPHONE) To configure the switchboard call on the video door phone Ref. 1375/825 access the System section and press on Speed Dial. Press on the key and enter the following parameters: — In the “Called” field, enter the “ SWITCHBOARDC” parameter. —... -
Page 41: Ip Cameras
To configure the access control it is necessary to access the menu Multimedia → Access Control. Once the Interface has been accessed, click on the button to create a new access code. Configure the required parameters as described below: ‹ Status: select whether you want to enable/disable the new access code immediately after its creation. ‹... -
Page 42: Connecting Ip Cameras
The iPerTAlk system can manage the following cameras of the Urmet range: ‹ IP Camera 5M 2.8MM COMPACT PRO CAMERA Ref. 1099/400 ‹ IP Camera 5M 2.8MM DOME PRO CAMERA Ref. 1099/460 ‹ IP Camera 5M AF 2.8-12MM COMPACT PRO Ref. 1099/401 ‹... -
Page 43: Camera Configuration
Consultation video call from videophone to audio extension with associated IP camera for the video IP camera RTSP/H.264 video Audio/Video call Audio call VoIP videophone Audio only VoIP telephone iPerTalk 11.11.2 CAMERA CONFIGURATION The following chapter provides procedures for the proper configuration of IP cameras. CASE 1: IPerTAlk system with DHCP router and automatic addressing 1. - Page 44 For each camera, the available Streaming Profiles and video streaming information are also listed automatically. ‹ Name (streaming profile): For Urmet cameras, 3 profiles are available: – MainStream – SubStream – MobileStream ‹ RTSP link: link of the camera used for the streaming. ‹...
- Page 45 9. In the “FPS” parameter set a minimum value of at least “10”. 10. In the “Video Code Type” parameter set the value to “H.264”. 11. Press the key to save the settings made. After configuring the camera parameters, you can acquire the video streaming. 12.
- Page 46 3. In the “Type” field, select the “Static” parameter to configure the IP address of the camera in static mode. 4. In the “IP Address” field, set an IP address that is separate from that of the iPerTAlk devices but that is in the same subnet.
- Page 47 12. Access the myTalk web interface by logging in as Installer. 13. Go to the menu Multimedia → Video surveillance. The iPerTAlk system will automatically start scanning the ONVIF cameras connected to the network. 14. The screen will show the list of IP cameras detected in the network by the ONVIF protocol displaying the following parameters: ‹...
- Page 48 After acquiring the video streaming iPerTAlk will automatically configure the new camera by associating an extension and an available system number (e.g. 90204). To display the configuration status of the extension and the relevant number, access the menu System → Advanced Configurations → Extensions. Once configuration is complete, video calls can be made from videophone devices (e.g.
-
Page 49: Camera Association To A Telephone Extension
11.11.3 CAMERA ASSOCIATION TO A TELEPHONE EXTENSION You can make video calls from videophones to telephone audio devices by automatically displaying the video coming from a camera. The most frequent cases of use are shown below: CASE 1 IP camera Streaming Audio Streaming Video RTSP/H.264... -
Page 50: Special Decoders Ref. 1039/81
11.12 SPECIAL DECODERS REF. 1039/81 The special decoder Ref. 1039/81 allows electrical loads to be activated by means of double exchange relays that can operate in two modes: ‹ Toggle ‹ Monostable timed from 0.5 to 20 seconds. Possible applications include: staircase lighting, additional lock, gate opening, etc. Since the relay is a power relay, in many cases it is possible to control the load directly. -
Page 51: Using The Special Decoder
6. Select the MAC address of the special decoder to be configured. Alternatively, if you want to define a device that is not currently connected to the network, you can define it manually by typing the MAC address of the device in the MAC field (without separators and with all lowercase letters, as required by iPerTAlk system). - Page 52 The contacts in the directory can be of three types: — public: these contacts can be entered only by the administrator user and are visible by all system users. — private: these contacts can be entered by any type of user and will be visible only to the same user. —...
-
Page 53: Inbound/Missed/Outbound Call Record
A function to import the directory is available for each user to allow him/her to load his/her own telephone numbers and/or contacts. The contacts loaded by each user are reserved and can be viewed only by the administrator or by supervisor users or users with administrator rights. To import several contacts at a time in the Directory, select , select the file of contacts in CSV format in your own PC and press Import. -
Page 54: Export Of Call Data
11.15 EXPORT OF CALL DATA It is possible to activate the page of the iPerTAlk interface from which it is possible to extract the tags of the calls managed by the iPerTAlk system in a determined period, according to selection filters. This page can be consulted by users with Supervisor and Administrator rights by accessing the CDR item of the System menu. - Page 55 — Transfer Management: allows setting the transfer of calls not managed by the extension, according to the following possible selections: • Do not disturb: allows inhibiting the calls directed to the extension; a call to the extension in “do not disturb”...
-
Page 56: Real-Time Consultation Of The State Of System's Lines And Extensions
The following parameters explain the different rights granted to any type of user. • Operator: this section allows activating the Operator Station page in the myTalk web interface for the user. (see relevant section of the manual). • Pick group: Identification of the belonging group of the extension for the function “answer for unavailable person”, i.e. -
Page 57: Date And Time Automatic Update
11.18 DATE AND TIME AUTOMATIC UPDATE iPerTAlk is equipped with an NTP server which has the task of keeping aligned the time of all the telephone devices connected. It also has an NTP client that synchronises the time with public NTP servers and an RTC module, which maintains the time in case of a blackout. -
Page 58: Setting Call Forwarding To Smartphone/Tablet Via Callme App
11.20 SETTING CALL FORWARDING TO SMARTPHONE/TABLET VIA CALLME APP You can forward any audio or audio-video call from an outdoor station or call module to one or more smartphones/ tablets. The maximum number of call forwarding operations to any smartphone/tablet is given by the number of licences for SIP Junction Channel Ref. - Page 59 5. From the Menu, select “System” and press “Call forwarding”. The following screen will be displayed: 6. Press the icon to open the settings page. 7. Press on the item “Configuration” and select the trunk to the cloud previously defined. Confirm the configuration by pressing the button 8.
- Page 60 To view the SIP ID, open the CallMe App with your smartphone/tablet and press the key Setting → Service management → SIP ID. 10. Save the configuration by pressing the button At this point you will be able to use the accounts created in the call redirection configurations of each extension. This operation can be performed through the iPerTAlk web interface (Telephone Functions →...
-
Page 61: Integration With Ipercom 2.0 System
You can also manually change the quality of the video considering the available internet bandwidth. This configuration is possible by accessing the menu System → Advanced Configurations → System Definition → System, changing the value of the “Video Quality for call forwarding” parameter. It is suggested to consider the following reference table: Level Upload bandwidth available... -
Page 62: Simultaneous Calls On Ipercom Trunks
Press the button “Save” to create the new gateway. You can only configure one trunk per type, i.e. after configuring an IperCom trunk, it will no longer be visible/selectable in the drop-down menu on the page to create a new trunk (the same applies to the Urmet Cloud trunk). -
Page 63: Enabling The Ipercom Network
11.21.4 ENABLING THE IPERCOM NETWORK After creating an inbound routing rule it is necessary to check the Ipercom network configuration. Select the following menu items: System → Advanced Configurations → System Definition → Network → IPerCom Network. If the integration with the Ipercom system requires the use of the switch Ref. 1375/701 follow the instructions below: 1. - Page 64 On this screen you can see the IP address assigned to your iPerTAlk device. — If there is a DHCP server (automatic addressing) in the Ipercom system, set the “NET MODE” parameter to “DHCP” mode. DS1375-020E...
-
Page 65: System Configuration
12. SYSTEM CONFIGURATION 12.1 INBOUND ROUTING This section of the system’s configuration controls how incoming calls are managed. Three default profiles are available: day, night and other. Through the licence for Routing Profile Ref. 1375/9 it is possible to activate a further profile for the management of the inbound call routing (in addition to the 3 provided by default by the system), for particular time intervals (for example: holidays, bank holidays, etc.). -
Page 66: Outbound Routing
ATTENTION: the iPerTAlk system checks the rules in order from the first line down and, when the first match is found, the call is forwarded to the destination specified in the rule. In this example: — all calls coming from the isdn01 line at any time will be forwarded to extension 90201 —... -
Page 67: Profile Calendar
In the image above, you can see that international calls are routed using the “isdn02” line trunk, while calls to domestic mobile numbers are routed using the “isdn01” line trunk. Both rules perform a manipulation by replacing the same sequence of digits that is used as a prefix, in essence the number called is not changed, but these operations are necessary to be able to select the most appropriate line according to the destination dialled. -
Page 68: Applications
12.5 APPLICATIONS The iPerTAlk system allows the installation of Applications, i.e. interactive automatic answering machines whose purpose is to manage an incoming call, according to the relative configurations applied. The pre-installed applications are the following ones: — ITM: is mainly used for managing incoming calls, keeping them on hold and trying to contact the extension or set of extensions indicated in the relevant configuration. - Page 69 in the section “Welcome Prompt”. 6) Press the key 7) Indicate the number called, among those confirmed to the iPerTAlk system, in the left box and the name of the file containing the music to be played in the right-hand box. 8) Repeat step 6 until the configuration is complete for all the desired numbers.
- Page 70 Parameter Values Description Target of the call if selections are not active. It can be a telephone number (extension or public network) or a name of a queue (if the ACD function is active and configured). public You can specify a series of destinations separated by semicolons: the answering Default number / machine will make the calls in sequence using the no answer timeout indicated...
- Page 71 Parameter Values Description Message file Closed (without Music played if the night profile is active (active with Profile Check set to true) extension) Target of the call if the default profile is not active (with Profile Check set to true). You can specify a series of destinations separated by semicolons: the answering public machine will make the calls in sequence using the no answer timeout indicated...
-
Page 72: Voicemails (Vmail / Consultation)
It is possible to create a multiple-choice menu. The destinations of choices can be as follows: — system’s extensions, both local and remote (by using the relevant system’s code prefix 9X); — groups of extensions; — numbers of the public network, both fixed and mobile, with the possibility to specify a choice for the line trunk; through the relative prefix (for example # 10112400);... - Page 73 The voice messages of all (user and system) voice mails are saved to the system memory support. iPerTalk autonomously deletes the messages older than 90 days, in order not to fill the memory. These applications are already installed by default in the iPerTAlk system. However, if they are not present, it is possible to install them again.
-
Page 74: Operator Station (Poa) Installation
WARNING: the function is available only for user vmails and not for system vmails, system messages can be listened via myTalk interface or via mail. Then configure the Vmail Application through the key present in the list of installed Applications: Ring welcome default: indicate the name of the audio file to play during the service welcoming phase. -
Page 75: Group Management
— Name : poa (in lowercase letters). — Indoor: (number of the extension to be assigned to the service). — Contemporary: (number of calls that can be managed simultaneously). — Music on hold custom (leave the field empty or choose a music available in the system). —... -
Page 76: Software Update
To move an extension to the group, select it in the windows on the left and move it to the windows on the right using the arrow key. To remove it from the group, select it in the windows on the right and move it to the windows on the left using the arrow key, under the same window. -
Page 77: Device Firmware Loca Update Via Mytalk Interface
3. Inside the folder “ipertalk” unzip the ZIP archive containing the local update package of the system. 4. Connect the USB device to any USB port of iPerTAlk (it is not required to restart the system). 5. Access the section “Software Update” inside the “System” menu. 6. -
Page 78: Fias Protocol Integration Module
12.8 FIAS PROTOCOL INTEGRATION MODULE To enable the service, the licence for Hotel Services FIAS Protocol Ref. 1375/7 is required. iPerTAlk supports the FIAS protocol Micros-Fidelio FIAS (Fidelio Interface Application Specification protocol). The protocol is commonly used for PMS applications in the Hotel and Hospitality sector and therefore makes it possible to interface iPerTAlk with the Hotel management system to exchange information such as: —... -
Page 79: Extensions
12.9.1 EXTENSIONS Terminal acquisition: — Enabled: it allows the self-configuration of supported Urmet devices. When they are connected to the network, an extension number is automatically assigned and they are entered in the system. — Disabled: it allows the automatic detection of supported Urmet devices. When they are connected to the network, they are detected, but their acquisition has to be confirmed by the administrator. -
Page 80: Analogue User Terminal Support, Ip/Sip, Third-Party Software
12.9.1.2 ANALOGUE USER TERMINAL SUPPORT, IP/SIP, THIRD-PARTY SOFTWARE iPerTAlk complies with the SIP standard, so it also allows you to manage third-party devices, as long as they comply with the SIP RFC3261 standard. The service requires the activation of a licence for Generic extensions Ref. 1375/32x. To configure a third-party IP/SIP type terminal, create a “SIP Extension”... - Page 81 Parameter Values Description Presentation Calling numerical code Number displayed from the extension for outbound calls. Number Number of Extension numbers associated to the gateway. To be configured based numerical code Channels on the availability of the terminal being configured. DTMF Relay rfc2833/info/off Type of DTMF digit signalling.
-
Page 82: Lines
12.9.2 LINES The Lines section allows the configuration of line gateways (analogue/ISDN), interconnection trunks between PBXs, lines to VoIP operators, connection to the Urmet cloud for call forwarding or trunks towards the Ipercom system. The Overflow function allows you to associate a line trunk with another line trunk that will be engaged if the first one has reached the maximum limit of simultaneous calls (all the channels that make up the first line trunk are busy). -
Page 83: Overflow On Line Trunks
In the Trunk Mapping section you can associate each line trunk with a specific prefix. The line trunk associated with prefix #0 will be the one used by default, i.e. in case the internal user dials a number that is not present in the iPerTAlk system numbering plan. -
Page 84: Voip Lines
12.9.2.3 VOIP LINES The iPerTAlk system allows managing different types of VoIP lines, namely: — lines for Urmet gateway: VoIP lines that allow interfacing the iPerTAlk system with gateways (external conversion devices) dedicated to the management of traditional lines (analogue, ISDN, GSM). Setting each one of these lines requires the activation of a licence for Urmet GW channel Ref. - Page 85 Once the gateway item no. has been selected, the gateway configuration page will be shown to enter the following parameters: — MAC Address: enter the MAC address of the gateway to be set (written on the rear side of the product), only numbers and characters (small), without any separators.
-
Page 86: Ipercom Lines
In this example, the numbers beginning with +39 are changed into 0039 and the numbers beginning with 11 are changed into 011. The editing rules use regular expressions: the first field is used for the analysis, the second one alters the subject of the analyses and its content. -
Page 87: Trunk Lines (Voip Junction)
— Activate Registration: timeout for the registration of your own credentials on the Provider’s servers. The registration activity (namely the authentication) performed from the iPerTAlk system towards the VoIP Provider is used to communicate on which public IP/port the calls from public numbers will be sent, in order to allow managing by the iPerTAlk system. -
Page 88: Line Trunks
12.9.3 LINE TRUNKS This section allows configuring line trunks in order to specify the port of the line gateway to be used for incoming calls. If a line gateway has been already configured, a trunk including all the gateway ports will be automatically created. To create a new trunk, click on the button and enter the relevant parameters. -
Page 89: Network - Telephone Network
— Intercom conversation timeout: maximum duration of calls between door phone indoor stations. — Default Operator: extension or application dedicated to the management of calls addressed to the operator station. — No answer redirection: implementation of the redirections configured in the terminals that can be set to activate them only on inbound calls or on all calls. -
Page 90: Remote Connections Via Vpn Tunnel
12.9.4.4 REMOTE CONNECTIONS VIA VPN TUNNEL The iPerTAlk telephone system features a VPN tunnel management system (of OPENVPN type) for the connection of remote offices, both in case of several offices with iPerTAlk system and in case of offices with remote telephones only. -
Page 91: Date And Time
12.9.4.5 DATE AND TIME This section allows forcing the system’s time and the reference Time Zone. Date and Time are kept by the internal clock and it is necessary to set them only if the system does not feature an access to the Internet. -
Page 92: Automatic Operator Station
12.10 AUTOMATIC OPERATOR STATION This section allows configuring the automatic Operator Station. This application manages INTERNAL or INBOUND calls that receive a busy signal from an extension or that are not answered. 12.10.1 INTERNAL CALL MANAGEMENT The Redial Reservation function allows activating (1) or disabling (0) the call reservation function in case of busy signal. -
Page 93: Alarm Clock
12.10.3 ALARM CLOCK The music used for the Appointments function is set in this section among those available in the application. 12.11 BILLING CALLS Enabling the service requires the presence of the license Hotel call billig Ref. 1375/6. The Billing calls page allows you to extract a report of outgoing calls made from an extension of the system in a given period, on which the total conversation time in minutes and seconds is calculated and then multiply this conversation time by a constant value that defines the cost per minute of the calls. -
Page 94: Cdr (Call Record)
Once the selection parameters have been set, confirm by pressing the key The following screen will appear: Call records can be downloaded in .csv format for any other further processing. 12.12 CDR (CALL RECORD) The CDR page allows checking the call history, managed through iPerTAlk system, by applying filters based on calling number, called number, time interval, call outcome and engaged line. -
Page 95: Backup/Restore Of The Configuration From Web Interface
— Start date: start date used for the search in the call records. — End date: End date (included) used for the search in the call records. — Start time: Start time used for the search in the call records. —... -
Page 96: Extension Management
The most frequent use of this function concerns the call to hotel receptions by typing the number “9”: in this case it will be necessary to insert in the column “Called No.” the “9” and in the column “New Destination” the extension of the reception. -
Page 97: Extension Registry
Gateways are automatically subjected to the reconfiguration of the extension but it is recommended to restart the gateway once (refer to the manuals of the gateway). In case you have changed the extension of a device configured as “SIP Audio extension” or “SIP Video extension”, the new extension must be reported manually in the configuration of the device itself. - Page 98 DS1375-020E...
- Page 99 DS1375-020E...
- Page 100 DS 1375-020E LBT 20692 URMET S.p.A. Area tecnica 10154 TORINO (ITALY) servizio clienti +39 011.23.39.810 VIA BOLOGNA 188/C http://www.urmet.com Telef. +39 011.24.00.000 (RIC. AUT.) e-mail: info@urmet.com +39 011.24.00.300 - 323...
Need help?
Do you have a question about the iPerTAlk 1375 and is the answer not in the manual?
Questions and answers