
Subscribe to Our Youtube Channel
Related Manuals for Procolored A3-R1390


Summary of Contents for Procolored A3-R1390
- Page 1 A3-R1390- Roller version Dtf Printer manual *Due to occasional product upgrades, this manual is for reference only.
-
Page 2: Table Of Contents
Table of Contents Safety Instructions ........................2 Machine Views ..........................3 Introduction of printer buttons ....................4 1.Connect the printer ........................5 2.Install the drive .........................6 3.Install the rip software ......................6 4.Install print curves ........................8 5.Machine Installation And Setting ..................10 6.Whole process of printing .....................11 7.Maintenance ...........................12 *Due to occasional product upgrades, this manual is for reference only. -
Page 3: Safety Instructions
Safety Instructions 1. Read all instructions. 2. Use the A3 R1390 Roller Printer only for its intended use. 3. To reduce the risk of electric shock, do not immerse the DTF printer in water or other liquids. 4. Do not disassemble or attempt to repair the DTF printer. Take it to a qualified service person for examination and repair. -
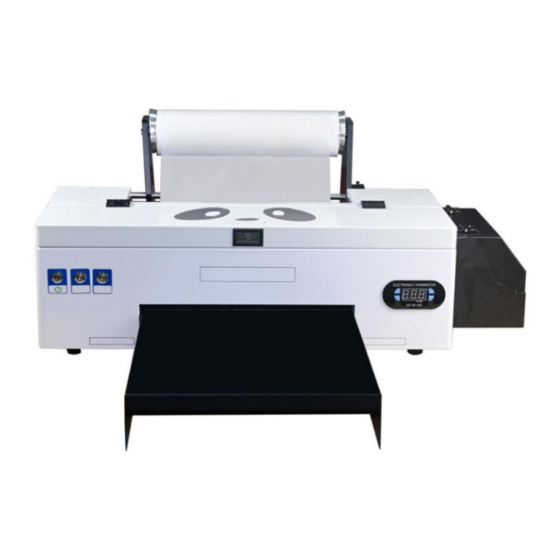
Page 4: Machine Views
Machine Views Film feed position Waste collector Temperature and humidity display Nozzle position Ink position printer panel buttons film exit position *Due to occasional product upgrades, this manual is for reference only. -
Page 5: Introduction Of Printer Buttons
Introduction of printer buttons start Press this button to open and close the printer power button Press this button to move the print head to the cartridge change location. When detecting the service life of the cartridge market, press this button to print the head to the ink check position. -
Page 6: Connect The Printer
1.Connect the printer 1.1 Connect the printer data cable 1.2 Insert data U disk 1.3 Connect the cable and start the 1.4 Click the Start button on the front power supply. of the printer. 1.5 In the process of self-checking, it lights up with 1.5 The printer is ready once the red double flashes. -
Page 7: Install The Drive
2.Install the drive 2.1 Find the driver file "DTF1390" in the data U disk 2.2 install to C drive 3.Install the rip software 3.1 Insert the dongle 3.2 Before installing the software,Under the root directory of your Computer's C drive, create a new folder and name it "C:\DTGRIP"... - Page 8 *Due to occasional product upgrades, this manual is for reference only.
-
Page 9: Install Print Curves
4.Install print curves 4.2 Find the 2 folders "media" and Find the "curve setup file" in the data U disk "profile" and copy them *Due to occasional product upgrades, this manual is for reference only. - Page 10 4.3 Find the installation folder of the rip software, 4.4 After the installation is successful, open the rip and copy the two folders just copied to the software, you can see the DTF-1390 curve installation folder of the rip software. *Due to occasional product upgrades, this manual is for reference only.
-
Page 11: Machine Installation And Setting
5.Machine Installation And Setting 5.1 Installation of waste ink bottle 5.2 Put one sheet PET film for a. Unscrew the screws testing b. Thread the plastic tube into the waste ink P.S. The side with matte of pet film bottle must put on the front side. -
Page 12: Whole Process Of Printing
Note: If the print head test line is not neat, there are too many missing lines. Go with F12 "Head Cleaning" again and print again 6.Whole process of printing 6.1 Place the pet film with matte on the 6.2 Select the image that you want to front side print and adjust the size and position 6.3 Make a simple setup and import the... -
Page 13: Maintenance
7.Maintenance 7.1. Work environment The best working environment temperature 25-30 degrees, humidity above 50% 7.2. The ink Please try to use up the ink within 3 months after opening to avoid spoilage. 7.3. Shut down the device After the work is completed, please turn off the equipment in the normal order, first turn off the printer with the button, then turn off the main power supply, and keep the ink cartridge cart on the right side (this is to make the print head and the waste ink pump fit closely to prevent the print... - Page 14 Notice: 1. The print head and waste ink pump are not covered by the warranty. Due to the characteristics of DTF ink, if the print head is not used for a long time, the print head is easily blocked. Please carefully maintain the print head. If you do not use it for more than three days, please install the print head moisturizing solution.
Need help?
Do you have a question about the A3-R1390 and is the answer not in the manual?
Questions and answers
i changed my print head now no ink is coming out that do i do
If no ink is coming out after changing the print head on your Procolored A3-R1390, first check if ink has been pulled into the dampers and drawn out from the waste tube. If both are okay, the new print head may be faulty or burned.
This answer is automatically generated