
Subscribe to Our Youtube Channel
Related Manuals for Procolored UV DTF-I608


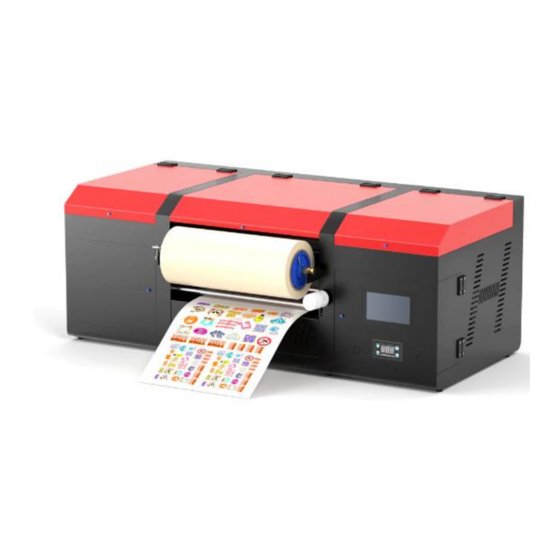
Summary of Contents for Procolored UV DTF-I608
- Page 1 UV DTF-I608 Printer Manual (AB Model) *Due to occasional product upgrades, this manual is for reference only.
-
Page 2: Table Of Contents
Content Safety Instructions .......................4 Machine Views ......................5 Operations Instructions ....................6 1. Connect the Printer ....................6 2. Install Software Driver .................... 7 3. AB Film Installation and Machine Performance Test .........12 4. Add Ink ........................16 5. Print State Diagram (For testing the performance of print head) ....17 6. - Page 3 Operation Videos Corresponding operation videos on YouTube for reference: 1.Connect the Printer: https://youtu.be/0Uf1ZHcwwao 2.Install Software Driver: https://youtu.be/wXC5tcqwBnk 3.AB Film Installation: https://youtu.be/yGXxoSaOR7M 4.How to Add Ink: https://youtu.be/AP5dDseqpPU 5.Print State Diagram: https://youtu.be/k-y1LbBbwZg 6.Printing Software Installation and Use: https://youtu.be/akykxO0o-Eg 7.Printing Sticker: https://youtu.be/X-VMxDLIfPY 8.Maintenance: https://youtu.be/Duu_odsZJzM *Due to occasional product upgrades, this manual is for reference only.
-
Page 4: Safety Instructions
Safety Instructions 1. Read all instructions. 2. Use the printer only for its intended use. 3. To reduce the risk of electric shock, do not immerse the printer in water or other liquids. 4. Do not disassemble or attempt to repair the printer. Take it to a qualified service person for examination and repair. -
Page 5: Machine Views
Machine Views B film position Ink bottles Ink bottles Wheel control handle Touch screen buttons Temperature controller and display Suction button Film exit position Switch Waste ink discharge tube A film position *Due to occasional product upgrades, this manual is for reference only. -
Page 6: Operations Instructions
Operations Instructions 1. Connect the Printer Refer to YouTube video: https://youtu.be/0Uf1ZHcwwao 1.1 Check the package and the whole 1.2 Cut off the white cable ties machine in case of damage 1.3 Connect the cable and start the power 1.4 Connect the USB cable to computer supply. -
Page 7: Install Software Driver
2. Install Software Driver Refer to YouTube video: https://youtu.be/wXC5tcqwBnk 2.1 Create a folder “A3 UV” 2.2 Open Windows Security Center 2.3 Click on Virus and Threat Protection *Due to occasional product upgrades, this manual is for reference only. - Page 8 2.4 Click Manage Settings 2.5 Click add or remove exclusions *Due to occasional product upgrades, this manual is for reference only.
- Page 9 2.6 Enter from the drop-down box “folder”, Select the folder “A3UV” 2.7 Back to Virus and Threat Protection, look for and click management ransomware protection *Due to occasional product upgrades, this manual is for reference only.
- Page 10 2.8 Open Controlled folder access, click protected folders 2.9 Click add a protected folder, add the folder A3UV created before. *Due to occasional product upgrades, this manual is for reference only.
- Page 11 2.10 Copy all the data in the white USB disk 2.11 Open the folder “ software driver” to the folder “ A3UV” 2.12 Unzip the VRIP, click the “usb device” , 2.13 Return to last folder, there is then double-click to install “vc-package”, open it and click VCR_hyb 2.14 Back to last folder, open V RIP 2.15 After that, right click VRIP to send to...
-
Page 12: Ab Film Installation And Machine Performance Test
3. AB Film Installation and Machine Performance Test Refer to YouTube video: https://youtu.be/yGXxoSaOR7M 3.1 Install A film rod and B film rod. 3.2 Install the fixing bracket of the A film First remove the 12 screws with screwdriver 3.3 Install C3 axis bracket 3.4 Install the electric transfer film shaft (C3 axis) 3.5 Insert the white terminal socket into the... - Page 13 3.7 Unscrew the screws which is in the front 3.8 Place the reel holder in the groove and of the machine to put B film reel note the direction of rotation of the reel 3.9 Press down the wheel control handle 3.10 Install B film (through rail), straighten it up 3.11 Same way to assemble the A film rod, 3.12 Install A film rod...
- Page 14 3.14 Peel off the transfer film on A film 3.15 Pass the stripped A film through rail, A film need to be the center of the B film 3.16 Pull the transparent film back through 3.17 Pull up the wheel control handle the bottom of the C1 axis, above the C2 axis, and then attach it to the C3 axis 3.18 Turn on the main switch and suction...
- Page 15 3.20 Print test diagram. click A3UV-test chart-right click the diagram-click print 3.21 Fill 50 in X Margin, right click the task ”222”, click ”start printing”, after printing, the ink cart will go back to the origin. *Due to occasional product upgrades, this manual is for reference only.
-
Page 16: Add Ink
4. Add Ink Refer to YouTube video: https://youtu.be/AP5dDseqpPU Add the corresponding ink C-cyan, M-magenta, Y-yellow, K-black, W-white, V-varnish, GL-glue 4.2 Ink Extraction 4.3 draw 10ml ink from waste ink tube one by one, draw 5-10ml ink each *Due to occasional product upgrades, this manual is for reference only. -
Page 17: Print State Diagram (For Testing The Performance Of Print Head)
5. Print State Diagram (For testing the performance of print head) Refer to YouTube video: https://youtu.be/k-y1LbBbwZg 5.1 Clean the print head, choose all head. 5.2 Print nozzle state diagram Repeat to clean once. 5.3 Finish printing, if there is no string color, mixed color or serious line break, that means the machine is in a good situation. -
Page 18: Printing Software Installation And Use
Printing Software Installation and Use Refer to YouTube video: https://youtu.be/akykxO0o-Eg 6.1 Open the A3UV folder-software 6.2 Open the unzipped folder RIIN5.2, click driver-unzip RIIN5.2 the application, complete the installation as prompted, then minimize the window. 6.3 Add curve 6.4 Unzip the two package, and right click and Click ”sticker RIIN curve”... - Page 19 6.7 Click Printer-honsonsoft-EPS4720, paste 6.8 Click to open the RIIN software the two curve folders to this 4720 folder. 6.9 Click RIIN-Printer setting 6.10 Set EPS-4720 as default 6.11 Spot color setting as below, then click application, minimize it. *Due to occasional product upgrades, this manual is for reference only.
- Page 20 6.12 Make 3 spot color channels in 6.13 Click channel-create new spot color Photoshop. First, import an image you want to channel, named “W1”, same to create”W2” print, select the layer and “W3” 6.14 Save the image as TIF format 6.15 Open the RIIN software, import the image we saved (TIF format), click the image to see and set printing size.
- Page 21 6.17 Click print 6.18 Save as PRN format, named “222” for example. Just wait to finish. *Due to occasional product upgrades, this manual is for reference only.
-
Page 22: Printing Sticker
Printing Sticker Refer to YouTube video: https://youtu.be/X-VMxDLIfPY 7.1 Open the RIIN software, import the image we saved as PRN format, click print 7.2 Click start printing *Due to occasional product upgrades, this manual is for reference only. - Page 23 7.3 Finish Printing, press back to output more film for cutting. 7.4 Cut the pattern, peel off the A film, stick to a product you want, peel off the B film *Due to occasional product upgrades, this manual is for reference only.
-
Page 24: Maintenance
8. Maintenance Refer to YouTube video: https://youtu.be/Duu_odsZJzM 1. Clean all print heads and print diagram everyday. ①click on the screen: clean -- clean all -- return *Due to occasional product upgrades, this manual is for reference only. - Page 25 ②test-status *Due to occasional product upgrades, this manual is for reference only.
- Page 26 2. Clean raster bar Move cart to the center -- use clean cloth with alcohol to clean. 3. Clean scraper *Due to occasional product upgrades, this manual is for reference only.
- Page 27 4. Clean ink station everyday *Due to occasional product upgrades, this manual is for reference only.
- Page 28 5. Clean the bottom of print head Move print head to the far left, use clean cloth with alcohol, please kindly note that we should wipe it in the same direction. Also clean the surrounding panel of print head. *Due to occasional product upgrades, this manual is for reference only.
- Page 29 6. Clean the rail and grease it every 15 days. 7. After after cleaning and maintenance is completed, click reset. It is forbidden for ink carts to stay beyond zero point for a long time to prevent print heads clogging. Then clean paper roller and printing platform.
- Page 30 Notice: Proper shutdown step: close the printing software turn off the machine *Due to occasional product upgrades, this manual is for reference only.
-
Page 31: Notice
Notice The print head and waste ink pump are not covered by the warranty. Due to the characteristics of UV ink, if the print head is not used for a long time, the print head is easily blocked. Please carefully maintain the print head.
Need help?
Do you have a question about the UV DTF-I608 and is the answer not in the manual?
Questions and answers