Table of Contents
Advertisement
Quick Links
Advertisement
Table of Contents

Related Manuals for RENPHO R-D002RS


Summary of Contents for RENPHO R-D002RS
- Page 1 User Manual Smart 2 in 1 Foot and Calf Massager...
-
Page 2: Table Of Contents
CONTENTS 1. Important Safety Instructions 2. About the Product 3. Using the Product 4. App Guide 5. Charging 6. Maintenance and Cleaning 7. Troubleshooting Guide 8. Warranty Policy 9. Customer Service... -
Page 3: Important Safety Instructions
Thank you for purchasing the RENPHO 2 in 1 Foot and Calf Massager! Please read this user manual carefully and use the device only as directed. RENPHO accepts no responsibility for any cause of injuries due to misuse or negligence to follow the instructions outlined. Please keep this manual for future reference. - Page 4 places. 8. Do not reach for the device that has fallen into the water. Unplug immediately. WARNING – To reduce the risk of burns, fire, electric shock or injury to persons: 1. Please consult your doctor before using if you are a user of the following types:...
- Page 5 20. To disconnect, turn all controls to the off position, then remove the plug from the outlet. 21. Only use accessories officially provided by RENPHO. 22. The device has a heated surface. Persons insensitive to heat must be careful when using the device.
-
Page 6: About The Product
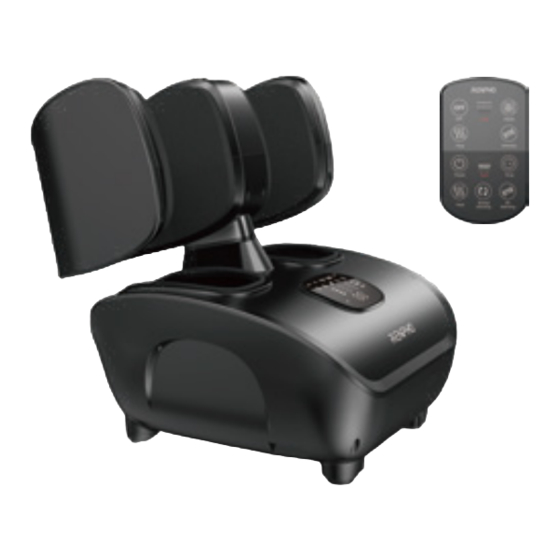
About the Product 1. What’s in the Box 1 × RENPHO 2 in 1 Foot and Calf Massager 1 × Remote Control 1 × User Manual 2. Product Parameters... - Page 7 3. Product Introduction Control Panel Calf Massager Detachable Calf LED Light Cover with Zipper Detachable Foot Cover with Zipper Charging Port Type-C Control Panel Charging Port Foot Massager Remote Control Control Panel (1) Foot Massager Tap to turn on/off the foot massager only OR both the foot massager and calf massager if they work together.
- Page 8 Tap to cycle through Level 1 (Default), Level 2, Level 3, Level 4 and OFF. Tap to cycle through Full (Default), Bottom, Instep and OFF. The indicator will be on once the pairing is successful. (2) Calf Massager Long press to turn on the calf massager only. Long/short press to turn off the calf massager only.
- Page 9 Remote Control Calf Mode Heat Intensity Power Foot Time Knead Heat Intensity Intensity Press to turn off the calf massager only. Short press to turn on/off the heat function (On, Calf default). Press to cycle intensity level through Light (Default), Medium and High.
- Page 10 Note: a. Please remove the isolation strip from the battery when you use the remote control for the first time. b. To prolong the battery life, remove the battery from the remote control when not in use for a long time. c.
-
Page 11: Using The Product
Using the Product 1. Recommended Massage Postures Note: a. It is not recommended to use the device for more than 30 minutes each time. b. To avoid any injury, do not stand up during the massage. 2. Operation Work Together (Foot massager+Calf massager) (1) Connect the power cord to the power supply, and the Power indicator on the foot massager will flash white, followed by a beep, indicating that the foot and calf massager is in standby mode. - Page 12 remote control to turn on the foot massager. (3) Select massage options pressing the corresponding buttons on the control panel or remote control according to your preference. (4) Tap the Power button on the control panel of the foot massager or press the Power button on the remote control to turn the foot massager off after the foot massage is complete.
-
Page 13: App Guide
DIY mode before switching off. App Guide 1. Download the Renpho Health App Search “Renpho Health” from Apple Store / Google Play or scan the QR code below to download the App. * The “Renpho Health” App may appear slightly different due to continuous updates. - Page 14 Method 1 a. Refresh the “Home Page” and a window will pop up on the phone screen. b. Tap “Pair” to pair the App with the device. Method 2 a. Tap “+” on the top right corner of the “Home Page” to connect manually.
- Page 15 4. Massage Massage (1) Foot Massage a. Tap the “Device Page” to choose “2 in 1 Foot and Calf Massager R-D002RS”. b. Tap “ ” on the homepage bottom to turn on/off the foot massager. c. Select massage options among Time, Air Intensity, Knead Intensity and Heat according to your preference.
- Page 16 (2) Calf Massage a. Tap the “Device Page” to choose “2 in 1 Foot and Calf Massager R-D002RS”. b. Tap “ ” on the right top of the calf massage section to turn on/off the calf massager. c. Select massage options among Mode, Air Intensity and Heat according to your preference.
- Page 17 5. DIY Mode a. Tap “DIY” on the homepage to DIY your massage session. b. Tap “Add” on the “DIY List Page” to add your customized settings. On the “Add Stage Page”, you can enter a name for your customized settings and choose a time range.
- Page 18 * Edit the massage stage a. Tap “Timer” to choose a duration time. b. Select the massage options for foot and calf massage according to your preference. *For foot massage, if the 2-tier or above air intensity is selected, you can choose the compression hold time and turn on/off the roller during the compression holding process.
- Page 19 d. The longer compression hold time you select, the more pressure you may get. It is recommended to switch the roller off if you feel any discomfort during the compression holding process. 6. Favorite Setting * Ensure that the device is on before setting your favorites. a.
-
Page 20: Charging
Charging *Only the calf massager can be charged. 1. Low Battery Reminder When the calf massager is in low battery, its lowest battery level indicator will flash. 2. Charging the Calf Massager Method 1: Place the calf massager back to the charging port of the foot massager and connect the power cord to the power supply to charge the calf massager. -
Page 21: Maintenance And Cleaning
Maintenance and Cleaning 1. The use of non-rated voltage is prohibited. 2. Unplug the device after use. 3. It is prohibited for non-professional personnel to repair the device or replace its parts. 4. The device is temperature protected. It will automatically shut off when the temperature exceeds the safety limit. -
Page 22: Troubleshooting Guide
Troubleshooting Guide Part Problem Cause Solution Short press the Long press the Power Power button button to turn the calf on the control massager on, while short panel. press to turn it off. Low Battery. Place the calf massager back to the charging port on the foot Power-on massager and connect... - Page 23 Part Problem Cause Solution Power-on The power plug is 1. Check the plug. failure. not inserted 2. Check the Power properly. indicator. Fail to adjust the Press the Heat button to heat. cycle through Full, The heat Bottom, Instep and OFF. function does not The foot massager...
- Page 24 Part Problem Cause Solution The phone is too Keep the phone close to operation far away from the the device. does not device. work. Slow app Poor network. Operate the App in an loading. environment with good Internet access. Tap too quickly. Re-tap later.
-
Page 25: Warranty Policy
Warranty Policy Your RENPHO product purchase is covered by a one-year limited manufacturer warranty from the date of delivery. For warranty terms and conditions, please visit: Note: Product registration is not required for the warranty. If you choose not to register your product, it will not diminish the product warranty. - Page 26 FCC Regulatory Compliance This device complies with part 15 of the FCC Rules. Operation is subject to the following two conditions: (1) This device may not cause harmful interference, and (2) this device must accept any interference received, including interference that may cause undesired operation. Warning: changes or modifications not expressly approved by the party responsible for compliance could void the user’s authority to operate the equipment.
- Page 27 (2)This device must accept any interference, including interference that may cause undesired operation of the device. Le présent appareil est conforme aux CNR d'Industrie Canada applicables aux appareils radio exempts de licence. L'exploitation est autorisée aux deux conditions suivantes: (1) l'appareil ne doit pas produire de brouillage, et (2) l'utilisateur de l'appareil doit accepter tout brouillage radioélec- trique subi, même si le brouillage est susceptible d'en compromettre le fonctionnement. This equipment complies with IC RSS-102 radiation exposure limits set forth for an uncontrolled environment.
- Page 28 US Importer: JOICOM CORPORATION...
- Page 29 印刷方式: 骑马钉 尺寸: 98*135mm 材质: 128g铜版纸 此页无需印刷...
Need help?
Do you have a question about the R-D002RS and is the answer not in the manual?
Questions and answers