Advertisement
Quick Links
QUICK
START GUIDE
Garage-Control Cam with Sensor
Garage-Control Cam Plus with Sensor
Anker Innovations Limited. All rights reserved. eufy Security and eufy Security Logo are
trademarks of Anker Innovations Limited, registered in the United States and other
countries. All other trademarks are the property of their respective owners.
*Scan the QR code to watch the step-by-step "How to Install" video.
51005003163 V02
Advertisement

Related Manuals for eufy Security Garage-Control Cam


Summary of Contents for eufy Security Garage-Control Cam
- Page 1 Garage-Control Cam with Sensor Garage-Control Cam Plus with Sensor Anker Innovations Limited. All rights reserved. eufy Security and eufy Security Logo are trademarks of Anker Innovations Limited, registered in the United States and other countries. All other trademarks are the property of their respective owners.
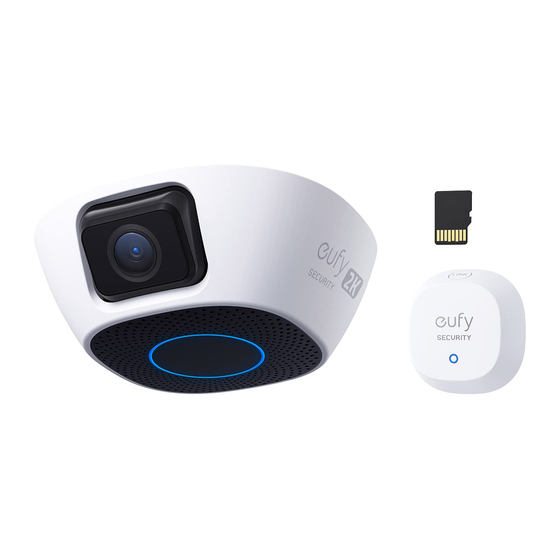
- Page 2 MicroSD Card Slot Garage Door Sensor Model: T8450 Status LED ① • Flashing blue: Pairing with the camera. • OFF: Working properly / Powered off. SYNC Button ② Battery Cover ③ Garage-Control Cam Plus / Garage-Control Cam Model: T8453 / T8452...
-
Page 3: Setting Up Camera
SETTING UP CAMERA 2. Download and install the eufy Security app, then 1. Connect the camera to a power outlet. sign up for an account. To use local storage, insert a memory card into the microSD card slot before powering the camera (Model T8453 includes one). - Page 4 WIRING CAMERA AND TESTING Make sure the paired strands are properly connected to their original terminal. 1. Press and hold the orange tabs, then insert one end of the provided motor connection wire into If you haven't connected to the wall control, the connectors.
-
Page 5: Mounting Camera
MOUNTING CAMERA 3. In the eufy Security app, follow on-screen instructions to open the door for a test. 1. Mount the camera underneath the garage door opener or to the ceiling. Option 1. Garage Door Opener Magnetically attach the camera underneath a metal garage door opener or a metal track. - Page 6 Option 2. Ceiling For garage door openers with a non-metal surface, stick the mounting plate underneath the garage door opener with the 3M sticker provided, then magnetically Fix the mounting iron plate to the ceiling with the attach the camera to the mounting plate. provided screw, then magnetically attach the camera to the mounting plate.
- Page 7 1. Open the battery cover, then install the provided battery. 2. Manually adjust the camera angle until you get the desired view through the eufy Security app. CR2450 Status LED Battery Status...
- Page 8 Mount the sensor on the top of the door (the gray area in the figure below). 3. In the eufy Security app, follow on-screen instructions to pair the sensor with the camera. 4. Select a location on your garage door to mount the sensor.
- Page 9 5. Mount the sensor with the provided 3M sticker. 6. In the eufy Security app, follow on-screen instructions to open the door for a test. For wood sectional doors, you can also mount the sensor with the screws provided. Make sure...
- Page 10 To show the door open/closed status correctly – mise au rebut d’une batterie dans un feu ou dans un in the eufy Security app, perform a calibration on four chaud, ou écrasement mécanique ou coupure d’une Camera Settings > Door Settings > Calibration batterie, susceptible de provoquer une explosion;...
- Page 11 explosion ou la fuite de liquide ou de gaz inflammables; interference by one or more of the following measures: (1) Reorient or relocate the receiving antenna. (2) – batterie soumise à une pression de l’air extrêmement Increase the separation between the equipment and faible pouvant provoquer une explosion ou la fuite de receiver.
-
Page 12: Customer Service
CUSTOMER SERVICE NOTICE (Canada) IC Statement This device complies with Industry Canada licence- exempt RSS standard(s). Operation is subject to the Warranty following two conditions: 12-month limited warranty 1. this device may not cause interference, and 2. this device must accept any interference, including interference that may cause undesired operation of the Call Us device.
Need help?
Do you have a question about the Garage-Control Cam and is the answer not in the manual?
Questions and answers