eufy Security SoloCam S340 Manual
- Quick start manual (20 pages) ,
- Quick start manual (78 pages)
Advertisement
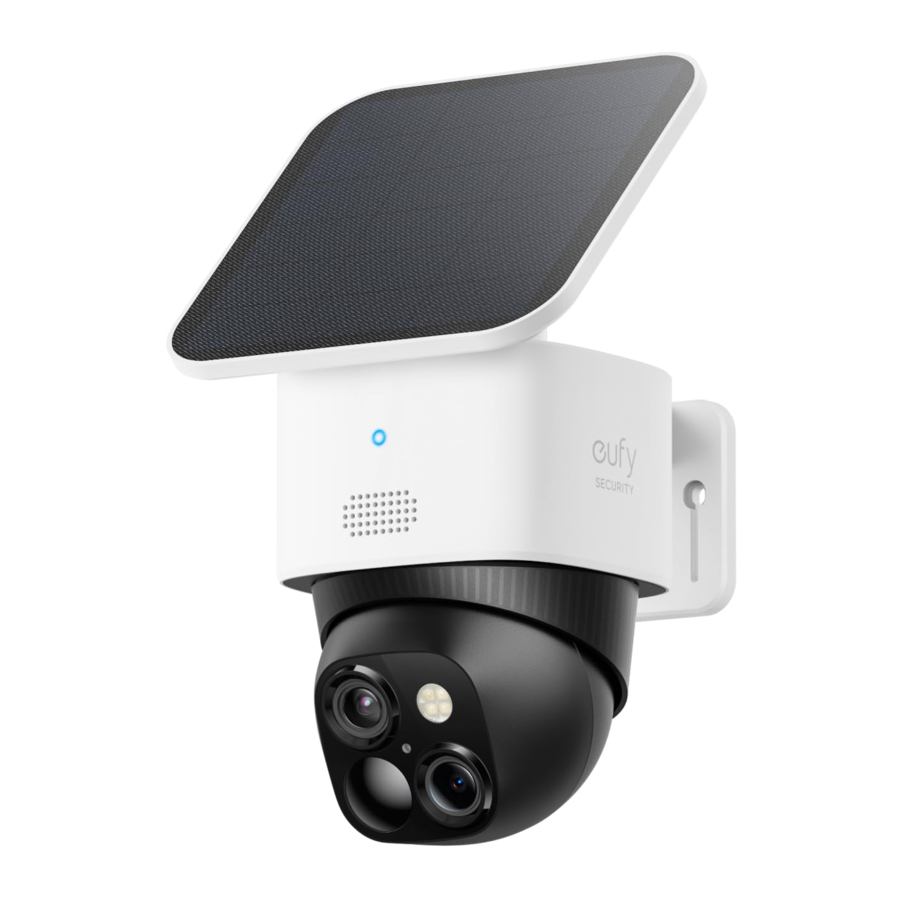
AT A GLANCE

- LED Indicator
- Speaker
- Telephoto Lens
- Photosensitive Sensor
- PIR Sensor
- Microphone
- Wide-Angle Lens
- LED Light
- Solar Panel Mounting Hole
- Mounting Hook
- USB-C Charging Port
- SYNC Button
CHARGING YOUR CAMERA
Fully charge before first use.

| Solid Blue | Charging |
| Light Off | Fully Charged |
| Charging Time | 8 Hours |
SETTING UP THE SYSTEM
- Download and install the eufy Security app, then sign in or create an account.
![]()
![www.apple.com]()
![play.google.com]()
- Follow the in-app instructions to add the camera to the device list.


MOUNTING YOUR CAMERA
Select a Location and a Height
Select a location where you can get the desired view. We recommend hanging the camera 7-10 ft (2-3 m) above the ground.

To ensure that no detection is missed, do not install the camera directly facing the monitoring area. Instead, maintain an angle to avoid any potential blind spots.

Select a Solar Panel Location
Option 1: Mount the Camera and the Solar Panel Separately (Best for Strong Solar Power)
If the camera is blocked, install the solar panel independently and use the provided USB-C extension cable to get strong solar power. The camera can be mounted on a wall or on the ceiling.


- Drill holes with a 15/64 inch (5.95 mm) drill bit with the provided positioning card, then insert the anchors into the holes.


- Connect the solar panel to the camera using the provided USB-C extension cable.

- Firmly secure the camera onto the mounting bracket.


 Be careful not to install by mistake.


- Install the mounting bracket of the solar panel in a suitable position.


- Install the solar panel onto its mounting bracket by turning it, then adjust the angle (20º~30º recommended).


Option 2: Mount the Camera with the Solar Panel Attached (Less Drilling)
If the camera is not blocked, install the solar panel directly on the top of the camera.

- Use two 5mm screws to attach the solar panel bracket to the top of the camera.
![]()

- Install the solar panel onto the solar panel's mounting bracket by turning it.

- Connect the USB-C connector to the USB-C port of the solar panel.

- Drill holes with a 15/64 inch (5.95 mm) drill bit with the included positioning card, then insert the anchors into the holes.


- Firmly secure the camera onto the mounting bracket and adjust the angle (20º~30º recommended).


SAFETY
- The suitable temperature for this device and accessories is -20°C to 50°C (Charging temperature is 0°C to 40°C).
- Unless specifically indicated that it is safe to do so in the user guide or instruction manual, do not use this device in an environment that exceeds the recommended low or high temperature.
- Unless specifically indicated that it is safe to do so in the user guide or instruction manual, avoid exposing your device to direct sunshine or excessively wet environments.
- It is recommended to supply the device in an environment with a temperature that ranges from 5°C to 25°C.
- When supplying power, place the device in an environment that has a normal room temperature and good ventilation.

THERE IS A RISK OF EXPLOSION IF AN INCORRECT BATTERY TYPE IS USED. DISPOSE OF USED BATTERIES ACCORDING TO THEIR INSTRUCTIONS.

- Replacing a battery with an incorrect type may bypass safeguards and create danger;
- Disposal of a battery in a fire or other source of significant heat, or by crushing, or cutting, may result in an explosion as well as leakage of flammable liquids and gases;
- Leaving a battery in an extremely hot environment may result in an explosion as well as leakage of flammable liquids and gases;
- A battery subjected to extremely low air pressure may result in an explosion as well as leakage of flammable liquids and gases.
Documents / Resources
References
Download manual
Here you can download full pdf version of manual, it may contain additional safety instructions, warranty information, FCC rules, etc.
Advertisement


Need help?
Do you have a question about the SoloCam S340 and is the answer not in the manual?
Questions and answers