
Subscribe to Our Youtube Channel
Related Manuals for Kabuto AERO-R1


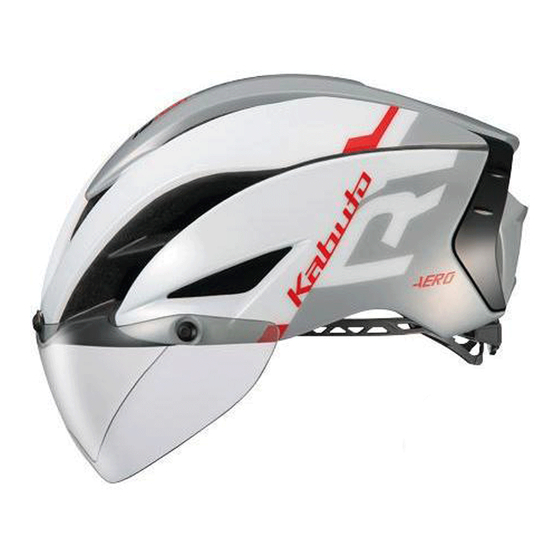
Summary of Contents for Kabuto AERO-R1
- Page 1 2017年04月版 エアロ AERO-R1系 取扱説明書 保存用 AERO-R1 INSTRUCTION MANUAL ご使用になる前に/NOTES BEFORE USE この取扱説明書は、 ご使用になる前に必ずお読みください。 また、 お読みの後は保管してくださいますようお願いいたします。 BE SURE TO READ THIS MANUAL BEFORE USING THE HELMET. KEEP THE MANUAL IN A SAFE PLACE FOR FUTURE REFERENCE.
- Page 2 ご使用になる前に このたびは、 弊社製品をお買い上げいただき、 誠にありがとうございます。 この取扱説明書は、 ヘルメットの正しい取扱方法について説明しております。 ご使用前には必ず最後までこの説明書をお読みいただき、 お読みの後は、 当説明書を大切に保管していただきますよう、 お願いいたします。 ヘルメットは、 いかなる事故にも絶対という訳ではなく、 万一の際に危険の度合いを 減らす装備の一つで、 安全の一要素としてご理解のうえご使用ください。 安全快適なバイシクルライフを楽しむためにも、 以下の注意事項を よくご理解いただきますようお願いいたします。 ●このヘルメッ トは 「自転車専用」 です。 オー トバイやその他の用途には絶対に使用しないでください。 ●国で定められている交通規則に必ず従ってください。 使用素材についての特徴説明 ■瞬間消臭素材 「MOFF 」 について ® 当製品のあごひもには、 ナノテク技術を利用した従来とは全く異なる新しい消臭方法 ® ® を採用した素材 「MOFF 」 を使用しています。 「MOFF 」...
- Page 3 部位名称ともくじ シェル ライナー XF-7アジャスター シール ド あごひも アジャス トロック ワンタッチバックル シェル ライナー ワンタッチバックルの取扱方法 あごひもおよびアジャストロックの調整 XF-7アジャスターの調整 XF-7アジャスター シールドについて ノーマルインナーパッ ドおよびA.I.ネッ トの交換方法 正しい位置でヘルメッ トを装着する...
- Page 4 ワンタッチバックルの取扱方法 ワンタッチバックルは、 あなたの頭にしっかりヘルメッ トを固定するための重要な装置です。 あごひもの両先端に付いている 「ワンタッチバックル」 を確実に留めましょ う。 ワンタッチバックルの留めかた 警 告 ワンタッチバックル ワンタッチバックルを留めるときは、 お肌を挟まないようご注意ください。 顔などケガをするおそれがあります。 ワンタッチバックルの外しかた : リリースボタンを押すと、 ワンタッチバックルが外れます。 ボタンを押す ボタンを押す 外れる 警 告 : ●あごひもは正しくしっかり締めてください。 締めないままの走行は、 万一転倒した際に大変危険です ので、 絶対におやめください。 ●ワンタッチバックルは、 必ずホルダーの最後まで (カチッと音がするまで) きっちり押し込んでくださ い。 押し込みが不完全ですと、 万一転倒した際にワンタッチバックルが外れてしまい、 大変危険です。 あごひもおよびアジャス トロックの調整 あごひもの 長さなど、 あなたの 頭にぴったりフィッ トするよう必 ず調整しましょう。 あごひもの長さは、...
- Page 5 アジャストロックの調整 ワンタッチバックルを留め、 しっかり顔の側面に合うように 「アジャス トロック」 の高さを調整しま す。 ヘルメッ トを装着し、 あごひもの の部分がすっきり納まっているか確認し、 耳の部分が緩い または、 キツい場合、 「 アジャス トロック」 を移動させて高さを調整します。 ●アジャストロックの移動方法 ② ② 上へ移動 下へ移動 ① ①を弛ませてから、 ② を 引 っ 張 る と ア ① アジャス トロック ジャストロックを移 正しいあごひも 動できます。 の状態 アジャス...
- Page 6 XF-7アジャスターの角度を変える (上下3段階) XF-7アジャスターの固定部付近をしっかりと持ち、 3段 XF-7アジャスター XF-7アジャスター 階のいずれかに移動させて合わせます。 ( 図1) なお固定 部にある4段階目の大きな穴はアジャスターを着脱する 固定部 ための穴です (図2) 。 調整時、 勢いよくこの穴まで移動さ せるとアジャスターが外れてしまいますので、 角度調整 の際はゆっく り移動させてください。 ご注意 XF-7アジャスターの角度を調整する際は、 必ずアジャス 図 1 ターの固定部付近を持って調整してください。 また調整 の際、 ねじったり無理に移動させたりすると破損の原因と なりますのでご注意ください。 ❶ XF-7アジャスターの脱着 3段階で ❷ 取り外しかた 調整可能 XF-7アジャスターの固定部付近をしっかりと持ち、 ( 図 ❸ 3)...
- Page 7 (別売) 「XF-7アジャスター」 について 「XF-7アジャスター」 は、 補修用としてもご用意しております。 別売 ・ XF-7 「別売 ・ XF-7アジャスター」 について詳しくは、 当製品掲載のカタログ アジ ャ スター もしくはホームページに掲載のパーツリス トをご覧ください。 Kabuto 検索 ご注意 : 弊社製品のアジャスター各種は、 各モデルの専用設計となっております。 補修用をお買い求めの際には、 ご使用のヘルメッ トに適合した部品をお買い求めください。 シールドについて このヘルメッ トはシールドを標準装備しており、 一般 的な眼鏡の上からお使いいただけるよう設計されて おります。 ※眼鏡の形状によっては、 ご使用になれない場合が あります。 シール ドは磁力で固定されていますので、 シール ドをしっかり持って引っ張ると取り外せます。...
- Page 8 フロン トスペーサーの取り付け方 フロン トスペーサー *裏側は黒い生地 フロン トスペーサー マジックテープ フロン トパッ ド マジックテープ (もしくはA.I.ネッ トの前部分) (ヘルメッ ト内側) マジックテープ (ヘルメッ ト内側) ※説明図は 「ノーマルインナーパッ ド」 を取り付ける場合です。 A.I.ネッ トを取り付ける場合も同様に取り付けます。 「 (別売) 補修用 フロン トスペーサーについて詳 しくは、 当製品掲載のカタログもしくはホーム ページに掲載のパーツリス トをご覧ください。 別売 ・ 補修用 フロ ン トスペーサー Kabuto 検索...
- Page 9 ノーマルインナーパッ ドおよびA.I.ネッ ト の交換方法 (Anti Insect Net) ◆当製品は、 用途やフィッティングで使い分けられる内装が2種類付属されています。 お好みによりいずれかのパッ ドを付けてください。 ※標準は 「ノーマルインナーパッ ドセッ ト」 が装着されています。 ノーマルインナーパッ ド 前 (フロン ト用) ノーマルインナーパッ ドセッ ト の 取り付け位置 図のように、 それぞれのノーマ ●エア導入効果を求めるかたに。 ルインナーパッ ドをヘルメッ ト 内部にあるマジックテープに押 しつけて貼り付けます。 ノーマルインナーパッ ド ご注意 : (トップ用) パッ ドを取り付ける際、 通気孔を塞いでしまうと、 エアの流入が悪くなるおそれがあります。 取り付ける際は、...
-
Page 10: インナーパッ ドのお手入れについて
汗などで汚れたインナーパッ ドは、 取り外して洗うことができますので、 定期的にお手入れする ことでインナーパッ ドを清潔に保てます。 インナーパッ ドを洗う場合は、 水もしくはぬるま湯 (35℃以下) にごく少量の洗髪用シャンプーもしくは家庭用中性洗剤を入れ、 やさしく手もみ洗 いを行ってからよくすすいでください。 洗い終わったら乾いた布などで水気をやさしく取り除き、 直射日光の当たらない風通しのよい場所で陰干しを行ってください。 (別売) 「AERO-R1 ・ 補修用パッ ド」 について インナーパッドは消耗品です! つね日ごろよりご使用いただいているヘルメッ ト内部のインナーパッ ドは、 消耗品です。 傷んだ インナーパッ ドをそのまま、 使い続けると破れてしまい、 フィ ッ ト感などに悪影響をおよぼしかね ません。 古くなったインナーパッ ドは、 早期に交換される事をお薦めします。 補修用パッ ド各種について詳しくは、 弊社カタログもしくはホームページに掲載の... - Page 11 警 告 : 下記の内容は必ずお読みください。 「あごひもは必ずしっかり締めてください。 」 あごひもを締めなかったり、 締め方が緩かったりすると、 万一転倒した時などに脱げてしま い、 頭を守ることができず非常に危険です。 また、 ヘルメットの下に、 帽子・ フード・バイザー・ ヘッドフォン等を着用しないでください。 ヘルメットがずれたり、 落ちるおそれがあります。 「大きな衝撃を受けたヘルメッ トは外観上に損傷がなくても、 ご使用にならないでください。 」 ヘルメットはシェル及び衝撃吸収ライナーが潰れることで、 衝撃エネルギーを吸収します。 大きな 衝撃を受けたヘルメットは、 既にライナーが潰れていることが多く、 そのまま使用すると、 再度衝 撃エネルギーを吸収できず非常に危険です。 外観に傷がなくても、 使用しないでください。 「ヘルメッ トの改造および分解は絶対にしないでください。 」 ヘルメットに穴を開けたり、 内部の衝撃吸収材を削ったり、 また、 あごひもなどは絶対に改造 しないでください。 ヘルメット本来の性能が発揮できなくなり非常に危険です。 「ヘルメッ...
-
Page 13: Notes Before Use
AERO-R1 INSTRUCTION MANUAL NOTES BEFORE USE BE SURE TO READ THIS MANUAL BEFORE USING THE HELMET. KEEP THE MANUAL IN A SAFE PLACE FOR FUTURE REFERENCE. - Page 14 NOTES BEFORE USE: Thank you for purchasing the Kabuto helmet. This manual explains how to use your Kabuto helmet correctly. Please take time to read this instruction manual before using the helmet, and keep the manual in a safe place for future reference. No helmet can protect the user 100% in any case of accidents, but it can reduce the risk of injury.
- Page 15 Part Names Shell Liner XF-7 Adjuster Shield Chinstrap Adjustment Lock Strap buckle Shell Liner Fastening the strap buckle Adjusting the strap and adjustment locks Adjusting the XF-7 Adjuster Shield XF-7 Adjuster Replacing the Normal inner pad set and A.I.Net (Anti Insect Net) How to wear helmet properly...
- Page 16 Fastening the strap buckle The strap buckle is important for secure fitting. Make sure to fasten the strap buckle firmly. How to fasten the strap buckle WARNING! Strap buckle Be careful not to pinch your skin when fastening the strap buckle.
- Page 17 How to adjust the adjustment locks Put on the helmet, fasten the strap buckle and adjust the adjustment locks so they can be placed firmly on the side of your face. Check that the A part is placed correctly. If the strap around your ears is loose or tight, change the position of the adjustment lock.
- Page 18 Setting the XF-7 Adjuster Position Hold the XF-7 Adjuster around the mounting part firmly XF-7 Adjuster XF-7 Adjuster and move it up and down among the three positions as illustrated (Fig.1, Fig.2.) The fourth hole is for Mounting part detaching the XF-7 Adjuster (Fig.2). In adjustment, move the XF-7 Adjuster slowly to avoid from accidental detachment.
- Page 19 Please refer to Parts List on our website for more information about replacement. http://www.ogkkabuto.com/ CAUTION! Kabuto’s helmet adjusters are developed exclusively to each models. Please confirm the model at purchasing the replacement. Shield The shield comes with the helmet as standard.
- Page 20 Front spacer By using the Front spacer packaged in, you can reduce the interference between your face/eye wear and the shield. Attaching the Front spacer Front spacer *Back side color is black Front spacer hook-and-loop fastener Front Pad hook-and-loop fastener (Or the front side of the A.I. net) (inside the helmet) hook-and-loop fastener (inside the helmet) *Figure shows when attaching the inner pads. When attaching the A.I.
- Page 21 Replacing the Normal inner pad set and A.I.Net (Anti Insect Net) 2 types of interior are packaged as standard accessory. *normal inner pad set is attached at shipment. FRONT FRONT Normal Inner Pad Normal Inner pad set (Front) ●Best Air Introduction Stick the Normal Inner pad on the hook-and-loop fasteners properly.
- Page 22 Dry linings with a dry cloth after washing, and leave them in a shaded and well-ventilated place. Avoid direct sunlight. Replacement AERO-R1 linings Linings wear out over time! Linings used every day will wear out over time. Continuing to use worn linings may lead to them breaking and causing poor fit.
- Page 23 WARNING! Be sure to read these instructions. ●This helmet is designed for bicycle use only. Never use the helmet for purposes or activities other than bicycle riding. ●The helmet should be worn in a way that it protects your forehead, with the edge just above your eyebrows, and never pushed far over the back of your head. Wear the helmet so it is level from front to back. ●No helmet can protect the wearer against all injuries or foreseeable impacts. ●Before riding a bicycle, make sure to adjust the helmet so it fits your head correctly. The strap should be positioned not to cover the ears, the buckle positioned away from the jawbone, and the strap and buckle adjusted to be both comfortable and secure. ●Your helmet is effective as protection only when it is worn properly. You should try different sizes to choose the size which feels secure and comfortable on your head at the time of purchase. ●Please handle the helmet with care. The helmet is designed to absorb shock by partial destruction of the liner and its damage may not be visible. DO NOT sit on it, drop it on the floor or otherwise cause impact. ●If subjected to a severe impact, the helmet should be discarded and destroyed. ●Wipe the helmet with common ph-neutral detergent diluted with clear water. Never use any petroleum, thinner, benzine, hot water above 50° C/122ºF or saline water. ●Do not leave the helmet in the direct sunlight or where the temperature may surpass 50ºC/122ºF such as in a car or near a heater, and/or avoid leaving in a humid place for a long time. Doing so will affect the materials and the performance of the helmet will diminish. ●Do not paint the helmet. Paints may reduce the original protective performance of the helmet considerably. ●Do not modify the helmet. In order to fully maintain the performance of the helmet, do not attempt to take it apart or change it in any manner that involves making holes in it or cutting it (or any of its parts) other than as recommended by the manufacturer. ●This helmet should not be used by children while climbing or doing other activities when there is a risk of strangulation/hanging if the child gets trapped with the helmet. THE EFFECTS OF THE DIRECT SUNLIGHT Do not leave the helmet in the direct sunlight.
- Page 24 OGK KABUTO Co., Ltd. 6-3-4, NAGATANISHI, HIGASHI-OSAKA, 577-0016, JAPAN. TEL: 06-6747-8031 WEB: Kabuto 検 索...
Need help?
Do you have a question about the AERO-R1 and is the answer not in the manual?
Questions and answers