Advertisement
Quick Links
Baby Trend, Inc.
13048 Valley Blvd.
Fontana CA 92335
1-800-328-7363
(8:00 a.m. ~ 4:30 p.m. PST)
www.babytrend.com
PY72XXXB_2L_051122.3_ZK
Read all instructions BEFORE assembly and USE of product.
KEEP INSTRUCTIONS FOR FUTURE USE.
Lea todas las instrucciones ANTES de armar y USAR el
producto. CONSERVE LAS INSTRUCCIONES PARA USO FUTURO.
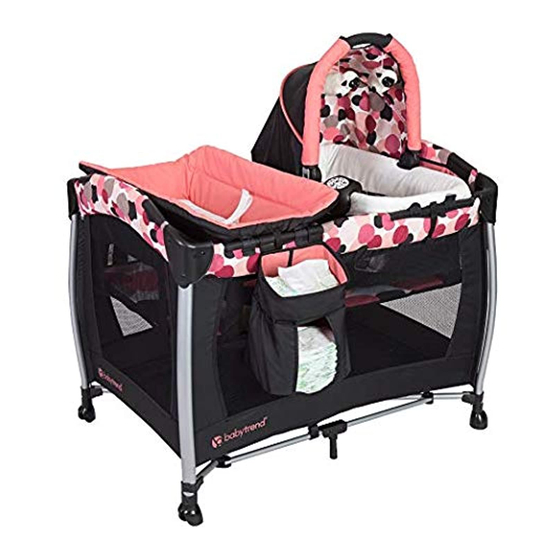
Resort Elite Nursery Center Playard
Instruction Manual
Instruction Manual
Manual de Instrucciones
Manual de Instrucciones
*Toys and mobile may vary
*Los juguetes y el móvil pueden variar
PY72xxxB
Advertisement

Related Manuals for BABYTREND Resort Elite Nursery Center Playard PY72 B Series


Summary of Contents for BABYTREND Resort Elite Nursery Center Playard PY72 B Series
- Page 1 *Toys and mobile may vary *Los juguetes y el móvil pueden variar Instruction Manual Instruction Manual PY72xxxB Manual de Instrucciones Manual de Instrucciones Baby Trend, Inc. 1-800-328-7363 13048 Valley Blvd. (8:00 a.m. ~ 4:30 p.m. PST) Fontana CA 92335 www.babytrend.com PY72XXXB_2L_051122.3_ZK...
- Page 2 Customer Service Department can be contacted at 1 (800) 328-7363 Monday through Friday between 8:00 a.m. and 4:30 p.m. (PST). Return Authorizations are required prior to returning product(s) to Baby Trend®. Please visit http://babytrend.com/pages/ limited-warranty for complete warranty details. GARANTIA NO DEVUELVA SU PRODUCTO A LA TIENDA.
- Page 3 PARTS PIEZAS WARNING IMPORTANT ! Check that you have all the parts for this model before assembling the product. To ensure safe operation of your product, Verifique que tenga todas las piezas para este modelo antes de montar el producto. please follow these instructions carefully.
- Page 4 WARNING WARNING Playard Warnings • Child can become entrapped and die when improvised netting or covers are placed on top of a playard. Never WARNING: Failure to follow the instructions could add such items to confine child in playard. result in serious injury or death. •...
- Page 5 ADVERTENCIA ADVERTENCIA Advertencia del Corralito • Only one child can use the Playard/Nursery Center at any time. ADVERTENCIA: La inobservancia de las • NEVER use this product if there are any loose or missing advertencias e instrucciones podría causar lesiones fasteners, loose joints, broken parts, or torn mesh/fabric.
- Page 6 ADVERTENCIA ADVERTENCIA ADVERTENCIA- • Cuando el niño sea capaz de levantarse agarrándose PELIGRO DE a objetos, quite las almohadillas protectoras, los ESTRANGULAMIENTO: ADVERTENCIA: NUNCA DEJE AL juguetes grandes y demás objetos que puedan servirle NIÑO EN EL PRODUCTO CON LOS COSTADOS BAJOS. El de escalones para trepar y salir.
- Page 7 Customer Service Fig. 2 Center at 1-800-328-7363 or visit us online at www.babytrend.com Copyright © 2022, Baby Trend Inc., All Rights Reserved. Todos los derechos reservados. Copyright © 2022, Baby Trend Inc., All Rights Reserved. Todos los derechos reservados.
- Page 8 ASSEMBLY ASAMBLEA ASSEMBLY ASAMBLEA 3) • Once all four (4) top rails are locked 5) • Insert the hook & loop fasteners located in place, push down on the center on the underside of the mattress handle (Fig. 3a). The center mechanism through the slots in the floor of each end automatically locks in place.
- Page 9 ASSEMBLY ASAMBLEA ASSEMBLY ASAMBLEA 6) • To roll or move the playard, lift playard FOLDING PLAYARD upward from the wheels opposing side CÓMO PLEGAR EL CORRALITO (Fig. 6a). 7) • Release the hook and loop fastener • To station the playard, set all 4 legs holding the Mattress from underneath the evenly down to the ground (Fig.
- Page 10 ASSEMBLY ASAMBLEA ASSEMBLY ASAMBLEA 8) • Locate the rail latch release in the center 9) • Gather all four (4) corners and the center and bottom side of each rail. Squeeze together tightly (Fig. 9). Wrap Mattress Center latch Tube Tube the lever with two hands until the rail around Playard frame with padded side...
- Page 11 WARNING WARNING ACCESSORIES • NEVER leave Changing Table in place when child is in the playard. Full-Size Bassinet & Cradles Warnings: • Only one child can use the Playard at any time. WARNING: • To reduce the risk of SIDS, pediatricians recommend Failure to follow these warnings and the healthy infants be placed on their back to sleep, unless instructions could result in serious injury or death.
- Page 12 ADVERTENCIA ADVERTENCIA ACCESSORIOS • La cuna deberá estar totalmente armada e instalada antes de usar. Advertencias de moisés y la cuna de tamaño completo : • El corralito, junto con las barandas laterales, deberán ADVERTENCIA: estar totalmente erguidos antes de usar. Asegúrese de La inobservancia de las que las trabas estén firmes.
- Page 13 ASSEMBLY ASAMBLEA ASSEMBLY ASAMBLEA TO ASSEMBLE THE FULL-SIZE BASSINET 12) • Position the Bassinet over and down into the fully assembled Playard. Secure in CÓMO ARMAR LA CUNA DE TAMAÑO COMPLETO place by pushing down firmly on each plastic support clip until all are snapped into place (Fig.
- Page 14 WARNING ADVERTENCIA ACCESSORIOS TO ASSEMBLE CHANGING TABLE ARMADO DE LA MESA CAMBIADORA El Cambiador: ADVERTENCIA- PELIGRO DE CAÍDA: niños han sufrido lesiones graves como consecuencia de haberse caído de mesas para cambiar bebés. Las caídas pueden ocurrir rápidamente. • PERMANEZCA a un brazo de distancia de tú hijo. (2) Short Bars with Connectors 1 Changing Table (2) Connector Bars...
- Page 15 ASSEMBLY ASAMBLEA ASSEMBLY ASAMBLEA ATTENTION: Playard and full-size bassinet must • Attach the short bars with the 2 be fully assembled and securely locked before connectors to the connector bars installing or using the changing table feature. (Fig. 14c). Be sure the clips are faced up (See To Assemble Playard and full-size bassinet during this preparation on the backside sections, page 3 - 22).
- Page 16 ASSEMBLY ASAMBLEA ASSEMBLY ASAMBLEA TO SECURE THE CHANGING TABLE TO THE PLAYARD TO USE CHANGING TABLE RESTRAINT SYSTEM PARA SUJETAR LA MESA CAMBIADORA AL CORRALITO PARA USAR EL SISTEMA DE RESTRICCIÓN DE LA MESA CAMBIADORA 16) • Place child on changing table, make sure IMPORTANT! When the changing table is on the upper hands and arms are clear of the restraint.
- Page 17 ASSEMBLY ASAMBLEA ASSEMBLY ASAMBLEA DIAPER STACKER TO REMOVE CHANGING TABLE PORTAPAÑALES PARA RETIRAR LA MESA CAMBIADORA 18) • Connect the diaper stacker to the playard 17) • Unsnap from the playard (Fig. 17a). Connecting clips Ganchos de conexión by pressing the two (2) connecting clips Locate all 4 clip/fasteners on the changing over the top rail of one of the playard’s table.
-
Page 18: Fall Hazard
WARNING WARNING SUFFOCATION HAZARD TO ASSEMBLE REMOVABLE ROCK-A-BYE BASSINET ARMADO DEL EXTRAÍBLE ROCK-A-BYE CAMITA Infants have suffocated: • In gaps between extra padding and sides of bassinet/ cradle and • On soft bedding Use only the pad provided by the manufacturer. NEVER add a pillow, comforter, or another mattress for padding. - Page 19 WARNING WARNING • The playard, including side rails, must be fully erected prior to • ALWAYS ensure that the playard, changing table, and Portable Rock-A-Bye Bassinet are safe by checking regularly, use. MAKE SURE EACH LATCH IS SECURE. before placing the child in it, that every part is properly and •...
- Page 20 ADVERTENCIA ADVERTENCIA ADVERTENCIA: ACCESSORIOS NUNCA deje al niño solo. Advertencias Accesorios de la Cuna Rock-A-Bye PELIGRO DE ASFIXIA: Portador puede ADVERTENCIA: volcarse en superficies blandas y asfixiarse. NUNCA colocar La inobservancia de las portador en camas, sofás, o en otras superficies blandas. advertencias e instrucciones podría causar lesiones PELIGRO DE CAÍDA: graves o la muerte.
- Page 21 ADVERTENCIA ASSEMBLY ASAMBLEA • Coloque a un solo niño por vez en la cuna Rock-A-Bye. 19) • Pull Bassinet fabric back to access the bottom of the Bassinet. Use the handles to • use la cuna de tamaño completo al usar la Cuna Rock-A- pull the frame supports into the support Bye Portátil locks (Fig.
- Page 22 ASSEMBLY ASAMBLEA ASSEMBLY ASAMBLEA 21) • Use the hook and loop fasteners provided 23) • To use the Bassinet in the Playard, lower to fix matress into the Bassinet (Fig. 21). Bassinet into the large bassinet (Fig. 23a). DO NOT use Bassinet without the provided Push down on the front and rear of the matress.
- Page 23 ASSEMBLY ASAMBLEA ASSEMBLY ASAMBLEA ROCKER FUNCTION TO FOLD REMOVABLE ROCK-A-BYE BASSINET FUNCIÓN DE MECEDORA PARA PLEGAR LA CUNA DESMONTABLE ROCK-A-BYE WARNING: 24) • Turn Bassinet over and pull rocker feet from Care must be taken when folding the base of Bassinet (Fig. 24a). Set Bassinet and unfolding to prevent finger entrapment.
- Page 24 ASSEMBLY ASAMBLEA OPERATION FUNCIONAMIENTO MUSIC CENTER • Repeat for the other side (Fig. 25c). CENTRO MUSICAL • Pull the support frames to the center until the Removable Bassinet fold (Fig. 25d). • Lower canopy handle, push both button on each side of the handle with your fingers while pushing the handle backwards (Fig.
- Page 25 OPERATION FUNCIONAMIENTO OPERATION FUNCIONAMIENTO 26) • The Music Center is designed to be To listen to MUSIC, press the MUSIC button. MUSIC MELODÍA Press the button to change the song. attached to the playard’s/bassinet’s long rail (Fig. 26). Para escuchar sonidos de la MELODÍA, oprima el botón MUSIC (MELODÍA).
- Page 26 OPERATION FUNCIONAMIENTO OPERATION FUNCIONAMIENTO FCC Statement These 2 buttons control the unit’s volume. VOLUME CONTROL CONTROL DE VOLUMEN Estos 2 botones de control de volumen de la unidad. This device complies with Part 15 of the FCC rules. Operation is subject to the following two conditions: 1 this device may not cause harmful interference, and VIBRATION: To use the VIBRATION, press down...
- Page 27 OTHER OTRO OTHER OTRO Declaración de la FCC Canada ICES-003 Statement Declaración ICES-003 de Canadá Este dispositivo cumple con las normas de la Parte 15 de la Comisión Federal de Comunicaciones (FCC). El funcionamiento está sujeto a las siguientes dos condiciones: This Class B digital apparatus complies with Industry Canada Standard ICES-003.
- Page 28 OTHER OTRO MAINTENANCE MANTENIMIENTO MAINTENANCE AND CLEANING INSTRUCTIONS: Use only household mild soap and warm water. DO NOT USE BLEACH. DO NOT MACHINE WASH. INSTRUCCIONES DE LIMPIEZA Y MANTENIMIENTO: Utilice sólo jabón suave y agua tibia. NO USE BLANQUEADOR. NO LAVE A MÁQUINA. ®...
Need help?
Do you have a question about the Resort Elite Nursery Center Playard PY72 B Series and is the answer not in the manual?
Questions and answers