Pentair SUNTOUCH Installation And User Manual
For pool and spa
Hide thumbs
Also See for SUNTOUCH:
- Installation and user manual (88 pages) ,
- Quick reference manual (2 pages) ,
- Installation and user manual (36 pages)

Related Manuals for Pentair SUNTOUCH


Summary of Contents for Pentair SUNTOUCH
- Page 1 SUNTOUCH CONTROL SYSTEM ® FOR POOL AND SPA 71°F / 91°F INSTALLATION AND USER'S GUIDE IMPORTANT SAFETY INSTRUCTIONS READ AND FOLLOW ALL INSTRUCTIONS SAVE THESE INSTRUCTIONS...
- Page 2 Customer Support Sanford, North Carolina (8 A.M. to 4:30 PM Moorpark, California (8 A.M. to 4:30 PM PS) Phone: (800) 831-7133 Fax: (800) 284-4151 Web sites http://www.pentairpool.com and staritepool.com P/N 520785 - Rev D - 8/13...
-
Page 3: Table Of Contents
SunTouch Solar Only System ......................4 Operating SunTouch in Solar Only Mode ..................5 Setting up SunTouch for Solar Only mode from Pool/Spa mode ........... 5 Adjusting the water temperature setting (Solar Only mode) ............6 Solar Only Menus .......................... 6 Set Temperature ........................ - Page 4 IntelliChlor Menu (13/14): Status and Error Messages ............. 36 Service Menu (14/14): Service, Timeout, Auto .................. 38 SunTouch Main Status Screen (Pool/Spa Mode - Single Body System) ........... 39 High/Low Temperature Circuit Control (Single Body System) ............40 HI-TEMP / LO-TEMP Circuit Controls ..................40 Setting up SunTouch to operate as a Single Body system ............
- Page 5 Check Electronics ............................ 65 SunTouch System Test ........................65 Testing the auxiliary relays ......................65 Setting up the SunTouch system for the first time (after equipment Installation) ....... 66 Connecting IntelliChem to the SunTouch System ................67 Section 3: Troubleshooting ......................68 Frequently Asked Questions (FAQ) ....................
-
Page 6: Important Warning And Safety Instructions
Before attempting installation or service, ensure that all power to the circuit supplying power to the system is disconnected/turned off at the circuit breaker. • Grounding (earth bonding) is required. The SunTouch ® Control System Power Center should be installed by a qualified professional and grounded. - Page 7 ® 4. A terminal grounding bar stamped is located inside the SunTouch Control System Power Center. To reduce the risk of electric shock, this terminal must be connected to the grounding means provided in the electric supply service panel with a continuous copper wire equivalent in size to the circuit conductors supplying this equipment (no smaller than 12 AWG or 3.3 mm).
-
Page 8: Technical Support
Technical Support Sanford, North Carolina (8 A.M. to 4:30 PM ET) Moorpark, California (8 A.M. to 4:40 PM PT) Phone: (800) 831-7133 Fax: (800) 284-4151 Web sites visit www.pentairpool.com and staritepool.com SunTouch Control System Installation and User’s Guide ®... -
Page 9: Section 1: Suntouch Pool And Spa Control System Overview
Variable Flow ® ® (VF) Pump to meet all your pool and spa needs. For a complete list of the SunTouch Control System and optional equipment, see to page 43. Solar Mode The SunTouch Control System Solar Mode provides automatic solar heating control using a differential temperature control designed especially for solar-heated swimming pool, spas, and hot tubs. -
Page 10: Suntouch Control Panel
Liquid Crystal Display (LCD): ➀ LCD with backlighting for easy viewing. While the SunTouch Control System is in normal day-to-day operations, Pool and Spa status display: the main status screen will toggle between the pool (or spa) set (and actual) temperature, and the current air temperature (if an air sensor is installed, see page 24 for details). - Page 11 “delay” mode and is not yet active. The same applies when AUX 2 or AIR 71°F AUX 3 are in “Delay” mode. See “Assigning Circuit Functions” on page 26 for more 11: 51AM AUX D23 information. SunTouch Control System Installation and User’s Guide ®...
-
Page 12: Suntouch Main Status Screen (Solar Only Mode)
SunTouch ® Control System Main Status Screen (Solar Only) The SunTouch Control System “Solar Only” main status screen display description is given below. ® Use Up/Down buttons for menu 85°F navigation only (see “Up and down arrow button” on page 3). -
Page 13: Operating Suntouch In Solar Only Mode
® (P/N 520857) information, see page 43. • Pump output on the SunTouch Control System motherboard is on whenever solar heat is available and off whenever Solar heat is not available • AUX 1/Booster pump is on whenever Solar heat is available and off whenever solar heat is not available •... -
Page 14: Adjusting The Water Temperature Setting (Solar Only Mode)
Lower water set Raise water set point temperature point temperature Solar Only Menus The following Main Menu features are available when the SunTouch Control System is configured in ® “Solar Only” mode. The main menu features are as follows: Set Water Temperature To set the water temperature: Menu button: The Set Water Temp menu is displayed. -
Page 15: System Control
Mode change the system from Solar Only to Pool/Spa mode. Time Set The SunTouch Control System time is displayed on the main screen. To set the SunTouch Control System time. Menu button: The Set Temp settings is displayed. Time Set Right button: Press the button until the Time Set setting is displayed. -
Page 16: Start And Stop Temp Differentials
Up/Down buttons: Select Yes to enable the sensor. Select No to disable the sensor (and not display the air temperature on the main status screen). Left button: Press the Left button to return to the main status screen. SunTouch Control System Installation and User’s Guide ®... -
Page 17: Freeze Protection In Solar Only Mode
Operating in Pool/Spa mode (Shared Equipment) Pool/Spa Mode Using the SunTouch Control System in the Pool/Spa mode allows pool and spa operations to be fully automated. The menu features let you create customized schedules for your pool and spa equipment, heat temperatures and chlorination settings to switch on and off at a time and day. -
Page 18: Selecting The Heat Source
The SunTouch Control System is compatible with solar and conventional ® heaters. The SunTouch control system will use the heating source that is selected. To select the heat source: Press either Up or Down AIR 7°F... -
Page 19: Suntouch Main Status Screen (Pool/Spa Mode - Shared Equipment)
Lights and other installed equipment are setup from the “Circuit Function” menu (page 26). Before using the SunTouch Control System, familiarize yourself with the status screen and control buttons. -
Page 20: Pool/Spa Mode Menus (Shared Equipment)
System Operation: [AUTO, TIMEOUT, SERVICE] (page 35) - Service Settings: F Pump: On/Off, HI SPD - VLV A, B: Pool, Drain, Fill, Spa - Heater: Off/On, AUX 1 - 3, VLC: (On/Off) - AUTO - [Solar On/Off - only] Note: (*) See page 6 for "SOLAR ONLY" menu. SunTouch Control System Installation and User’s Guide ®... -
Page 21: Pool/Spa Mode Menus
9:45 AM HEATER function to manually switch the pool filter pump on or off. Note: The Solar auxiliary relay (Valve C) on the SunTouch Control System motherboard can operate a solar booster pump which will switch on when the filter pump is running. -
Page 22: Heat Menu (2/14)
The spa will also begin to heat when switched on by the optional QuickTouch wireless remote. The SunTouch Control System allows for solar and conventional heaters. The SunTouch Control System will use the heating source that is selected. The heat source selections are: •... -
Page 23: Spa Temperature And Heat Source
The heater will switch off when the water temperature rises above the set temperature. LO-TEMP (Spa) Menu Operation The LO-TEMP on and off control is made from the Heat menu setting. For SunTouch Control System ®... -
Page 24: Delay Cancel Menu (3/14)
The Delay Cancel feature is mainly for use by service technicians when it’s necessary to shut the filter pump off immediately, and know the heater has not been running. Heaters manufactured by Pentair do not require this cool-down period and do not need the delay to be set up. -
Page 25: Schedules Menu (4/14)
(e.g. AUX 1-3 or FT. 1 - 4). Schedule [FT. 1 ] Prg: 1/0 - Edit Press the Left button to return to the main status screen. POOL 71°F / 91°F 11: 51AM HEATER SunTouch Control System Installation and User’s Guide ®... -
Page 26: Schedule Your Spa Or Pool
5. Press the Right button to move to the mode setting. Press the Up/Down button until “Del” is displayed. 6. Press the Right button to delete the program 1. The program counter now displays (3/4). If you want to delete the other three programs, repeat steps 3 through 6. SunTouch Control System Installation and User’s Guide ®... -
Page 27: Clock Menu (5/14)
Notes about solar heating: Install the solar sensor at the collectors. If “Heat Pump” is selected and is being used in place of a solar heating system, install the solar sensor near the SunTouch power center. Connect the solar sensor wires to the SOLAR screw terminals according to the wiring diagram on page 51. Plug the solar valve actuator cable into three-pin socket marked VLV C on the SunTouch Control System motherboard. - Page 28 The solar collector is similar to a car radiator, in that cool air on the surface of the solar collector is used to cool the water off. SunTouch Control System Installation and User’s Guide...
-
Page 29: Valves Menu (7/14)
Valves Menu (7/14) The valves feature allows you assign a circuit to the extra valve output (Valve C) on the SunTouch Control ® System motherboard. The SunTouch Control System can drive the auxiliary valve actuator for applications such as solar heating and water features and for freeze protection. By assigning any one of the auxiliary (AUX 1, AUX 2, AUX 3, FEATURE 1 - 4) circuits to control the valve actuator, you can conserve auxiliary circuits for high voltage relays for controlling pumps and lights. -
Page 30: Advanced Menu (8/14): Heater And Valve Delays
10 minutes to allow the heater to cool down. Pentair Aquatic System heaters do not require a cool down time. To override the “heater cool-down,” press the filter pump button again to switch off the pump. -
Page 31: Advanced Menu (8/14): Calibrate Water, Air And Solar Sensors
Temp: 77 F When calibrating the air sensor, place the thermometer next to the air sensor. The air sensor is normally located near or under the SunTouch Control System enclosure, not inside the enclosure. Take an accurate temperature reading in the shade. -
Page 32: Advanced Menu (8/14): Air Sensor Enable/Disable
Advanced Menu (8/14): System Type From the System Type menu you can configure the SunTouch Control System for a pool and spa system (shared equipment), or as a Single Body of water system (pool only or spa only). For the “Single Body”... -
Page 33: Advanced Menu (8/14): Reset Factory
To view the current IntelliChem Controller pH and OPR status an RS-485 cable must be connected to the ® COM port on the SunTouch Control System (see page 56) and IntelliChem Controller circuit board. Menu button: Select the Diagnostics 9/14 menu. IntelliChem Right button: Press the button until IntelliChem control system is displayed. -
Page 34: Circuit Functions Menu (10/14)
The cleaner pump would automatically shut off whenever the spa and/or solar is switched on. : The AUX 3 circuit connector on the SunTouch Control System motherboard cannot be ®... -
Page 35: Preset Circuit Functions
Automatic pool cleaners are turned off when this feature is turned on. SunTouch Control System Installation and User’s Guide ®... -
Page 36: Settings Menu (11/14): Quicktouch (Qt4) Wireless Remote
10 minutes to allow the heater to cool down. Pentair Aquatic Systems heaters do not require a cool down time. To override the “heater cool-down,” press the Filter Pump button again to switch off the pump. -
Page 37: Two-Speed Filter Pump
Left button: Press the Left button to return to the main status screen. TWO SPEED FILTER PUMP ® Note: There must be a two-speed relay installed in the SunTouch Control System enclosure and plugged into the AUX3 connector for the “Two-Speed” pump menu feature to operate. -
Page 38: Intelliflo Vs Pump
NOTE: INTELLIFLO PUMP “FREEZE” PROTECTION - If the IntelliFlo Pump is on due to a freeze condition (not switch on from a relay circuit), and if a freeze speed is set in SunTouch Control System, this setting takes priority even if the previous setting is lower than the default circuit speed. If no “freeze” protection is set, the pump will be forced on at the default circuit speed. - Page 39 RPM: 1500 75 W and operating Watts. Press the button again to view the current pump communication status. Left button: Press the Left button to return to the main status screen. Status: NORMAL SunTouch Control System Installation and User’s Guide ®...
-
Page 40: Intelliflo Vf Pump
Press Right button to select Filter Params Time. Press the Up/Down buttons to set the Filter Size (1000 to 255000 gallons). Press Right button to select Filter Params Manual Filter. Press the Up/Down buttons to set the Filter Size (15 - 130). SunTouch Control System Installation and User’s Guide ®... - Page 41 If there is only one pump, it is always seen as pump #1 by SunTouch Control System. In this case you do not need to set the pump address. When using multiple IntelliFlo Pumps with SunTouch Control System assign an address to each pump.
- Page 42 Press Right button to view the filter circuits. Press the Up/Down buttons to select Filter Circuit the circuit: (NONE, SPA, POOL, AUX 1, AUX 2, AUX 3). [ POOL Left button: Press the Left button to return to the main status screen. SunTouch Control System Installation and User’s Guide ®...
-
Page 43: Intelliflo Vsf+Svrs Pump
Press Right button to select Assign PSI. Press the Up/Down buttons to set the pressure rate from 1-30 PSI. Left button: Press the Left button to return to the main status screen. SunTouch Control System Installation and User’s Guide ®... -
Page 44: Intellichlor Menu (13/14)
“Pool/Spa” mode. The IntelliChlor (SCG) menu features are active when the salt chlorine generator is connected to the COM port on the SunTouch Control System motherboard. Note: While in “Freeze Protection” mode, the IntelliChlor (SCG) will not operate during the time that the filter pump is operating. - Page 45 Salt Chlorine Generator (SCG), the error message ® will be displayed on the SunTouch Control System control panel screen. All status and error messages can be viewed from the IntelliChlor (SCG) menu. For troubleshooting information, refer to the IntelliChlor Electronic Chlorine Generator User’s Guide (P/N 520589).
-
Page 46: Service Menu (14/14): Service, Timeout, Auto
Service mode, except for switching off equipment manually for emergencies. If a power outage occurs while the SunTouch Control System is in Service mode, after power is restored the system will power up in Service mode. -
Page 47: Suntouch Main Status Screen (Pool/Spa Mode - Single Body System)
These circuits are assigned in the “Circuit Functions” menu (see page 26). Before using SunTouch Control System to operate a single body system (pool only or spa only), familiarize yourself with the status screen and control buttons. -
Page 48: High/Low Temperature Circuit Control (Single Body System)
The LO-TEMP on and off control is made from the Heat menu setting. For the SunTouch Control System single body systems (pool only or spa only, see page 35), the LO-TEMP menu setting is used to switch on and off the heat source and filter pump. A heat selection must be selected in the Heat menu before the heater is activated. -
Page 49: Pool/Spa Mode (Single Body Of Water) Menus
Pool, Drain, Fill, Spa - Heater: Off/On, Solar: Off/On, AUX 1 - 3, FT 1 - 4, VLC: (On/Off) - AUTO - [Solar On/Off - only] Note: (*) See page 6 for "SOLAR ONLY" menu. SunTouch Control System Installation and User’s Guide... -
Page 50: Section 2: Installation And Setup
Review, prepare and install SunTouch Power Center (pages 49): Review high voltage connections. Prepare and install the SunTouch Control System Power Center at the equipment pad. AC power for SunTouch should be provided from the main-panel circuit breaker located at the house. -
Page 51: Suntouch Solar Package Contents
• Solar valve (P/N 263047) - QTY 1 • Temperature sensors (20 ft. water, solar 40 inches) - QTY 2 SunTouch Control System Solar with non-solar 3-way valve (P/N 520856) • SunTouch Control System Power Center - QTY 1 •... -
Page 52: Suntouch System Overview
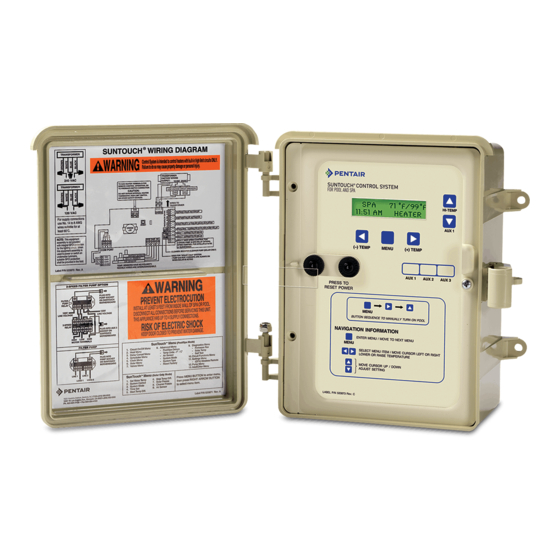
® SunTouch Control System Overview • Pumps Filter, Cleaner, Spa Jet - 1.5 HP 120 VAC 3 HP 277 VAC 20 FLA/120 LRA,120 VAC 17 FLA/102 LRA, 277 VAC • Pool/Spa Lights 1.5 KW 120 VAC Tungsten 4.8 KW 240 VAC Tungsten 20 AMP, 277 VAC Ballast •... - Page 53 SunTouch ® Control System Power Center (Front View) Low voltage push-button circuit breakers (18 VAC / 24 VAC) Control Panel LCD and buttons Mounting bracket (x3) Front panel handle Spring latch Retaining screw Enclosure front door 1” Grommet for low voltage...
-
Page 54: Plumbing Requirements
Pool Cleaner Valve at this line. The motorized valve will automatically open whenever the SunTouch activates the pool cleaner. If a booster pump pool cleaner is being used, plumb the booster pump so that its suction-side is connected to the pool return, after the heater, and as close to the ground as practical. -
Page 55: Equipment Location
Install a drain valve at the solar feed line and connect to the pool fill line. Equipment Location All equipment, with the exception of the spa-side remote, must be located at least 10 ft. from the water’s edge. SunTouch® SUNTOUCH Control System... -
Page 56: Solar Hydraulics System
Solar Hydraulics System Plumb the SunTouch Control System solar system in accordance with recommended hydraulics shown ® below. • 2” diameter plumbing is advised to ensure maximum flow of water through the solar panels. A solar booster pump should be added if panels are installed at a very high elevation. -
Page 57: Suntouch Power Center High Voltage Connections
• Install the SunTouch Control System Power Center no less than five (5) feet from pool or spa near to the pumps, heater, valves, and sensors. Mount the Power Center outside or inside a pool equipment house or other enclosure. -
Page 58: Grounding And Bonding To The Suntouch Power Center
Control System ground bus bar. ® Also ground each piece of high voltage (120 VAC or 240 VAC) equipment that is connected to the SunTouch Control System Power Center relays. The SunTouch Control System Power Center must also be connected to the pool bonding system using an 8 AWG (minimum) wire. -
Page 59: Preparing The Suntouch Power Center
Mounting the SunTouch Control System Power Center, page 51 • Removing Electrical Conduit Knockouts, page 53 • Installing Conduit and Wire to the SunTouch Control System Power Center, page 54 • Transformer Connections, page 55 • SunTouch Control System Motherboard Connections, page 56 4. -
Page 60: Mounting The Suntouch Power Center
5 feet from the pool or spa and no further than 15 feet from the pool/spa valve. To mount the SunTouch Control System Power Center: 1. Position the Power Center against the vertical flat surface. If wall anchors are being used, support the Power Center in position (horizontally level and square) against the surface and mark the bracket hole pattern on the wall. -
Page 61: Removing Electrical Conduit Knockouts
Removing Electrical Conduit Knockouts Before installing the SunTouch Control System Power Center electrical conduit, read the following ® recommended guidelines. Remove the power center conduit knockouts as needed: • Determine the number of low and high voltage circuits being used in the Power Center, the conduit size and runs needed based on the wire size, and the number of conductors within the conduit. -
Page 62: Installing Conduit And Wire To The Suntouch Power Center
CAUTION All of the electrical wiring methods and materials used to complete the electrical installation of the SunTouch Control System must be in accordance with the current National Electrical Code or the Canadian Electric Code, as well as any local electrical codes in effect at the time of installation. -
Page 63: Transformer Connections
Control System enclosure. The SunTouch ® Control System can be connected either to 120 VAC or 240 VAC. The SunTouch Control System should be wired to receive continuous power (connect directly to sub-panel). The maximum current rating is 820/410 mA at 120/240 VAC 60 Hz/50 Hz. -
Page 64: Suntouch Motherboard Connections
(GFCB) and interrupters (GFCI). • A maximum of three (3) power relays can be installed in the SunTouch Control System Power Center. Connect pumps and other high-voltage equipment to the power relays. TRANSFORMER... -
Page 65: Accessing The Suntouch Motherboard
Control System motherboard provides connectors for three auxiliary relays, valve actuators ® and sensors. To access the SunTouch Control System Power Center electronics compartment: 1. Loosen the retaining screw on the front panel. Open the hinged front panel to access the electronics compartment. -
Page 66: Installing Auxiliary Relays
Control System Power ® Center. Depending on the SunTouch Control System kit, relays may not be included in the kit. Relays must be installed at the site. When using a 2-Speed pump, the optional 2-Speed relay (P/N 520198) can be installed, replacing the standard relay which is located in the right-side of the Power Center. - Page 67 Control System motherboard. ® Note: If there is an Emergency Shut-Off Switch (ESO) circuit board installed in the SunTouch Control System Power Center, connect the relay wires to the ESO circuit board. For more information, see “Emergency Shut-Off Switch Installation,” on page 73.
-
Page 68: Installing Valve Actuators
Note: For more information, see Item 2 and 3 of Plumbing requirements on page 43 1. Excess cable can be coiled in the SunTouch Control System enclosure low voltage raceway. Do not coil the wire in upper low voltage compartment. -
Page 69: Installing And Connecting Temperature Sensors
Freeze protection for a “Solar Only” system requires an additional solar sensor (P/N 522101). To disable the air sensor, see “Advanced Menu (8/14): Air Sensor” on page 24. Run a two-conductor cable between the sensor and the SunTouch Control System Power Center. The maximum sensor cable length is 300 ft from the SunTouch Power Center. -
Page 70: Connecting Suntouch To A Gas Heater
5. Do NOT disconnect or wire around the thermostat, pressure switch, high limit switch, or other safety devices. 6. Switch ON the main power switch of the heater. Note; the SunTouch Control System does not control the AC power to the heater. -
Page 71: Connecting To A Sta-Rite Gas Heater
Refer to the minimum temperature rating for wires recommended by the manufacturer. See the heater owners manual for details. 5. Switch ON the main power toggle switch of the heater. Note; the SunTouch Control System does not control the AC power to the heater. -
Page 72: Suntouch Solar System Installation
SunTouch ® Control System Solar System Start-Up 1. Switch power on to the SunTouch Control System Power Center. ® 2. If pool cleaner protection has been added to the system, the pool cleaner pump motor should be activated whenever the pool cleaner timer is on. -
Page 73: Suntouch Pool/Spa Controller System Start-Up
Transformer wire harness (J10) attached to the motherboard. • Heater control connector GAS HEATER (J12) or two-wire screw terminal. Refer to “Summary System Installation Steps Summary,” on page 37, and “SunTouch Control System Motherboard Connections on page 51. SunTouch Control System Test The following describes how to test the main control panel to activate the heater, valves and pumps. -
Page 74: Setting Up The Suntouch System For The First Time (After Equipment Installation)
System Mode: Configure the SunTouch Control System to operate in Solar Only or Pool/Spa mode. System Type: Configure the SunTouch Control System to operate as a Shared Equipment system or as a Single Body system (pool only or spa only). -
Page 75: Connecting Intellichem To The Suntouch System
® ® communication cable is connected to the COM port on the SunTouch Control System circuit board. For more information, refer to the IntelliChem Controller Installation and User’s Guide (P/N 521363) 1. Connect IntelliChem Controller cable to COM Port (J7): Strip back the cable conductors ¼ in. -
Page 76: Section 3: Troubleshooting
However, if three relays are being used, two relays must be located outside the SunTouch Control System enclosure. The SunTouch Control System enclosure which houses two relays. Note: These circuits do not switch the pump on. -
Page 77: Suntouch Error Messages
SunTouch Control System Error Messages Error Messages If the system detects that a sensor is not connected to the SunTouch Control System Power Center or it is ® defective, an error message is displayed in the Diagnostics menu (page 25). The following lists the sensor errors. -
Page 78: Problem Solving A Solar System
SunTouch Control System solar is not operating Verify the circuit breaker at sub-panel is not tripped. If the 3 AMP Circuit Breaker on the on the SunTouch ® Control System is tripped, it is most often due to a defective Circuit Board or Valve Actuator. Try disconnecting each one separately to determine which one is at fault. -
Page 79: Temperature Vs. Resistance Data
Control System ® from the SunTouch Control System, the sensor will read 10k Ohm at 77º F (25ºC). Refer to the following table for the resistance at other temperatures. An accurate reading should give a temperature setting that is accurate... -
Page 80: Intellichlor Error Messages
SUPER CHLORINATE “Super Chlorination” details) mode for 24 hours. IntelliChlor (SCG) communication error Check cable from IntelliChlor (SCG) to SunTouch Control COM LINK ERROR with SunTouch Control System motherboard. System motherboard. Check IntelliChlor Refer to IntelliChlor (SCG) User’s Guide troubleshooting CHECK FLOW/PCB (SCG) electrolytic cell. -
Page 81: Problem: The Quick Touch Remote Will Not Work, Or Will Not Work Dependably
® Wireless Remote will not work, or will not work dependably. Symptom Possible Cause Solution SunTouch Control Ensure power is being supplied and that the power System Load Center center operates correctly without the receiver installed does not have power... -
Page 82: Intelliflo Warning And Alarm Conditions
2. Run motor at a higher speed to Alarm improve cooling air flow. Power Out Supply voltage Ensure proper supply voltage. Alarm ® SunTouch Control System Specifications • Power: 95 VAC to 135 VAC, 0.82 AMP 50/60 Hz or 192 VAC to 288 VAC, 0.41 AMP 50/60Hz • Valve Actuator Output: 24VAC, 50/60 Hz. 0.65 AMP maximum (3 pin connector) • Relay Outputs: 3HP@240V, 1.5HP@120V, booster pump, pool sweep interlock, filter pump or lights. Three (3) relays provided. • Sensors (thermistor type, 10K W 77° F (25° C). Two sensors required for solar and pool temperatures. Freeze protection requires an additional sensor for air temperature. -
Page 83: Wiring Suntouch To The Intellichlor Salt Chlorine Generator
System, the IntelliChlor (SCG) AC power center wires must be connected to the PUMP SIDE OF THE MAIN FILTER PUMP RELAY (LOAD SIDE) located in the SunTouch Control System Power Center. This ensures the IntelliChlor cell produces chlorine only when the main filter pump is on (see page 73 and 74). -
Page 84: Wiring Intellilchlor (Scg) And Standard Pump To Suntouch
® ® Wiring IntellilChlor (SCG) and Standard Pump to SunTouch Control System The following diagram shows how to connect the IntelliChlor (SCG), a standard pool filter pump to the ® SunTouch Control System Power Center. ® TO AUX (FILTER PUMP) SOCKET (ON SUNTOUCH®... -
Page 85: Wiring Intellilchlor (Scg) And Intelliflo Pump To Suntouch
(SCG), an IntelliFlo Pool Filter Pump to ® ® the SunTouch Control System Power Center. ® SUNTOUCH® CONTROL SYSTEM POWER CENTER CIRCUIT BOARD TO AUX (FILTER PUMP) SOCKET (ON SUNTOUCH® CONTROL SYSTEM CIRCUIT BOARD) FILTER PUMP RELAY (IN POWER CENTER) Source voltage: IntellilFlo®... -
Page 86: Appendix
FILTER PUMP PUMP JET PUMP 2 (opt.) Low Voltage High Voltage Commercial Application SunTouch Control System See “Commercial Application using ESO3 and (Single Body System) on page 36 for information. SunTouch Control System Installation and User’s Guide ®... -
Page 87: Installing The (Eso3) Circuit Board
5. Connecting relay plugs: Connect the relay cable plugs to the two-pin sockets on the right-side of the Emergency Shut-Off Switch circuit board. Connect the corresponding relay cable plugs from the SunTouch motherboard to the left-side of the Emergency Shut-Off Switch circuit board as shown SunTouch Control System below. - Page 88 Installing the ESO Circuit Board (Continued) 6. Connecting the ESO switch: Route a two-wire cable through grommet located on the left-side of SunTouch Control System Power Center, up into the low voltage raceway to the ESO switch ® circuit board.
-
Page 89: Commercial Application Using Eso3 And Suntouch (Single Body System)
AUX 1 (Jet pump) is programmed by SunTouch to operate from 5:00 AM to 12:00 AM. When the Emergency Shut-Off Switch is pressed, both relays will disengage. If the pool or spa light is controlled by AUX 2, the light will remain operational. -
Page 90: Glossary
Low Voltage Compartment: Top compartment of SunTouch Control System Power Center for low voltage wiring. Low Voltage Raceway: Vertical space in the left side of SunTouch Control System Power Center for low voltage wires. Motherboard: The SunTouch Control System circuit board mounted behind the control panel. - Page 91 Notes SunTouch Control System Installation and User’s Guide ®...
- Page 92 Hayward Industries Inc. Jandy® is a registered trademark of Jandy Industries Inc. Unless expressly noted, names and brands of third parties that may be used in this document are not used to indicate an affiliation or endorsement between the owners of these names and brands and Pentair Water Pool and Spa, Inc.
Need help?
Do you have a question about the SUNTOUCH and is the answer not in the manual?
Questions and answers