PROAIM Cinema Series Assembly Manual
Camera jib crane package
Hide thumbs
Also See for Cinema Series:
- Instruction manual (18 pages) ,
- Assembly manual (14 pages) ,
- Instruction manual (6 pages)
Advertisement
Quick Links
24ft Fraser Camera Jib Crane Package
What's In The Box
Please inspect the contents of your shipped package to ensure you have received everything that is listed
below.
Monitor Supporting Rod(Part-2)
Cable Guide Support Rods
No part of this document may be reproduced, stored in a retrieval system, or transmitted by any form or by any means,
electronic, mechanical, photo-copying, recording, or otherwise, except as may be expressly permitted by the applicable copyright
A s s e m b l y M a n u a l
Box—1
Jib Sections 1, 2, 3, 4, 5 & 6 and Supporting Rods
All rights reserved.
statutes or in writing by the Publisher.
(JB-FR4T-02)
1
Advertisement

Related Manuals for PROAIM Cinema Series


Summary of Contents for PROAIM Cinema Series
- Page 1 24ft Fraser Camera Jib Crane Package (JB-FR4T-02) A s s e m b l y M a n u a l What’s In The Box Please inspect the contents of your shipped package to ensure you have received everything that is listed below.
- Page 2 Weight rod & Weight Closers Hub locking knob Box—2 Accessories & Cables Anchor Dolly with Studio wheels Hook DJI Ronin Monitor Supporting Rod (Part-1) LCD Monitor Arm Double Spanner Safety Belt Allen Key 4mm, 5/16” Head Section Gravity Stand Tool pouch Red Cables Blue Cables Yellow Cable...
-
Page 3: Safety Hints
Safety Hints ATTENTION: PLEASE READ THIS BEFORE USING TO PREVENT SERIOUS DAMAGE TO THE GEAR! • The crane may not be assembled or operated under influence of alcohol, drugs or any other intoxi- cating substances. Lack of attention while connecting the components together can cause substantial damage to equipment/operator. - Page 4 Dolly Setup • By loosening the knob of the anchor dolly, spread its three legs properly in an equal position. • After spreading the anchor dolly's three legs properly, re-tighten its knob properly. NOTE: To stabilize the anchor dolly, lock the studio wheels by pushing down the lock lever.
- Page 5 • Secure the gravity stand with the locking pin for more security. • By matching the three legs of the gravity stand with the center holes of the anchor dolly, place it properly on the top of the dolly. • After properly aligning the Gravity stand and Anchor Dolly, secure it with Double Safety Belt.
- Page 6 • Remove the bolts before connecting Section-1 to Section-2. • Then Connect section-1 with section-2. • By joining Section-1 with Section-2, tighten the bolt with 5/16” Allen Key. Cable Guide Rods Setup • Loosen the section-2 bolt with the 5/16” Allen Key, then align the section-2 leg to the cable guide support rods.
- Page 7 Red Stability Cables Setup • Insert one end of the 4ft-7" red (1st wire) cable into the hook of the cable guide rod, then attach the other end of the cable to the clamp of section 1. • Similarly, insert one end of the 3ft-7" red (2nd wire) cable into the same hook of the cable guide rod, then attach the other end of the cable to the clamp of section-1.
- Page 8 • Similarly, connect the one end of the 10ft-8" cables with section-4 by inserting them into the hook of the section-1's clamp and tighten the cable wire with the turnbuckle according to your requirement. LCD Monitor Arm Setup • Remove the key knob of the accessory part of Section 1.
- Page 9 Weight Rod Setup • Loosen the knob of Section-1 and insert the weight rods matching the center hole of Section-1. • Align the weight rod properly and tighten the section-1 key by loosening it. • In section 1, after the weight rod is properly fixed, insert the weight (Not-Included) in the...
- Page 10 Yellow Stability Cables Setup • Attach the yellow cable to the hook in the head section (section-1), pull the wire towards the hub, and align it with the wire holder. • Connect the other end of the yellow wire to the hub section (section-2).
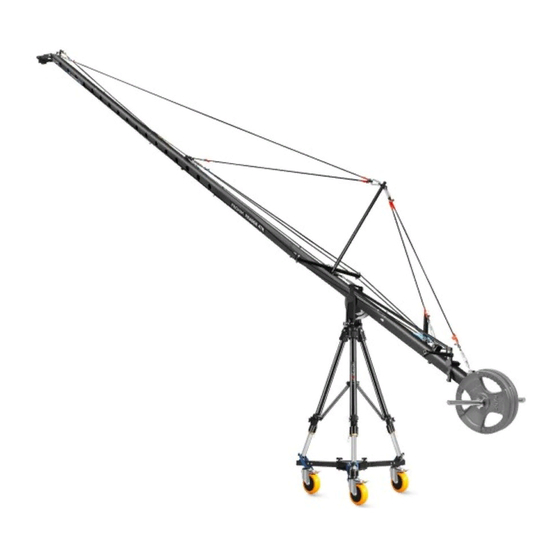
- Page 11 YOUR PROAIM 24FT FRASER CAMERA JIB CRANE PACKAGE ALL DRESSED UP AND READY TO GO! (SHOWN WITH OPTIONAL ACCESSORIES) Warranty: We offer one year warranty for our products from date of purchase. Within this period of time, we will repair it without charge for labor or parts. Warranty doesn’t cover transportation costs nor does it cover a product subjected to misuse or accidental damage.
Need help?
Do you have a question about the Cinema Series and is the answer not in the manual?
Questions and answers