Table of Contents
Advertisement
Quick Links
Download this manual
See also:
Reference Manual
Advertisement
Table of Contents

Related Manuals for Intermec M90 Series


Summary of Contents for Intermec M90 Series
- Page 1 M90 Series Portable Data Entry Unit USER’S GUIDE " " " " " " " " " " " " " " " " " " " " " " " " " " " " P/N: M90901 Revision C...
- Page 2 " NOTICE The information contained herein is proprietary and is provided solely for the purpose of allowing customers to operate and service Intermec manufactured equipment and is not to be released, reproduced, or used for any other purpose without written permission of Intermec.
-
Page 3: Table Of Contents
..........M90 Series Portable Data Entry Unit User’s Guide CONTENTS "... - Page 4 FIGURES Figure 1-1 Sliding Main Battery in M90 Figure 1-2 Backup Battery in M90 Without Cover Figure 1-3 Connecting M90 to AC Wall Outlet Via DC Power Adapter Figure 1-4 Connecting Dock to AC Wall Outlet Figure 1-5 Dock Chamber and Pocket...
-
Page 5: M90 Pde Unit
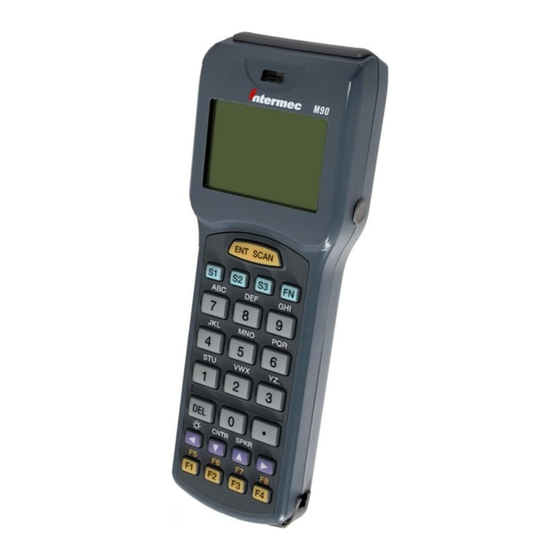
M90 features and allow you maximum productiv- ity and satisfaction from using this unit. General The M90 PDE unit allows you to enter data with the key- board or integrated barcode scanner. Pen and paper are now redundant. The stored data is later transferred to your host computer either directly via a cable or over the tele- phone network via a modem. -
Page 6: Customized Version
M90 PDE Unit Customized Version Your M90 PDE unit has more than likely been adapted to suit your specific requirements. This has been achieved by programming your unit with your special version of the M90 program. The functions described in this manual can therefore vary from your customized version. -
Page 7: Customer Support
Visit our Web site at http://www.intermec.com to download many of our current manuals in PDF format. To order printed versions of the Intermec manuals, contact your lo- cal Intermec representative or distributor. M90 Series Portable Data Entry Unit User’s Guide... -
Page 8: Start Up Of New M90 Pde Unit
" NOTE: It is only necessary to follow these steps once after taking delivery of the M90. If your M90 is delivered with inserted batteries and applica- tion program these procedures normally do not apply. On the next two pages are instructions for replacing either the main battery or the backup battery. -
Page 9: Main Battery Replacement
3. Insert the new main battery pack up into the battery compartment. 4. Slide the tab from left to right to secure the battery. Figure 1-1 Sliding Main Battery in M90 M90 Series Portable Data Entry Unit User’s Guide M90 PDE Unit... -
Page 10: Backup Battery Replacement
2. Insert a new lithium battery into the holder. Be sure to align the “+” symbol on the lithium battery with the screw hole in the M90 (see Figure 1-2). 3. Securely tighten the backup battery cover back onto the M90. -
Page 11: Downloading From Host Computer
REMOTE DEL filename Delete a program or data file in the M90. Kermit Communications Program To set up the PC to talk to the M90 PDE unit using a Ker- mit communications program, consult your manual for the Kermit communications program... -
Page 12: Set Up Host Computer
Connection Description to create a new connec- tion icon. 3. Enter a descriptive title for this connection in Name, such as “M90,” and select an icon from Icon to illus- trate this connection. Click OK to continue. M90 Series Portable Data Entry Unit User’s Guide... - Page 13 M90 PDE Unit 4. Select the applicable “Direct to Com” option from Con- nect using, then click OK to continue. M90 Series Portable Data Entry Unit User’s Guide...
- Page 14 Set Bits per second to “19200.” " Set Flow control to “None.” " Click Apply, then click OK. A communications icon (like the one shown left) appears for this connection within the Hyper Terminal directory. M90 Series Portable Data Entry Unit User’s Guide...
-
Page 15: Set Up Protocol Via Hyper Terminal
3. From Hyper Terminal, select File → Save to exit. The host computer is now ready to send and receive files. Your connection is saved, for later use, under the name and icon created. M90 Series Portable Data Entry Unit User’s Guide M90 PDE Unit... -
Page 16: Download The Program Myprog.exe To The M90 Pde Unit
Download the Program MYPROG.EXE to the M90 PDE Unit Do the following to download files from the host computer to the M90 PDE unit. Repeat these steps for each file to be downloaded: 1. From Hyper Terminal, select Transfer → Send File to access Send File (shown on page 11). - Page 17 4. Click Send to download MYPROG.EXE to the M90 PDE unit. File transmission progress is displayed. If the file is sent successfully, the status screen " disappears. If the transmission fails, the following Sending " Files message appears. Click OK to exit, then try to send MYPROG.EXE again.
-
Page 18: Review Hyper Terminal Settings
Change Icon. Click Configure to access the COMx Properties and change the communication port settings. Click OK to save the changes or click Cancel to exit this screen without saving the changes. M90 Series Portable Data Entry Unit User’s Guide... -
Page 19: Operation, General
The M90 PDE unit has no ON/OFF switch. Press the [S1] and [FN] keys simultaneously to turn the M90 PDE unit on. To turn the M90 PDE unit off, press the [S1] and the [FN] keys simultaneously again. The M90 PDE unit has an automatic “auto off” feature to reduce power drain from the internal main batteries. -
Page 20: User Mode
Set the parameters of the M90 PDE unit To return to the Ready mode, you have to press the [FN] key, release it, then press and release the " key. M90 Series Portable Data Entry Unit User’s Guide 2. -
Page 21: Special Keys
Or, if in review mode, it moves to the next field, when in a bar code reading field it will activate the bar code scanner. Enter Data Enter data into the M90 PDE unit via any of the following: Pressing keys on the keyboard. "... -
Page 22: Key Entry
Start Application Program To start the application program, either enter the file name in the Ready mode or use the RUN command in the User mode. The executable program has the extension EXE. M90 Series Portable Data Entry Unit User’s Guide... -
Page 23: Battery Replacement
“Off” position (see page 15). These warn- ing will periodically repeat until the battery is replaced. If the main battery is not replaced, the M90 will be Off and if the backup battery is at its full capacity, the data will be safe for two years. -
Page 24: Battery Life
Alkaline batteries (see note) 12 to 14 hours " Rechargeable batteries " Laser Scanner option CCD Scanner option No Active Use: When the M90 PDE unit is not used or turned off. Main batteries: " Alkaline batteries (see note) Two months Rechargeable batteries Backup battery "... -
Page 25: Peripherals
The spare battery will start changing only when the unit battery is fully-charged, or there is no unit in the dock. It will take four hours to fully charge the battery in the M90, and then an additional four hours to charge the spare bat- tery. -
Page 26: Vehicle Dock
Using the Dock To put the M90 in the vehicle dock, enter it with the top section first so that the hooks of the vehicle dock grip around the rubber grommet at the top of the M90. Then, push the bottom end of the M90 forward so that it will slide into the vehicle dock. -
Page 27: Regular Battery Charging
Regular Battery Charging Plug one end of a 9-volt DC power adapter into the DC-jack of the M90 PC Cable (P/N: M90402) and the other end into an ac wall outlet. The battery pack will be fully recharged after 14–16 hours. -
Page 28: Quick Charging Of Battery In M90 Pde Unit
M90 PDE Unit Quick Charging of Battery in M90 PDE Unit Connect the power adapter to the dock and insert the M90 PDE unit into the chamber of the dock. The M90 battery can be fully charged in about four hours and the status of the battery charging is indicated by the LED on the front panel of the dock. -
Page 29: Quick Charging Of Battery Outside M90 Pde
The battery will be fully charged in four hours providing that there is no M90 PDE unit in the dock. If an M90 is in the dock, the spare battery does not start charging until the battery within the M90 is fully charged (as in Figure 1-4). -
Page 30: Maintenance
1. Simultaneously press [S1] and [FN] to turn on the M90 PDE unit. 2. Replace the main battery according to page 5. 3. If the fault still remains, return the M90 to your Sys- tem Partner for service. M90 PDE Unit Locked in Position Do a system reset. - Page 31 The program adapting your M90 Portable Data Entry (PDE) unit to your specific application. Cold Start The procedure which resets or restarts the M90. All data in the RAM or the RAM disc will be deleted. Field A field is one piece of information, such as a name, date, quantity, article number.
- Page 32 Transfer The act of moving data records from the M90 PDE unit to a host computer or printer. During transfer, the M90 sends the entered data via a communication link to the host computer.
Need help?
Do you have a question about the M90 Series and is the answer not in the manual?
Questions and answers