Table of Contents
Advertisement
Quick Links
Advertisement
Table of Contents

Related Manuals for Focusrite Audio Engineering vocaster one studio


Summary of Contents for Focusrite Audio Engineering vocaster one studio
- Page 1 User Guide Tell the world Version 1 Focusrite.com...
-
Page 2: Table Of Contents
CONTENTS Contents Overview ..........3 Listening with speakers . -
Page 3: Overview
OVERVIEW Overview Introduction Welcome to your new Vocaster One Studio Connect Vocaster One to a computer via its Vocaster One is also compatible with Apple pack. The Vocaster One interface is designed USB-C port and the cable provided. You can... -
Page 4: Hardware Features
OVERVIEW Hardware features Vocaster One Studio includes a Vocaster One The microphone signal routes to your Vocaster One has outputs for both audio interface, a Vocaster DM1 dynamic computer’s audio recording software via the headphones and speakers: a front panel ¼’... -
Page 5: In The Box
OVERVIEW In the Box System requirements Along with your Vocaster One you will find: The easiest way to check your computer’s operating system (OS) is compatible with • Vocaster DM1 dynamic microphone, the Vocaster One is to use our Help Centre’s with microphone clip and 3/8”-to-5/8”... -
Page 6: Getting Started
GETTING STARTED Getting Started When you connect Vocaster One for the first time, your computer recognises it in the same way as if it were a USB memory stick. Easy Start Tool Getting up and running with your Vocaster One is made easy by our Easy Start Tool. -
Page 7: Mac Users
GETTING STARTED Mac Users: On connecting your Vocaster to your Mac you Double-click on the icon or pop-up to open After you submit the form you can either will see a pop-up and/or a Vocaster icon will the Finder window shown below: follow our step-by-step setup guide, which appear on the desktop: is tailored to how you want to use Vocaster... -
Page 8: Windows Users
GETTING STARTED Windows Users: On connecting your Vocaster One to your PC, Double-click: This redirects you to the Focusrite website, this notification will appear: where we recommend you register Open folder to view files your device: this opens an Explorer window: Click on the notification to open the dialogue box shown below: After you submit the form you can either... -
Page 9: Ipad Users
GETTING STARTED iPad Users: NOTE: Before connecting Vocaster One to To make the connections: your iPad, we recommend you follow the ‘Getting Started’ section above to ensure 1. Connect one end of the your hardware is up to date through USB Type-C to C cable (or adaptor) to Vocaster Hub. -
Page 10: All Users
GETTING STARTED All users: If you have any issues using the Easy Start We recommend you download and install our To allow you to get started if you do not tool, open the file More Info & FAQs, where Vocaster Hub software application, as this already have a DAW application installed on you should be able to find answers to unlocks the full potential of the interface. -
Page 11: Audio Setup In Hindenburg
GETTING STARTED Audio Setup in Hindenburg The examples opposite show Tutorial videos explaining how to the correct configuration on the set up and use Vocaster One with Hindenburg audio preferences on various DAWs can be found at our Windows and Mac. There are two Getting Started pages. -
Page 12: Examples Of Use
XLR connector: this includes the Vocaster possibilities is shown below. DM1 dynamic microphone supplied with the Vocaster One Studio. Although the Vocaster Recording with a microphone One interface can be used with condenser This setup shows a typical configuration for... -
Page 13: Microphone Tips
Dynamic microphones, such as the Vocaster • Use a mic stand. As the Vocaster DM1 with your Vocaster Studio is a dynamic DM1 included in your Vocaster One Studio, is a dynamic microphone, handling microphone optimised for voice recording, do not require phantom power. It’s rare,... - Page 14 EXAMPLES OF USE Microphone Dos and Don’ts (cont) • Understand the microphone’s pick-up • Experiment with your distance from • Don’t blow into a microphone to test it! pattern. The Vocaster DM1 is an ‘end the microphone. Speaking close to the Lightly rub or scratch the end instead.
-
Page 15: Using Auto Gain
EXAMPLES OF USE Using Auto Gain Auto Gain didn’t set my input level Vocaster One’s Auto Gain feature allows Speak into the microphone for ten If the halos flash amber the signal is too you to get a good recording level seconds, using a normal speaking voice loud or too quiet so Auto Gain couldn’t without guesswork. -
Page 16: Manual Gain Adjustment
EXAMPLES OF USE Manual gain adjustment On Vocaster One, the large knob marked To set your gain, speak into your microphone sets the microphone gain, and the level to as if you were recording, adjust the gain knob your recording software. until the halo(s) just start to turn amber when you speak at your loudest. -
Page 17: Microphone Mute
EXAMPLES OF USE Microphone Mute Using Enhance Vocaster One’s microphone channel has a Vocaster One’s Enhance feature optimises the To use Enhance, either press the button or, if you have Vocaster Hub open, click the on- mute button, marked microphone’s audio processing to achieve the screen Enhance icon. -
Page 18: Listening With Headphones
EXAMPLES OF USE Listening with headphones The Vocaster One Studio includes a set The headphones let you hear what you of high quality HP60v headphones. They are recording. This is a ‘default’ mix of are lightweight and durable, and should... -
Page 19: Listening With Speakers
EXAMPLES OF USE Listening with speakers Use the ¼’ jacks marked Outputs R and L You can also mute the speakers using Vocaster Hub software. Click the speaker to connect speakers. You can connect icon in the top right of Vocaster Hub powered monitors or an amplifier to these software to toggle mute on (red) or off outputs. -
Page 20: Recording A Phone
VOCASTER HUB SOFTWARE connector also feeds Vocaster One’s Recording a phone output back to the phone so the person on You can connect a phone to Vocaster One the phone call can hear the whole podcast to record a conversation, or to record music mix, but without their own voice. -
Page 21: Recording To A Video Camera
VOCASTER HUB SOFTWARE Recording to a video camera If you are working with video, you may want to record your audio into a video camera. Vocaster One has a dedicated output connector for this purpose, the 3.5 mm TRS jack socket on the rear panel marked voice from phone You can connect this output to the audio/mic input on your camera using a 3.5mm jack-to-... -
Page 22: Vocaster Hub Software
VOCASTER HUB SOFTWARE Vocaster Hub software As part of the Easy Start registration process, If your Vocaster One interface is not When you connect the interface and power you’ll install Vocaster Hub software on your connected to your computer and powered it on, the icon lights white to confirm computer. -
Page 23: Controlling The Microphone
VOCASTER HUB SOFTWARE Controlling the microphone The Host Input panel is where you adjust The bar should remain green most of the Vocaster One’s microphone channel: time, with amber showing only on the loudest ‘peaks’. If it goes red, the gain is set too high. Below the meter/level display are three buttons which duplicate those on the interface top panel:... -
Page 24: Controlling Your Mix
VOCASTER HUB SOFTWARE Controlling your mix • Host (mono) – this is Vocaster One’s • Loopback 1 and Loopback 2 (stereo)– The Mix section of Vocaster Hub allows you to Host microphone. these control the level of two audio balance the audio inputs and computer outputs sources within your computer: these making up your Show Mix. -
Page 25: Recording Sounds From Your Computer
VOCASTER HUB SOFTWARE Recording sounds from your computer Vocaster’s Loopback feature lets you record • Loopback 1 – this input gets its signal audio sources from within your computer from software with its output set to (e.g., the audio output from a web browser). Playback 1-2, or software that doesn’t There are two stereo Loopback sliders support output routing. -
Page 26: Example Of Loopback Usage
VOCASTER HUB SOFTWARE Example of Loopback usage Recording Tracks into Software You might want to use both Loopback inputs Depending on which recording software you when you’re recording a show but need use, you can pick from up to ten channels to independent recordings of other software record from, to separate tracks. -
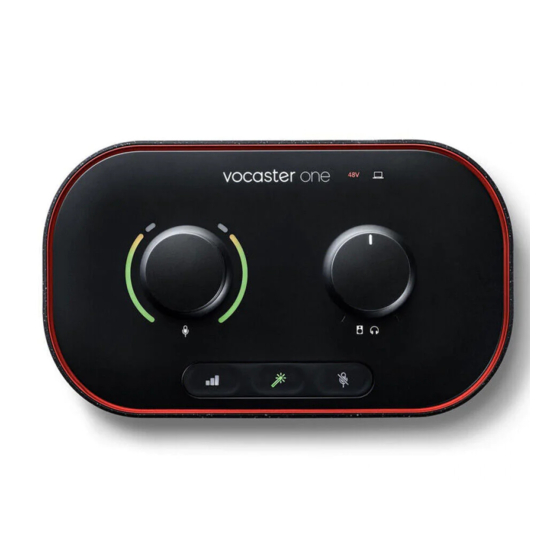
Page 27: Hardware Features
HARDWARE FEATURES Hardware Features Top Panel Indicators The large rotary control adjusts the gain An LED which illuminates white when the for the microphone input. interface has established communication with the computer it is connected to, and The gain control has two ‘halo’ LED arcs. red if communication fails. -
Page 28: Rear Panel
HARDWARE FEATURES Rear Panel Press to turn Vocaster One on and off. 3.5 mm TRS jack socket for connecting Vocaster One to Phantom power switch for microphone input – press to the external audio input of a video camera. enable 48V phantom power at the XLR socket. USB 3.0 port –... -
Page 29: Specifications
SPECIFICATIONS Specifications Performance Specifications These specifications allow you to compare your Vocaster with other devices and make sure they’ll work together. If you’re not familiar with these specifications, don’t worry you don’t need to know this information to use your Vocaster with most devices Sample Rate Phone Input Headphone Output... - Page 30 SPECIFICATIONS Physical And Electrical Characteristics Other Audio I/O Camera output 3.5 mm TRS jack on rear panel Phone input and output 3.5 mm TRRS jack on rear panel Loopback inputs Two (stereo) via Vocaster Hub Microphone Input Connector Balanced, via female XLR on rear panel Phantom power 48V, rear panel switch Weight and Dimensions...
- Page 31 SPECIFICATIONS Vocaster DM1 Microphone Specifications Vocaster HP60v Headphones Specifications Capsule Performance Type Dynamic Impedance 32Ω Polar Pattern Cardioid Sensitivty 98dB ±3dB Frequency Response 20Hz - 20kHz Max. power rating 1.2W Performance Sensitivity -53dB ±3dB (0dB = 1V/Pa at 1kHz) Physical and Electrical Characteristics Frequency Response 50Hz - 14kHz Type...
-
Page 32: Troubleshooting
All other trademarks and trade names are the Daniel Hughley, David Marston, Derek Orr, property of their respective owners. Ed Fry, Eddie Judd, Emma Davies, 2022 © Focusrite Audio Engineering Limited. Harry Morley, Ian Hadaway, Jack Cole, All rights reserved. Jake Wignall, James Johnson, James Otter,...
Need help?
Do you have a question about the vocaster one studio and is the answer not in the manual?
Questions and answers