Table of Contents
Advertisement
Available languages
Available languages
Quick Links
Advertisement
Chapters
Table of Contents

Subscribe to Our Youtube Channel
Related Manuals for FOTILE JQG9001


Summary of Contents for FOTILE JQG9001
- Page 1 RANGE HOOD User Manual JQG9001 Please read the following safety information carefully before installing and/or using this appliance. We recommend that you keep this manual for future use and/or in case of transfer of ownership of the range hood...
-
Page 2: Table Of Contents
6.5 Installation Procedure ...... 34 or indirect, will not be accepted by authorized service 6.6 Test Run After Installation ....41 center of Fotile. If you require warranty or post- FOTILE YouTube US WeChat Service warranty after-sale service, please contact the local authorized service center of Fotile nearest you. -
Page 3: Safety Information
Fotile Range Hood and/or bodily injuries as a • Please make sure correct installation and • The operating temperature of the range hood of the glass determines the extremely little should not exceed 104 ℉... -
Page 4: Operation
D) Use proper pan size. Always use cookware in operation. Never touch hot parts. Keep • Fotile is not responsible for injuries caused equipped with a cord having a grounding wire with appropriate for the size of the surface element. -
Page 5: Cleaning And Maintenance
Once Important Note: etc. 1. Fotile Range Hood Control Panel pressed, the button will fully illuminate. Reattach the grease filter after cleaning and • Please avoid excessive accumulation of Press the button again and the light will maintenance of the range hood. -
Page 6: Faq
★ Please: regularly clean the oil filter for the Washing and cleaning the surface, Grease • Fotile suggests that you clean the surface of health of you and your families. Cup, and grease filter: (The cleaning can be Use type lamp is self-ballasted fluorescent the appliance for better use. -
Page 7: Service Information
3)The product installed, dismantled or repaired Problem/Issue Possible Cause • Please carefully read all instructions prior to and tools provided by Fotile to ensure safe by customer or any party other than Fotile’s After the POWER button The appliance may installation. -
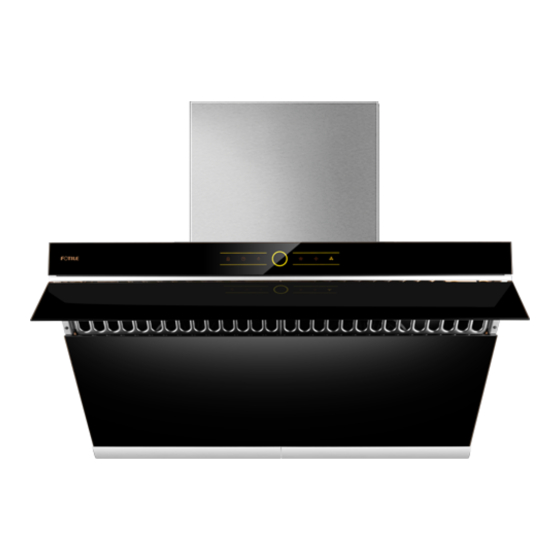
Page 8: Product Dimensions
#10×2 9/16"(ST5×65mm) 6.4 Installation Tools: bolts, please do not apply any unqualified bolts. 6.2 Product Dimensions The following accessories must be purchased separately (please contact the authorized Fotile branch) Duct Cover Housing Assembly Accessories (optional) Blower Housing Gasket Decorative Cover... -
Page 9: Installation Procedure
The Installation of the Fotile Range Hood with an Upper Cabinet: of the top cabinet meet. This is the location, in which distance from the countertop of the gas stove to to secure the bracket. - Page 10 of the top cabinet) of the bottom board of the top cabinet shall be deemed as the location datum. And the distance between the upper edge and the center of the bracket shall be 7 4''(101.6mm) 11/16"(194.4mm) for 6"(152.4mm) decorative sheet and 5 11/16"(143.6mm) for 4"(101.6mm) Caution: Two installers are required to ensure decorative sheet.
- Page 11 down on the bottom of the upper cabinet, and the hood against the wall tightly. Secure the Diameter of smoke Diameter of hole digging tube Φ6" (152.5mm) then drill the holes as indicated on the hole- 6 1/2" (165mm) duct to the duct cover and seal the connection Φ...
-
Page 12: Test Run After Installation
If the distance between the ceiling and duct bracket equals to or is less than the value, Caution: Please run the machine and test if secure the decorative cover bracket on the wall the smoke pipe leaks air after it is sealed with right under the ceiling. - Page 13 JQG9001...
- Page 14 《使用安装说明书》(以下简称说明书),此说 * 地址:6 Campus Dr, Suite 210, Parsippany, NJ 07054 明书将有利于您熟悉油烟机安全信息、操作和保 清洁保养 ............. 5 * 电话:888-315-0366 养维修等,并让您享受到全新的下厨乐趣。 常见问题解答 ............. 7 * 官网: us.fotileglobal.com 请您在使用前务必认真阅读说明书,并遵从 * 服务邮箱:serviceusa@fotile.com 售后服务 ............. 7 说明书要求进行使用。本说明书的操作说明对于 安装 ..............7 维持产品的良好工作状况十分重要,若因使用不 当造成产品故障,您将丧失免费保修的权利,任 一、安装须知 ............何直接或间接的免费保修申请将不被本公司各地 二、产品尺寸 ............
-
Page 15: 安全信息
打开油烟机周围橱柜门时撞击到玻璃;玻璃处 火灾危险 安全信息 息和要求。 于过冷和过热、冷热交替严重的环境等情况。 为降低火灾危险并合理排气,请总是外排。请 如用户房屋密封,安装有大功率烟机,建议安 擅自改装此产品会产生风险。 不要将废气排到墙体、天花板、阁楼、窄小空 为避免任何对油烟机的意外风险和损害,请在开 装补充空气装置。方太油烟机的配置,建议密 警告: 间或车库中。 始安装和使用前仔细阅读此产品说明书。只有这 封性高的新房用户安装补充空气装置。如所属 触电危险 如果不按本说明书规定的方法清洗 , 油烟机有 样您才能安全正确地操作此产品,降低火灾、电 州或地区有相关法律规定要求,建议遵守相关 有缺陷的产品可能引起电击,绝不启动有缺陷的 起火的危险。 击或者人身伤害等风险。请保留此产品说明书, 法律规定要求安装相应补充空气装置。 产品。如发现问题请将此产品从电源上拔下或切 热油和油脂会快速点燃,绝不让热油或油脂处 以供今后使用或后续用户使用。 本产品仅限于美国和加拿大使用。 断总电源,并请联系方太授权的服务中心。 于无人看管状态。 重要提示: 注意: 此产品应使用专用电源插座,并且专用电源插 油网中油脂沉淀物可能着火, 请定期清洗油网。 本产品仅用于家庭室内使用,不可用于室外。 若当地适用的法规包含更为严格的安装和认证 座应有可靠接地,因为电源线中途连接、使用 请勿在无油网的情况下操作此产品。 仅按照制造商的方式使用本产品,若您在室外... -
Page 16: 清洁保养
非在对其安全负责的人监督或指导如何安全使 产品信息 档运行,再轻触一下低档键 ,电机停止 他化学药剂清洗油烟机。 用此产品的情况下。孩童应受监管,确保其不 运转,低档指示灯 恢复至半亮。 型号 JQG9001 玩弄此产品。 电击危险: 灯键:轻触一下,隔烟屏自动开启,照明 35 7/8 × 18 1/4 × 17 7/16 " 产品尺寸 L*D*H 油烟机可能有非常锋利的边,在进行安装、清 灯打开, 灯指示灯全亮。再轻触一下,照 渗透的水气可能导致电击。 清洁、 维修油烟机前, (910 × 462 × 442 mm) 洁或修理时,谨防被油烟机内金属板快口等划 明灯关闭, 灯指示灯恢复至半亮。 请拨下电源插头或者切断总电源,以免触电。... -
Page 17: 常见问题解答
的)。 1. 拔掉油烟机电源插头,或关闭插座电源; 所用灯为 LED 灯:灯功率为 3W,电压范围为 8.5~12V,灯尺寸为宽度 2 13/16”(70mm)/ 深 3. 自行或非方太指定服务人员或服务机构安装和拆 度 7/8”(21mm)/ 高度 3/4”(19mm)。 修的产品。 电击危险:在更换 LED 灯前,请先拨下电源插 4. 购买凭证和保修卡信息与产品不符的。 头或者切断油烟机插座电源,以免触电。 5. 因不可抗拒力造成产品损坏的(如自然灾害、战 争等)。 6. 不根据“使用说明书”的规定使用,造成产品故 常见问题解答 2. 把灶具上器具清理干净; 障或损伤的。 ★建议:为了您与家人的健康,请定期清洗油网。 3. 请准备好中性洗涤剂和软布 ( 软刷 ); 警告:电击危险 为防止拆卸油网时割伤手指,请不要徒手摘取油... -
Page 18: 二、产品尺寸
3. 油烟机排出的废气不能排放到用于排出燃烧燃气 直线、较短的出风管布置将使得油烟机的排烟 不要将废气排到墙面或天花板内空间,或者阁 上柜板固定螺钉垫圈 或其他燃料的烟雾使用的热烟道中。 更加顺畅。 楼、窄小空间或车库中。 φ1 5/16"(φ32mm) 4 颗 4. 因油烟机的尺寸较大和重量较重,建议两位安装 尽量避免使用过长以及有较多弯道的出风管, 三、零配件一览表 人员安装。由于本油烟机的安装程序复杂,因此需 使用这些管道将影响油烟机的排烟效果。 装箱单 木螺钉 要专业安装维修人员按照此说明书进行安装。 出风管与墙孔的连接处使用管道胶严格进行密 标准配置 #10×2 9/16"(ST5×65mm) 4 颗 5. 产品固定后,插头应在可接触位置。 封。必须确保出风管与出风罩连接牢固,并用铝 主机 6. 安装时须尽量保证机身水平。 箔胶带密封。 1 台 以 下 配 件 须 另 外 单 独 购 买( 请 联 系 方 太 授 权 网 点 ) 7. -
Page 19: 四、安装工具
四、安装工具 的部件,且这些部件变形时,不会影响对触及带 图 上 孔 A、 孔 B 必 须 固 定 螺 钉, 区 域 C 挂 钩 孔位能对应木柱部分必须固定木螺钉 (#10×2 电部件的防护。如所属州或地区有相关法律规定 9/16"(ST5×65mm))。 油烟机安装高度,建议遵守相关法律(包括但不 仅限于建筑物和消防法规和标准),但产品的吸 4. 固定挂钩: 油烟效果可能会受到较大影响。 1)打孔标识处是瓷砖(大理石):在打孔标识 此油烟机安装分为有上柜、无上柜共三种安装方 处用电钻打 φ3/8"(φ8mm) 孔,并埋设瓷砖膨胀 式。 管 (φ1/4"×1 5/16"(φ5.3×32mm)), 用 挂 钩 螺 注意:... - Page 20 4. 固定挂钩: 1)打孔标识处是瓷砖(大理石):在打孔标识 处用电钻打 φ3/8"(φ8mm) 孔,并埋设瓷砖膨 胀管 (φ1/4"×1 5/16"(φ5.3×32mm)),用挂钩 螺钉 (#8×1 7/16"(ST4.2×36mm)) 固定挂钩, 并用水平尺确保挂钩水平。 7. 抬起主机倾斜着将背底部挂钩孔挂上挂钩,再 2) 打 孔 标 识 处 是 灰 板: 在 打 孔 标 识 处 将烟机推上去靠紧墙壁。 直 接 用 螺 丝 刀 将 灰 板 膨 胀 管 (φ3/16"×1 5/8"(φ4×40mm)) 拧进墙面,然后用挂钩螺钉...
- Page 21 9/16"(ST5×65mm))。 无上柜加装饰罩 首先以灶具中心点确认油烟机安装中心点,然后以 灶具台面为基准确认挂钩安装位置,做好打孔标 志。尺寸为:灶具台面到挂钩中心点最低 27 7/8" 木柱 (708mm)—30 7/8"(783mm); 安全挡块:挂钩中心线往左 4 9/16"(115.5mm) 再 往上 2 5/16"(58.5mm) 8. 抬起主机将背上部挂钩孔挂上挂钩,再把烟管 装饰罩挂钩:常规尺寸是,主机挂钩中心点往上 固定在出风罩上用铝箔胶带做好密封。 最高 29 15/16"(760mm),如果楼层高度在这个 尺寸内就把装饰罩挂钩与天花板平齐。如楼层高 度高于这个尺寸,那要单独购买加长装饰罩。加 长装饰罩高度分别是:27 9/16"(700mm) 和 35 3. 确认固定主机挂钩、安全挡块和装饰罩挂钩的 7/16" (900mm) 位置: 打孔标识处埋设膨胀管: 注意:为了安全你需要两个人来安装这个油烟机。 1)打孔标识处是瓷砖(大理石):在打孔标识 处用电钻打 φ3/8"(φ8mm) 孔,并埋设瓷砖膨 9.
-
Page 22: 六、安装后调试
爆炸图 推杆支架 推杆盖 上密封垫 出风罩 箱体 电器盒电源板组件 电器盒盖 推杆 摇杆 压板 油网 开关盒 控制板 密封圈 上玻璃 挡烟板玻璃 下玻璃 LED灯 装饰条 注意:铝箔胶带密封后,请开机测试烟管是否有 漏风。烟管尽量能够拉直。 9. 首先撕掉装饰罩、风机外罩上的保护膜,把装 饰罩放入风机外罩里。然后同时拿起装饰罩和风 机外罩,将装饰罩挂在装饰罩挂钩上,将风机外 罩慢慢放下, 同时推将装饰罩和风机外罩往里推, 直到风机外罩扣到相应的外罩螺钉上。 油杯挂钩 挂钩 油杯 蜗壳 电机 叶轮 导油板组件 手紧螺母 进风口圈 转轴 碰扣座 6. - Page 23 JQG9001...
- Page 24 FOTILE Magasin phare à Toronto vous fournira les pièces de rechange et le soutien sur notre site Internet : www.fotileglobal.com. technique professionnel de Fotile de sorte que votre * Adresse:8365 Woodbine Ave,Markham, L3R2P4 appareil bénéficie d’une maintenance efficace et de * Numéro vert:844-315-0315...
-
Page 25: Consignes De Sécurité
• Débranchez l’appareil de la prise en cas votre état ou votre région. posé sur elles, l’appareil installé au-dessus In order to prevent accidental damage to the Fotile d’inutilisation prolongée. •L'utilisation de ce produit est réservée aux peut être endommagé par la chaleur ou Range Hood and/or bodily injuries as a result of •... - Page 26 • Avant de nettoyer, d’installer ou d’entretenir • Ne pas utiliser l’appareil en l’absence du filtre à de gaz principal et éloigner les substances service agréés de FOTILE. l’appareil, coupez le courant afin d’éviter graisse. inflammables de la flamme.
-
Page 27: Fonctionnement
: l’écran de de l’appareil : l’appareil émet un son court Modèle JQG9001 risques d’électrocution et d’incendie. fumée s’ouvre automatique et la touche de et la touche s’allume en lumière forte. Si Dimensions du produit 35 7/8 ×... - Page 28 • Pour un nettoyage en profondeur de la hotte, mains, puis le sortez en le tirant vers l’extérieur. • L’humidité pénétrée peut provoquer un choc contactez un centre de service agréé de FOTILE. Avertissement : Veillez porter des gants de électrique. Avant le nettoyage et l’entretient •...
-
Page 29: Questions Fréquentes
éviter l'électrocution. spécifiquement suggéré dans le manuel. Tous dans le bord de la lampe et enlevez l’ensemble par le centre de service agréé de FOTILE ou les autres travaux d'entretien doivent être Contactez le service après-vente agréé par de la lampe. -
Page 30: Dimensions Du Produit
Coupe d’huile à une mauvaise installation ne sont pas de l’appareil. creux, l’épaisseur de sa partie solide doit couvertes par la garantie de FOTILE. être supérieure à 13/16 pouces (30mm). Notice d’utilisation Avertissements avant installation 2 . P o u r a s s u r e r l a s é c u r i t é e t l e b o n Pour les murs en béton, l’installation peut... -
Page 31: Procédure D'installation
Les accessoires ci-dessous sont à acheter (auprès d'un de cuisson sur la cuisinière et la partie la plus point de vente agréé de Fotile) basse de la hotte) est inférieure à 24" ( 610mm) Accessoires pour l’installation du capot extérieur (Etats-Unis) / 25 5/8"... - Page 32 5.Collez le papier de l'ouverture sur le bas Attention : Pour plus de sécurité, il faut deux de la paroi supérieure avec la face indiquant personnes pour installer la hotte. la dimension de l'ouverture vers le bas. Puis 8. Utiliser 3 vis de fixation de plaque d’armoire creusez l'ouverture selon les instructions.
- Page 33 10. Make sure the hood is leveled. Install the oil Si les crochets sont fixés sur les carreaux Attention: Au moins une des vis de bois(#10×2 9/16"(ST5×65mm)) du crochet de l’appareil vernissés, le côté Rear Wall du papier de cup, and plug in the appliance for a test run. principal doit être fixée sur la poutre en bois.
- Page 34 1. Ouvrez l’emballage, sortez l’appareil principal et principal doit être fixée sur la poutre en bois. vissez les vis et vérifiez le niveau de l’accroche. vérifiez les accessoires avec la liste d’accessoires. Il faut mettre les vis de fixation dans les trous A et B illustrés dans la figure.
-
Page 35: Test Après L'installation
6.6 Test après l’installation (1) Fortes vibrations de l’appareil. (2) Les turbines ne tournent pas. 1. Appuyez sur la touche Marche/Arrêt, puis sur (3) Du bruit de frottement apparent se produit lors la touche Eclairage. Vérifiez le fonctionnement de de la rotation des turbines. l’éclairage et l’ouverture automatique de l’écran (4) Du bruit anormal du moteur se produit. - Page 37 110100051902F...
Need help?
Do you have a question about the JQG9001 and is the answer not in the manual?
Questions and answers