Intermec 6100 User Manual
Hand-held computer
Hide thumbs
Also See for 6100:
- Programmer's reference manual (328 pages) ,
- Installation instructions manual (66 pages) ,
- Supplementary manual (123 pages)

Related Manuals for Intermec 6100


Summary of Contents for Intermec 6100
- Page 1 6100 Hand-Held Computer USER’S GUIDE " " " " " " " " " " " " " " " " " " " " " " " " " " " " PN: 961-028-085 Revision C August 1999...
- Page 2 " NOTICE The information contained herein is proprietary and is provided solely for the purpose of allowing customers to operate and service Intermec manufactured equipment and is not to be released, reproduced, or used for any other purpose without written permission of Intermec.
-
Page 3: Table Of Contents
..........6100 Hand-Held Computer User’s Guide CONTENTS "... - Page 4 Repair Service 6100 Hand-Held Computer User’s Guide .........
- Page 5 ........6100 Hand-Held Computer User’s Guide CONTENTS .
- Page 6 Table 4-1 Basic Troubleshooting 6100 Hand-Held Computer User’s Guide ....... .
-
Page 7: General Information
About this User’s Guide Section 1 Contains general information about the components of your 6100 Hand-Held Computer . This includes telling you how the user guide is organized, a summary of the sections, and the specifications for your computer. Section 2 Tells you how to prepare for using your computer. - Page 8 Contains the Utilities Program screens. This is system-level information and is intended to be used by your system ad- ministration people when defining and setting parameters to support your application. Appendix C Contains the supported radio configurations for this hand- held computer. 6100 Hand-Held Computer User’s Guide...
-
Page 9: Hand-Held Computer Description
The following descriptions will familiarize you with the name, function, and locations of the main hand-held com- puter components. Figure 1-1 and Figure 1-2, on pages 1-4 and 1-5, show you the location for your hand-held comput- er key components. General Information 6100 Hand-Held Computer User’s Guide... -
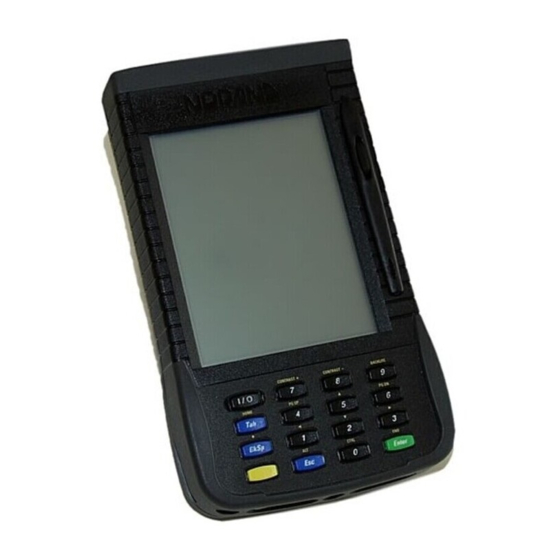
Page 10: Figure 1-1 Front View
General Information SECTION 1 1. Touch screen 2. Stylus 3. Keyboard 4. Docking connector 5. Speaker slot 6. Infrared lens 7. DC power jack Figure 1-1 Front View 6100 Hand-Held Computer User’s Guide... -
Page 11: Figure 1-2 Back View
SECTION 1 General Information 1. PC card access door 2. Release button 3. Slide latch 4. Battery pack Figure 1-2 Back View 6100 Hand-Held Computer User’s Guide... -
Page 12: Hand-Held Computer Keyboard
Figure 1-3 on page 1-6 details the keyboard layout. 1. Numeric keys 2. ENTER key 3. Esc (Escape) key 4. GOLD (Shift) key 5. BkSp (Back Space) key 6. Tab key 7. I/O (Suspend/Resume) key 6100 Hand-Held Computer User’s Guide Figure 1-3 16-Key Keyboard SECTION 1... -
Page 13: Display
To write or enter data on the touch screen use only the stylist pro- vided with your computer or use your finger. The PEN*KEY Model 6100 Programmer’s Reference Guide NPN: 977-054-001 contains details for adjusting the con- trast settings. Backlight Your hand-held computer display comes equipped with a backlight. - Page 14 Your hand-held computer contains two 100 mA hour vanadium lithium backup batteries. The backup battery charges itself from the main pack or a charging source so it is constantly ready to take over data protection. 6100 Hand-Held Computer User’s Guide...
-
Page 15: Figure 1-4 Battery Capacity Displayed
SECTION 1 General Information Battery capacity 100% Figure 1-4 Battery Capacity Displayed 6100 Hand-Held Computer User’s Guide... -
Page 16: Memory
Applications stored in flash ROM are copied into DRAM for execution. PC Cards Different brands of PC cards can be used in your hand-held computer. Memory cards are available in a variety of sizes 1-10 6100 Hand-Held Computer User’s Guide SECTION 1... -
Page 17: [Gold] (Shift) Key
To force a suspend, press the key defined as the suspend key. To resume operation, press the [1/0] key. Additionally, pressing the release button on the battery pack door forces a suspend. This protects against losing data when removing the battery pack. 6100 Hand-Held Computer User’s Guide 1-11... -
Page 18: Serial Ports
PC card endcap. Figure 1-5 shows the location of the reset switch. To reset your hand-held computer, use the tip of the stylus that is provided with your hand-held com- puter. 1-12 6100 Hand-Held Computer User’s Guide SECTION 1 1. Reset switch Figure 1-5 Reset Switch... -
Page 19: Options And Accessories
Tethered Scanner Endcap The tethered scanner endcap provides the standard 9-pin D-sub connector and phone jack. Tethered Scanner and Phone Jack Endcap General Information 1. Shoulder bolt 2. Phone jack 3. 9-pin D-sub connector Figure 1-6 6100 Hand-Held Computer User’s Guide 1-13... -
Page 20: Integrated Scanner Endcap
2. Laser scanner warning labels (one on front and one on bottom of scanner endcap) 3. Laser scanner 4. Phone jack Integrated Scanner and Phone Jack Endcap 1-14 6100 Hand-Held Computer User’s Guide CAUTION LASER LIGHT DO NOT STARE INTO BEAM 670 nm LASER DIODE 1.0 MILLIWATT MAX OUTPUT... -
Page 21: Radio Module And Headset
Figure 1-8 shows a hand-held computer with a radio module. Computer with Radio Module and Headset Front View Back View 1. Headset 2. Antenna 3. Radio module pod Figure 1-8 6100 Hand-Held Computer User’s Guide General Information 1-15... -
Page 22: Magnetic Stripe Reader
Figure 1-10). 1. Keyboard 2. Display 3. Magnetic stripe reader 4. Tethered scanner endcap 5. Direction arrow for sweeping the card through the reader Magnetic Stripe Reader with Tethered Scanner Endcap 1-16 6100 Hand-Held Computer User’s Guide Figure 1-9 SECTION 1... -
Page 23: Figure 1-10 Magnetic Stripe Reader With Integrated Scanner Endcap
SECTION 1 General Information 1. Keyboard 2. Display 3. Magnetic stripe reader 4. Integrated scanner endcap 5. Direction arrow for sweeping the card through the reader Figure 1-10 Magnetic Stripe Reader with Integrated Scanner Endcap 6100 Hand-Held Computer User’s Guide 1-17... -
Page 24: Using The Magnetic Stripe Reader (Msr)
1. Installed magnetic stripe reader 2. Card Using the Magnetic Stripe Reader 1-18 6100 Hand-Held Computer User’s Guide Figure 1-11 SECTION 1... -
Page 25: Hand-Held Computer Specifications
Two PC card slots; two Type II cards, or one Type III card Processor: AMD Élan chip 386 architecture, 33 Mhz. (fully charge ¶ 2.5 hours; 95% fully charged ¶ 1.5 hours ) 6100 Hand-Held Computer User’s Guide General Information 1-19... - Page 26 General Information Display: Type: Quarter size VGA LCD, CGA Controller, with Backlight Size: 240 (wide) by 320 (long) pixel, portrait orientation 1-20 6100 Hand-Held Computer User’s Guide SECTION 1...
-
Page 27: Introduction
Connect to peripheral devices " Getting Started Unpack your 6100 Hand-Held Computer and inspect it for signs of physical damage from shipment or storage. When you start using your hand-held computer or any time that all power has been completely removed, you are “cold- booting”... -
Page 28: Rechargeable Battery Labelling
The lithium battery can explode if placed incorrectly in the charger. AVERTISSEMENT: Les batteries au lithium peuvent exploser ou prendre feu si elles sont trop chargées à cause d’une mauvaise installation de la station d’accueil. 6100 Hand-Held Computer User’s Guide SECTION 2... -
Page 29: Installing The Main Battery
If the display remain blank after charging for five minutes, remove it from the charging device. Press the reset switch and your computer will power up. The display will then become active. Continue to charge until the batteries are fully charged. Operation 6100 Hand-Held Computer User’s Guide... -
Page 30: Figure 2-1 Replacing Main Battery Pack
After the initial charging of 14 hours, the normal charge time for the main battery pack is 2-1/2 hours. 1. Rechargeable battery pack (contacts on underside) 2. Battery compartment 3. Slide latch 4. Release button 6100 Hand-Held Computer User’s Guide Figure 2-1 Replacing Main Battery Pack SECTION 2... -
Page 31: Charging The Batteries
Figure 2-2 shows the main components for the cigarette lighter adapter. The multidock, single dock, and vehicle dock installation and instructions are contained in a sepa- rate publication 6100 Series Docks Installation Instructions PN: 962-020-003. 1. DC plug 2. Lighter socket adapter 3. -
Page 32: In External Source
= fully charged; blinking red = bad battery or bad connection). Figure 2-3 shows a multipack charger and Figure 2-4 shows a single pack charger. 6100 Hand-Held Computer User’s Guide 1. Voltage selector 110 or 220 2. Battery pack (eight) compartments 3. -
Page 33: Figure 2-4 Single Pack Charger
1. Battery pack compartment 2. Battery pack contacts 3. Charging indicator LED: (red = charging; green = fully charged; blinking red = bad connection, lift and reseat) 4. Power cord Figure 2-4 Single Pack Charger 6100 Hand-Held Computer User’s Guide... -
Page 34: Removing The Main Battery
Wait until you hear the quick beeps before doing Step 2. 2. Slide the Slide Latch towards the release button and remove the battery. 6100 Hand-Held Computer User’s Guide 1. Release (suspend) button 2. Slide latch 3. Battery pack... -
Page 35: Measuring Battery Pack Capacity
LEDs light: one LED = less than 25% capacity; two LEDs = 25- -50% capacity; three LEDs = 50- -75% capacity; four LEDs = more than 75% Figure 2-6 6100 Hand-Held Computer User’s Guide Operation... -
Page 36: Backup Battery
5 years before it needs to be replaced. Whenever your hand-held computer alerts you that the backup needs to be replaced, send it in to the Customer Ser- vice Center for replacement. 2-10 6100 Hand-Held Computer User’s Guide SECTION 2... -
Page 37: Installing Tethered Or Integrated Scanner Endcap
3. Hold the endcap against the computer and tighten the shoulder bolt. Again ensure that the endcap is securely seated. 6100 Hand-Held Computer User’s Guide Operation 2-11... -
Page 38: Figure 2-7 Installing Endcap
Operation SECTION 2 Rectangular Bar Hinge Figure 2-7 Installing Endcap 2-12 6100 Hand-Held Computer User’s Guide... -
Page 39: Using Pc Cards To Load Your Programs
CONFIG.SYS file. In the CONFIG.SYS: For complete details on creating a “boot” card, refer to the instructions in the Model 6100 Hand-Held Computer Pro- grammer’s Reference Guide PN: 977-054-001. shell=d:\command.com d:\ /p device=d:\Elanapm.e device=d:\nordospm.exe... - Page 40 You can use an IrDA dongle (for example, Jeteye company) on a PC running a terminal program to control your hand- held computer. Use the following two DOS commands on your hand-held computer: 2-14 6100 Hand-Held Computer User’s Guide MODE COM3:9600,N,8,1,P CTTY COM3 SECTION 2...
-
Page 41: Installing Pc Cards
Figure 2-8). 3. Remove the endcap (see Figure 2-9 on page 2-17). 4. Slide the card, connector end first, into the slot. If it resists going in, flip the card over and try again. 6100 Hand-Held Computer User’s Guide Operation 2-15... -
Page 42: Removing Pc Cards
Press in on the ejector button to release and eject the card. The button will eject the card far enough so you can pull it the rest of the way with your fingers. 2-16 6100 Hand-Held Computer User’s Guide Figure 2-8 Removing PC Card End Cap SECTION 2... -
Page 43: Figure 2-9 Installing And Ejecting Pc Cards
3. One option of modular endcap 4. Shoulder bolt for attaching endcap to computer 5. PC card slots (upper drive B, lower drive A) 6. Options connector Figure 2-9 Installing and Ejecting PC Cards 6100 Hand-Held Computer User’s Guide 2-17... -
Page 44: Downloading Programs Into Your Hand-Held Computer
5. After your hand-held computer finishes booting, and the copyright notice is displayed, press [ENTER] to continue. 2-18 6100 Hand-Held Computer User’s Guide ROM DOS 5 Start From: 1) Memory Card 1 =A: 2) Memory Card 2 =B: 3) RAM Drive... - Page 45 At this point go to Appendix B for the Utilities Programs procedures. UTILITIES LOAD PROGRAMS/DATA 1. BEGIN COMM SESSION 2. COM x-comm set -- x 3. UNIT ID ZZZZZZX 9. ADVANCED UTILITIES [ESC]QUIT 6100 Hand-Held Computer User’s Guide Operation 2-19...
- Page 46 Operation SECTION 2 2-20 6100 Hand-Held Computer User’s Guide...
-
Page 47: Routine Care And Maintenance
Refer to the Troubleshooting section for solutions. " " " " " " " " " " 6100 Hand-Held Computer User’s Guide Section 3 " " " " " " " "... -
Page 48: Cleaning Your Hand-Held Computer
Street, Omaha, NE 68127-0205. Docking Connectors If docking connector contacts become dirty or tarnished, clean them with a cotton swab dipped in alcohol. It may also be necessary to lightly burnish them with a pencil eras- 6100 Hand-Held Computer User’s Guide SECTION 1... -
Page 49: Table 4-1 Basic Troubleshooting
Check to ensure that the dock is plugged in and hand-held To Power computer is making good contact. Troubleshooting " " " " " " " " " " Table 4-1 Basic Troubleshooting 6100 Hand-Held Computer User’s Guide Section 4 " " " " " " " "... - Page 50 The printer may be running off battery power. The printer Computer Will Not does not charge the battery in your hand-held computer Turn ON When when it is running off of battery power itself. Inserted In A Printer 6100 Hand-Held Computer User’s Guide Table 4-1 continued SECTION 4...
- Page 51 * May not turn OFF when it is processing data. If either of these conditions continues for a long period of time, contact support personnel as this will run down the batteries. Table 4-1 continued 6100 Hand-Held Computer User’s Guide Troubleshooting...
-
Page 52: Repair Service
Be sure to carefully pack the unit and include a description of the problem and the measures you took to correct it. If possible, include any printout (if applicable) or write down displayed error messages to illustrate the problem. 6100 Hand-Held Computer User’s Guide Table 4-1 continued SECTION 4... -
Page 53: Pin Docking Connector (Standard)
Battery Clock 12.0 Volts Terminal From Dock Ground BDAT Battery Data Transmit for Serial Port Receive for Serial Port Ready To Send Clear To Send Model 6100 Hand-Held Computer User’s Guide Appendix A " " " " " " " "... - Page 54 APPENDIX A Connector Pin-Outs " PEN*KEY Model 6100 Hand-Held Computer User’s Guide...
-
Page 55: Entry Point
Y or B Appendix B Utilities Program Utilities Program provides basic functions PEN*KEY UTILITIES PSROMOC Vx.xx COPYRIGHT 1994--1998 INTERMEC TECHNOLOGIES CORPORATION. ALL RIGHTS RESERVED [ENTER]CONTINUE 6100 Hand-Held Computer User’s Guide Key Description... -
Page 56: Drop-Down Lists
Press the number of a suboption, or press the Y or B keys to scroll through the list and press the [ENTER] key to en- ter. Select one suboption each time. Press the [ESC] key to exit a drop-down list. 6100 Hand-Held Computer User’s Guide CHANGE UNIT ID UNIT ID 2233233... -
Page 57: Alphanumeric Fields
Press [ENTER] to save the entries and exit the menu. Press the [ESC] key to exit without saving the entries. NETWORK PARAMETERS SERVER NAME I.U.N. INCORPORATED SERVER IP ADDRESS 123.123.123.123 CLIENT IP ADDRESS 123.123.123.123 ROUTER SUBNET MASK [ESC]QUIT 6100 Hand-Held Computer User’s Guide... -
Page 58: Title Screen
Title Screen When you reboot or reset your computer, the Title Screen appears: Press the [ENTER] key to continue. 6100 Hand-Held Computer User’s Guide PEN*KEY UTILITIES PSROMOC Vx.xx COPYRIGHT 1994--1998 INTERMEC TECHNOLOGIES CORPORATION. ALL RIGHTS RESERVED [ENTER]CONTINUE... -
Page 59: Language Selection
Press the number of a language, or press the Y or B keys to scroll through the list, then press the [ENTER] key to enter. Press the [ESC] key to exit this menu. PEN*KEY UTILITIES LANGUAGE SELECTION 1. ENGLISH [ESC]QUIT 6100 Hand-Held Computer User’s Guide... -
Page 60: Communications Menu
If your computer does not support any of the features listed, the fol- lowing pop-up menu appears. Press the [ENTER] key to continue: The Communications Menu appears after the Title Screen: 6100 Hand-Held Computer User’s Guide COMMUNICATIONS FEATURE ESCT SUPPORTED... -
Page 61: Option 1 Begin Comm Session
This window may not appear immediately. For most communication settings, a session cannot be interrupted once it has started, so the [ESC] key is not processed until the next session is attempted. ARE YOU SURE YOU WANT TO STOP COMMUNICATIONS ESCW? [ENTER]STOP [ESC]RESUME 6100 Hand-Held Computer User’s Guide... - Page 62 Session Status on page B-12 for meaning. Following a successful session, PEN*KEY Utilities executes the downloaded application. If the necessary program files are not found, this message window appears: 6100 Hand-Held Computer User’s Guide PEN*KEY UTILITIES COMMUNICATIONS COMM SETTINGS: NRINET...
- Page 63 If the session is unsuccessful, LAST SESSION appears with the failure status, such as “T803.” PEN*KEY UTILITIES COMMUNICATIONS COMM SETTINGS: NRINET SERVER NAME CLIENT IP ADDRESS ROUTER SIGNING ON STATUS: LAST SESSION INVALID HOST NAME OR IP ADDRESS [ESC]STOP COMM 6100 Hand-Held Computer User’s Guide 0.0.0.0 0.0.0.0 T803...
- Page 64 The computer may stay at the “CONFIGURING” screen for about 20 seconds if a modem is not detected. If the session is unsuccessful, LAST SESSION appears with the failure status, such as “T289.” B-10 6100 Hand-Held Computer User’s Guide PEN*KEY UTILITIES COMMUNICATIONS COMM SETTINGS: MODEM/DIRECT...
- Page 65 BEGIN COMM SESSION with INTERSERVER If you select this option and Option 2. COMM SETTINGS is set to INTERSERVER, this Communication Status menu appears: Transfer: Press the [ESC] key to exit this screen. 6100 Hand-Held Computer User’s Guide B-11...
- Page 66 The following values indicate an error returned by MININET.EXE. 100 is added to the error returned by MININET.EXE to avoid conflict with other defined errors. B-12 6100 Hand-Held Computer User’s Guide Illegal buffer length Invalid command Command timed out Message incomplete...
- Page 67 107 Block check error 108 Block framing error 109 Control character error 2xx Modem error Hayes response code, or code defined by program: No carrier Command not recognized No dial tone Dialed number is busy 6100 Hand-Held Computer User’s Guide B-13...
- Page 68 " NOTE: For response codes not listed above, if you purchased this modem from the Norand Mobile Systems Division of Intermec Technologies Corporation, contact our Customer Response Center at 1- -800- -221- -9236. If this modem is not from the Norand Mobile Systems Division, con- tact your modem supplier.
- Page 69 Make sure the host is still running, and check all cables and network connections. 935 Operation would block. 939 Destination address required. 940 Message too long. 948 Address already in use. 950 Network is down. 6100 Hand-Held Computer User’s Guide B-15...
- Page 70 User aborted communications by pressing [ESC] key. 201 TFTP.EXE failed. 202 TFTP.EXE not found. 203 Unknown server. 204 Remote file name is invalid. 205 Local file name is invalid. 206 File not found on server. 207 Timeout. B-16 6100 Hand-Held Computer User’s Guide...
-
Page 71: Option 2 Comm Setting
Option 2. COMM SETTING. See a sample menu on page B-6. Press the [ESC] key to exit this drop-down list. The com- puter takes you to the Communications Menu. 6100 Hand-Held Computer User’s Guide B-17... - Page 72 Suboption 2 MODEM/DIRECT If you select this suboption, the computer returns to the Communications Menu with the MODEM/DIRECT option assigned to Option 2. COMM SETTING: B-18 6100 Hand-Held Computer User’s Guide PEN*KEY UTILITIES COMMUNICATIONS 1. BEGIN COMM SESSION 2. COMM SETTING MODEM/DIRECT 3.
- Page 73 SETTING. PEN*KEY UTILITIES COMMUNICATIONS 1. BEGIN COMM SESSION 2. COMM SETTING ACCESSORY CARD 3. UNIT ID 9. ADVANCED UTILITIES Suboption 4 HANDHELD Suboption 5 REMOTE OPS These suboptions are not supported at this time. 6100 Hand-Held Computer User’s Guide B-19...
-
Page 74: Option 3 Unit Id
Option 4 NETWORK PARAMETERS Network Parameters appears as Option 4 when Option 2. COMM SETTINGS is set to one of these three NETWORK options: NRINET, TFTP, or ESCVELL NETWARE. B-20 6100 Hand-Held Computer User’s Guide CHANGE UNIT ID UNIT ID 2233233 WORKGROUP... - Page 75 Press the Y or B keys to move between fields. Press [ENTER] to save the entries and exit the Network Parameters menu. Press the [ESC] key to exit without sav- ing the entries. 6100 Hand-Held Computer User’s Guide B-21...
-
Page 76: Option 4 Modem Parameters
If you select this suboption, a drop-down list appears with supported modem types. Press the Y or B keys to scroll through the list, then press the [ENTER] button to enter. B-22 6100 Hand-Held Computer User’s Guide 1. 802.2 2. ETHERNET II 3. 802.3 RAW 4. - Page 77 If you leave this menu blank, a string is not saved. b. Press the [ENTER] key to enter the string or press [ESC] to exit this pop-up menu. MODEM INIT STRING ATE0V0Q0&M0&S1&C1& D2&R/QX0L1 [F2]TEST STRING [ENTER]OK [ESC]QUIT 6100 Hand-Held Computer User’s Guide B-23...
- Page 78 Press the [ENTER] key to update the modem ini- tialization string. The computer returns to the Mo- dem Parameters pop-up menu with OTHER EX- TERNAL or OTHER INTERNAL assigned. B-24 6100 Hand-Held Computer User’s Guide MODEM INIT STRING ATE0V0Q0&M0&S1&C1& D2&R/QX0L1 PLEASE WAIT . . .
- Page 79 [ENTER] key to enter. The computer returns to the Modem Parameters pop- up menu with the selected BPS rate assigned. Press the [ESC] key to exit this drop-down list. 6100 Hand-Held Computer User’s Guide B-25...
-
Page 80: Option 5 Network Interface
B keys to scroll through the list, then press the [ENTER] key to enter. The computer returns to the Communications menu with the selected network interface assigned. B-26 6100 Hand-Held Computer User’s Guide 1. 8N1 2. 7E1 1. ETHERNET 2. RS485... -
Page 81: Option 5 Phone Number
[.] to insert a dialing pause command (“,”). Press the [ENTER] key to save the new phone number and return to the Communications Settings menu. Press the [ESC] key to exit this pop-up menu. 6100 Hand-Held Computer User’s Guide B-27... -
Page 82: Option 9 Advanced Utilities
[ENTER] key to enter. " NOTE: Suboption 4 FORMAT RAM CARD appears only if the FOR- MAT.COM program is in the PATH. B-28 6100 Hand-Held Computer User’s Guide PEN*KEY UTILITIES ADVANCED UTILITIES 1. SET DATE/TIME 2. BATTERY STATUS 3. FORMAT RAM DRIVE 4. - Page 83 PEN*KEY UTILITIES BATTERY STATUS MAIN PACK VOLTAGE LAST COND CAPACITY BACKUP VOLTAGE LAST COND CAPACITY CHARGER [F2]CONDITION BATT 6100 Hand-Held Computer User’s Guide CHARGING 7.37 10/10/96 23:59 2.94 10/10/96 23:59 16.22 [ESC]QUIT B-29...
- Page 84 A zero in both fields deletes the RAM drive. Press the [ENTER] key after each entry. A pop-up verifica- tion appears: B-30 6100 Hand-Held Computer User’s Guide Status of the main battery pack: Battery operating properly. Power running low, needs recharging.
- Page 85 FORMAT RAM DRIVE ALL DATA ON EXISTING RAM DRIVE WILL BE DESTROYED! OK TO CONTINUE? [ENTER]OK [ESC]QUIT Press the [ENTER] key to continue. Press the [ESC] key to exit the menu. 6100 Hand-Held Computer User’s Guide B-31...
- Page 86 B keys to scroll through the list, then press the [ENTER] key to enter. A pop-up verification window appears: Press the [ENTER] key to continue. Press the [ESC] key to exit the menu. B-32 6100 Hand-Held Computer User’s Guide FORMAT RAM CARD 1. A: 2. B: 5. E: 6.
- Page 87 The computer returns to the Advanced Utilities menu. Press the [ESC] key to exit this pop-up menu. SET BOOT DRIVE 1. A: 2. B: 3. C: 4. D: 5. E: 6. F: [ESC]QUIT 6100 Hand-Held Computer User’s Guide B-33...
- Page 88 Utilities Program APPENDIX B B-34 6100 Hand-Held Computer User’s Guide...
-
Page 89: Rm280
The RM280 is a 2.4 GHz FHSS (Frequency Hopped Spread Spectrum) Network Interface Card. The RM280 is avail- able in your 6100 Computer as a factory installed option. The RM280 adds a wireless LAN capability to the hand- held computer, allowing it to communicate with other net- work devices, through the 6710 Wireless Access Point. - Page 90 Supported Radio Configurations APPENDIX C 6100 Hand-Held Computer User’s Guide...
- Page 91 Installing memory cards, 2-15 Installing PC memory cards, 2-15 Integrated scanner endcap, 1-14 IrDA, 2-14 Keyboard features 30-key keypad, 1-6 56-key keypad, 1-6 Keypad options 30-key keypad, 1-6 6100 Hand-Held Computer User’s Guide INDEX " " " " " " " "...
- Page 92 Removing memory cards, 2-16 Removing PC memory cards, 2-16 Repair service, 4-4 Reset switch, 1-12 Serial ports, 1-12 Index-2 6100 Hand-Held Computer User’s Guide PHONE NUMBER, B-27 UNIT ID, B-20 communications menu subop- tions ACCESSORY CARD, B-19 AUTO ANSWER, B-26...
Need help?
Do you have a question about the 6100 and is the answer not in the manual?
Questions and answers