Keysight M8000 Series Getting Started Manual
Hide thumbs
Also See for M8000 Series:
- Quick start manual (6 pages) ,
- Installation manual (78 pages) ,
- Manual (26 pages)

Subscribe to Our Youtube Channel
Related Manuals for Keysight M8000 Series


Summary of Contents for Keysight M8000 Series
- Page 1 Keysight M8000 Series of BER Test Solutions M8040A High-Performance BERT Getting Started Guide...
- Page 2 APPLICABLE LAW, KEYSIGHT DISCLAIMS conditions are fully understood and ware to U.S. government customers under ALL WARRANTIES, EITHER EXPRESS OR met. its standard commercial license, which is IMPLIED WITH REGARD TO THIS MANUAL Keysight M8040A High-Performance BERT Getting Started Guide...
-
Page 3: Safety Summary
Failure to comply with these precautions or with specific warnings or operating instructions in the product manuals violates safety standards of design, manufacture, and intended use of the instrument. Keysight Technologies assumes no liability for the customer's failure to comply with these requirements. Product manuals are provided with your instrument on CD-ROM and/or in printed form. -
Page 4: Safety Symbols
Indicates the time period during which no hazardous or toxic substance elements are expected to leak or deteriorate during normal use. Forty years is the expected useful life of the product. Keysight M8040A High-Performance BERT Getting Started Guide... -
Page 5: Compliance And Environmental Information
The crossed out wheeled bin symbol indicates that separate collection for waste electric and electronic equipment (WEEE) is required, as obligated by DIRECTIVE 2012/19/EU and other National legislation. http://about.keysight.com/en/companyinfo/environment/takeback.shtml to understand your Trade in options with Keysight in addition to product takeback instructions. Keysight M8040A High-Performance BERT Getting Started Guide... -
Page 6: About This Guide
About This Guide This guide provides high-level information for an initial setup of the Keysight J-BERT M8040A High-Performance BERT. This guide focuses on setting up “bundled” systems such as the M8040A-BU1, M8040A-BU2 and M8040A-BU3. The M8040A-BU1 system has the M8000 module(s), M9537A AXIe Embedded Host Computer, M8070B software plus license, and module licenses pre-installed. -
Page 7: Table Of Contents
M8045A Features M8045A Module Components M8045A Front Panel Input/Output Ports M8046A High-Performance BERT Analyzer Module M8046A Features M8046A Module Components M8046A Front Panel Inputs/Outputs Ports M8057A/B Pattern Generator Remote Head M8057A/B Remote Head Components Keysight M8040A High-Performance BERT Getting Started Guide... - Page 8 Step 4 - Connect the M9505A AXIe Chassis to a Power Supply Step 5 - Power Up (if connecting via PCIe) Step 6 - Verify Basic M8040A Operation Step 7 - Install Keysight IO Libraries Suite (not required for M8040A-BU1) Step 8 - Install M8070B Software (not required for...
- Page 9 Contents 3 Using the M8040A High-Performance BERT Locating Electronic Manuals and Online Help Routine Care Starting the M8070B Software Perform a Measurement Updating Software Components Contacting Keysight Service and Support Index Keysight M8040A High-Performance BERT Getting Started Guide...
-
Page 11: Introduction
/ 22 M8046A High-Performance BERT Analyzer Module / 25 M8057A/B Pattern Generator Remote Head This chapter introduces you to Keysight’s M8040A High-performance BERT. It also introduces you to the concept of using a host computer to communicate with the M8040A. -
Page 12: Introduction
Introduction Introduction The Keysight Technologies M8040A is a highly integrated BERT for physical layer characterization and compliance testing. With support for pulse amplitude modulation 4-level (PAM-4) and non-return-to-zero (NRZ) signals, and symbol rates up to 64 GBaud (corresponds to 112 Gbit/s) it covers all flavors of the emerging 400 GbE and CEI-56G standards. -
Page 13: Applications
Thunderbolt 3/4 • Universal Serial Bus USB 3.2, USB4 and USB4v2 • 64G/112G Fiber Channel • InfiniBand-HDR • Proprietary interfaces for chip-to-chip, chip-to-module, backplanes, repeaters, and active optical cables, operating up to 64 Gbaud. Keysight M8040A High-Performance BERT Getting Started Guide... -
Page 14: M8040A Modules
N connectors. Figure 1 on page -14 shows a typical configuration of M8045A, M8046A and M8057A/B. M8057A/B Remote Head M8046A Module M8045A Module (2 Channels) Figure 1 M8045A, M8046A and M8057A/B configuration Keysight M8040A High-Performance BERT Getting Started Guide... -
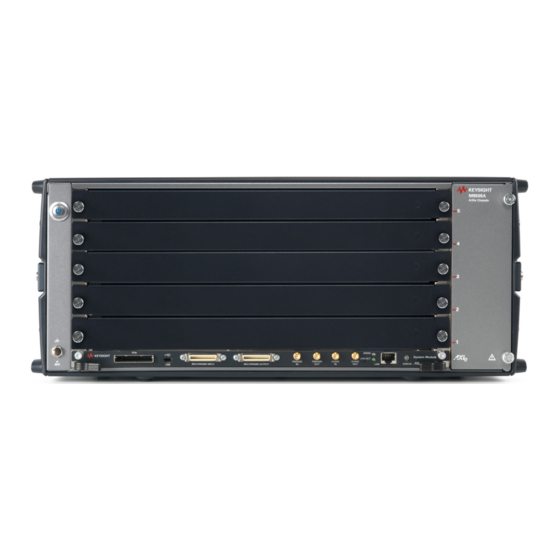
Page 15: M9505A Axie Chassis
PCIe connectivity between the M9505A AXIe Chassis and an external NOTE desktop PC controller is recommended when full channel plus large patterns need to be downloaded. Refer to the Keysight M9505A AXIe Chassis Startup Guide to get detailed information about the AXIe chassis. Figure 2 M9505A 5-slot chassis... -
Page 16: Axie Embedded System Module (Usb Esm)
• synchronizes timing across all modules through the Keysight Trigger Bus, using an internal or external clock source. LAN connector on AXIe ESM is not used. Only use LAN connection on the host computer. -
Page 17: Keysight M9537A Axie Embedded Controller Module
PC with a USB port or x8 or wider PCIe slot for the cabled PCIe adapter card. Refer to the Computer Hardware and Software Requirements on page 30 for external host computer minimum requirements. Keysight M8040A High-Performance BERT Getting Started Guide... -
Page 18: M8045A High-Performance Bert Pattern Generator-Clock Module
To remove the module, you first need to loosen these screws ensuring that these screws disengage completely. Module Insertion/Extraction The handles on both sides of the module to insert or eject the module from the Handles slot of the M9505A AXIe Chassis. Keysight M8040A High-Performance BERT Getting Started Guide... - Page 19 Trig Out output is active green Clk Mod In input is active green Sys Out A/Sys Out B output is active green Sys In A/Sys In B logic state is detected green Keysight M8040A High-Performance BERT Getting Started Guide...
-
Page 20: M8045A Front Panel Input/Output Ports
• Electrical Idle If the input level is above the threshold level the output amplifier enters electrical idle. Normal operation resumes when the input level is below the threshold. Keysight M8040A High-Performance BERT Getting Started Guide... - Page 21 The granularity is the vector size. SYS OUT A, SYS OUT B These are control outputs at system level and can be used to signal events to the DUT or external instruments. The granularity is the vector size. Keysight M8040A High-Performance BERT Getting Started Guide...
-
Page 22: M8046A High-Performance Bert Analyzer Module
To remove the module, you first need to loosen these screws ensuring that these screws disengage completely. Module Insertion/Extraction The handles on both sides of the module to insert or eject the module from the Handles slot of the M9505A AXIe Chassis. Keysight M8040A High-Performance BERT Getting Started Guide... -
Page 23: M8046A Front Panel Inputs/Outputs Ports
This input is only available for M8046A modules with a serial number below DExxxx01000. Ctrl Out A Outputs a pulse in case of an error. Generates a pulse or static high/low if used from sequencer. Keysight M8040A High-Performance BERT Getting Started Guide... - Page 24 M8045A and M8046A modules for enabling interactive link training, e.g. For 5/ 8/ 16/ 32Gb/s PCIe. It requires the cable M8051A-801. This interface is available for M8046A modules with a serial number above DExxx01000. Upgrades are available for older serial numbers (M8046A-US1, requires return-to-Keysight). Keysight M8040A High-Performance BERT Getting Started Guide...
-
Page 25: M8057A/B Pattern Generator Remote Head
The following figure displays the front panel of the M8057A remote head with its various components. The similar front panel components are also available on the M8057B remote head. Figure 7 M8057A/B remote head front panel Keysight M8040A High-Performance BERT Getting Started Guide... - Page 26 M8057A/B. Also, make sure NOT to remove the M8057A/B connections when it is powered on. However, if you wish to remove the M8057A/B connections, ensure that the instrument is powered off. Keysight M8040A High-Performance BERT Getting Started Guide...
-
Page 27: Basic Setup For M8040A
Step 5 - Power Up (if connecting via PCIe) / 34 Step 6 - Verify Basic M8040A Operation Step 7 - Install Keysight IO Libraries Suite (not required for M8040A-BU1) / 35 / 35 Step 8 - Install M8070B Software (not required for M8040A-BU1) -
Page 28: Step 1 - Unpack The Shipment
Guide High- Performance BERT. Getting Started Guide This document, M8040A Getting Started Guide. (Please check the Keysight website: www.keysight.com/find/M8040A for the latest guide.) Carefully inspect all items in the shipment for any damage. Keysight M8040A High-Performance BERT Getting Started Guide... -
Page 29: Return The Damaged/Defective Item To Keysight For Repair/Replacement
(for example, M8045A) in the Product Number field, and specify the serial number from the top of the module in the Serial Number field. Contact the nearest Keysight Sales Office. If you need assistance finding Keysight contact information, go to www.keysight.com/find/assist (worldwide contact information for repair and service). -
Page 30: Computer Hardware And Software Requirements
The M8070B software is required to control the M8040A. NOTE PCIe connectivity between the M9505A AXIe Chassis and an external NOTE desktop PC controller is recommended when full channel plus large patterns need to be downloaded. Keysight M8040A High-Performance BERT Getting Started Guide... -
Page 31: To Connect Via Usb
To connect via PCIe In case of PCIe connectivity, the host computer can be a desktop PC with an available x8 or wider PCIe slot. Review the Keysight recommended list of host computers at http://literature.cdn.keysight.com/litweb/pdf/5990-7632EN.pdf that are compatible with the Keysight M9505A AXIe Chassis. -
Page 32: Step 4 - Connect The M9505A Axie Chassis To A Power Supply
Insert the power cord into the inlet at the rear of the chassis. Connect the cord to an appropriate AC power main. Push the circuit breaker to the right, which is the ON position. Figure 11 Chassis circuit breaker Keysight M8040A High-Performance BERT Getting Started Guide... -
Page 33: Step 5 - Power Up (If Connecting Via Pcie)
If you plan to connect the M8040A to a corporate LAN and the M9537A NOTE AXIe Embedded Controller is installed, you must use the Ethernet port available on the M9537A AXIe Embedded Controller or the LAN port on the external PC. Keysight M8040A High-Performance BERT Getting Started Guide... -
Page 34: Step 6 - Verify Basic M8040A Operation
If the Fail LED on the front panel of the instrument module is steady red and does not turn off, it indicates a power fault condition. In such a situation, the instrument module may require repair/service. Contact your Keysight representative to replace or service the chassis/module. Keysight M8040A High-Performance BERT Getting Started Guide... -
Page 35: Step 7 - Install Keysight Io Libraries Suite (Not Required For M8040A-Bu1)
Basic Setup for M8040A Step 7 - Install Keysight IO Libraries Suite (not required for M8040A-BU1) IO Libraries Suite version 16.3 or later is required. Always use the latest version of the Keysight IO Libraries. Perform this step if you are setting up an M8040A-BU2 system or the... -
Page 36: Step 9 - Install The Plugins
When displayed, accept the license agreement and click Next. Click Install to start the installation then follow any on-screen prompts/instructions. In Windows click Start > All Programs > Keysight M8070B > Keysight M8070B to verify software installation. The Startup screen of the M8070B software should display. -
Page 37: Step 10 - Install The Licenses
Basic Setup for M8040A For further details on how to install, update or uninstall plugins, please refer to the M8000 Series User Guide or M8000 Series Plugins Getting Started Guide. Step 10 - Install the Licenses All M8040A-BU1 licenses have been pre-installed (except for a NOTE floating/networked license). -
Page 38: Installing Module Licenses (For Upgrades Only)
Module licenses enable specific options in the modules of the M8040A system. Once a module license has been installed using the Keysight License Manager, the next time the M8070B software and M8040A hardware are started, the license is recognized by the M8070B software and compared to the module’s serial number. - Page 39 Option label sheet Locate the option label sheet shown in Figure 13 on page -39. Affix the option labels as shown in Figure 14 on page -39. Option Labels Figure 14 Affix option labels Keysight M8040A High-Performance BERT Getting Started Guide...
-
Page 40: Step 11 - Turning Off The Chassis And Modules
Step 11 - Turning off the Chassis and Modules Turn off the chassis and module in the following sequence: Turn off the host computer. If you are using the Keysight AXIe Embedded Controller module as the host computer, ensure that you shut down the controller by executing the Windows shutdown process. -
Page 41: M9537A Embedded Controller Setup Example
ESM through the chassis backplane. Therefore, there is no need to establish any external PCIe/USB or LAN connection between the embedded controller module and chassis. Loopback to ED Figure 16 M9537A embedded controller setup example Keysight M8040A High-Performance BERT Getting Started Guide... -
Page 42: Hardware Connections
Ensure that the chassis is NOT powered up or connected to a power source while making connections to M8057A/B. • Terminate unused ports (TRG Out, Data Out and Clk Out) with 50 Ohm to GND. Keysight M8040A High-Performance BERT Getting Started Guide... - Page 43 Using the M8040A High-Performance BERT / 44 Locating Electronic Manuals and Online Help / 44 Routine Care / 45 Starting the M8070B Software / 46 Perform a Measurement / 53 Updating Software Components / 53 Contacting Keysight Service and Support...
-
Page 44: Locating Electronic Manuals And Online Help
Using the M8040A High-Performance BERT Locating Electronic Manuals and Online Help Various electronic manuals and the M8000 Series Online Help provide information on how to configure and use the supported instrument modules. On installing the M8070B software, you will find documentation by clicking Start >... -
Page 45: Starting The M8070B Software
Ensure that the system is powered up and ready to start as described in the sections Basic Setup for M8040A on page On the host computer, click on Start > All Programs > Keysight M8070B > Keysight M8070B. When the Load Settings screen appears as shown in Figure 17 page -45, load the last used, factor preset, or new settings. -
Page 46: Perform A Measurement
In the M8070B software interface, set the data rate to 10 Gb/s as follows: a Click on System > System View. b Click on the PLL Synthesizer Internal block as shown in Figure 19 on page -47 to display the Synthesizer properties. Keysight M8040A High-Performance BERT Getting Started Guide... - Page 47 Using the numeric keypad, enter 10 then click on the GHz button as shown in Figure 20 on page -47. If your system has a maximum data rate of 8 Gb/s, leave the frequency setting at 5 GHz. Figure 20 Set frequency to 10 GHz Keysight M8040A High-Performance BERT Getting Started Guide...
- Page 48 Figure 21 Select Sequence Pattern Dialog In the Select Sequence Pattern dialog, select Prbs as the Pattern Type and then select 2^9- 1 as the Polynomial as shown in Figure 22 on page -49. Keysight M8040A High-Performance BERT Getting Started Guide...
- Page 49 Select Channel 1 DataOut On the Properties Window, expand Amplifier. 10 Select the coupling type as AC Coupling. You must select ‘AC Coupling’ when doing a loopback to the M8046A NOTE error detector. Keysight M8040A High-Performance BERT Getting Started Guide...
- Page 50 Figure 27 on page -51. Alternatively, you can also click on the Start BER Threshold Auto Alignment button present on the Status Indicator to synchronize and align the error analyzer. Keysight M8040A High-Performance BERT Getting Started Guide...
- Page 51 (bottom-left of display) to view/hide the module status including BER. 17 From the menu bar, click on Measurements > Error Ratio. 18 The default acquisition parameter settings are used as shown in Figure on page -51. Figure 28 Acquisition parameter settings Keysight M8040A High-Performance BERT Getting Started Guide...
- Page 52 Start measurement 20 After the measurement has completed (60 sec), review the results shown below the graph in the Calculated Results table as shown in Figure 30 on page -52. Figure 30 Calculated results Keysight M8040A High-Performance BERT Getting Started Guide...
-
Page 53: Updating Software Components
Using the M8040A High-Performance BERT Updating Software Components Updated versions of the M8070B and module specific software components are available on the Keysight website. These software components are available as .EXE files. To download a software upgrade: Go to http://www.keysight.com/find/M8070B Click the Technical Support tab. - Page 55 18, host computer, set up external, M8046A, M8046A components, 22, M8046A Module Components, M8051A components, safety summary, M8057A, insertion/extraction handles, Sync In, M8057A Remote Head IO Libraries, install, Components, Keysight M8040A High-Performance BERT Getting Started Guide...
- Page 56 Index USB connectivity, 15, Keysight M8040A High-Performance BERT Getting Started Guide...
- Page 58 This information is subject to change without notice. © Keysight Technologies 2022 Edition 3.0, April 2022 Printed in Malaysia www.keysight.com...
Need help?
Do you have a question about the M8000 Series and is the answer not in the manual?
Questions and answers