Table of Contents
Advertisement
DT17 Digital Timer Installation and
Operating Instructions
Thank you for purchasing the
DT17 Digital Timer.
Features of this timer include
Features
• Automatic or manual operation. Push
ON/OFF to switch the plugged in
light(s) on or off any time.
• Program up to 14 on/off time pairs per day
(maximum 98 automatic switch settings).
• Minimum setting interval 1 minute.
• A setting can be for a particular day of the week,
every day, only weekdays, only weekends, or every
day but Sunday.
• Random feature adjusts the ON/OFF times within 15
minutes of each programmed setting.
• Batteries (replaceable) save the time and program
settings when the unit is unplugged or there is a
power outage.
Please read the instructions before programming your
timer.
Battery Installation
Using a small flat screwdriver or coin,
pry the battery
holder open. Position the 2 batteries,
supplied with the timer, so the flat part
of the batteries are facing the +
terminal. When the batteries are in
place, press the battery holder back
into its original position.
NOTE: For battery replacement use SR44 or LR44
Notes:
(1) WARNING DO NOT USE THE TIMER TO TURN OFF
POWER FOR MAINTENANCE (repairs, removing broken
bulbs, etc.). ALWAYS TURN POWER OFF AT THE
SERVICE PANEL BY REMOVING A FUSE OR CIRCUIT
BREAKER BEFORE DOING ANY CIRCUIT REPAIRS.
(2) In case of a conflict (for example you have programmed
the timer to be on at 4 pm every day of the week and also
programmed the timer to be off at 4 pm on saturdays) the
higher program number is followed. In case of a conflict
within a program number Off is followed rather than On.
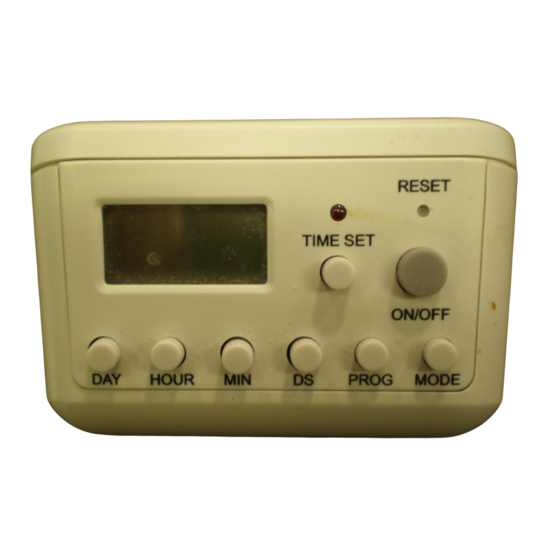
Familiarize yourself with the timer controls and displays.
Timer Controls
1 Display - LCD display
(reset display shown).
1
2
3
2 On light - red LED is
lit when the DT17 is in
4
operation.
RESET
5
MO TU WE TH FR SA SU
3 RESET button -
AM PM
TIME SET
Prg
push the RESET
Off
Auto On Rand
button with a ball point
ON/OFF
pen to clear all
DAY
HOUR
MIN
DS
PROG
MODE
programming and the
clock.
6
7
8
9 10 11
4 TIME SET button -
push and hold to set
the clock.
5 ON/OFF button - push and release to manually
switch on or off at any time.
6 Day button - use during time set to set the day of
the week. Use during programming to set individual
days, weekdays, weekends or the entire week.
7 HOUR button - use during time set or programming
to set the hour.
8 MIN button - use during time set or programming to
set the minute.
9 DS button - push and hold for a couple of seconds
to switch to or from daylight savings time.
10 PROG button - push and release to set or change
programmed on and off times.
11 MODE button - push and release to choose ON/
Off, Auto, Random or Countdown timer modes.
MO TU WE TH FR SA SU
Displays
1
1. Daylight
savings symbol
indicates day-
PM
light savings
2
time when on.
Auto
2. AM/PM
AM
PM
3. MO TU... Day
of the week.
4. 03:12 - Time.
5. On/Off display
On display. Usually displayed when On light is lit
and timer is on, during programming indicates an
on time is being pro-
grammed.
Off display (Usually dis-
played when On light is off
and timer is off, during pro-
6
gramming indicates an off
time is being programmed.)
6. Program number - (1-14)
7. Mode - Countdown Timer, Off,
Auto, On, or Rand. See Modes, next page, for specific
mode displays.
Daylight Savings Time
In Off, Auto, or On mode,
push and hold DS for a
couple of seconds to switch
daylight savings time on or
off. The daylight savings (S)
symbol switches on or off and the time switches one hour
in the appropriate direction.
Setting The Clock
WE
PM
Off
1
4
How to set the clock:
1. The mode must be
On, Auto, or Off.
2. If it is daylight savings time, push and hold DS for a
couple of seconds so the daylight savings symbol
3
4
appears.
If it is not daylight savings time, push and hold DS for a
WE
couple of seconds so the daylight savings symbol is
off.
3. Push and hold TIME SET.
5
4. The blinking colon stays on (stops blinking).
While holding TIME SET:
a. Push and release DAY to change the day of week.
b. Push and release HOUR to change the hour and
AM/PM.
c. Push and release MIN to change the minute.
FR
AM
Notes:
Prg
If you push and hold DAY, HOUR or MIN the display
changes quickly.
Auto
Seconds are set at 0 when the TIME SET button is
7
released if either the HOUR or MIN have been set.
TH
AM
On
2
3
RESET
WE
PM
2
TIME SET
Off
1
ON/OFF
DAY
HOUR
MIN
DS
PROG
MODE
a b
c
Advertisement
Table of Contents

Related Manuals for Intermatic DT17


Summary of Contents for Intermatic DT17
- Page 1 Familiarize yourself with the timer controls and displays. Timer Controls 1 Display - LCD display (reset display shown). 2 On light - red LED is lit when the DT17 is in operation. RESET MO TU WE TH FR SA SU 3 RESET button -...
-
Page 2: Timer Modes
The flash- ing alarm clock symbol indicates the DT17 is in countdown timer mode. To set the countdown timer: Push and release MODE until the countdown timer clock is displayed.
Need help?
Do you have a question about the DT17 and is the answer not in the manual?
Questions and answers