Table of Contents
Advertisement
Available languages
Available languages
MODEL DT500CH Series
Installation and User Instructions
Ratings
•
Input: 102-132 VAC 60 Hz, 2.5W max.
Output: 10 Amp/1200W Resistive, 5 Amp Inductive, 500W Tungsten
•
•
Electrical shock hazard. Risk of injury or death. Always plug three-prong plug
into a properly grounded outlet. Never attempt to defeat this safety feature.
•
Risk of fire. Do not use timer to control devices that could have dangerous
consequences due to inaccurate timing, such as sun lamps, sauna, heaters,
crock pots, etc.
•
Follow local electrical codes during use.
•
Dispose of used batteries promptly per local regulations.
1 – Activate the Battery
The timer comes with two LR44 batteries installed.
1.
Remove the pull tab from the
battery holder to connect the
installed batteries.
2.
The timer will turn on and show the
default display (MO, "12:00 PM")
with the "12" flashing (Fig. 1).
NOTE: If the default display doesn't
show, the batteries may be dead.
Replace the batteries before using the
digital timer.
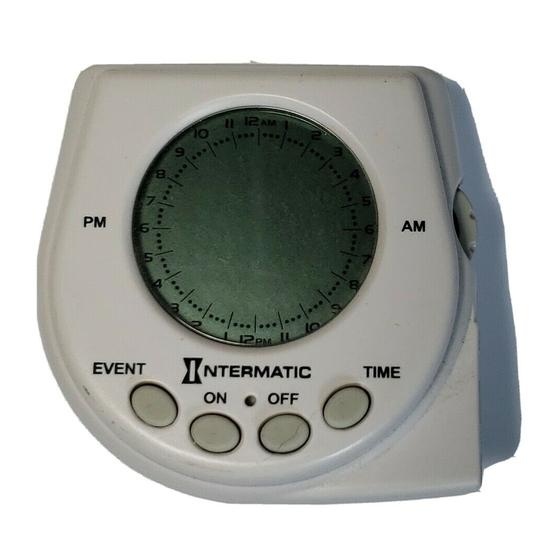
2 – Get Familiar with the Timer's Features
6
11
9
10
8
7
6
PM
9
5
4
3
EVENT
8
1.
Battery Holder — two LR44 batteries keep time and data up to
three months without power
2.
Time Of Day (TOD) Display — acts like a clock during normal
operation, displays messages during programming and displays
alerts, such as the Low Battery Display
3.
Selector Wheel
4.
PM Indicator — comes on to indicate TOD is PM, goes out to
indicate TOD is AM
Digital Timer
WARNING
NOTICE
12
11
AM
10
9
8
MO
TU WE TH FR SA SU
7
6
5
RANDOM
4
3
2
1
12
PM
1
12
11
AM
1
10
2
3
4
MO TU
WE
TH
FR
SA
SU
5
6
PM
AM
7
RANDOM
8
9
2
10
1
11
12
PM
TIME
ON
OFF
5.
One Timed Outlet — has green LED that lights when outlet is
turned on
6.
Green LED
7.
Pushbuttons — used for setup, programming and manual
operation of plugged-in device
8.
Reset Button
9.
Random Display — indicates when the Random feature is turned
on. Random uses the timer's settings varied by random 5-minute
increments of ±15 minutes.
10.
Day Of Week (DOW) Display — events can be programmed
for just one day of the week (Daily Mode, 21 total events), all
the days of the week (Weekly Mode, 48 total events), or just
weekends or weekdays (Weekend/Weekday Mode, 24 + 24 total
events)
11.
Event ON/OFF Indicators — a full day is broken into 96 segments
(15 minutes each) to show the ON and OFF times programmed
NOTE: The timer may be set up and programmed before you plug
it in. Be aware that while it is unplugged, the display will turn off to
conserve battery power if there is no pushbutton activity for a few
minutes. If this happens, simply push any button to turn the display
back on.
3 – Clear Any Existing Programming
1
2
It's unlikely that your new digital timer has any existing
3
4
programming, but to make sure, use this procedure before setting
the time.
5
1.
Locate the Reset button. It is the small, round hole adjacent to the
6
PM
keypad. You will need a pen or paper clip to press this button.
7
Press and release the Reset button. The display will light up all
8
2.
9
the segments and then go blank.
10
11
3.
The timer has erased all programming, displays the default
Fig.
1
settings (MO, "12:00 PM") and is ready for setup.
4 – Set the Time, Day and Operating Mode
NOTE: The time, day AND operating mode must be set before any
ON Events can be programmed. Settings for time and ON Events
will not be activated until setup and programming are complete.
Setting Time and Day
2
1.
Ensure that the time is displayed. A
timer that is just reset will display
3
MO, "12:00 PM".
2.
The first two digits (hours) of the
Time of Day (TOD) display will begin
4
to flash (Fig. 3).
5
3.
Turn the selector wheel until the
correct hour shows in the TOD hours
display, along with the PM indicator,
7
if desired. Note that PM indicator will
alternate on and off as the time
passes through noon and midnight.
Fig.
4.
Press the
2
hour. Or, if no change to the hour
is needed, press the TIME button to
keep the original hour setting. The
last two digits of the TOD display
(minutes) will begin to flash (Fig. 4).
5.
Turn the selector wheel until the
correct time in minutes shows.
ON button to set the new
12
11
AM
1
10
2
9
3
4
8
MO
TU WE TH FR SA SU
5
7
6
6
PM
5
7
RANDOM
4
8
3
9
2
10
Fig.
11
1
12
PM
3
12
11
AM
1
10
2
9
3
4
8
MO
TU WE TH FR SA SU
5
7
6
6
PM
5
7
RANDOM
4
8
3
9
2
10
Fig.
11
1
12
PM
4
1
Advertisement
Table of Contents

Related Manuals for Intermatic DT500CH Series


Summary of Contents for Intermatic DT500CH Series
-
Page 1: Ratings
Digital Timer MODEL DT500CH Series Installation and User Instructions One Timed Outlet — has green LED that lights when outlet is turned on Ratings Green LED Pushbuttons — used for setup, programming and manual • Input: 102-132 VAC 60 Hz, 2.5W max. -
Page 2: Set An Initial On Event
4 – Set the Time, Day and Operating Mode (Continued) 5 – Set an Initial ON Event (Continued) 6. Press the ON button to set the Programming an ON Event minutes. Or, press the TIME button to From the current day’s time display, keep the original minute setting. -
Page 3: Select Random Feature
Manually Overriding with ON or OFF 6 – Change the Time, Day or Operating Mode The ON and OFF buttons can be used to override the timer’s Ensure that the time is currently being displayed. programming. Press and hold the TIME button until the hours begin to flash. Manually Overriding an ON Event Follow the same procedure as outlined in Section 4, “Set the Time, Day and Operating Mode”. -
Page 4: Troubleshooting Guide
LIMITED LIFETIME WARRANTY If within the warranty period specified, this product fails due to a defect in material or workmanship, Intermatic Incorporated will repair or replace it, at its sole option, free of charge. This warranty is extended to the original household purchaser only and is not transferable. This warranty does not apply to: (a) damage to units caused by accident, dropping or abuse in handling, acts of God or any negligent use; (b) units which have been subject to unauthorized repair, opened, taken apart or otherwise modified;... -
Page 5: Capacidades
Temporizador digital MODELO de serie DT500CH Instrucciones para el usuario y la instalación Un tomacorriente temporizado: Tiene un LED verde que se ilumina cuando el tomacorriente está encendido LED verde Capacidades Botones: Se usan para configurar, programar y realizar la Entrada: 102 a 132 V CA 60 Hz, 2.5 W máx. -
Page 6: Ajuste Un Evento De Encendido Inicial
4 – Ajuste la hora, el día y el modo de funcionamiento (continuación) 5 – Ajuste un evento de encendido inicial (continuación) 6. Presione el botón ON para ajustar los Programación de un evento de encendido minutos. O, presione el botón TIME En la pantalla de hora del día actual, para mantener el ajuste de minutos presione y mantenga presionado... - Page 7 6 – Cambio de hora, día o modo de funcionamiento Anulación manual con ON y OFF Asegúrese de que actualmente se muestre la hora. Los botones ON y OFF se pueden usar para anular la programación del temporizador. Presione y mantenga presionado el botón TIME (Hora) hasta que las horas empiecen a parpadear.
-
Page 8: Guía De Solución De Problemas
GARANTÍA LIMITADA DE POR VIDA Si dentro del período de garantía especificado, este producto falla debido a un defecto del material o de mano de obra, Intermatic Incorporated lo reparará o lo reemplazará, a su exclusivo criterio, libre de cargo. Esta garantía se extiende sólo al comprador doméstico original y no es transferible. Esta garantía no se aplica a: (a) daño a las unidades causado por accidente, caída o uso indebido en su manipulación, casos fortuitos o cualquier uso negligente;...
Need help?
Do you have a question about the DT500CH Series and is the answer not in the manual?
Questions and answers