Table of Contents
Advertisement
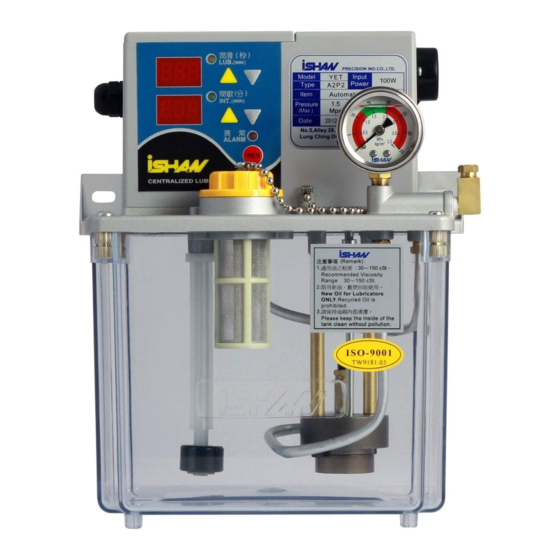
Centralized Lubrication Systems
YET-A1 / YET-A2
Micro-computer controlled
YET -A1P2 / YET-A2P2
Micro-computer controlled
lubricator withpressure detector
Congratulations on buying an iSHAN centralized lubrication system. For proper,
problem-free use, you must read through these instructions carefully and follow them
exactly.
lubricator
Operation Instructions
1 - 21
Advertisement
Table of Contents

Related Manuals for iSHAN YET-A1


Summary of Contents for iSHAN YET-A1
- Page 1 Micro-computer controlled lubricator YET -A1P2 / YET-A2P2 Micro-computer controlled lubricator withpressure detector Operation Instructions Congratulations on buying an iSHAN centralized lubrication system. For proper, problem-free use, you must read through these instructions carefully and follow them exactly. 1 - 21...
-
Page 2: Table Of Contents
Table of Contents 1 Use / Range of application ................3 2 Commencement of operation ................4 2-1 Safety measures ..................4 2-1.1 Before installing ................4 2-1.2 Before filling oil ................4 2-1.3 Safety measures for the control panel ........... 4 2-1.4 When failures occur .............. -
Page 3: Use / Range Of Application
The maximum discharge rate of YET-A1 pump is 200 ml/min, and 100 ml/min for YET-A2 model. The max discharge pressure are 7 bar for YET-A1 model, and 15 bar for YET-A2 model. In order to protect the auxiliary equipments, there consists a pressure release valve to control the pipe pressure remains a constant value during lubrication times. -
Page 4: Commencement Of Operation
Before installing Before installing, refer to instructions for the correct connection of the power. Make sure the correct electrical specification before installation. iSHAN centralized lubrication systems shall not used for purposes other than the lubrication of machines with oil. 2-1.2 Before filling oil Use only oil with a viscousity of 30 to 250 cSt. -
Page 5: Parts Of Lubricator
2-2 Parts of lubricator Screw of cover of control box. Oil level switch Control Box Oiltank (3L) Control panel Thimble nut Cable gland Pressure Relief Valve Inlet filter Oil pump Oiltank cap Outlet filter Pressure gauge Suspension hole Upper lid Fig. -
Page 6: Marking Label
2-3 Marking Label Name Plate (YET-A1) Name Plate (YET-A2) Electric Shock Outside the control box Right front side of control box Right front side of control box Oil level Connection Operation YET-A1/YET-A2 操作說明(Operation instruction) 一、 操作方式(Operating): ▲▼ :潤滑/間歇時間設定鍵(潤滑時間:1~999 秒、間歇時 間:1~999 分)。當按住設定鍵約 2 秒後即可調整時間設定值,... -
Page 7: Installation
2-4 Installation 2-4.1 Mounting of lubricator Mount the lubricator on the machine by fastening it with two screws at the suspension hole (Fig. 2) to the hole on the machine for fastening the screws must have a distance of 188~206 mm. The lubricator should be mounted in the height of 0.6~1.7 m above the ground level. -
Page 8: 2-4.3 Connection Of Oil Pipe
2-4.3 Connection of oil pipe Connect the oilpipe now (Fig. 4). The elbow joint for the oilpipe is located at the right side of the lubricator. Remove the thimble nut and carefully take out the thimb inside the elbow joint and connect the oilpipe together with the nut and the thimble. - Page 9 Connect the cable at the connection points for power and alarm now (Fig. 8). First, open the screw for the point of the earthing .Next, connect the ground cable and fix it by fastening the screws. Connect the cables for plus and minus accordingly at "POWER" According to this connection the lubricator will send out an acoustic and an optic signal when the oil level reaches a critical minimum.
-
Page 10: Instructions For Use
Close the cover after having connected all cables. For protecting the cable not to be pulled out of the box and disconnected from the ports, fasten the gland again (Fig. 9). The lubricator can be connected with the power supply now. When connected properly, you will hear a “beep”-sound first which is send out by the alarm. -
Page 11: Numerical Intermittent Time And Lubricating Time Display
3-2 Numerical intermittent time and lubricating time display Setting for the intermittent/lubricating time could be done by pressing the soft key button “▲“ or ” ▼ ” (Fig. 10, S1 ~ S4) for 1 to 2 seconds and then the setting could be read from the display (Fig. -
Page 12: Reset
“ RES “ key. 3-5 Setting of the operational module Attention: Only the iSHAN-customer service workshops are authorized to change the original function settings of the lubricator. The users may proceed the basic lubrication/intermitent time setup only. -
Page 13: 3-5.2 Soft Key Functioning Table
Lubrication Indicator Intermittent Indicator Alarm lamp Lamp Shines Lamp Blinks Continuous Beep Discrete Beep REMARK ! The internal buzzer makes acoustic sound under the following condition : 1. Makes one beep when re-start the lubricator (including Power-On, pressing RES key, and the time setting has been done). 2. -
Page 14: Refilling Oil
Lubricating Actuating Recording Mode When Actuation Lubricat-ing Minute/ Second Time Unit Intermittent: Setting Minute/ Second Mode Intermittent: counting time / times mode Initial mode Example : 1. Change between the lubricating and the recording modes when actuation. Lubricating when actuation :The lubricator starts pumping oil as soon as power-On .Recording when actuation :... -
Page 15: Maintenance
2. To protect the electrical stability, once you have turn off the power, please wait for at least 20 seconds to restart the lubricator. 3. The elbow joints of YET-A1 and YET-A2 are special parts, never change them by yourself. The YET-A2 lubricator is reacted by pressure release model. Generally, it should be compacted with piston distributers to control the mount of oil discharged per cycle precisionly. -
Page 16: Trouble Shooting
5 Trouble shooting Note !! Turn off the power before check, repair, or maintain. Note !! Please do not repair or disassemble the lubricator for the faults not listed below. You should consult and inform the iSHAN workshop at once. Fault Cause... -
Page 17: Guarantee
Never send spare-parts to our service workshop without consultation. Shipments which have to be paid by the receiver can only be accepted when our service workshop agrees in advance. -
Page 18: Technical Data
If you meet any electrical fault, we strongly suggest you to sent the lubricator back to the iSHAN-customer service workshops. We will changing a new PC board with same function or updated function instead of the old one in reasonable price. The following diagram are only a basic reference of the controller which support you to understand the fault by yourself. - Page 19 F T 1 R L 1 P2-2 P2-3 P2-1 R L 2 C 1 1 C 1 0 R 1 0 R 1 1 Circular diagram for powe connection Circular diagram for control unit R 1 0 R 1 4 R 1 5 R 1 1 A 2 A 2...
-
Page 20: Fluid Power Diagram
3 Gear Pump 4 Oil Level Switch 5 Pressure Gauge 6 progressive feeder 7 Non-return valve 8 Presure Switch Fig 11 Fluid power diagram of YET-A1 type lubricator. Oiltank Inlet Filter Gear Pump Oil Level Switch Pressure Gauge Piston distributors... - Page 21 9 Address Manufacturer : ISHAN Precision Industry Co., Ltd. Add: No.5, Alley 28, Lane 256, Tai Si S.Rd, Lungching Hsiang, Taichung Hsien, Taiwan Tel: + 886-4-26302881 Fax: +886-4-26302880 E-mail: ishan @ tcts.seed.net.tw http://www.ishan.com.tw Affiliate Company: Zhejiang Sunshine Machinery Co., Ltd Add: No.852, Qingfeng S.Rd, Tongxiang, Zhejiang Province, Mainland China...
Need help?
Do you have a question about the YET-A1 and is the answer not in the manual?
Questions and answers