
Related Manuals for Trace2O METALYSER FIELD PRO HM3000


Summary of Contents for Trace2O METALYSER FIELD PRO HM3000
- Page 1 Metalyser® Field Pro HM3000 Instruction Manual v 5.0 METALYSER® FIELD PRO HM3000 Advanced Portable Field Heavy Metals Analyser www.trace2o.com...
-
Page 2: Table Of Contents
5.2 Plating 5.3 Analysis 5.4 Adding a standard addition 5.6 Results 5.7 Results log 6. LINEAR REGRESSION 7. ADVANCED OPERATIONS 7.1 Background Subtraction 7.2 Variable volume standard additions 7.3 Variable Deposition time 8. TROUBLESHOOTING 9. INTERFERENCE EFFECTS 10. SPECIFICATIONS www.trace2o.com... -
Page 3: Introduction
The HM3000 is very portable as it uses a battery as its power source and the embedded rugged tablet PC that runs Trace2o’s advanced Windows based Metaware software gives the user laboratory capabilities on site. -
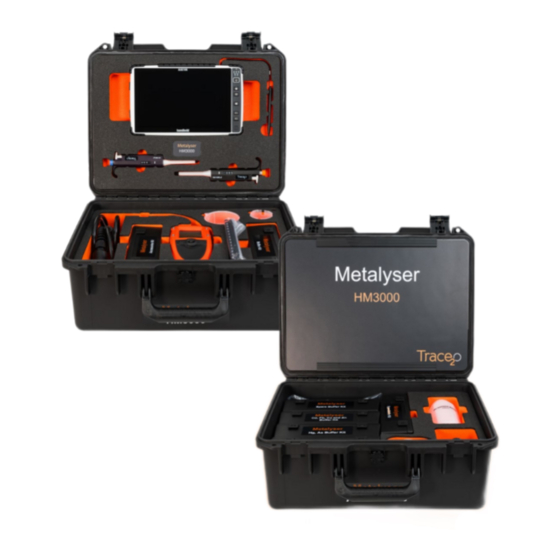
Page 4: Kit Content
Daily Buffer Kit Metalyser ® Instruction Manual Instrument Space for Additional Standards Consumables USB Power Supply Transformers and Conditioning Adapters Solution Stirrer Oil and Reference Electrode Sample Analysis Fill Solution Beaker (SAB) Deionised Water Buffer Kits Tablet PC Power Cable www.trace2o.com... -
Page 5: Getting To Know Your Metalyser
Metalyser® Field Pro HM3000 Instruction Manual v 5.0 3. GETTING TO KNOW YOUR METALYSER ® 3.1 Tablet PC 10.1” Touchscreen Control Panel DC Connector LAN port VGA Port USB port Headphone USB Port jack Serial Comms Port Camera Stylus Battery Rear cover www.trace2o.com... -
Page 6: Tablet Pc And Metaware Software
The 10.1” touch screen can be used with the attached stylus or by hand. The PC is pre-loaded with the Trace2o Metaware software. This is essentially a Windows-based control panel which controls the instrument and provides a graphical representation of the data (voltammogram) allowing the user to accurately analyse the data. -
Page 7: Instrument
Metalyser® Field Pro HM3000 Instruction Manual v 5.0 3.3 Instrument www.trace2o.com... - Page 8 To select an option or ‘OK’ a choice, press the joystick in the centre. Cancel Button Pressing the cancel button will return you to the previous menu or screen. www.trace2o.com...
-
Page 9: On Screen Indicators
Battery fast charge indicator Battery trickle charge indicator Battery fault/overheat indicator Battery full Battery ¾ full Battery ½ full Battery ¼ full Battery empty USB connection to PC established Stirrer on indicator www.trace2o.com... -
Page 10: Instrument Menu System
Used to set the instrument date and time → Language Used to select the display language → Charge Battery charging options → Auto switch off Auto off select → Program internal hardware (Not used in normal Program P/STAT operation) www.trace2o.com... -
Page 11: Components And Care Of Components
The second option is to fit the extension cable between the Sonde and the instrument. This allows the instrument to be used to collect samples as well as analyse them. The sonde (electrodes x 4) SAB (Sample Analysis Beaker) www.trace2o.com... - Page 12 Note: A clamp and stand are provided. The stand slots into the hole in the right hand rear corner of the box. This can be used to clamp the Sonde as shown above, which improves stability during the analysis. www.trace2o.com...
- Page 13 The different Working Electrodes can be identified by the number of connecting pins and are not interchangeable. Electrode WE1 (6 pins) is to be fitted in position WE1. Electrode WE2 (3 pins) is to be fitted in position WE2. Do not mix up the electrodes. www.trace2o.com...
- Page 14 Slide the band down from the hole 3. Use the pipette to drop enough solution into the Reference Electrode to fill it up. Once topped up, replace the band to prevent the electrode fill solution escaping. Note: Only use the supplied Reference Electrode Fill Solution. www.trace2o.com...
- Page 15 Hold the electrode perpendicular to the platen and use a smooth figure of eight motion as indicated. Polish until the surface has a mirror finish and no scratches or imperfections are seen. www.trace2o.com...
- Page 16 Plating Solutions – The plating solutions should be stored in a dark, cool place and have a shelf life of one year. Refer to solutions for expiry dates. Should the efficacy of the plating solution deteriorate before this during use, they should be discarded and replaced. www.trace2o.com...
-
Page 17: Getting Started
100mA Trickle charge rate From the 500mA Fast charge rate system AUTO The instrument will automatically select menu the best charge rate select Charge and you will be given three options: To select the charge rate follow these steps: www.trace2o.com... -
Page 18: Powering Up The System
The lights should now come on and the instrument will start up. Windows will load and request a log-on. Please enter: Username: HM3000 Password : <None> It is recommended the password is changed to one of your personal choosing. www.trace2o.com... - Page 19 <No> can be selected. When the test methods have been read, the ‘Measurements available’ drop down box should be populated as below: www.trace2o.com...
-
Page 20: Setting The Date And Time
Metaware as the instrument controls are isolated when the Metaware is running and the status is showing connected. To disconnect, navigate to ‘Metalyser’ via the tools/communications menu and click the Bluetooth logo. The pain at the bottom left should show disconnected. www.trace2o.com... -
Page 21: Backlight
The backlight will switch on when a key is pressed or the screen AUTO refreshes. It will turn of after five seconds of inactivity. The battery life will be shortened in this mode. Highlight the required setting and press <OK> • Press <cancel> to return to main menu • www.trace2o.com... -
Page 22: Auto Switch Off
This is recommended to extend battery life. To adjust the Auto Switch Off: From the main menu, select System • From the system menu, select Auto Switch Off • Highlight the required setting and press <OK> • Press <cancel> to return to main menu • www.trace2o.com... -
Page 23: Methods
Likewise for WE1 during analyses using WE2. When switching between different analyses, the unused electrode needs to be removed, otherwise results may be affected. Procedures for each parameter are detailed in the relevant application notes. www.trace2o.com... -
Page 24: Plating
Test Methods menu, then choose the conditioning step which will be at the top of the list. The conditioning step should be carried out in samples water and undertakes a run which sensitises the Working Electrode. www.trace2o.com... -
Page 25: Analysis
Standard Addition procedure. A third procedure using *calibration curve technique can be carried out, but only in exceptional circumstance - please contact info@trace2o.com for assistance. 1. Standard Addition (Single Point): This is the recommended method of analysis when using the Metalyser ®... -
Page 26: Adding A Standard Addition
To release the pipette tip after use, push the white button at the side of the pipette. Before carrying out testing, become familiar using the pipette and the two different stops on the plunger to ensure the correct volume of standard is added. www.trace2o.com... - Page 27 For example, if the used wishes to measure 600 ppb, dilute the sample by half and then multiply the result by 2. Always dilute with water that will not contribute to the heavy metals being tested; deionised water is ideal. www.trace2o.com...
-
Page 28: Results
Print: Prints the graph to a selected printer. • Zoom Out: Zooms back out one zoom step. • Reset Zoom: Restores the viewing window to the default setting. • Set Scale to Default: Restores the axis to the default values. www.trace2o.com... - Page 29 Show Data Points: For more detailed information the data points can be displayed on the graph. Click the Tools option from the top menu and select the ‘Show Data Points’ option to toggle them off and on. www.trace2o.com...
- Page 30 If a file is saved with a different name, the updated filename will not be displayed until the file is re-loaded. Note: The contents of the “File” menu will change according to which tab is currently in use. File Menu while using the Graph tab www.trace2o.com...
-
Page 31: Results Log
Select the log file tab and then refresh to display the log file. These results only contain numerical information but each analysis run by Metaware can be saved complete with the graphical data. The log file can be saved in .CSV format which can be then loaded into a spreadsheet for record keeping. www.trace2o.com... -
Page 32: Linear Regression
20ppb. The calculated peak heights from the graph tab need to be calculated and entered into the table. To achieve greater accuracy, repeat analysis can be run after each addition to give an average over three readings, although this www.trace2o.com... -
Page 33: Advanced Operations
This is in order to minimise carry-over and to clean off all traces of the previous analysis. The Sonde head can be washed in the sample water and then given a final rinse with the rinse solution in the kit. www.trace2o.com... -
Page 34: Variable Volume Standard Additions
The following table gives some guidance as to what values to use: Final Metals Standard concentration standard Addition in SAB volume 1 ppb 5ppm 14ul 5 ppb 5ppm 70ul 20ppb 5ppm 280ul 100ppb 50ppm* 140ul 500ppb 50ppm* 700ul *Standards supplied as accessories. www.trace2o.com... -
Page 35: Variable Deposition Time
If using the spreadsheet function it is important to ensure that the deposition time is kept the same for all analyses. www.trace2o.com... -
Page 36: Troubleshooting
The metal concentration is below the minimum limit of detection for the method being used Addition error The increase in metal response was not sufficient enough to determine the addition Calibration error The addition was not added or the metals have not been detected www.trace2o.com... - Page 37 If the fault persists, contact the supplier to organise a return Connected via Disconnect the Metalyser ® from Metaware Metaware Turn off Metalyser ® and then turn back on after a few seconds This should give control back to the Metalyser ® www.trace2o.com...
- Page 38 The information on this graph is very informative and tells the operator what is happening with the results. www.trace2o.com...
-
Page 39: Interference Effects
120V – 240V AC Input, 50 -60Hz, 12V DC Output Communication Wireless LAN 802.11 ac a/b/g/n. Bluetooth V2.0, GSM, GPRS, EDGE quad-band 850/900/1800/1900 Mhz. Operating Microsoft Windows 10 Enterprise System Display 10.1” Widescreen 1920 x 1200 resolution TFT LCD Max view Sunlight readable display. www.trace2o.com... - Page 40 Storage temp: -20 ºC to + 70 ºC Battery 3.3V Li-ion 2200mAh rechargeable. Connections 1 x waterproof Mini USB port, 1 x 12 Way Multipole Connector. Display 128 x 128 pixel monochrome backlit LCD. Power supply 4.5 – 5V DC, 700mA. www.trace2o.com...
- Page 41 Metalyser® Field Pro HM3000 Instruction Manual v 5.0 NOTES www.trace2o.com...
- Page 42 Metalyser® Field Pro HM3000 Instruction Manual v 5.0 NOTES www.trace2o.com...
- Page 43 Metalyser® Field Pro HM3000 Instruction Manual v 5.0 The Technology Centre Wagtech Court Station Road Thatcham Berkshire RG19 4HZ United Kingdom T: +44(0) 1635 866772 Fax: +44(0) 1635 873509 E: sales@trace2o.com W: www.trace2o.com www.trace2o.com...
Need help?
Do you have a question about the METALYSER FIELD PRO HM3000 and is the answer not in the manual?
Questions and answers