Table of Contents
Advertisement
Quick Links
EN
INSTANTANEOUS ELECTRIC WATER HEATER
VI
MÁY NƯ C NÓNG ĐI N T C TH I
PH
ELEKTRONIKONG SAGLIT NA PAMPAINIT NG TUBIG
เครื ่ อ งทำน้ ำ อุ ่ น ไฟฟ้ า ทั น ที
TH
လက် င င် း လျှ ပ ် စ စ် ရ ေပူ ရ ေပူ
MM
ID
PEMANAS AIR LISTRIK INSTAN
ASSEMBLY AND OPERATION INSTRUCTIONS
The home of sustainable comfort
RELEASE 15/06/22
AURES TOP
Advertisement
Table of Contents
Troubleshooting

Related Manuals for Ariston AURES TOP 4.5P


Summary of Contents for Ariston AURES TOP 4.5P
- Page 1 The home of sustainable comfort RELEASE 15/06/22 AURES TOP INSTANTANEOUS ELECTRIC WATER HEATER MÁY NƯ C NÓNG ĐI N T C TH I ELEKTRONIKONG SAGLIT NA PAMPAINIT NG TUBIG เครื ่ อ งทำน้ ำ อุ ่ น ไฟฟ้ า ทั น ที လက်...
-
Page 2: General Safety Instruction
16. Do not place anything under the water heater which may be damaged by a leak. 17. If any of the follow conditions occur, immediately switch off the mains and contact to Ariston service agent for repair. Never attempt to repair the unit yourself. -
Page 3: General Safety Standards
18. During lighting/thunder, switch off the electric supply to protect the shower unit against pos- sible damage. 19. The earth continuity conductor of the electrical installation must be effectively connected to all exposed metal parts of the appliance and services in the room, which the heater is to be installed to conform to local regulations and ensure proper earthing/grounding for ELCB to be effective. -
Page 4: Technical Characteristics
TECHNICAL CHARACTERISTICS For the technical specifications, refer to the nameplate (located on the right side of the water heater). PRODUCT INFORMATION AURES TOP AURES TOP AURES TOP AURES TOP AURES TOP AURES TOP AURES TOP MODEL 4.5P 3.5 CU 4.5 CU Power (kW) Voltage (V) Phases... -
Page 5: Water Connection
4. Mark the screws points of the slider rail set beside the heater. It is recommended the top of the portion is in same level with the top of the heater. 5. Use 6mm diameter drill and make the wall plug holes for heater and shower accessory to 35mm depth. 6. - Page 6 GREEN or GREEN/YEOLLOW for EARTH(E) 6. Make sure the wiring connection is tight, then close the front cover. 7. Fix back the screw A. OPERATING INSTRUCTIONS TO TAKE THE SHOWER FOR THE USER (see fig.2) IMPORTANT! THE HEATER TANK MUST BE FILLED UP WITH WATER BEFORE TURN ON THE ELECTRIC SUP- PLY THIS IS TO PREVENT ANY DRY BURNT DAMAGE TO THE HEATING ELEMENT.
- Page 7 8. The height and the direction of the shower head are adjustable. Depress the release button and slide the shower holder to the desired position. Move the hand shower to the desired angle. A ratchet mechanism in the shower holder; 9.
- Page 8 4. Shower profile cold shower a. From Shower profile P3 setting, pressing again MODE button the user will go to set Shower cold shower, the shower icon P3 disappears, P0 will appear on temperature digits. The user will take the shower at inlet temperature (Show pict) b.
-
Page 9: Troubleshooting
Troubleshooting SCREEN ELCB HEATING PROBLEM DISPLAY LAMP LAMP CHECKING ACTIONS 1. Ensure power supplier availability, by checking house power supply voltage;. 1. Ensure water flow rate is big enough (over 1,2L/ min); 2. Ensure the water heater is turned ON, by rby pressing ON/OFF button;... - Page 10 HƯỚNG DẪN AN TOÀN CHUNG Sách hướng dẫn này là một phần rất quan trọng của sản phẩm. Xin hãy cất giữ cẩn thận sách hướng dẫn này cùng với thiết bị và trao lại cho người dùng/người sở hữu tiếp theo trong trường hợp thiết bị thay đổi chủ...
- Page 11 18. Khi có sấm sét, hãy tắt nguồn sản phẩm để bảo vệ sản phẩm tránh bị hư hại. 19. Đảm bảo nối đất phải có hiệu quả đối với tất cả các chi tiết kim loại của thiết bị và dịch vụ trong phòng, máy nước nóng phải được lắp đặt phù...
-
Page 12: Đặc Điểm Kỹ Thuật
ĐẶC ĐIỂM KỸ THUẬT Để biết các thông số kỹ thuật, hãy tham khảo nhãn tem (nhãn tem nằm ở mặt bên của máy nước nóng). THÔNG TIN SẢN PHẨM AURES TOP AURES TOP AURES TOP AURES TOP AURES TOP AURES TOP AURES TOP KIỂU MÁY... - Page 13 Lắp đặt thiết bị 1. Lựa chọn vị trí phù hợp trong phòng tắm. 2. Tháo vít A (hình 3) ở đáy thiết bị và nhấc cụm mặt trước lên 3. Đánh dấu vị trí bắt máy lên tường. Vị trí khuyến nghị khi treo bình là 1.5m từ sàn phòng tắm. 4.
-
Page 14: Quan Trọng
NÂU hoặc ĐỎ cho dây PHA (L) XANH LỤC hoặc ĐEN cho dây TRUNG TÍNH (N) XANH LÁ hoặc XANH - VÀNG cho dây nối đất (E) 6. Kiểm tra kỹ tất cả các kết nối xem đã nối đúng và xiết chặt chưa, Sau đó, đóng cụm mặt trước. 7. - Page 15 9. Ấn để tắt màn hình hiển thị và khóa van nước đầu vào khi ngừng tắm; HOẠT ĐỘNG CỦA BƠM Bơm sẽ bắt đầu hoạt động khi người dùng bật sản phẩm và mở khóa nước đầu vào. Bơm sẽ hoạt động suốt khoảng thời gian có...
- Page 16 CÀI ĐẶT CHỨC NĂNG ECO Ấn nút ECO, chức năng ECO được kích hoạt. sản phẩm sẽ bắt đầu hoạt động ở chế độ tiết kiệm năng lượng, tiết kiệm tiền điện mà vẫn tắm ở mức độ thoải mái và ổn định. a.
- Page 17 Nhận biết và giải quyết lỗi MÀN HÌNH ĐÈN VẤN ĐỀ HIỂN THỊ ĐÈN ELCB HEATING HÀNH ĐỘNG KIỂM TRA Đảm bảo có nguồn điện vào bằng cách đo điện TẮT TẮT TẮT áp tại nhà 1) Đảm bảo lưu lượng nước vào lớn hơn 1,2L/phút; 2) Đảm bảo bình đun nước đang được bật bằng các nhấn nút ON/OFF;...
-
Page 18: General Safety Instruction
16. Do not place anything under the water heater which may be damaged by a leak. 17. If any of the follow conditions occur, immediately switch off the mains and contact to Ariston service agent for repair. Never attempt to repair the unit yourself. -
Page 19: General Safety Standards
18. During lighting/thunder, switch off the electric supply to protect the shower unit against pos- sible damage. 19. The earth continuity conductor of the electrical installation must be effectively connected to all exposed metal parts of the appliance and services in the room, which the heater is to be installed to conform to local regulations and ensure proper earthing/grounding for ELCB to be effective. -
Page 20: Technical Characteristics
TECHNICAL CHARACTERISTICS For the technical specifications, refer to the nameplate (located on the right side of the water heater). PRODUCT INFORMATION AURES TOP AURES TOP AURES TOP AURES TOP AURES TOP AURES TOP AURES TOP MODEL 4.5P 3.5 CU 4.5 CU Power (kW) Voltage (V) Phases... -
Page 21: Water Connection
4. Mark the screws points of the slider rail set beside the heater. It is recommended the top of the portion is in same level with the top of the heater. 5. Use 6mm diameter drill and make the wall plug holes for heater and shower accessory to 35mm depth. 6. - Page 22 GREEN or GREEN/YEOLLOW for EARTH(E) 6. Make sure the wiring connection is tight, then close the front cover. 7. Fix back the screw A. OPERATING INSTRUCTIONS TO TAKE THE SHOWER FOR THE USER (see fig.2) IMPORTANT! THE HEATER TANK MUST BE FILLED UP WITH WATER BEFORE TURN ON THE ELECTRIC SUP- PLY THIS IS TO PREVENT ANY DRY BURNT DAMAGE TO THE HEATING ELEMENT.
- Page 23 8. The height and the direction of the shower head are adjustable. Depress the release button and slide the shower holder to the desired position. Move the hand shower to the desired angle. A ratchet mechanism in the shower holder; 9.
- Page 24 a. From Shower profile P3 setting, pressing again MODE button the user will go to set Shower cold shower, the shower icon P3 disappears, P0 will appear on temperature digits. The user will take the shower at inlet temperature (Show pict) b.
-
Page 25: Troubleshooting
Troubleshooting SCREEN ELCB HEATING PROBLEM DISPLAY LAMP LAMP CHECKING ACTIONS 1. Ensure power supplier availability, by checking house power supply voltage;. 1. Ensure water flow rate is big enough (over 1,2L/ min); 2. Ensure the water heater is turned ON, by rby pressing ON/OFF button;... - Page 26 16. Do not place anything under the water heater which may be damaged by a leak. 17. If any of the follow conditions occur, immediately switch off the mains and contact to Ariston service agent for repair. Never attempt to repair the unit yourself.
- Page 27 18. During lighting/thunder, switch off the electric supply to protect the shower unit against pos- sible damage. 19. The earth continuity conductor of the electrical installation must be effectively connected to all exposed metal parts of the appliance and services in the room, which the heater is to be installed to conform to local regulations and ensure proper earthing/grounding for ELCB to be effective.
- Page 28 TECHNICAL CHARACTERISTICS For the technical specifications, refer to the nameplate (located on the right side of the water heater). PRODUCT INFORMATION AURES TOP AURES TOP AURES TOP AURES TOP AURES TOP AURES TOP AURES TOP MODEL 4.5P 3.5 CU 4.5 CU Power (kW) Voltage (V) Phases...
- Page 29 4. Mark the screws points of the slider rail set beside the heater. It is recommended the top of the portion is in same level with the top of the heater. 5. Use 6mm diameter drill and make the wall plug holes for heater and shower accessory to 35mm depth. 6.
- Page 30 GREEN or GREEN/YEOLLOW for EARTH(E) 6. Make sure the wiring connection is tight, then close the front cover. 7. Fix back the screw A. OPERATING INSTRUCTIONS TO TAKE THE SHOWER FOR THE USER (see fig.2) IMPORTANT! THE HEATER TANK MUST BE FILLED UP WITH WATER BEFORE TURN ON THE ELECTRIC SUP- PLY THIS IS TO PREVENT ANY DRY BURNT DAMAGE TO THE HEATING ELEMENT.
- Page 31 8. The height and the direction of the shower head are adjustable. Depress the release button and slide the shower holder to the desired position. Move the hand shower to the desired angle. A ratchet mechanism in the shower holder; 9.
- Page 32 a. From Shower profile P3 setting, pressing again MODE button the user will go to set Shower cold shower, the shower icon P3 disappears, P0 will appear on temperature digits. The user will take the shower at inlet temperature (Show pict) b.
- Page 33 Troubleshooting SCREEN ELCB HEATING PROBLEM DISPLAY LAMP LAMP CHECKING ACTIONS 1. Ensure power supplier availability, by checking house power supply voltage;. 1. Ensure water flow rate is big enough (over 1,2L/ min); 2. Ensure the water heater is turned ON, by rby pressing ON/OFF button;...
- Page 34 16. Do not place anything under the water heater which may be damaged by a leak. 17. If any of the follow conditions occur, immediately switch off the mains and contact to Ariston service agent for repair. Never attempt to repair the unit yourself.
- Page 35 18. During lighting/thunder, switch off the electric supply to protect the shower unit against pos- sible damage. 19. The earth continuity conductor of the electrical installation must be effectively connected to all exposed metal parts of the appliance and services in the room, which the heater is to be installed to conform to local regulations and ensure proper earthing/grounding for ELCB to be effective.
- Page 36 TECHNICAL CHARACTERISTICS For the technical specifications, refer to the nameplate (located on the right side of the water heater). PRODUCT INFORMATION AURES TOP AURES TOP AURES TOP AURES TOP AURES TOP AURES TOP AURES TOP MODEL 4.5P 3.5 CU 4.5 CU Power (kW) Voltage (V) Phases...
- Page 37 4. Mark the screws points of the slider rail set beside the heater. It is recommended the top of the portion is in same level with the top of the heater. 5. Use 6mm diameter drill and make the wall plug holes for heater and shower accessory to 35mm depth. 6.
- Page 38 GREEN or GREEN/YEOLLOW for EARTH(E) 6. Make sure the wiring connection is tight, then close the front cover. 7. Fix back the screw A. OPERATING INSTRUCTIONS TO TAKE THE SHOWER FOR THE USER (see fig.2) IMPORTANT! THE HEATER TANK MUST BE FILLED UP WITH WATER BEFORE TURN ON THE ELECTRIC SUP- PLY THIS IS TO PREVENT ANY DRY BURNT DAMAGE TO THE HEATING ELEMENT.
- Page 39 8. The height and the direction of the shower head are adjustable. Depress the release button and slide the shower holder to the desired position. Move the hand shower to the desired angle. A ratchet mechanism in the shower holder; 9.
- Page 40 a. From Shower profile P3 setting, pressing again MODE button the user will go to set Shower cold shower, the shower icon P3 disappears, P0 will appear on temperature digits. The user will take the shower at inlet temperature (Show pict) b.
- Page 41 Troubleshooting SCREEN ELCB HEATING PROBLEM DISPLAY LAMP LAMP CHECKING ACTIONS 1. Ensure power supplier availability, by checking house power supply voltage;. 1. Ensure water flow rate is big enough (over 1,2L/ min); 2. Ensure the water heater is turned ON, by rby pressing ON/OFF button;...
- Page 42 16. Do not place anything under the water heater which may be damaged by a leak. 17. If any of the follow conditions occur, immediately switch off the mains and contact to Ariston service agent for repair. Never attempt to repair the unit yourself.
- Page 43 18. During lighting/thunder, switch off the electric supply to protect the shower unit against pos- sible damage. 19. The earth continuity conductor of the electrical installation must be effectively connected to all exposed metal parts of the appliance and services in the room, which the heater is to be installed to conform to local regulations and ensure proper earthing/grounding for ELCB to be effective.
- Page 44 TECHNICAL CHARACTERISTICS For the technical specifications, refer to the nameplate (located on the right side of the water heater). PRODUCT INFORMATION AURES TOP AURES TOP AURES TOP AURES TOP AURES TOP AURES TOP AURES TOP MODEL 4.5P 3.5 CU 4.5 CU Power (kW) Voltage (V) Phases...
- Page 45 4. Mark the screws points of the slider rail set beside the heater. It is recommended the top of the portion is in same level with the top of the heater. 5. Use 6mm diameter drill and make the wall plug holes for heater and shower accessory to 35mm depth. 6.
- Page 46 GREEN or GREEN/YEOLLOW for EARTH(E) 6. Make sure the wiring connection is tight, then close the front cover. 7. Fix back the screw A. OPERATING INSTRUCTIONS TO TAKE THE SHOWER FOR THE USER (see fig.2) IMPORTANT! THE HEATER TANK MUST BE FILLED UP WITH WATER BEFORE TURN ON THE ELECTRIC SUP- PLY THIS IS TO PREVENT ANY DRY BURNT DAMAGE TO THE HEATING ELEMENT.
- Page 47 8. The height and the direction of the shower head are adjustable. Depress the release button and slide the shower holder to the desired position. Move the hand shower to the desired angle. A ratchet mechanism in the shower holder; 9.
- Page 48 a. From Shower profile P3 setting, pressing again MODE button the user will go to set Shower cold shower, the shower icon P3 disappears, P0 will appear on temperature digits. The user will take the shower at inlet temperature (Show pict) b.
- Page 49 Troubleshooting SCREEN ELCB HEATING PROBLEM DISPLAY LAMP LAMP CHECKING ACTIONS 1. Ensure power supplier availability, by checking house power supply voltage;. 1. Ensure water flow rate is big enough (over 1,2L/ min); 2. Ensure the water heater is turned ON, by rby pressing ON/OFF button;...
- Page 50 Front Plate Trước tấm Control Area Khu vực kiểm soát Filter Bộ lọc WATER INLET NƯỚC VÀO Water supply valve Van cấp nước WATER OUTLET ĐẦU RA NƯỚC Shower Hose Vòi hoa sen Sliding Rail Đường ray trượt Shower Hanger Móc áo tắm Shower Head Đầu vòi hoa sen...
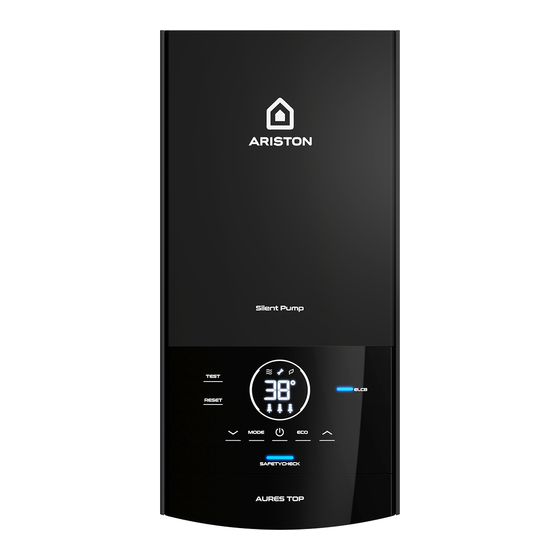
- Page 51 Button to switch ON/OFF Button water setting temperature (-) MODE button RESET button TEST button HEATING icon It lights on when heating MAINTENANCE icon ECO function incon Temperature and quinck diagnostic 10 ELCB Led 11 P1,P2,P3 shower programming icon 12 ECO button 13 Button water setting temperature (+) 14 SAFETY CHECK button Button to switch ON/OFF...
- Page 52 CLOSE COVER STEPS Đóng n p Các bư c CLOSE COVER STEPS CLOSE COVER STEPS CLOSE COVER STEPS CLOSE COVER STEPS ON/OFF DP (double pole) Switch Double PVC cable Công tắc chuyển 2 cực Dây PVC đôi ON/OFF DP (double pole) Switch Double PVC cable ON/OFF DP (double pole) Switch Double PVC cable...
- Page 53 Double PVC cable Double PVC cable Double PVC cable Double PVC cable Double PVC cable Dây PVC đôi Main Water Valve Van nước chính Main Water Valve Van nước chính Main Water Valve Van nước chính COLD Water Nước lạnh COLD Water COLD Water HOT Water...
- Page 54 Terminal block Zero sequence current transformer Main PCB Pump (if presenty) Triac PCB/ Triac Copper base Connect pipe Inlet Reed Switch Outlet pipe 10 Outlet NTC 11 Heater tank 12 Bottom cover 13 Thermostat Cầu đấu điện Cuộn biến dòng(ZCT) Bảng mạch chính Bơm (nếu có) Bảng mạch Triac/Triac...
- Page 55 81,5 =152,6= Table 1- ELECTRICAL LOADING TABLE Bảng 1- BẢNG THÔNG SỐ ĐIỆN Table 1- ELECTRICAL LOADING TABLE / Table 1- ELECTRICAL LOADING TABLE Table 1- ELECTRICAL LOADING TABLE/ Table 1- ELECTRICAL LOADING TABLE Voltage Power Current Conductor size ON/OFF Switch Fuse MBC Điện thế...
- Page 56 Produced by: Ariston S.p.A. Viale Aristide Merloni, 45 60044 Fabriano (AN) - ITALY ariston.com 420011260500 - 06/22...
Need help?
Do you have a question about the AURES TOP 4.5P and is the answer not in the manual?
Questions and answers