Advertisement
Quick Links
Imported by
Amart Furniture
For any assistance with assembly or for missing parts please phone
Amart Furniture
2021-09-29
Pty Ltd, Qld, Brisbane Australia.
, Customer Service Free call 1800 351 084
ASSEMBLY INSTRUCTION
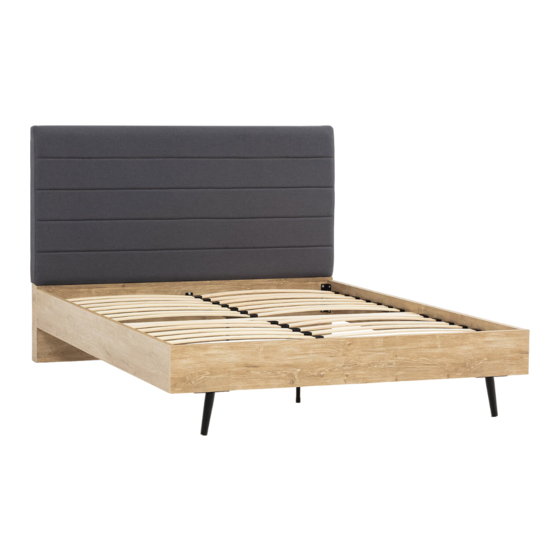
DALVIN QUEEN BED
ITEM CODE 74030
Imported by Amart Furniture Pty Ltd, Qld, Brisbane Australia.
For any assistance with assembly or for missing parts please phone
Amart Furniture , Customer Service Free call 1800 351 084
1
Item Code:74030
Advertisement

Subscribe to Our Youtube Channel
Related Manuals for Amart Furniture Dalvin 74030


Summary of Contents for Amart Furniture Dalvin 74030
- Page 1 ITEM CODE 74030 Imported by Amart Furniture Pty Ltd, Qld, Brisbane Australia. For any assistance with assembly or for missing parts please phone Amart Furniture , Customer Service Free call 1800 351 084 Imported by Amart Furniture Pty Ltd, Qld, Brisbane Australia.
- Page 2 2021-09-29 Item Code:74030...
- Page 3 HEADBOARD METAL RAILS LEFT RAIL WOODEN SLATS SUPPORT RAIL RIGHT RAIL FOOTBOARD CROSS SUPPORT 2021-09-29 Item Code: 74030...
- Page 4 CHECKLIST Before you start..1.Choose a clean,level,spacious assembly area. Avoid hard surfaces that may damage the product. 2.Check and ensure that you have all required contents for complete assembly. 3.Always read the assembly instructions carefully before beginning assembly. 4.The packaging and contents can be a choking hazard. Please keep out of reach of small children at all times.
- Page 5 (MM) 1600x1160x120 2050x190x25 2050x190x25 1600x190x25 1920x20x20 77x60x9 2050x40x40 1550x70x12 Item Code:74030 2021-09-29...
- Page 6 18xD STEP 1: Fix metal rails ⑤ to left rail ② and right rail ③ using screws (D). Bottom veneer edge Bottom veneer edge 12xF 12xG STEP 2: Fix metal brackets (A) to left rail ② and right rail ③ using screws (E), spring washers (F),washers (G) and allen key (H).
- Page 7 STEP 3: Insert dowels (C) to footboard ④. Attach footboard ④ to left rail ② and right rail ③ using screws (E), spring washers (F),washers (G) and allen key (H). Top veneer edge Top veneer edge Top veneer edge 2021-09-29 Item Code:74030...
- Page 8 STEP 4: Fix legs (B) to the existing unit using screws (D), screws (E),spring washers (F),washers (G) and allen key (H). Bottom veneer edge Bottom veneer edge Bottom veneer edge Item Code:74030 2021-09-29...
- Page 9 STEP 5: Insert dowels (C) to headboard ①. Attach headboard ① to the existing unit using screws (E), spring washers (F),washers (G) and allen key (H). Top veneer edge Top veneer edge Left veneer edge Item Code:74030 2021-09-29...
- Page 10 STEP 6: Attach legs (N) to support rail ⑦ using screws (E) and allen key (H). Attach support rail ⑦ to headboard ① and footboard ④ using screws (E), spring washers (F),washers (G) and allen key (H). Top edge Top veneer edge Top edge Top veneer edge Left veneer edge...
- Page 11 STEP 7: Attach cross support ⑧ to support rail ⑦ and Metal Rails ⑤ using screws (E) and allen key (H). Top veneer edge Top edge Top veneer edge Left veneer edge Item Code:74030 2021-09-29...
- Page 12 28xO 14xP STEP 8: Attach wooden slats ⑥ using plastic connectors (P) and plastic buckles (O). Left veneer edge Item Code:74030 2021-09-29...
- Page 13 ASSEMBLY COMPLETE. CAUTION: Always Lift Your Bed When Moving /Relocating - Do Not Drag. Dragging Can Cause The Centre Support Legs To Bend/Break. Item Code:74030 2021-09-29...
-
Page 14: Product Care
PRODUCT CARE: To protect your furniture,we suggest the following: *Avoid placing your furniture in direct sunlight. *Do not place furniture directly under windows. *Do not place sharp materials(knife,fork,etc) directly onto your furniture as sharp material may scrape and damage the finish. Do not place material with high temperature directly onto the surface of your furniture.
Need help?
Do you have a question about the Dalvin 74030 and is the answer not in the manual?
Questions and answers