Advertisement
Quick Links
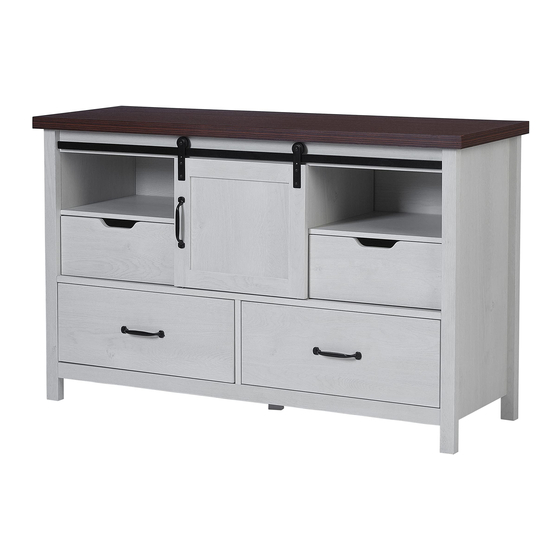
SIENA
SIDEBOARD
Item#: 64014
ATTACH YOUR RECEIPT
Keep a copy of your proof of purchase
or order confirmation, which will be
needed if you need to contact us about
warranty coverage.
Purchase date:
Questions, problems, missing parts?
Before returning to your retailer, our Florida-based customer service team is available:
Call toll-free
Email
Live Chat
(866) 985-7877
cservice@welltraveled.net
www.balkenehome.com
SAVE THESE INSTRUCTIONS
FOR FUTURE REFERENCE.
9 am – 9 pm, EST
9 am – 6 pm, EST, Monday – Friday
09282021
Advertisement

Related Manuals for Balkene Home SIENA 64014


Summary of Contents for Balkene Home SIENA 64014
- Page 1 SIENA SIDEBOARD Item#: 64014 ATTACH YOUR RECEIPT SAVE THESE INSTRUCTIONS Keep a copy of your proof of purchase FOR FUTURE REFERENCE. or order confirmation, which will be needed if you need to contact us about warranty coverage. Purchase date: Questions, problems, missing parts? Before returning to your retailer, our Florida-based customer service team is available: Call toll-free (866) 985-7877...
-
Page 2: Before You Begin
INFORMATION BEFORE YOU BEGIN Before beginning assembly, make sure all parts are present. Compare parts received with the "Parts List." If any part is missing or damaged, do NOT attempt to assemble the product. Please read and understand this entire manual before attempting to assemble this product. -
Page 3: Parts List
PARTS LIST DESCRIPTION DESCRIPTION DESCRIPTION PART PART PART Top Panel Bottom Face Frame Left Drawer Side Left Side Support Leg Right Drawer Side Right Side Shelf Small Drawer Front Left Divider Upper Face Frame Small Drawer Back Right Divider Door Rail Small Drawer Bottom Middle Shelf Door... -
Page 4: Hardware Contents
HARDWARE CONTENTS Cam Bolt Cam Nut Dowel Hex Bolt Handle Screw Bolt 6x35mm 8x30mm 6x18mm 4x18mm Qty: 44 Qty: 44 Qty: 42 Qty: 3 Qty: 3 Qty: 6 Drawer Runner Screw Hex Wrench Screw Screw Hanger Roller 4x65mm 4x35mm 3x12mm Qty: 8 Qty: 2 Qty: 24... - Page 5 ASSEMBLY Install Runners on the Left Divider and Right Divider Fully extend one Runner and align the inner section along one set of 3 small holes on the Left Divider as shown. Verify that the orientation of the Runner matches the diagram, then fasten the Runner to the Divider using 3 Screws positioned as shown.
- Page 6 ASSEMBLY Insert Dowels into the 2 holes between the Cam Bolts in each Divider Insert the hardware installed in the Left Divider into the corresponding holes in the edges of one Shelf as shown. Secure by inserting a Cam Nut into each of the adjoining holes in the underside of the Bottom Shelf.
- Page 7 ASSEMBLY Insert Cam Bolts into the 2 indicated holes in the Bottom Face Frame . Use a Phillips-head screwdriver to tighten the threads into the panels. Hardware Required: Cam Bolt x2 Insert Dowels into the 2 remaining holes in the Bottom Face Frame Insert the hardware in the Bottom Face Frame into the corresponding holes in the edge of the Base Panel...
- Page 8 ASSEMBLY Place Dowels in the 2 indicated holes between the Cam Bolts in the bottom of the Middle Shelf Insert the installed Dowels and Cam Bolts into the corresponding holes in the top edge of the Bottom Divider Secure by inserting a Cam Nut 2 into each of the adjoining holes in the side of the Bottom Divider.
- Page 9 ASSEMBLY Attach the Door Rail to the Top Face Frame using 3 Hex Bolts . Use the Hex Wrench tighten each Hex Bolt. Hardware Required: Hex Bolt (6x18mm) x3 Hex Wrench Insert 7 Dowels into the Left Side as indicated. Attach the Left Side to the partially- assembled unit by inserting the installed Dowels and Cam Bolts...
- Page 10 ASSEMBLY Insert a total of 8 Cam Bolts into the indicated holes in the underside of Top Panel Attach each Anchor Bracket near the back edge of the Top Panel using a Screw Hardware Required: Cam Bolt x8 Anchor Bracket x2 Screw (4x12mm) x2 Slide the Top Backer into the groove along...
- Page 11 ASSEMBLY With runner side facing out, attach the Left Drawer Side Insert Cam Bolts into the indicated holes the Small Drawer Back using 2 Screws . Ensure that the in each Small Drawer Front . Use a Phillips- narrow groove at the bottom runs continuously along the head screwdriver to tighten the threads fully into the panels.
- Page 12 ASSEMBLY Insert Cam Bolts into the indicated holes in With runner side facing out, attach the Left Drawer Side each Large Drawer Front . Use a Phillips- the Large Drawer Back using 2 Screws . Ensure that the head screwdriver to tighten the threads fully narrow groove at the bottom runs continuously along the into the panels.
- Page 13 ASSEMBLY To install the first drawer, fully extend both Drawer Runners in one drawer compartment and slide the drawer into place between them. Secure the Runners to the sides of the Drawer using 2 Screw Bolts Follow the same method to install the remaining 3 drawers. Hardware Required: Screw Bolt (4x10mm) x8 Attach a Handle...
- Page 14 ASSEMBLY Hang the Door by resting the wheels of the Roller Hangers on top of the Door Rail settling the track pin on the bottom of the door into the bottom door track. Secure the Door to the Door Rail by inserting a Screw Bolt as indicated in each Roller Hanger.
- Page 15 ASSEMBLY Use the Anchor Brackets to anchor the unit to the wall for safety. The included hardware is appropriate for drywall installation and requires the use of a drill. If needed, consult a qualified tradesperson or online resources for the appropriate steps to safely anchor this unit. Hardware Required: Screw (4x35mm) x2 Drywall Anchor x2...
- Page 16 EXTEND YOUR WARRANTY When you purchase a Fire Sense or Balkene Home product from any authorized retailer, you'll have peace of mind in knowing that it comes with a one-year warranty. Extend your warranty for an additional year when you review your item at balkenehome.com within 365 days of purchase.
Need help?
Do you have a question about the SIENA 64014 and is the answer not in the manual?
Questions and answers