Table of Contents
Advertisement
Quick Links
Advertisement
Table of Contents

Related Manuals for Bellini BOM613G


Summary of Contents for Bellini BOM613G
- Page 1 Built-in Electric Oven Model No. BOM613G GSM Retail Australia Pty Ltd ABN: 53 007 582 475 For Warranty and technical queries: 1300 373 199 Aust OR 0800 764 912 NZ V6 Feb 2022 www.belliniappliances.com.au Model: BOM613G Fineline: Built-in Electric Oven...
- Page 2 Bellini prides itself on ‘affordable living’ making sure there is not compromise in your favourite room..The Kitchen. All Bellini appliances carry a 3 year In Home warranty, be sure to retain your installation and user manual and receipt. For all warranty and technical queries please phone:...
-
Page 3: Table Of Contents
APPLIANCE DOOR ..........CURE YOUR APPLIANCE WHEN NEEDED ... GSM Retail Australia Pty Ltd ABN: 53 007 582 475 For Warranty and technical queries: 1300 373 199 Aust OR 0800 764 912 NZ www.belliniappliances.com.au Model: BOM613G Fineline: Built-in Electric Oven... -
Page 4: Safety Instructions
In case of failure, only the authorised Technical Service may repair this oven. Otherwise the guarantee will be null and void. All Bellini Appliances are for domestic use only. Never to do: • Incorrect repairs are dangerous. Repairs may only be... - Page 5 Safety Instructions • Do not use the oven unless you are wearing DECLARATION OF COMPLIANCE something on your feet. Do not touch the oven with wet or damp hands or feet. When you have unpacked the oven, make sure that •...
-
Page 6: Installation
INSTALLATION min.35 To operate this appliance safe, please be sure that it has been installed to a professional standard respecting the min.35 installation instructions. Damages occur because of incorrect installation are not within the warranty. While doing the installation , please wear protective gloves to prevent yourself from min.585 getting cut by sharp edges . -
Page 7: Operating The Appliance
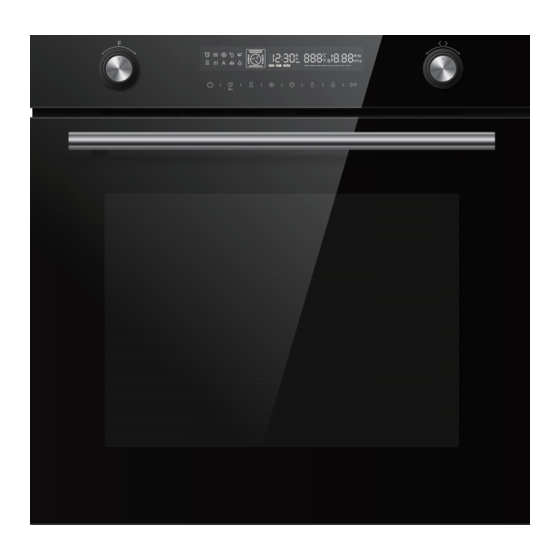
OPERATING THE APPLIANCE 1. Oven – Function Turn this knob to change heating mode. 2. ON / OFF Switch on and off oven. 3. Timer / Child-Proof Lock Use timer function/use child-proof lock with 3s press 4. End time Set an end time to the cooking duration. 5. -
Page 8: Before Using The Appliance
BEFORE USING THE APPLIANCE First time using the appliance Before using the appliance to prepare food for the first time, you must clean the cavity and accessories. 1. Remove all stickers, surface protection foils and transport protection parts. 2. Remove all accessories and the side-racks from the cavity. 3. -
Page 9: Types Of Heating
TYPES OF HEATING Your appliance has various operating modes which make your appliance easier to use. To enable you to find the correct type of heating for your dish, we have explained the differences and scopes of application here. Types of Heating Temperature For traditional baking and roasting on one Conventional... - Page 10 TYPES OF HEATING Notes To defrost big portions of food, it is possible to remove the side-racks and place the container on the cavity floor To warming tableware, it is beneficial to remove the side-racks and the heating modes “Hot Air Grilling” and “Fan Heating” with temperature setting of 50°C are useful.
-
Page 11: Using Your Appliance
USING YOUR APPLIANCE Cooking with oven After the oven has been electrically connected, turn the oven-function knob to select functions, turn the adjust knob the set cooking temperature. Touch Start / Pause symbol oven begin to work, if not, oven will back to clock after 10 minutes. - Page 12 USING YOUR APPLIANCE Caution! After the appliance switched off, it becomes very hot especially inside the cavity. Never touch the interior surfaces of the appliance or the heating elements. Use oven gloves to remove accessories or ovenware from the cavity, and allow the appliance to cool down. Keep children at a safe distance at the same time to avoid the injury of burns.
- Page 13 Accessories included Your appliance is equipped with the following accessories: Accessory Name Picture Quantity Baking tray Grill rack Grill rack Screws(ST4x30) and Distant holder...
- Page 14 Secure the oven to cabinet Fit oven into the cabinet recess. Open the oven door. Secure the oven to the kitchen cabinet with two distance holders "A" which fit the holes in the oven frameand fit the two wood screws "B". Inserting accessories The cavity has five shelf positions.
- Page 15 Tilt protection Accessories can be approximately pulled halfway out until they lock in place. The locking function prevents accessories from tilting with the gravity of food and accessories themselves while they get pulled out. Accessories should be inserted into cavity correctly for the tilt protection.When inserting the wire rack, ensure the wire rack is onto the right facing direction like the picture When inserting the backing tray, ensure the backing tray is onto the right facing direction like...
-
Page 16: Environment
ENVIRONMENT The packaging is made for protect your new appliance against damages during transport. The materials used are selected carefully and should be recycled. Recycling reduces the use of raw materials and waste. Electrical and electronic appliances often contain valu-able materials. Please do not dispose of it with your household waste. - Page 17 Caution! Risk of surface damage Do not use: Harsh or abrasive cleaning agents. Cleaning agents with a high alcohol content. Hard scouring pads or cleaning sponges. High-pressure cleaners or steam cleaners. Special cleaners for cleaning the appliance while it is hot. Wash new sponge cloths thoroughly before use.
- Page 18 Area Appliance exterior Cleaning Hot soapy water: Clean with a dish cloth and then dry with a soft cloth. Door handle If descaler comes into contact with the door handle, wipe it off immediately. Otherwise, any stains will not be able to be removed. Enamel surfaces and Observe the instructions for the surfaces of the cooking com-partment self-cleaning surfaces...
-
Page 19: Appliance Door
Enamel is baked on at very high temperatures. This can cause some slight color variation. This is normal and does not affect operation. The edges of thin trays cannot be completely enameled. As a result, these edges can be rough. This does not impair the anti-corrosion protection. - Page 20 Removing the appliance door Open the appliance door fully. Fold open the two locking levers on the left and right. Close the appliance door as far as the limit stop. With both hands, grip the door on the left- and right-hand side, and pull it out upwards. Fitting the appliance door Reattach the appliance door in the opposite sequence to removal.
- Page 21 Removing the door cover The plastic inlay in the door cover may become discolored. To carry out thorough cleaning, you can remove the cover. Remove the appliance door like instructed above. Press on the right and left side of the cover. Remove the cover.
- Page 22 Caution! While the appliance door is well installed, the door cover can also be taken o°, by this time. Removing the door cover means to set the inner glass of the appliance door free, the glass can be easily moved and cause damage or injury. As removing the door cover and inner glass means to reduce the overall weight of the appliance door.
-
Page 23: Cure Your Appliance When Needed
Change the power cord Position A show the terminal box position on the back of the back outer case and it’s closed. Steps: a. cut off the power, use small f at screwdriver to open two snap 1,2. b. use Phillips crew driver to take off screws 3,4 ,5and 6. c. - Page 24 Knobs can be removed. To disengage knobs, simply remove them from the support. Alternatively, press on the outer edge of knobs so that they tip and can be picked up easily. Knobs can no There is dirt Carefully clean the knobs using a cloth and soapy water. Dry longer be under knobs with a soft cloth.
- Page 25 Maximum operating time The maximum operating time of this appliance is 9 hours, to prevent that you forget shot off the power. Replacing the lamp on the corner of the cavity If the cavity lamp fails, it must be replaced. Heat-resistant, 25 watt, 230 V halogen lamps are available from the after-sales service or specialist retailers.
- Page 26 Subject to the other clauses of this warranty, the Company warrants to the Consumer that the Bellini product will be free of manufacturing defects and will perform to the Company’s specifications. The benefit of this warranty extends only to the Consumer as original purchaser of a Bellini product which is installed in a domestic household area.
- Page 27 1.10 If you are required to transport the Bellini product to the Company or its service agent, you must ensure it is safely disconnected by a qualified tradesman and securely packed and insured. The Company does not accept any responsibility for loss or damage of the Bellini product prior to it being received by the Company or its service agent.
Need help?
Do you have a question about the BOM613G and is the answer not in the manual?
Questions and answers