Advertisement
Quick Links
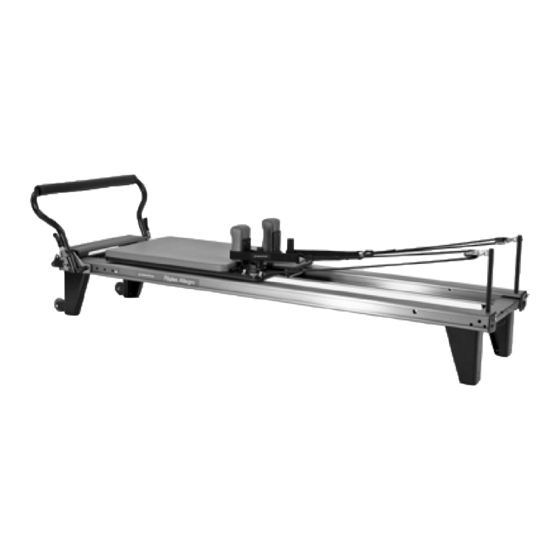
How to Assemble the Allegro
THIS IS A MEDICAL DEVICE
PARTS LIST
Part number
Description
950-002
Complete footbar
950-020
Shoulder bolts and washers
950-228
Shoulder rest with brackets
616-400
Locking shoulder post
GEN8000
Twist lock plunger knobs
210-070
Soft Touch Ropes
210-064
Double loops (Soft Touch)
950-225
Allegro riser with pulley
GEN9050
5/16" Allen wrench
ALL0060
Allegro wrench
SPR9070
Red spring
SPR9071
Blue spring
SPR9241
Yellow spring
UPH7040
Foam Pad for Standing Platform
GEN9282
5/32" Allen wrench
GEN9472
1/4"-20 Button head screw
GEN9054
Split washer
Transport bracket preinstalled
618-008
with wheel
Qty
1
To reduce the risk of serious injury, read the following
1 kit
important precautions before using the Allegro.
1 pair
» Read all instructions in this manual before using the
2
Allegro. Review the Setup and Safety video included with
2
the Allegro before using the equipment. Use the Allegro
only as described in these instructions and the video.
1 pair
1 pair
» It is the responsibility of the owner to ensure that all users
2
of the Allegro are adequately informed of all precautions.
1
» Use the Allegro only on a level surface. Keep hands and
1
feet away from all moving parts. When the Allegro is
3
not in use, leave at least two springs connected to the
1
carriage. Keep children under the age of 12 and pets away
from the Allegro at all times.
1
1
» If you feel pain, dizziness, or shortness of breath, stop
1
exercising immediately.
2
2
» Before beginning any exercise program, consult your
physician.
2
Balanced Body, Inc.
5909 88th St,
Sacramento, CA 95828 USA
Reformer
®
IMPORTANT PRECAUTIONS:
PLEASE READ WARNING
1-800-PILATES | +1-916-388-2838
pilates.com | info@pilates.com
EC
Balanced Body, In
Sacramento, CA
001-916-388-2838
Contact Us
17291 | 2021-04
Advertisement

Related Manuals for Balanced Body Allegro Reformer


Summary of Contents for Balanced Body Allegro Reformer
- Page 1 1/4”-20 Button head screw GEN9054 Split washer » Before beginning any exercise program, consult your physician. Transport bracket preinstalled 618-008 with wheel Balanced Body, In Sacramento, CA 001-916-388-2838 Contact Us Balanced Body, Inc. 1-800-PILATES | +1-916-388-2838 5909 88th St, pilates.com | info@pilates.com...
- Page 2 STATEMENT OF INTENDED USE DECLARACIÓN DE USO PREVISTO The Allegro® Reformer device is intended by the manufacturer El dispositivo Allegro® Reformer está diseñado con fines de to be used by people for the purposes of physiotherapy, fisioterapia, rehabilitación, prevención, tratamiento y alivio de rehabilitation, the prevention, treatment and relief of injuries, lesiones, terapia de apoyo y funcional para una discapacidad o supportive, functional therapy for a disability or for general...
- Page 3 INSTALL THE SHOULDER RESTS 1. Note the two protruding studs on the bottom of the shoulder rests. Lower the shoulder rest studs into the keyholes and slide away from the carriage pad. See Figure A. Note: The shoulder rests can be installed in two positions. One position is wider, and more comfortable for broad shoulders.
- Page 4 7. Pivot the footbar slightly until the large hole at the bottom of INSTALL THE TRANSPORT WHEEL BRACKET the footbar aligns with the remaining hole in the trunnion plate. 14. Remove the 1/4”-20 button head screw and the split washer 8.
-
Page 5: Cleaning And Maintenance
Move QUESTIONS? and lock the footbar into the position closest to the foot-end Call Balanced Body technical support at 1-800-745-2838 of the Reformer frame. Raise (US and Canada), or +1-916-388-2838. the footbar to its highest position. Lift the head-end of the Allegro frame to waist height. - Page 6 How to Install the Allegro Legs Kit ® PARTS INCLUDED: TOOLS NEEDED (NOT INCLUDED): » Two 1/2” or adjustable wrenches Item No. Part Number Description 618-030 Allegro Leg, A » One 7/16” wrench 618-031 Allegro Leg, B » 3/8” wrench or socket 618-021 Leg Nut Plate Wheel Bracket, Allegro Ext...
- Page 7 1. Attach all springs to keep the carriage stationary. Remove ropes, shoulder rests, and risers. Place the footbar (if installed) in its lowest position and check that all pins are locked so that the footbar is secure. Then, with the help of a friend, lift the Allegro from both ends and carefully turn it upside down and set it on the floor.
- Page 8 5. Your legs are installed and you may now carefully lift and turn shown. Typically these are installed at the foot end of the your Allegro Reformer back over onto the legs. Re-install your Reformer as shown in Figure G.
- Page 9 How to Install and Use the Standing Platform Pad Your Allegro Reformer comes with a standing platform pad. Place the pad directly on top of the standing platform to use. This pad will make the standing platform height the same as your carriage pad.
-
Page 10: Parts List
Assembling the Allegro® Tower of Power™ Prior to assembly, check the parts and components received against the following list. If you are missing any parts, contact the Balanced Body customer service department at 1-800-PILATES (1-800-745-2837) in the U.S. and Canada, or +1-916-388-2838 (international). -
Page 11: Important: Read First
IMPORTANT: READ FIRST NOTE: If you have an original version of the Allegro with the angled corner joints (Serial Number less than 36396), follow these instructions. a. Using the provided 5/32” Allen wrench, loosen and remove the six screws (one on each side of the Reformer and 4 on the head end) that hold the head end of the frame on. - Page 12 Bracket ledge Figure C Figure E 6. Install the adjustable pulleys by assembling the components 4. Make sure both brackets are slid all the way up against the as shown in Figure F with the pulley on the inside of the plastic rail caps.
- Page 13 REPOSITION THE T-PIN MOVING AND STANDING AN ALLEGRO WITH TOWER For shipping purposes, the Note: Always exercise caution when moving, lifting, or storing an Tower is packaged with the Allegro or an Allegro with Tower. Use proper lifting technique to T-pins installed on the inside of avoid injury.
- Page 14 NOTE: Do not try to wrap the strap ends around the entire frame is completely within the wall. - it will not fit. IMPORTANT: Balanced Body is not responsible for any damage or injury caused by improper wall mount installation, or the use of incorrect or improper wall mounting equipment.
- Page 15 How to Assemble the Allegro Stretch Reformer ® PARTS LIST Part number Description IMPORTANT PRECAUTIONS: PLEASE READ WARNING 950-002 Complete footbar 950-020 Pivot bolts and washers 1 kit To reduce the risk of serious injury, read the following important precautions before using the Allegro. 950-228 Shoulder rest with brackets 1 pair...
- Page 16 INSTALL THE SHOULDER RESTS The stretch reformer comes with eight different positions of shoulder rests. Shoulder rests can be adjusted based on narrow or broad shoulders. The left and right shoulder rests can be swapped to achieve these configurations. 1. Note the two protruding studs on the bottom of the shoulder rests.
- Page 17 7. Pivot the footbar slightly until the large hole at the bottom of STORING THE ALLEGRO REFORMER the footbar aligns with the remaining hole in the trunnion plate. Stacking 8. Slide the shoulder bolt with one washer through the large To see a demonstration of how to stack the Allegro, watch the footbar hole.
- Page 18 For additional usage and safety information or to view complete ATTENZIONE: questo macchinario è potenzialmente pericoloso equipment manual translations (USER GUIDE #10896), please e Balanced Body Inc. non si assume la responsabilità in caso visit https://www.pilates.com/store/faq-safety/. For printed di utilizzo o di utilizzo improprio. Se non siete ben informati instructions, contact your seller.
Need help?
Do you have a question about the Allegro Reformer and is the answer not in the manual?
Questions and answers