Table of Contents
Advertisement
Quick Links
Advertisement
Table of Contents

Related Manuals for Pacific Trapeze CTP-E48BSX


Summary of Contents for Pacific Trapeze CTP-E48BSX
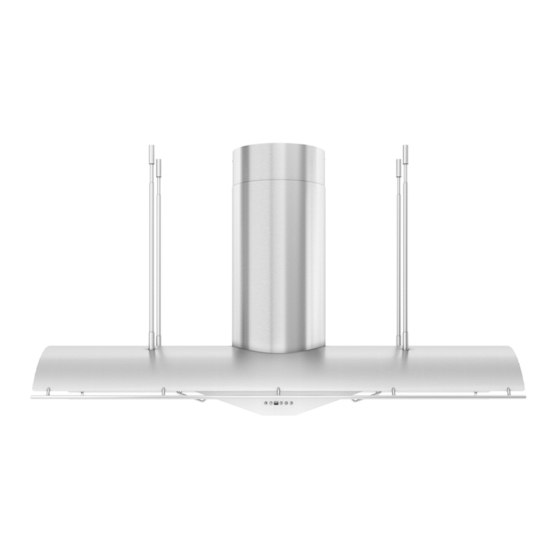
- Page 1 Trapeze CTP-E48BSX CTP-E54BSX CTP-E60BSX...
- Page 2 SAFETY NOTICE ..............LIST OF MATERIALS ............INSTALLATION Ducting Calculation Sheet ........Mounting Height & Clearance ........ Ducting Options ......................Blower Preparation 9-11 ............. Mounting the Range Hood 12-14 ........FEATURES & CONTROLS Touch Controls ............. Features ................Optional Remote Control .........
- Page 3 READ AND SAVE THESE INSTRUCTIONS WARNING TO REDUCE THE RISK OF FIRE OR ELECTRIC SHOCK, DO NOT USE THIS FAN WITH ANY SOLID-STATE CONTROL DEVICE. WARNING TO REDUCE THE RISK OF FIRE, ELECTRIC SHOCK, OR INJURY TO PERSONS, OBSERVE THE FOLLOWING: a.
-
Page 4: Operation
WARNING TO REDUCE THE RISK OF FIRE, USE ONLY METAL DUCTWORK. NOT FOR USE IN OUTDOOR COOKING ENVIRONMENTS. CAUTION attics, crawl spaces or garages. OPERATION and loose clothing. The manufacturer declines all responsibility in the event of failure to observe the instructions given here for installation, maintenance and suitable use of the product. - Page 5 MODEL: CTP-E48BSX, CTP-E54BSX, CTP-E60BSX 1 - Hood 4 - 6W Zephyr Bloom™ HD LED Light Bulbs 2 - Telescopic Duct Covers 4 - Telescopic Support Rod Sets 4 - Telescopic Support Rod Couplers 2 - Utensil Rails 1 - 8” Round Starting Collar 1 - AC Power Wiring Box 1 - Remote Blower Wire Harness &...
- Page 6 WARNING FIRE HAZARD All exhaust must be ducted to the outside. Some Ducting Options External Blower side wall cap w/ gravity damper Soffit or crawl space Roof Pitch w/ Flashing & Cap External Blower Soffit or crawl space...
-
Page 7: Side View
Top View Side View 32” Standard Duct Cover Min 34” - Max 51 1/2” Z1C-00TP Extension Min 47” - Max 72” 15-3/4” Ceiling Bracket Front View 11-3/4” 10” 13/16” 9” 1/2” 5/8” 12-1/8” FRONT 47-15/16”, 53-15/16”, 59-1/8”... - Page 8 INTERNAL BLOWER PREPARATION hardware. 3. Secure AC power wiring box to internal blower 4. Secure ground wire to underside of internal washer. 5. Connect 9 pin molex connector from capacitor cable to 9 pin molex connector from internal step 1. blower.
-
Page 9: Remote Blower Preparation
INTERNAL BLOWER PREPARATION CONT. 8. Connect 6 pin molex connector from capacitor screws. cable to 6 pin molex connector from control box. Connect 2 pin plug from AC power cable to 2 pin plug from control box. Secure cables to hood interior with zip ties and zip tie holders. - Page 10 REMOTE BLOWER PREPARATION CONT. 4. Secure remote blower 8” round collar to remote 3. Secure AC power ground wire and remote blower ground wire to underside of remote washer each. M4*6 screws. NOTE: For instructions on mounting the remote blower please refer to the CBE-1000 or PBN- 1000A remote blower manual included in the www.zephyronline.com 7.
- Page 11 Tabs Add Blockings Tabs FIG. 1 Ceiling Bracket Ceiling Mounting Holes Marking for Coupler Set screw mounting hole FRONT FIG. 2 Electrical wiring passage couplers if needed. FIG. 1. the set screw mounting hole is toward the bottom of the coupler during mounting. FIG. 2.
- Page 12 FIG. 4 FIG. 3 of hood. FIG. 3.
- Page 13 Telescopic Rod Installation screws M4*4 set screw for each rod. set screw for each rod set. Tool screw FRONT BACK Utensil Rail Installation 1. Attach utensil rail to long side of hood canopy. A small hole has been pre-drilled into the canopy to provide a starting onto the canopy.
-
Page 14: Speed Selection
Display (Speed level, Delay Off Indicator) Blower On/Off 15 Min Delay Off Adjust 3 Speed Levels Lights On/Dim/Off Blower On/Off By pressing , the blower is switched On and Off. When switched on, the blower and lights turn on at the same setting they were switched off at. - Page 15 Baffle Filter Clean Reminder Whether your hood is installed as an exhaust or purifying unit, a set if baffle filters are fitted by the factory, These baffle filters are intended to filter out residue from cooking. They need not be replaced on a regular basis but are required to be kept clean.
- Page 16 FCC Caution: To assure continued compliance, any changes or modifications not expressly approved by the party responsible for compli- ance could void the user’s authority to operate this equipment. (Example - use only shielded interface cables when connecting to computer or peripheral device.
-
Page 17: Surface Maintenance
SURFACE MAINTENANCE: Clean periodically with hot soapy water and clean cotton cloth. Do not use corrosive or abrasive detergent, or steel wool/scoring pads which will scratch and damage surface. For heavier soil use liquid degreaser. using hood. Handles... - Page 18 TROUBLESHOOTING PROCEDURES FOR TRAPEZE Issue Cause What to do After installation, 1. The power source is not turned ON. the unit doesn’t power is ON. is not connecting properly. connected properly. 3. The switch board and control board wirings are disconnected.
- Page 19 VOLTS MAX AMPS CTP-E48/54/60BSX CBI290A 0.8 CBI600A 2.7 INTERNAL BLOWER CIRCUIT DIAGRAM...
- Page 20 VOLTS MAX AMPS CTP-E48/54/60BSX CBE1000 6.0 PBN1000A 4.8 REMOTE BLOWER CIRCUIT DIAGRAM...
Need help?
Do you have a question about the Trapeze CTP-E48BSX and is the answer not in the manual?
Questions and answers