
Related Manuals for Storz TELE PACK X LED


Summary of Contents for Storz TELE PACK X LED
- Page 1 GEBRAUCHSANWEISUNG TP 100 – TELE PACK X LED INSTRUCTION MANUAL TP 100 – TELE PACK X LED MANUAL DE INSTRUCCIONES TP 100 – TELE PACK X LED...
- Page 3 Einzelheiten und Handgriffe werden anschaulich of the TELE PACK X LED. All required details and ción correctas del TELE PACK X LED. Con tal fin, erklärt. Bitte lesen Sie deshalb diese Anleitung...
-
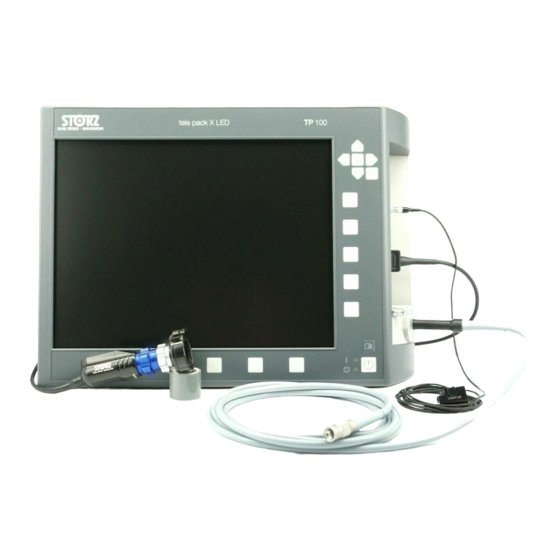
Page 4: Images Of The Device
Geräteabbildungen Images of the device Imágenes del equipo Geräteabbildungen Images of the device Imágenes del equipo *HINWEIS: Anschlussfeld und *NOTE: The connection panel and network *NOTA: El campo de conexión y la conexión Netzwerkanschluss werden im Kapitel 7.3 connection are described in more detail in para red se explican específicamente en el konkretisiert. -
Page 5: Bedienelemente, Anzeigen, Anschlüsse Und Ihre Funktion
Bedienelemente, Anzeigen, Controls, displays, Elementos de control, Anschlüsse und ihre Funktion connectors and their uses indicadores, conexiones y sus funciones Bedienelemente, Anzeigen, Controls, displays, Elementos de control, Anschlüsse und ihre Funktion connectors and their uses indicadores, conexiones y sus funciones Teclas de función Funktionstasten Function buttons Diodo luminoso verde (con.) -
Page 6: Symbolerläuterungen
Symbolerläuterungen Symbols employed Explicación de los símbolos Symbolerläuterungen Symbols employed Explicación de los símbolos Gebrauchsanweisung beachten Consult instructions for use or refer Consúltense las instrucciones bzw. Aufruf der Kurzanleitung! to the quick guide! de uso o las indicaciones de las Instrucciones resumidas. -
Page 7: Table Of Contents
Important information for users of Indicaciones importantes para los von KARL STORZ Geräten ..... III KARL STORZ devices ......III usuarios de equipos de KARL STORZ . III Geräteabbildungen ......... IV Images of the device ......IV Imágenes del equipo ......IV... - Page 8 Inhalt Contents Índice 7. 6 Netzwerkverbindungen 7. 6 Setting up the network 7. 6 Configuración de conexiones de red ..21 einrichten ...........21 connections ..........21 7. 6. 1 Diálogo de red ........21 7. 6. 1 Der Netzwerkdialog .......21 7. 6. 1 The network dialog ........21 7.
- Page 9 Inhalt Contents Índice 8. 9. 1 Aktivieren der 8. 9. 1 Activating the stroboscopy 8. 9. 1 Activación de la función de Stroboskopiefunktionalität ......46 functionality ..........46 estroboscopia ........46 8. 9. 2 Stroboskopie starten/stoppen....46 8. 9. 2 Starting/stopping the stroboscopy ..46 8.
-
Page 10: Gerätebeschreibung
Description of the device Descripción del aparato Der TELE PACK X LED ist ein revolutionäres The TELE PACK X LED is a revolutionary combi- El TELE PACK X LED es un revolucionario aparato Kombigerät und vereint die Funktionen unit and combines the functions of illumination, combinado que reúne en un sistema compacto... -
Page 11: Sicherheitshinweise
Sicherheitshinweise Safety instructions Instrucciones de seguridad Sicherheitshinweise Safety instructions Instrucciones de seguridad 6. 1 Erklärung zu Warn- und 6. 1 Explanation of warnings and 6. 1 Explicación de las indicaciones Vorsichtshinweisen cautions de alarma y advertencia Die Bezeichnungen Warnung, Vorsicht The words Warning, Caution and Note convey Los términos Cuidado, Advertencia y Nota und Hinweis haben spezielle Bedeutungen. -
Page 12: Sicherheitsvorschriften
Sicherheitshinweise Safety instructions Instrucciones de seguridad 6. 2 Sicherheitsvorschriften 6. 2 Safety regulations 6. 2 Indicaciones de seguridad WARNUNG: Verletzungsgefahr für WARNING: Danger of injury to the patient CUIDADO: Riesgo de lesiones para el Patienten und/oder Anwender. Beim and/or user. There is a risk of explosion if paciente y/o el usuario. - Page 13 Sicherheitshinweise Safety instructions Instrucciones de seguridad WARNUNG: Veränderungen des Gerätes WARNING: Modifications to the device CUIDADO: No está permitido realizar sind nicht erlaubt. are not permitted. modificaciones en el aparato. WARNUNG: Gefahr eines elektrischen WARNING: Risk of electric shock! This CUIDADO: Peligro de descarga eléctrica.
- Page 14 Daten be performed to safeguard data. de los datos es imprescindiblemente regelmäßig zu sichern. KARL STORZ KARL STORZ is not liable for loss of data. necesario guardarlos periódicamente. kann für Datenverluste keine Haftung Responsibility for the data lies with the KARL STORZ no puede asumir ninguna übernehmen.
-
Page 15: Zweckbestimmung
Stroboskopie. quirúrgicas, así como para la estroboscopia. The TELE PACK X LED must only be used with Der TELE PACK X LED darf nur mit Zubehör accessories which are stated as being suitable by El TELE PACK X LED solo puede ser utilizado con verwendet werden, die KARL STORZ für das... -
Page 16: Sicherheitsmaßnahmen Am Aufstellort
Sicherheitshinweise Safety instructions Instrucciones de seguridad 6. 6 Sicherheitsmaßnahmen 6. 6 Safety precautions at 6. 6 Medidas de seguridad en am Aufstellort the site of installation el lugar de emplazamiento Das Gerät darf nur in medizinisch genutzten The device may only be used in medical rooms El equipo solo podrá... -
Page 17: Erstinbetriebnahme
7. 1 Unpacking 7. 1 Desembalaje Entnehmen Sie den TELE PACK X LED und Carefully remove the TELE PACK X LED and Extraiga cuidadosamente el TELE PACK X LED das Zubehör vorsichtig aus der Verpackung. accessories from their packaging. Check the y sus accesorios del embalaje. -
Page 18: Anschlussübersicht
Erstinbetriebnahme Initial commissioning Primera puesta en servicio 7. 3 Anschlussübersicht 7. 3 Overview of connections 7. 3 Diagrama de conexión OUT DVI IN OUT DVI IN Fußschalter Footswitch Interruptor de pedal Line-Out Line out Line-Out Mikrofoneingang Microphone input Entrada para micrófono Line-In Line in Line-In... - Page 19 Erstinbetriebnahme Initial commissioning Primera puesta en servicio SD-Karteneinschub SD card slot Unidad de tarjeta SD 2 x USB 2 x USB 2 USB Stroboskopie-Mikrofoneingang Stroboscopy microphone input Entrada para micrófono para estroboscopia Kameraanschluss Camera connection Conexión para cámara Lichtanschluss Light port Conexión de luz Parkstutzen für Lichtkabel Connector for light cable...
-
Page 20: Gerät Für Anwendung Vorbereiten
TELE PACK X LED's potential connector a la espiga de conexión equipotencial anschließen und mit dem Potentialausgleich im pin and connect it with the room's potential del TELE PACK X LED y con la conexión Raum verbinden. equalization. equipotencial de la sala. -
Page 21: Kamerakopf/Videoendoskop Anschließen
2. Insert the videoscope's camera connector as 2. Introduzca el enchufe de conexión de la Videoendoskops bis zum Anschlag in den far as it will go into the TELE PACK X LED's cámara del videoendoscopio hasta el tope en la Kameraanschluss des TELE PACK X LED camera connection. -
Page 22: Weißabgleich Durchführen
Erstinbetriebnahme Initial commissioning Primera puesta en servicio 7. 4. 3 Weißabgleich durchführen 7. 4. 3 Performing the white balance 7. 4. 3 Realización del balance de blancos HINWEIS: Führen Sie vor jeder Anwendung NOTE: Perform a white balance before NOTA: Antes de cada aplicación, einen Weißabgleich durch. -
Page 23: Zubehör Anschließen
Erstinbetriebnahme Initial commissioning Primera puesta en servicio 7. 5 Zubehör anschließen 7. 5 Connecting the accessories 7. 5 Conexión de los accesorios 7. 5. 1 Anschließen von USB-Geräten 7. 5. 1 Connecting USB devices 7. 5. 1 Conexión de aparatos USB Die USB-Schnittstellen sind zum Anschluss The USB ports are suitable for connecting up the Las interfaces USB son apropiadas para la... -
Page 24: Anschließen Des Mikrofons
Erstinbetriebnahme Initial commissioning Primera puesta en servicio 7. 5. 2 Anschließen des Mikrofons 7. 5. 2 Connecting the microphone 7. 5. 2 Conexión del micrófono 1. Stecken Sie das Mikrofon in die 1. Plug the microphone into the microphone input 1. -
Page 25: Anschließen Einer Sd-Karte
20221070 die Line-Out Schnittstelle des the line out interface of the PULSAR II to the line la Line-In del TELE PACK X LED i usando el PULSAR II mit der Line-In des TELE PACK X in of the TELE PACK X LED i. -
Page 26: Anschließen Eines Externen Monitors
La señal de vídeo es emitida en la pantalla del Das Videosignal wird auf dem Bildschirm des the TELE PACK X LED and the external monitor. TELE PACK X LED y en el monitor externo. TELE PACK X LED und auf dem externen Monitor ausgegeben. -
Page 27: Netzwerkverbindungen Einrichten
Sie den Netzwerkdialog des TELE PACK can be accessed via the menu item ‘Settings abrir el diálogo de red del TELE PACK X LED. El X LED aufrufen. Im Netzwerkdialog können Sie Network’. You can change the settings for the diálogo de red le permite modificar ajustes para el... -
Page 28: Lokale Einstellungen
Möchten sie das TELE PACK X LED nicht If you do not want to automatically configure the Si no desea configurar el TELE PACK X LED de automatisch konfigurieren, müssen sie die TELE PACK X LED, you will need to enter the forma automática, ha de introducir manualmente... -
Page 29: File-Share-Einstellungen
NOTE: It is recommended to create a user HINWEIS: Es wird empfohlen einen eigenen NOTA: Se recomienda crear un usuario for the TELE PACK X LED on the FTP server. Benutzer am FTP-Server für das TELE PACK propio para el TELE PACK X LED en el X LED anzulegen. -
Page 30: Worklist-Einstellungen
TELE PACK X LED puede verse beeinflussen. Es wird ein Maximalwert von mance of the TELE PACK X LED. A maxi- afectado notablemente. Se recomienda 1000 empfohlen. mum value of 1000 is recommended here. -
Page 31: Bedienhinweise
Bedienhinweise Operating instructions Instrucciones operativas Bedienhinweise Operating instructions Instrucciones operativas 8. 1 Grundsätzliches zur Bedienung 8. 1 Basic information on operation 8. 1 Principios operativos básicos 8. 1. 1 Navigationstasten 8. 1. 1 Navigation keys 8. 1. 1 Teclas de navegación Mit den Navigationstasten können Sie in den The navigation keys are used to navigate in the Con las teclas de navegación puede navegar por... -
Page 32: Fußschalter
Bedienhinweise Operating instructions Instrucciones operativas 8. 1. 4 Fußschalter 8. 1. 4 Footswitch 8. 1. 4 Interruptor de pedal Mit jedem Pedal des Fußschalters lassen sich Two functions can be controlled with each Con cada uno de los pedales del interruptor de zwei Funktionen steuern. -
Page 33: Hauptscreen
Bedienhinweise Operating instructions Instrucciones operativas 8. 2 Hauptscreen 8. 2 Main screen 8. 2 Pantalla principal Menü Menu Menú Infoleiste Info bar Barra de información Funktionstasten des Function buttons of the main Teclas de función de la pantalla Hauptscreens screen principal... -
Page 34: Informationsleiste
Bedienhinweise Operating instructions Instrucciones operativas 8. 2. 1 Informationsleiste 8. 2. 1 Information bar 8. 2. 1 Barra de información In der Informationsleiste gibt es Hinweise zu den The information bar provides information on the La barra de información contiene indicaciones Einstellungen. -
Page 35: Menü
Bedienhinweise Operating instructions Instrucciones operativas HINWEIS: Die Video- und Tonaufnahme NOTE: Video and audio can be recorded NOTA: Se admite la grabación simultánea kann gleichzeitig aufgezeichnet werden. simultaneously. de vídeo y sonido. HINWEIS: Die Funktion „Worklist öffnen“ ist NOTE: The ‘Open worklist’ function is only NOTA: La función “Abrir lista de trabajo”... - Page 36 Bedienhinweise Operating instructions Instrucciones operativas Patientendaten importieren Importing patient data Importar datos del paciente Über diesen Menüpunkt können Sie sich die This menu item is used to import the patient data A través de este punto del menú, usted puede Patientendaten einer auf dem Speichermedium into the patient mask from a treatment already importar los datos del paciente de un tratamiento...
-
Page 37: Voreinstellungen
NOTE: The last used preset is loaded Das Untermenü wird geöffnet. 3. Haga clic en el submenú sobre el punto again when the TELE PACK X LED is next 3. Klicken Sie im Untermenü auf den Menüpunkt “activar”. switched on. -
Page 38: Einstellungen
Bedienhinweise Operating instructions Instrucciones operativas 8. 2. 5 Einstellungen 8. 2. 5 Settings 8. 2. 5 Ajustes Hier können Sie verschiedene Einstellungen zu The different settings for video, controls, audio, Aquí puede usted realizar diferentes ajustes para Video, Bedienelemente, Audio, Drucker und printer, and general device settings can be made vídeo, elementos de control, audio, impresora y allgemeine Geräteeinstellungen vornehmen. - Page 39 DVI. Farbsystem Color system Sistema de color Der TELE PACK X LED ist mit PAL- und The TELE PACK X LED is compatible with PAL El TELE PACK X LED es compatible con NTSC-Kameraköpfen kompatibel. Mit dieser and NTSC camera heads.
- Page 40 Bedienhinweise Operating instructions Instrucciones operativas Stroboskopie Stroboscopy Estroboscopia Zeitlupe Slow motion Cámara lenta Die Geschwindigkeit der sichtbaren Stimmband- The speed of the visible vocal cord movement La velocidad del movimiento visible de las bewegung kann von 0,2 Hz bis 2,5 Hz in Stufen can be set in increments between 0.2 and 2.5 cuerdas vocales puede ajustarse de forma eingestellt werden.
- Page 41 Bedienhinweise Operating instructions Instrucciones operativas Netzwerk Network Netzwerkeinstellungen Network settings Ajustes de la red Hier können Sie den Netzwerkmodus Allows you to configure the network mode Aquí puede configurar el modo de red (véase el konfigurieren (siehe Kapitel 7.6 (see Section 7.6 ‘Setting up the network capítulo 7.6 “Configuración de conexiones de „Netzwerkverbindungen einrichten“).
-
Page 42: Infoleiste
Bedienhinweise Operating instructions Instrucciones operativas 8. 2. 6 Infoleiste 8. 2. 6 Info bar 8. 2. 6 Barra de información In der Infoleiste werden wichtige Geräteinformationen The info bar displays important device information. En la barra de información aparecen indicadas angezeigt. -
Page 43: Behandlungsübersicht
Bedienhinweise Operating instructions Instrucciones operativas 8. 3 Behandlungsübersicht 8. 3 Treatment overview 8. 3 Sinopsis de tratamientos In die Behandlungsübersicht gelangen Sie You can enter the treatment overview by pressing Usted accederá a la sinopsis de tratamientos durch Drücken der Taste . -
Page 44: Übersicht Der Funktionstasten Der Behandlungsübersicht
Bedienhinweise Operating instructions Instrucciones operativas 8. 3. 1 Übersicht der Funktionstasten 8. 3. 1 Overview of the treatment 8. 3. 1 Sinopsis de las teclas de función der Behandlungsübersicht overview's function buttons de la sinopsis de tratamientos Die Funktionen der unterschiedlichen Symbole The functions of the different symbols are as Las funciones de los diferentes símbolos son las sind wie folgt:... -
Page 45: Bilder Drucken
Bedienhinweise Operating instructions Instrucciones operativas 8. 3. 2 Bilder drucken 8. 3. 2 Printing images 8. 3. 2 Imprimir imágenes 1. Wählen Sie das zu druckende Bild aus. 1. Select the image to be printed. 1. Seleccione la imagen que desea imprimir. 2. -
Page 46: Übersicht Datenbrowser
Bedienhinweise Operating instructions Instrucciones operativas 8. 4 Übersicht Datenbrowser 8. 4 Data browser overview 8. 4 Sinopsis del navegador de datos Der Datenbrowser zeigt alle Speichermedien und The data browser displays all the storage media El navegador de datos muestra todos los soportes die darauf gespeicherten Behandlungen an. -
Page 47: Übersicht Der Funktionstasten Des Datenbrowsers
Bedienhinweise Operating instructions Instrucciones operativas 8. 4. 1 Übersicht der Funktionstasten 8. 4. 1 Overview of the data browser’s 8. 4. 1 Sinopsis de las teclas de función des Datenbrowsers function buttons del navegador de datos Über den Datenbrowser können Sie sich You can use the data browser to view the A través del navegador de datos puede hacer que die zuvor gespeicherten Behandlungen der... -
Page 48: Netzwerkkommunikation
As soon as a file has been successfully transferred Serververzeichnis gelöscht. también del directorio del servidor. from the local SD card of the TELE PACK X LED Sobald eine Datei erfolgreich von der lokalen to the server directory, the local copy will be... -
Page 49: Übersicht Worklist-Screen
Bedienhinweise Operating instructions Instrucciones operativas 8. 7 Übersicht Worklist-Screen 8. 7 Worklist screen overview 8. 7 Sinopsis de la pantalla Lista de trabajo Im Worklist-Modus können Sie auf eine In the Worklist mode, you can select a patient vorbereitete Liste mit Patienten zurückgreifen from a prepared list. -
Page 50: Ungeplanter Patient
As soon as a file has been successfully transferred Sobald eine Datei erfolgreich von der lokalen from the local SD card of the TELE PACK X LED Una vez transferido un archivo correctamente SD-Karte des TELE PACK X LED in das Server-... -
Page 51: Stroboskopie-Modus
Bedienhinweise Operating instructions Instrucciones operativas 8. 9 Stroboskopie-Modus 8. 9 Stroboscopy mode 8. 9 Modo de estroboscopia Im Stroboskopie-Modus wird die eingebaute In stroboscopy mode, the LED light source is En el modo de estroboscopia, el disparo de la LED-Lichtquelle synchron zum Audiosignal des triggered at the same time as the audio signal of fuente de luz LED integrada se produce de forma Mikrofons getriggert. - Page 52 Bedienhinweise Operating instructions Instrucciones operativas HINWEIS: Die Darstellung der NOTE: The stroboscopy information is NOTA: La representación de la información Stroboskopieinformationen erscheint sobald displayed once the stroboscopy footswitch recogida por el estroboscopio aparece en der Stroboskopie-Fußschalter betätigt wird. is actuated. cuanto se presiona el interruptor de pedal para estroboscopia.
- Page 53 Instandhaltung Service and repair Mantenimiento Instandhaltung Service and repair Mantenimiento 9. 1 Sicherungswechsel 9. 1 Fuse replacement 9. 1 Cambio de fusibles 1. Schalten Sie das Gerät aus und trennen Sie die 1. Switch the device off and disconnect from the 1.
- Page 54 Instandhaltung Service and repair Mantenimiento 9. 2 Aufbereitung 9. 2 Reprocessing 9. 2 Preparación WARNUNG: Vor sämtlichen WARNING: Always disconnect from the CUIDADO: Antes de realizar cualquier Reinigungsarbeiten ist das Gerät vom Netz power supply before cleaning. trabajo de limpieza, desconecte el aparato zu trennen.
- Page 55 Instandhaltung Service and repair Mantenimiento 9. 3 Wartung und 9. 3 Maintenance and 9. 3 Mantenimiento y Sicherheitsüberprüfung safety check verificación de seguridad 9. 3. 1 Wartung 9. 3. 1 Maintenance 9. 3. 1 Mantenimiento Eine vorbeugende Wartung ist nicht zwingend Preventive maintenance is not essential.
- Page 56 Instandhaltung Service and repair Mantenimiento Funktionsprüfung Test for proper functioning Prueba de funcionamiento Funktionskontrolle nach Gebrauchsanweisung A functional check must be carried out in Lleve a cabo un control de funcionamiento durchführen (siehe Abschnitt 7.4.4). accordance with the instruction manual (see según el Manual de instrucciones (véase el Section 7.4.4).
- Page 57 Las reparaciones, modificaciones o ampliaciones von KARL STORZ autorisierte Fachleute on the correct functioning of equipment or que no hayan sido realizadas por KARL STORZ o durchgeführt werden, führen zum Verlust aller instruments which have been repaired by por personal experto autorizado por KARL STORZ Garantieansprüche.
- Page 58 Sie bitte die für Sie zuständige Sammelstelle bei KARL STORZ SE & Co. KG, a KARL STORZ consulte a KARL STORZ SE & Co. KG, a una KARL STORZ SE & Co. KG, einer KARL STORZ subsidiary or your specialist dealer for information sociedad distribuidora de KARL STORZ o a su Niederlassung oder Ihrem Fachhändler.
- Page 59 • Remove camera cover • Retire la tapa de la cámara • Kamerakopf bzw. Gerät zur Überprüfung an • Send camera head or device to KARL STORZ • Envíe el cabezal de la cámara o el aparato para KARL STORZ senden to be checked su comprobación a KARL STORZ.
- Page 60 • El cable de conexión de la cámara está quebrado Abhilfe: Remedy: Solución: • Kamerakopf zur Reparatur an KARL STORZ • Send camera head to KARL STORZ for repair. senden. • Envíe el cabezal de la cámara a KARL STORZ para su reparación.
- Page 61 Abhilfe: Remedy: Solución: • Gerät zur Reparatur an KARL STORZ senden • Send device to KARL STORZ for repair • Envíe el aparato a KARL STORZ para su reparación. Fehlerbeschreibung: Symptom: Descripción del error: • Bild lässt sich nicht speichern •...
- Page 62 Technische Beschreibung Technical description Descripciones técnicas 10. 3 Technische Daten 10. 3 Technical data 10. 3 Datos técnicos TELE PACK X LED TELE PACK X LED TELE PACK X LED Netzspannung 100…240 VAC Line voltage 100…240 VAC Tensión de red 100…240 V CA...
- Page 63 KARL STORZ dual-pedal interruptor de para interruptor de doble fußschalter 20 010330 footswitch 20 010330 pedal pedal de KARL STORZ 20 010330 USB für Stroboskopie- USB for stroboscopy Fußschalter 40 160033 footswitch 40 160033 USB para interruptor de pedal para estroboscopia...
- Page 64 Technische Beschreibung Technical description Descripciones técnicas 10. 4 Normenkonformität 10. 4 Standard compliance 10. 4 Conformidad con las normas (für TP 100) (for TP 100) (para TP 100) Nach IEC 60601-1; IEC 60601-2-18; According to IEC 60601-1; IEC 60601-2-18; Según CEI 60601-1; CEI 60601-2-18; UL 60601-1;...
- Page 65 Ersatzteile, Spare parts, Piezas de repuesto, empfohlenes Zubehör recommended accessories accesorios recomendados Ersatzteile, Spare parts, Piezas de repuesto, empfohlenes Zubehör recommended accessories accesorios recomendados 11. 1 Ersatzteilliste 11. 1 List of spare parts 11. 1 Piezas de repuesto Artikel Article Artículo Bestell-Nr.
- Page 66 11. 3 Compatible light cables 11. 3 Cables de luz compatibles Alle KARL STORZ Lichtkabel sind zur Verwendung All KARL STORZ light cables are suitable for use. Todos los cables de luz de KARL STORZ son geeignet. apropiados para su aplicación.
- Page 67 Artikel Article Artículo Bestell-Nr. Order no. N.º de artículo KARL STORZ USB-Stick KARL STORZ USB stick Memoria USB de KARL STORZ 20 0402 82 Headset Headset Auriculares W21341* Verbindungskabel ACC zu PULSAR II, ACC to PULSAR II connection cable, Cable de conexión ACC al PULSAR II,...
- Page 68 Ersatzteile, Spare parts, Piezas de repuesto, empfohlenes Zubehör recommended accessories accesorios recomendados 11. 7 Empfohlenes Zubehör 11. 7 Recommended accessories 11. 7 Accesorios recomendados Stroboskopie Stroboscopy Estroboscopia Artikel Article Artículo Bestell-Nr. Order no. N.º de artículo Fußschalter Footswitch Interruptor de pedal 40 1600 33 Mikrofonset Microphone set...
- Page 69 Verträglichkeit (EMV) compatibility (EMC) electromagnética (CEM) Der TELE PACK X LED Modell TP 100 entspricht The TELE PACK X LED model TP 100 El TELE PACK X LED, modelo TP 100, responde der EN/IEC 60601-1-2 [CISPR 11 Klasse A] und...
- Page 70 Störfestigkeit der TELE PACK X LED model TP 100. The ca- o una reducción de la inmunidad a TELE PACK X LED Modell TP 100 führen.
- Page 71 Hinweise zur Information on Indicaciones sobre elektromagnetischen electromagnetic compatibilidad Verträglichkeit (EMV) compatibility (EMC) electromagnética (CEM) Zubehör und Leitungen mit denen die Übereinstimmung mit der EN/IEC 60601-1-2 nachgewiesen wurde: Schirm Länge [m] Ferrite Verwendung Netzkabel Nein Nein Spannungsversorgung Zweipedalfußschalter Nein Gerätesteuerung, Buchse Rückseite USB-Tastatur mit Nein Nein...
- Page 72 The TELE PACK X LED model TP 100 is designed for operation in an environment as defined below. The user of the device must make sure that the TELE PACK X LED model TP 100 is operated in such an environment.
- Page 73 Der TELE PACK X LED Modell TP 100 ist für den Betrieb in der unten angegebenen elektromagnetischen Umgebung bestimmt. Der Anwender des TELE PACK X LED Modell TP 100 sollte sicherstellen, dass es in einer solchen Umgebung benutzt wird. Störfestigkeitsprüfungen EN/IEC 60601 Prüfpegel...
- Page 74 The TELE PACK X LED model TP 100 is designed for operation in the electromagnetic environment defined below. The user of the TELE PACK X LED model TP 100 should make sure that it is used in such an environment.
- Page 75 El TELE PACK X LED, modelo TP 100, está previsto para el uso en un entorno electromagnético especificado debajo. El usuario del TELE PACK X LED, modelo TP 100, se debería asegurar de que se use en dicho entorno. Nivel de ensayo de la...
- Page 76 Für medizinische elektrische Geräte, die nicht lebenserhaltend sind Der TELE PACK X LED Modell TP 100 ist für den Betrieb in der unten angegebenen elektromagnetischen Umgebung bestimmt. Der Anwender des Gerätes sollte sicherstellen, dass das Gerät in einer solchen Umgebung benutzt wird.
- Page 77 The TELE PACK X LED model TP 100 is designed for operation in the electromagnetic environment defined below. The user of the device should make sure that it is used in such an environment.
- Page 78 El TELE PACK X LED, modelo TP 100, está previsto para el uso en un entorno electromagnético especificado debajo. El usuario del equipo se debería asegurar de que se use en dicho entorno.
- Page 79 TELE PACK X LED Modell TP 100 Der TELE PACK X LED Modell TP 100 ist für den Betrieb in einer elektromagnetischen Umgebung bestimmt, in der die HF-Störgrößen kontrolliert sind. Der Anwender des Gerätes kann dadurch helfen, elektromagnetische Störungen zu vermeiden, indem er den Mindestabstand zwischen tragbaren und mobilen HF-Telekommunikationsgeräten (Sendern) und dem Gerät –...
- Page 80 TELE PACK X LED model TP 100 The TELE PACK X LED model TP 100 is intended for use in an electromagnetic environment in which the RF disturbances are controlled. The user of the device can help prevent electromagnetic interference by maintaining a minimum distance between portable and mobile RF communications equipment (transmitters) and the device, according to the power output of the communications equipment as recommended below.
- Page 81 TELE PACK X LED modelo TP 100 El TELE PACK X LED, modelo TP 100, está previsto para el uso en un entorno electromagnético en el que las perturbaciones radiadas de RF están controladas. El usuario del equipo puede ayudar a prevenir la interferencia electromagnética manteniendo una distancia mínima entre el equipo portátil y móvil de comunica- ciones de RF (transmisores) y el aparato –...
- Page 82 7171 Millcreek Drive, Mississauga E-Mail: asiakaspalvelu@karlstorz.fi Phone: +27 21 417 2600, Fax: +27 21 421 5103 Chengdu, 6100414, People’s Republic of China KARL STORZ Endoskop Polska Marketing Sp. z o.o. E-Mail: info@karlstorz.co.za Ontario, L5N 3R3, Canada Phone: +86 28 86587977, Fax: +86 28 86587975 KARL STORZ SE &...
- Page 84 KARL STORZ SE & Co. KG Dr.-Karl-Storz-Straße 34 78532 Tuttlingen Postfach 230 78503 Tuttlingen Germany Telefon: +49 (0)7461 708-0 Telefax: +49 (0)7461 708-105 E-Mail: info@karlstorz.com Web: www.karlstorz.com...
Need help?
Do you have a question about the TELE PACK X LED and is the answer not in the manual?
Questions and answers