
Subscribe to Our Youtube Channel
Related Manuals for Moxa Technologies MGate 4101-MB-PBS-T


Summary of Contents for Moxa Technologies MGate 4101-MB-PBS-T
- Page 1 MGate 4101-MB-PBS Modbus Serial-to- PROFIBUS Slave Gateway User Manual Version 6.1, April 2022 www.moxa.com/products © 2022 Moxa Inc. All rights reserved.
- Page 2 MGate 4101-MB-PBS Modbus Serial-to-PROFIBUS Slave Gateway User Manual The software described in this manual is furnished under a license agreement and may be used only in accordance with the terms of that agreement. Copyright Notice © 2022 Moxa Inc. All rights reserved. Trademarks The MOXA logo is a registered trademark of Moxa Inc.
-
Page 3: Table Of Contents
Table of Contents Introduction ........................... 4 Overview ............................4 Package Checklist ..........................4 Product Features..........................4 Getting Started ..........................5 Connecting Power ..........................5 Connecting PROFIBUS Devices ......................5 Connecting Modbus Serial Devices ...................... 5 Connecting to a Host via Serial Console Cable ..................5 Hardware............................ -
Page 4: Introduction
1. Introduction Welcome to the MGate 4101-MB-PBS line of Modbus to PROFIBUS gateways. All models feature easy protocol conversion from Modbus to PROFIBUS, and RS-232/422/485 port for Modbus communication. Overview The MGate 4101-MB-PBS is a line of protocol gateways that provides users with the following features: Protocol conversion between Modbus and PROFIBUS MGate 4101-MB-PBS series products can be used to connect Modbus devices and PROFIBUS devices to provide PLCs (ex. -
Page 5: Getting Started
2. Getting Started Connecting Power The unit can be powered using the AC adaptor or by connecting a power source to the terminal block, depending on the model. The following instructions are for the AC adaptor: Plug the connector of the power adapter into the DC-IN jack on the back of the unit. Plug the power adapter into an electrical outlet. -
Page 6: Hardware
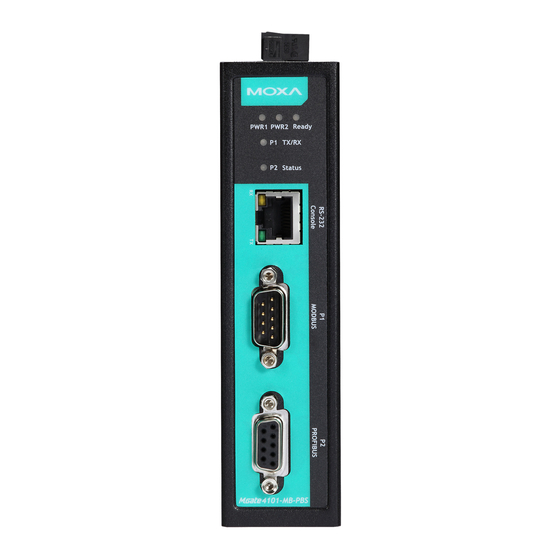
3. Hardware Power Input and Relay Output Pinouts Shielded DC Power DC Power DC Power DC Power N.O. Common N.C. Ground Input 2 Input 2 Input 1 Input 1 LED Indicators Color Function Green Power is on. PWR1 Power is off. Green Power is on. -
Page 7: Pin Assignments
Pin Assignments Modbus P1 Pin Assignment The MGate 4101-MB-PBS series use DB9 (male) serial port to connect to Modbus devices. RS-422/ RS-232 RS-485 (2W) RS-485 (4W) TxD-(A) – TxD+(B) – RxD+(B) Data+(B) RxD-(A) Data-(A) – – – – – – –... -
Page 8: Mounting The Unit
Mounting the Unit The unit can be mounted on the wall or on a DIN-rail. The MGate 4101-MB-PBS/4101I-MB-PBS series is designed to be attached to a DIN-rail or mounted on a wall. For DIN-rail mounting, push down the spring and properly attach it to the DIN-rail until it “snaps” into place. For wall mounting, install the wall mount kit (optional) first, and then screw the device onto the wall. - Page 9 RS-232: TxD, RxD, RTS, CTS, DTR, DSR, DCD, GND RS-422: Tx+, Tx-, Rx+, Rx-, GND RS-485-4w: Tx+, Tx-, Rx+, Rx-, GND RS-485-2w: Data+, Data-, GND PROFIBUS Interface Protocol: PROFIBUS DP-V0 Slave Data Rate: 9600 bps, 19.2, 93.75, 187.5, 500 kbps, 1.5, 3, 6 and 12 Mbps Connector: DB9 female Isolation: Built-in 2 kV Rotary Switch: PROFIBUS address 0~99 (addresses 100 to 125 supported by SW)
-
Page 10: Adjustable Pull High/Low Resistors For The Modbus Port (P1) In Rs-485 Mode
Adjustable Pull High/Low Resistors for the Modbus Port (P1) in RS-485 Mode Pull High Pull Low Terminator 1 KΩ 1 KΩ 120 Ω Default 150 KΩ 150 KΩ – In some critical environments, you may need to add termination resistors to prevent the reflection of serial signals. -
Page 11: Rotary Switch
Rotary Switch Before communication, you must assign a slave ID to the PROFIBUS slave, If you would like to assign an address between 0 to 99, you need to change the rotary switch to the desired address. If you would like to assign an address which is over 99, you must set it in the MGate utility. -
Page 12: Configuration
4. Configuration Installing the Software The following instructions explain how to install MGate Manager, a utility for configuring and monitoring MGate 4101-MB-PBS units over the network. Please download the MGate Manager software from Moxa's website at http://www.moxa.com. Then, locate and run the following setup program to begin the installation process: MGM_Setup_[Version]_Build_[DateTime].exe (The latest version could have the following format: MGM_Setup_Verx.x.x_Build_xxxxxxxx.exe.) You will be greeted by the Welcome window. - Page 13 When the Select Destination Location window appears, click Next to continue. You may change the destination directory by first clicking on Browse. When the Select Additional Tasks window appears, click Next to continue. You may select Create a desktop icon if you would like a shortcut to MGate Manager on your desktop. MGate 4101-MB-PBS Modbus Serial-to-PROFIBUS Slave Gateway User Manual...
- Page 14 Click Next to start copying the software files. A progress bar will appear. The procedure should take only a few seconds to complete. MGate 4101-MB-PBS Modbus Serial-to-PROFIBUS Slave Gateway User Manual...
-
Page 15: Starting Mgate Manager
A message will indicate that MGate Manager is successfully installed. You may choose to run it immediately by selecting Launch MGate Manager. Starting MGate Manager MGate Manager is a Windows-based utility that is used to configure the MGate 4101-MB-PBS. Before running MGate Manager, make sure that the MGate 4101-MB-PBS is connected to your PC. Please refer to Chapter 2 for more details. -
Page 16: Change Language Setting
Change Language Setting If you wish to run MGate Manager in a different language, you may click Language to change the language setting. A dialog box showing the available languages should appear as shown below. When you click OK, MGate Manager will immediately reflect your chosen language. After changing to a different language, you will find that all strings on MGate Manager are replaced in your chosen language. -
Page 17: Connecting To The Unit
Connecting to the Unit Prior to configuration, MGate Manager must be connected to its unit. There are three methods to establish connection. Broadcast Search locates the MGate series on the LAN. Search by IP attempts to connect to a specific unit by IP address, which is useful if the unit is located outside the LAN or can only be accessed by going through a router. -
Page 18: Search
Search Click Search to begin searching the serial console for the MGate 4101-MB-PBS units. A dialog box will appear. Click Connect through COM Port and choose which COM port is used to connect to MGate 4101-MB-PBS. MGate 4101-MB-PBS Modbus Serial-to-PROFIBUS Slave Gateway User Manual... -
Page 19: Modifying The Configuration
Modifying the Configuration Once your unit is displayed in MGate Manager, select it by clicking on it. The Configuration button will become available. Click Configuration to open the configuration window. MGate 4101-MB-PBS Modbus Serial-to-PROFIBUS Slave Gateway User Manual... -
Page 20: Configure Device
Configure Device In first page, you can change device name and select a password to protect the unit from unauthorized access. Parameter Value Notes You can enter a name to help you identify the unit, such as Name (an alphanumeric string) the location, function, etc. -
Page 21: Configure Modbus Settings
Configure Modbus Settings The Serial tab is where Modbus serial port’s communication parameters are configured. You can configure Baud Rate, Parity, Stop Bit, Flow Control, FIFO, and Interface Mode. Mode Description RTU Master Modbus RTU slave(s) will be connected to the serial port RTU Slave A Modbus RTU master will be connected to the serial port ASCII Master... -
Page 22: Set Up Profibus
Protocol Description Slave ID Slave mode only, Modbus slave identification number of the MGate 4101-MB-PBS Response Time-out Master mode only, the time master will wait for a response after sending a request. (ms) See detailed description below. Master mode only, the number of times the master will retry the same request when Max. -
Page 23: Io Mapping Setup
IO Mapping Setup In this page, you should define all commands that Modbus uses and all I/O modules PROFIBUS slave provides. If you choose MGate 4101-MB-PBS as Modbus Master, you should designate all Modbus Read or Write requests in the table on the left. MGate 4101-MB-PBS Modbus Serial-to-PROFIBUS Slave Gateway User Manual... - Page 24 Click Add to create each Modbus request. Each Modbus request includes Name, Enable, Modbus slave ID, Function Code, Address, Length, Internal Address, Poll Interval, Swap, Fault Protection, Fault Timeout. Please refer to datasheets or manuals of Modbus slave devices to fill out these fields. Parameter Description Name...
- Page 25 Parameter Description When a message is sent from a Client to a Server device the function code field tells the server what kind of action to perform. We support the following function code by far: 01: Read coils 02: Read discrete inputs Function Code 03: Read holding registers 04: Read input register...
- Page 26 After adding a command, you find out that many similar commands with different slave IDs need to be configured. You can choose (Ctrl + click-left) desired commands and press Clone to duplicate commands. Then, a dialog box that is used to set the desired Slave ID will appear. The Slave ID range could be set and then click OK to produce commands.
- Page 27 Click Add to create each PROFIBUS I/O module in the table on the right. Then, a dialog which is used to set up the IO module will appear, please adjust the parameters which correspond with the Modbus requests you set before. Click OK to record this IO module. Parameter Description Name...
- Page 28 Finally, you can see the IO module you configure before is put into PROFIBUS Slave list. Follow the steps above; you can map all of the Modbus requests you need into IO module. If you would like to check if the I/O map is totally correct, you could click PROFIBUS I/O module that will show what Modbus commands are included in the table on the right.
-
Page 29: Auto Mapping
Auto Mapping Auto Mapping is a useful function that can help you map Modbus commands to PROFIBUS I/O modules easily. This function is for Modbus master mode only. Typically, users need to spend lots of time in setting I/O modules. By using the Auto Mapping function, it will map Modbus commands to PROFIBUS I/O modules automatically. -
Page 30: Quicklink
QuickLink The QuickLink is an innovative function to let you configure more quickly and easily, Typically, most PROFIBUS users must spend a lot of time to set up Modbus commands in a PROFIBUS application. By using the QuickLink function, the MGate 4101-MB-PBS will learn Modbus requests automatically to save time in deployment. -
Page 31: Paging
The interface of the next dialogue box is divided into two sections. The upper section is labeled Modbus and will display the details of the Modbus requests which have been learned by the MGate 4101-MB-PBS. The lower section is labeled PROFIBUS Slave and will display the I/O module. Moreover, based on these learned requests, the I/O module blocks are allocated intelligently by MGate Manager. - Page 32 Input refers to the dataflow from the Modbus device to the PROFIBUS master. More specifically, it means the gateway will read the Modbus device’s data and store in its input memory area. And the PROFIBUS master will read these Modbus data stored at the gateway’s input memory. Users can choose internal memory address between 0 to 224.
-
Page 33: Load Default
The output I/O module, which is called P1, is used to change the page number to the specified one. The first byte of module P1 attempts to switch input page number, and the second byte attempts to change output page number. In addition, the input I/O module, which is called P2, is used to read the current page number. -
Page 34: Monitoring Modbus Activity
If you are sure you would like to reset the configuration to the factory default, click the OK button. If not, click Cancel. After MGate Manager resets completely, it will automatically execute a Broadcast Search for all MGate units on the LAN and the recording COM port. Your MGate should reappear in the list of units. ATTENTION Load Default will completely reset the configuration of the unit, and all of the parameters you have saved will be discarded. - Page 35 Open Traffic Monitor Window Select the unit that you wish to monitor and click Monitor to open the Traffic Monitor window. In the Traffic Monitor window, click Start to begin live monitoring of the data passing through the selected MGate 4101-MB-PBS unit. MGate 4101-MB-PBS Modbus Serial-to-PROFIBUS Slave Gateway User Manual...
- Page 36 To stop capturing the log, press the Stop button. Save Log to File To save the data log to a file, click Save. You may retrieve a saved log by clicking Load. MGate 4101-MB-PBS Modbus Serial-to-PROFIBUS Slave Gateway User Manual...
-
Page 37: Diagnose
Diagnose Diagnose is a powerful function to identify communications problems and assist in troubleshooting when setting up a PROFIBUS and Modbus environment. Select the desired unit from the list in MGate Manager and click Diagnose to check the communication status. The dialog box will show the details of the communication status of Modbus, PROFIBUS, and I/O Data View. - Page 38 There are two parts. In Modbus tab, the first part is the information regarding Modbus. These details will help you to analyze the Modbus communication. Modbus Description State The communication state of Modbus side Type RTU Slave / RTU Master / ASCII Slave / ASCII Master Slave ID The Slave ID for Modbus Valid Requests...
-
Page 39: Upgrading Firmware
The I/O Data View tab is designed to check all exchanging data in MGate's internal memory. Select PROFIBUS I/O module/Modbus command to obtain the correct data. Upgrading Firmware Firmware updates for the MGate 4101-MB-PBS are located at www.moxa.com. After you have downloaded the new firmware onto your PC, you can use MGate Manager to write it onto your MGate 4101-MB-PBS. -
Page 40: Import/Export
The dialog boxes will guide you through the process. You will need to browse your PC for the firmware file. Make sure that it matches your model. As the firmware is written to the unit, progress is displayed in the window. Once the firmware has been successfully written onto the unit, click Exit to close the Upgrade Firmware window. - Page 41 To begin, click the Export button. Type in a file name and use the Browse button to set the save file to a specific path. Then, click the OK button. If you export the configuration/GSD file successfully, a confirmation message will pop up. After that, the configuration file will be saved as an .INI file MGate 4101-MB-PBS Modbus Serial-to-PROFIBUS Slave Gateway User Manual...
- Page 42 The GSD file will be saved as a .zip file. The exported GSD file is used for easy configuration when setting PLC. Typically, users waste lots of time in importing MGate 4101 general GSD files and then set the I/O modules respectively. If we import the specified GSD coming from MGate 4101, a user just needs to pull the module to the PROFIBUS system.
- Page 43 Select the file you want to import, then click the OK button Please be patient and wait as MGate Manager configures the target device. If you import the configuration file successfully, a confirmation message will pop up. After closing the message dialog box, MGate Manager will automatically execute a Broadcast Search for all MGate units on the LAN and the recording COM port.
-
Page 44: Off-Line Configuration
Off-Line Configuration Users can create or modify the configuration file manually through MGate Manager. To use this function, users can click on the Off-Line Configuration button to load the configuration window. A dialog box will appear. Choose the correct model and series. Click the OK button for the desired MGate device to proceed to the next step. - Page 45 A dialog box to store the configuration file as *.INI file is displayed. The file for “Load existing configuration” can be generated from the Export function, or loaded from the file stored when “Create new configuration.” MGate 4101-MB-PBS Modbus Serial-to-PROFIBUS Slave Gateway User Manual...
-
Page 46: Quick Configuration
A. Quick Configuration Typical Applications Here is a typical application to demonstrate how to use the Quick Link function and explain how QuickLink works. First, we are assuming a legacy Modbus master is in the original application, and the Modbus master is running. -
Page 47: Quick Configuration Steps
NOTE QuickLink is enabled with the MGate 4101-MB-PBS is in master mode only. Please set the MGate 4101-MB- PBS in master mode before you use the QuickLink function. Quick Configuration Steps MGate 4101-MB-PBS provides an innovative function which can automatically and quickly finish the configuration. -
Page 48: Profibus Overview
PROFIBUS Overview Introduction PROFIBUS (Process Field Bus) is a standard for fieldbus communication in automation technology and was first promoted in 1989 by BMBF (German department of education and research). Topology PROFIBUS uses the bus topology. In this topology, a central line, or bus, is wired throughout the system. Devices are attached to this central bus. - Page 49 Communication is by Request and Response All Modbus communication is by request and response. A master sends a request, and a slave sends a response. The master will wait for the slave’s response before sending the next request. For broadcast commands, no response is expected.
-
Page 50: Diagnose Packet Format
Modbus Ethernet vs. Modbus Serial Although Modbus is intended as an application layer messaging protocol, the data format and communication rules for Ethernet-based Modbus TCP are different from serial-based Modbus ASCII and RTU. The major difference between the Ethernet and serial Modbus protocols is the behavior of the communication model.
Need help?
Do you have a question about the MGate 4101-MB-PBS-T and is the answer not in the manual?
Questions and answers