Table of Contents
Advertisement
Quick Links
AQUA UNO Tub Door Installation Instruction
IMPORTANT
Please read carefully the following instructions before installing your tub door. If you have
any questions regarding tub door installation, please call our technical support specialists
Monday through Friday 9:00AM – 5:00PM EST at 1-866-731-8378, ext. 3 or e-mail our
technical support group at
support@BathAuthority.com
DreamLine
reserves the right to alter, modify or redesign
TM
products at any time without prior notice. For the latest up-to-
date technical drawings, manuals or any other details please
refer to the
BathAuthority.com
web page.
Rev 1.1
1
Advertisement
Table of Contents

Related Manuals for Dreamline AQUA UNO


Summary of Contents for Dreamline AQUA UNO
- Page 1 AQUA UNO Tub Door Installation Instruction IMPORTANT Please read carefully the following instructions before installing your tub door. If you have any questions regarding tub door installation, please call our technical support specialists Monday through Friday 9:00AM – 5:00PM EST at 1-866-731-8378, ext. 3 or e-mail our technical support group at support@BathAuthority.com...
-
Page 2: Tools Required
3. Please note that you should consult your local building codes with questions on installation compliance standards. Building and plumbing codes may vary by location, and DreamLine is not responsible for code compliance standards for your project. 4. Please insure that prior to the installation the tub is leveled and solid and will be able to support the total weight of the unit. -
Page 3: Packing List
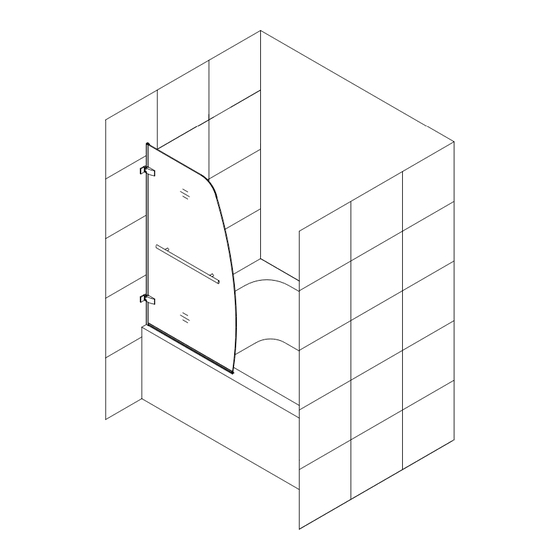
Before discarding the carton, check for small hardware bags that tend to fall to the bottom of the box. If any parts are damaged or missing, please contact DreamLine for replacement. - Page 4 Tub Door Installation Assemble the Hinges (05) onto the Glass door (01) using the predrilled holes and the bolts with the provided decorative cover. To remove the decorative cover and reveal the bolts, loosen the set screw on the back side of the decorative cover using 2mm Hex Wrench See Fig.
- Page 5 3. Mark the drill holes on the wall. Set the Glass door (01) aside, drill the holes using Ø5/16” drill bit, and insert the Wall anchors (03). See Fig. 3 for details. Ø 5/16” 4. Place the Glass door (01) back in position and secure the Hinges (05) to the wall using the Flat head screw ST5×35 (04).
- Page 6 5. Remove the flat timber and open the door. Attach the Side anti-water strip (06) over the vertical edge of the Glass door (01). Attach the Bottom anti-water strip (07) over the bottom edge of the Glass door. Install the Handle (02) using the predrilled holes on the Glass door.
-
Page 7: Product Maintenance
Product maintenance To insure long lasting life for your acrylic back walls, wipe them off after each use with a soft cloth. To clean the acrylic back walls use non-abrasive sprays or cream based cleaners. Never use abrasive cleansers, metal brushes or scrapers that could scratch or dull the surface. To insure long lasting life for your glass shower products, wipe them off after each use with a soft cloth. - Page 8 SHOWER CABINS (JETTED & STEAM) DreamLine™ warrants glass, acrylic and finish to be free from defects in workmanship for a period of five (5) years from initial date of purchase by the owner/end-user, contractor or builder from an authorized dealer; and plumbing, electrical and steam generator components for a period of one (1) year from the initial date of purchase by the owner/end-user, contractor or builder from an authorized dealer.
- Page 9 Installation and Care Guide Guide d’installation et d’entretien Guía de instalación y cuidado Apron Acrylic Baths Baignoires à bandeau en acrylique Bañeras acrílicas con faldón K-1100-LA, K-1100-RA, K-1108-LA, K-1108-RA, K-1113-LA, K-1113-RA, K-1115-LA, K-1115-RA, K-1123-LA, K-1123-RA, K-1125-LA, K-1125-RA, K-1150-LA, K-1184-LA, K-1184-RA, K-1193-LA, K-1193-RA, K-1195-LA, K-1195-RA, K-1197-LA, K-1197-RA, K-1199-LA, K-1199-RA, K-1219-LA,...
-
Page 10: Merci D'avoir Choisi La Compagnie Kohler
Thank You For Choosing Kohler Company Thank you for choosing Kohler Company. Your Kohler Company product reflects the true passion for design, craftsmanship, artistry, and innovation Kohler Company stands for. We are confident its dependability and beauty will surpass your highest expectations, satisfying you for years to come. -
Page 11: Before You Begin
Tools/Outils/Herramientas Plus:/Plus:/Más: • #6 large-head galvanized nails Clous galvanisés #6 à tête large Clavos del #6 galvanizados de cabeza grande • Conventional woodworking tools and materials Outils et matériels conventionnels de menuiserie Herramientas y materiales convencionales de carpintería • Drop cloth/Bâche de protection/Lona •... -
Page 12: Avant De Commencer
Before You Begin (cont.) The basin area requires no additional support when the subfloor is level and square with the stud framing. Consider using shims for additional support if the subfloor is uneven. Plan for adequate mounting and connection space for the faucet. Verify adequate support for the faucet. -
Page 13: Antes De Comenzar
Avant de commencer (cont.) Les illustrations peuvent être différentes de votre produit actuel. Les instructions d’installation s’appliquent tout de même. Cette baignoire est conforme au standard ANSI Z124.1.2. Toutes les dimensions sont nominales. Kohler Co. se réserve le droit d’apporter toutes modifications sur le design des produits et ceci sans préavis, tel que spécifié... - Page 14 Product Identification Model # K-_______________________ Please write the exact identification number, copied from the label on the box. This information will assist our customer service representatives should you need their assistance in the future. Save this manual for future reference. Identification du produit Modèle # K-_______________________ Veuillez noter le numéro exact d’identification, copié...
-
Page 15: Préparer Le Site
Prepare the Site (cont.) NOTICE: To ensure a successful installation, it is critical that bath be installed on a level subfloor. Verify the subfloor is level. Adjust for level, if necessary. Framing NOTICE: The bath must be installed into an alcove. NOTICE: Take into account the thickness of the finished wall materials when constructing the framing. -
Page 16: Prepare El Sitio
Préparer le site (cont.) Attacher le drain à la baignoire selon les instructions du fabricant du drain. Ne pas connecter le siphon à ce moment. Placer une bâche propre au fond du bassin. Ceci évitera les rayures de la surface de la baignoire pendant l’installation. - Page 17 Secure Bath to Subfloor Rebord Clear spaces for leveling blocks. Borde Dégager les espaces pour les blocs de mise à niveau. Leveling Blocks Limpie los espacios para los Blocs de mise à niveau bloques niveladores. Bloques niveladores Spread a 2" (5.1 cm) layer of cement or mortar bed material.
- Page 18 Secure Bath to Subfloor (cont.) Connect the drain tailpiece to the trap. Fixer la baignoire sur le sous-plancher AVERTISSEMENT: Risque de blessures corporelles. Ne pas soulever la baignoire par le rebord. Soulever la baignoire par la base uniquement. NOTICE: La baignoire doit être sécurisée en utilisant une des deux méthodes suivantes: ciment ou mortier ou adhésif de construction.
- Page 19 Fije la bañera al subpiso (cont.) AVISO: Asegúrese de que el subpiso esté a nivel antes de continuar. Si es necesario, coloque cuñas para lograr poner a nivel. Método de cemento o mortero AVISO: No utilice cemento de yeso o pasta para paneles de yeso, estos materiales no proporcionarán una adherencia duradera.
- Page 20 Secure Bath to Framing 1/4" (6 mm) Thick Drill a small hole through the nailing-in Furring Strips flange at each stud. Coyaux de 1/4" (6 mm) Percer un petit trou pilote sur la bride de cloutage à chaque montant. Listones de enrasar gruesos de 1/4"...
Need help?
Do you have a question about the AQUA UNO and is the answer not in the manual?
Questions and answers